
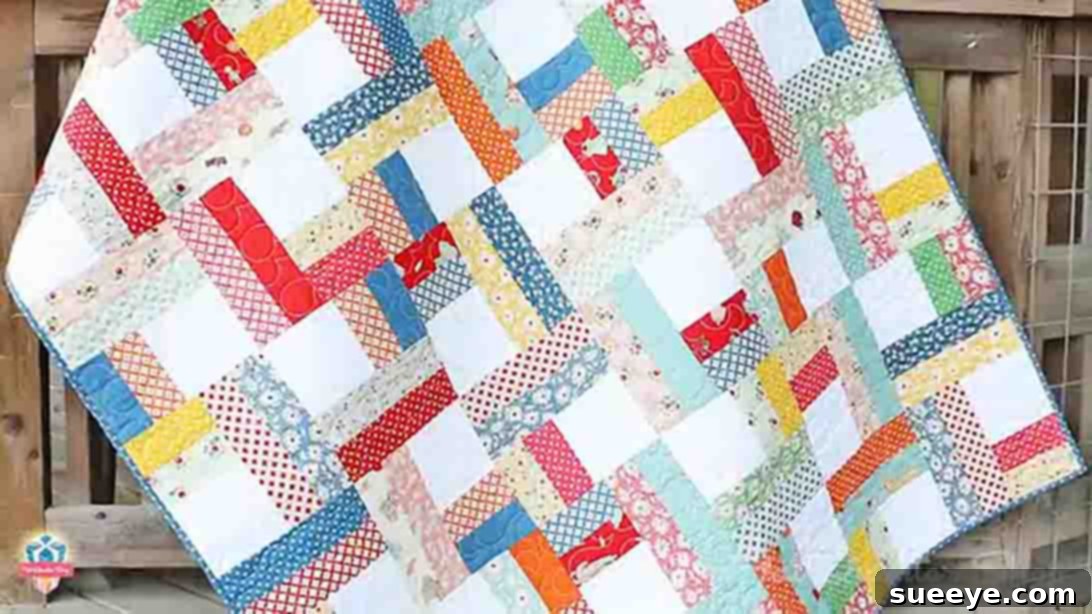
Are you searching for your next captivating quilting adventure? Look no further than the delightful Jelly Roll Twist Quilt! This popular pattern, expertly demonstrated by the Fat Quarter Shop on YouTube, offers a perfect blend of simplicity and stunning visual appeal. It’s an ideal “shortcut” quilt, meaning you can often complete the top in a single weekend, making it perfect for last-minute gifts or when you’re simply craving a quick, satisfying finish.
Whether you’re a seasoned quilter looking for a refreshing project or a beginner eager to hone your skills, the Jelly Roll Twist Quilt provides an excellent opportunity. Its straightforward construction, combined with the exciting “twist” effect, ensures a fun and rewarding experience. This quilt is not only a fantastic way to utilize those beautiful pre-cut jelly rolls but also results in a personalized, heartfelt item perfect for gifting to loved ones or adding a touch of handmade charm to your own home. Get ready to dive into this engaging project and create a quilt that will undoubtedly become one of your go-to patterns!
RELATED: Discover another fantastic Jelly Roll Scrap Quilt Tutorial here!
Below, we’ll guide you through the materials needed and provide comprehensive, step-by-step instructions to create your own Jelly Roll Twist Quilt. Follow along closely, and you’ll soon have a beautiful, finished quilt to cherish.
Essential Materials & Tools for Your Jelly Roll Twist Quilt
Before embarking on any quilting project, gathering all your materials and tools is crucial. The Jelly Roll Twist Quilt utilizes convenient pre-cut fabrics, making the preparation process smoother and faster. Here’s what you’ll need to get started:
- Click here for the free Jelly Roll Twist Quilt pattern from Fat Quarter Shop. This pattern provides additional diagrams and specific cutting instructions that complement this tutorial.
- Fabric A: 1 Jelly Roll or thirty-four 2 1/2″ x WOF strips. A jelly roll is a collection of 40-42 fabric strips, each 2.5 inches wide and the full width of the fabric (WOF), typically 42-44 inches. For this project, you’ll need 34 of these strips. Choosing a jelly roll with a cohesive color palette or a variety of prints will significantly impact your quilt’s final aesthetic.
- Fabric B: 1 Charm Pack or forty-two 5″ squares. A charm pack consists of 42 pre-cut 5-inch by 5-inch fabric squares. These squares will serve as crucial connecting pieces in your quilt blocks, often providing a consistent background or accent.
- Binding Fabric: 5/8 yard. This fabric will be used to create the border that finishes the edges of your quilt, providing durability and a polished look.
- Backing Fabric: 3 1/3 yards. The backing fabric forms the underside of your quilt. Choose something soft and complementary to your quilt top.
- Batting: Approximately 60″ x 70″ (for a typical throw size). While not listed in the original pattern’s material list, batting is essential for any quilt. It provides warmth, loft, and helps define the quilting stitches.
Cutting Your Binding Fabric (Fabric C):
For your binding, you will need to cut the 5/8 yard binding fabric into the following:
- 7 – 2 1/2″ x WOF strips. These strips will be sewn together to form one long continuous strip for your quilt binding.
Essential Quilting Tools:
Beyond the fabrics, ensure you have these standard quilting tools readily available for precision and ease:
- Sewing Machine: A reliable machine with a 1/4-inch presser foot is highly recommended for accurate seams.
- Rotary Cutter, Mat, and Rulers: Essential for precise and efficient cutting of fabric strips and squares. A 6.5″ x 24″ ruler and a smaller square ruler (e.g., 9.5″ or 12.5″ square) will be very helpful.
- Iron and Ironing Board: Crucial for pressing seams open or to one side, ensuring flat and accurate blocks.
- Thread: High-quality 100% cotton thread that matches or complements your fabrics.
- Pins or Fabric Clips: To hold fabric pieces together securely while sewing.
- Seam Ripper: Every quilter needs one for those occasional mistakes!
Step-by-Step Directions: Mastering the Jelly Roll Twist Quilt
Creating the Jelly Roll Twist Quilt is a methodical process that, when followed carefully, yields stunning results. Precision in cutting and sewing is key to achieving the signature “twist” effect. Let’s break down each step:
Step 1: Preparing Your Strip Sets – The Foundation of Your Quilt
The first crucial step involves preparing your jelly roll strips. These initial strip sets form the building blocks for both the ‘long’ and ‘short’ units of your quilt blocks.
- Unroll and Select: Begin by unrolling your jelly roll. From the entire roll, carefully select your favorite 34 prints. Consider how the colors and patterns will interact when sewn together.
- Stitch Strip Pairs: Take two jelly roll strips from your selected stack. Align their long edges and stitch them together using a consistent 1/4-inch seam allowance. Accuracy here is paramount for ensuring your blocks will come together correctly later.
- Press Seams Open: After stitching each pair, press the seam open. Pressing seams open helps to reduce bulk, creating a flatter and smoother quilt top.
- Repeat for All Sets: Continue this process until you have created 17 of these two-strip sets. Each set should measure approximately 4.5 inches wide (2.5 inches + 2.5 inches – two 1/4-inch seam allowances = 4.5 inches).
Step 2: Cutting Your Quilt Units – Long and Short Pieces
With your 17 strip sets prepared, it’s time to transform them into the specific units required for your quilt blocks. These units are what create the dynamic “twist” design.
- Creating Long Piece Units:
- Take 11 of your 17 strip sets.
- Carefully align your ruler with the raw edges and trim both ends of each strip set to ensure they are perfectly straight and square.
- From each of these 11 strip sets, cut four 9-inch rectangles. You’ll achieve these by placing your ruler at one trimmed end and cutting at the 9-inch mark, then moving the ruler and cutting the next 9-inch piece, and so on.
- This will yield a total of 44 long piece units (11 strip sets x 4 units each). You will only need 42 for the quilt, leaving you with 2 spares.
- These units should measure 4.5 inches by 9 inches.
- Creating Short Piece Units:
- From the remaining 6 strip sets (17 total – 11 used for long pieces = 6 remaining), you will create your short piece units.
- From each of these 6 strip sets, cut seven 5-inch rectangles.
- This will give you a total of 42 short piece units (6 strip sets x 7 units each).
- These units should measure 4.5 inches by 5 inches.
Pro Tip: Using a sharp rotary cutter and a non-slip ruler will help maintain accuracy during these crucial cutting steps. Small deviations here can lead to issues with block assembly later.
Step 3: Assembling Your Quilt Blocks – Bringing the Twist to Life
Now that all your units are cut, it’s time to assemble the individual quilt blocks. This is where the charm pack (Fabric B) comes into play and the “twist” begins to take shape.
- Join Short Piece Unit and Fabric B: Take one short piece unit (4.5″ x 5″) and one 5-inch Fabric B square. Align their 5-inch edges and stitch them together using a 1/4-inch seam allowance.
- Press Towards Fabric B: After stitching, press the seam allowance towards the Fabric B square. This ensures the seam is hidden and reduces bulk, especially if Fabric B is a lighter solid.
- Add the Long Piece Unit: Now, take one long piece unit (4.5″ x 9″). Align one of its 9-inch sides with the assembled short piece unit and Fabric B. Stitch them together with a 1/4-inch seam allowance. You can add the long piece unit to either the top or bottom of your sewn short piece/Fabric B unit, but maintain consistency across all blocks.
- Press Again: Press the seam again, ideally towards the long piece unit or open, depending on your preference for minimizing bulk.
- Repeat for All Blocks: Continue this process until you have successfully made all 42 quilt blocks. Each finished block should measure approximately 9 inches square, including seam allowances.
Step 4: Assembling the Quilt Top – Revealing the Twist Pattern
With all 42 blocks constructed, the exciting moment arrives when you start to see your quilt top come together and the “twist” pattern emerge. This step requires careful arrangement and precise sewing.
- Layout Your Blocks: On a large flat surface (your floor, a design wall, or a large table), arrange your 42 finished blocks into a grid. For this quilt, you will lay out 6 blocks in each row.
- Create the “Twist”: The magic of this quilt lies in the orientation of every other block. As you lay out your blocks, “twist” or rotate every other block within each row. This alternating orientation creates the mesmerizing, dynamic visual effect that gives the quilt its name. Take your time to get this layout just right, as it’s key to the final design.
- Form Your Rows: Once you are satisfied with the arrangement of your 6 blocks for the first row, carefully pick them up in order and stitch them together, maintaining your 1/4-inch seam allowance. Continue to create seven rows in total (6 blocks/row x 7 rows = 42 blocks).
- Press Your Rows: After sewing each row, press the seams. For this step, you might consider pressing the seams in alternating directions for each row. For example, press seams in Row 1 to the right, Row 2 to the left, Row 3 to the right, and so on. This technique, known as “nesting seams,” helps the rows interlock perfectly when joined, reducing bulk and creating flatter intersections.
- Join the Rows: Finally, align your seven completed rows. Carefully pin them together, making sure the intersections of the blocks match up as precisely as possible. Stitch the rows together with a 1/4-inch seam allowance.
- Final Press: Once all rows are joined, give your entire quilt top a final, thorough press to ensure all seams are flat and the quilt top is perfectly square.
Step 5: Finishing Your Quilt – The Batting, Backing, and Binding
While the initial tutorial focuses on the quilt top, a completed quilt involves a few more essential steps. These steps transform your pieced top into a functional and beautiful finished item.
- Prepare the Quilt Sandwich:
- Backing: Lay your backing fabric (3 1/3 yards) face down on a clean, flat surface, securing it with tape or pins to keep it taut.
- Batting: Center your batting (approximately 60″ x 70″) smoothly over the backing fabric.
- Quilt Top: Carefully place your finished Jelly Roll Twist Quilt top, right side up, over the batting. Ensure it’s centered and free of wrinkles.
- Basting: Secure all three layers together using your preferred basting method. This could be pin basting (using safety pins placed every few inches), spray basting (using temporary adhesive spray), or thread basting (using long, loose stitches). Proper basting prevents shifting during the quilting process.
- Quilting: This is where you add the decorative stitching that holds all three layers together. You can choose to machine quilt (using your sewing machine for straight lines, free-motion designs, or a walking foot) or hand quilt (for a softer, more traditional look). The quilting pattern can be simple straight lines, a stipple, or a more intricate design that complements the “twist” of the blocks.
- Trimming: Once quilted, trim the excess batting and backing fabric, squaring up your quilt edges to prepare for binding.
- Binding: Take your 7 – 2 1/2″ x WOF binding strips (Fabric C). Sew them end-to-end to create one continuous long strip. Press the seams open. Then, fold this long strip in half lengthwise and press, creating a double-fold binding. Attach the binding to the raw edges of your quilt, either by machine or by hand, for a neat and durable finish.
Tips for Success with Your Jelly Roll Twist Quilt
To ensure your Jelly Roll Twist Quilt project goes smoothly and yields the best results, consider these helpful tips:
- Accuracy is Key: In quilting, a consistent 1/4-inch seam allowance is critical. If your seams are slightly off, it can lead to blocks that don’t square up or rows that don’t align. Practice your 1/4-inch seam before starting.
- Pressing Matters: Don’t underestimate the power of a good press! Pressing seams flat and in the correct direction can make a huge difference in the final look and flatness of your quilt top. A warm iron and a flat surface are your friends.
- Chain Piecing: To save time when sewing many similar units (like your strip sets or block components), use chain piecing. Stitch one unit, then feed the next unit under the needle without lifting the presser foot or cutting the thread. This creates a “chain” of sewn pieces.
- Organize Your Blocks: When laying out your quilt top in Step 4, take a picture of your desired arrangement with your phone. This way, if you accidentally bump your layout, you have a reference to put everything back in order.
- Quality Materials: While you can use any fabric, choosing good quality 100% cotton quilting fabric will ensure your quilt is durable, washes well, and holds its color over time.
- Enjoy the Process: Quilting is a journey, not just a destination. Don’t be afraid to make mistakes – that’s how we learn! Enjoy the creative process and the satisfaction of making something beautiful with your own hands.
Conclusion: Your Beautiful Jelly Roll Twist Quilt Awaits!
The Jelly Roll Twist Quilt is a truly enjoyable and rewarding project that demonstrates how simple pre-cut fabrics can be transformed into a visually dynamic and intricate-looking quilt. From selecting your vibrant jelly roll strips to carefully arranging your “twisted” blocks, each step brings you closer to a beautiful, finished piece that radiates handmade charm.
Whether this is your first quilt or your hundredth, the satisfaction of seeing the unique design emerge is immeasurable. This quilt is not just a functional item; it’s a testament to your creativity and patience, making it a perfect gift for loved ones or a cherished addition to your own home decor. We encourage you to watch the full video tutorial from Fat Quarter Shop for a visual guide and to download the free pattern to have all the details at your fingertips.
Gather your materials, fire up your sewing machine, and get ready to create a Jelly Roll Twist Quilt that you’ll be proud to show off for years to come!
Jelly Roll Twist Quilt Tutorial (Video Guide)
For a visual walkthrough of these steps, be sure to watch the comprehensive tutorial from Fat Quarter Shop: