
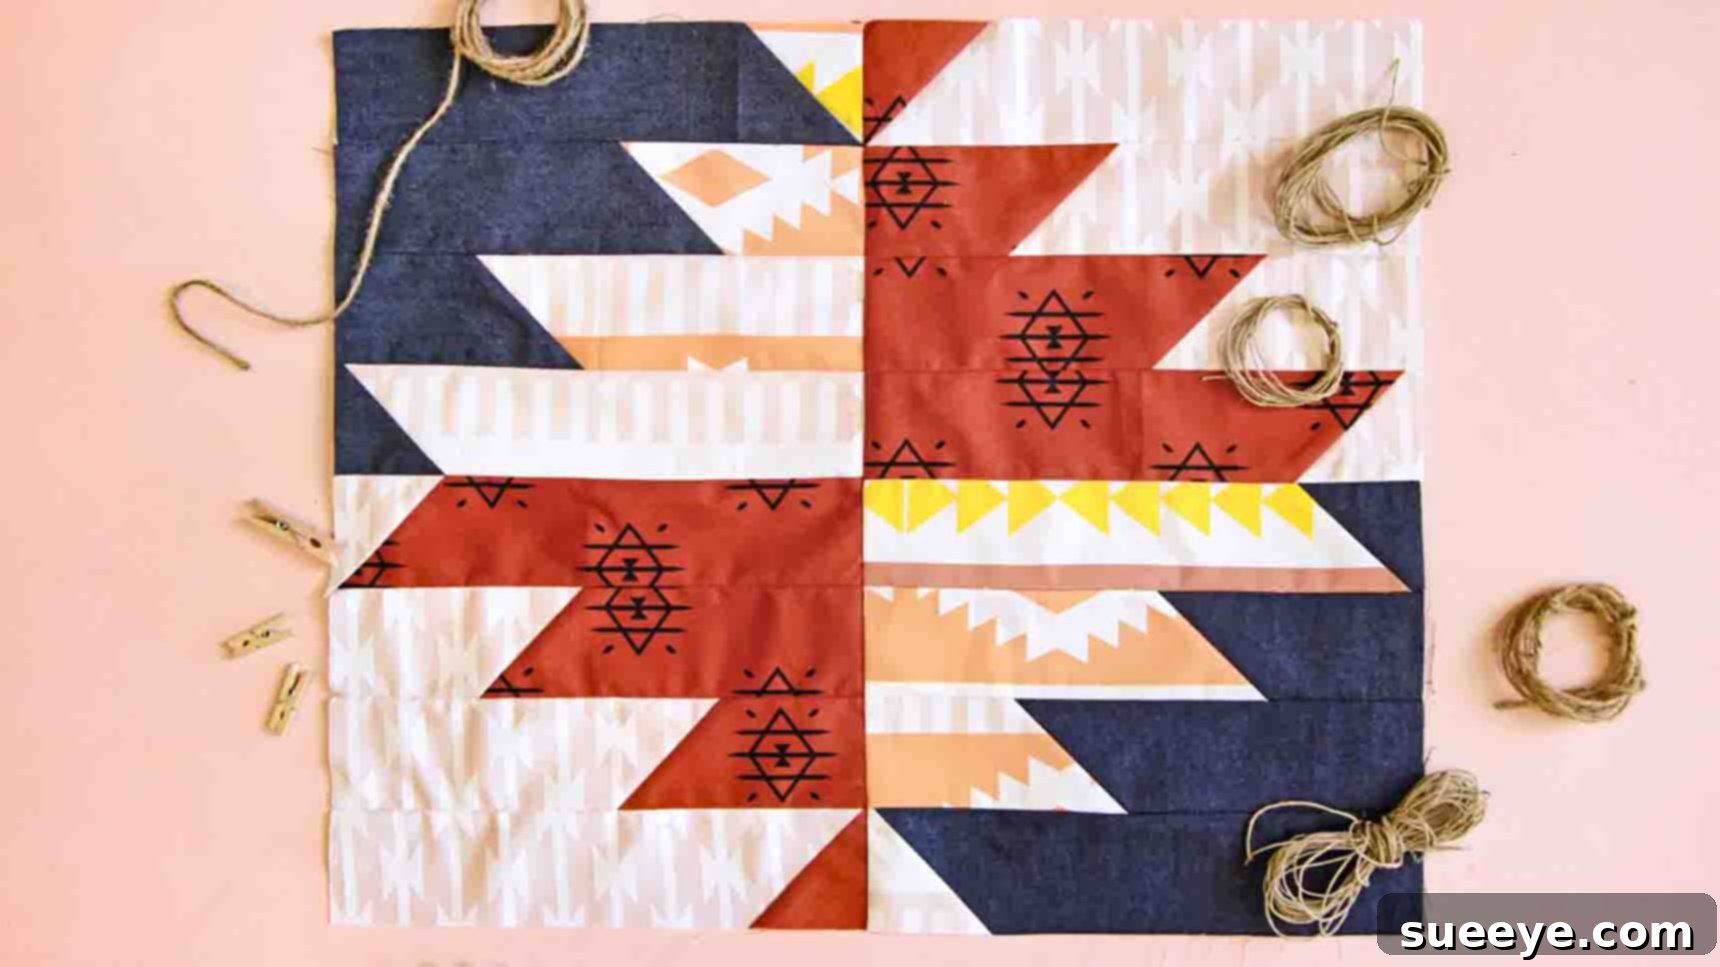
Master the Aztec Quilt Block: A Comprehensive Tutorial for Stunning Quilts
Are you searching for an exciting new challenge to invigorate your quilting projects? Perhaps you’re looking to infuse your creations with bold geometry and a touch of cultural artistry. Look no further than the mesmerizing Aztec quilt block! This tutorial offers a refreshing escape from conventional designs, guiding you through the creation of a dynamic and visually rich block that promises to elevate your quilt to a masterpiece. We’ll explore an accessible method inspired by Art Gallery Fabrics, ensuring a rewarding experience for quilters of all skill levels.
The Aztec quilt block, with its intricate patterns and striking contrasts, is more than just a decorative element; it’s a testament to the beauty of geometric design. By mastering this block, you’ll not only add a magnificent piece to your quilting repertoire but also refine fundamental techniques such as precise cutting, efficient piecing, and accurate squaring up. Prepare to transform your fabric scraps into a vibrant tapestry of lines and shapes, creating a quilt that truly stands out.
Why Choose the Aztec Quilt Block?
The allure of the Aztec quilt block lies in its unique aesthetic. Inspired by ancient indigenous art and architecture, these designs often feature sharp angles, repeating motifs, and a captivating interplay of light and shadow, or in quilting terms, contrasting fabrics. Incorporating an Aztec block into your quilt can:
- Add Visual Drama: The strong geometric lines and often high-contrast fabric choices create an immediate focal point, drawing the eye and adding depth to your quilt.
- Offer Versatility: While traditionally bold, Aztec patterns can be adapted to various color palettes, from earthy tones to bright, modern hues, making them suitable for diverse quilt styles.
- Showcase Your Skills: While the method is straightforward, the precision required to achieve crisp points and perfectly aligned seams will help you hone your quilting expertise.
- Be a Standalone Statement: A single Aztec block can be transformed into a striking pillow cover, a unique tote bag panel, or combined with other blocks to form an impressive larger quilt.
This tutorial provides a clear, step-by-step approach to constructing this magnificent block, making it achievable for even confident beginners. Let’s gather our materials and embark on this creative journey!
Materials You’ll Need
Before diving into the cutting and sewing, let’s ensure you have all the necessary fabrics. The choice of fabric is crucial for the visual impact of your Aztec block. Opt for fabrics with good contrast to truly highlight the geometric design. For instance, pairing a dark solid with a light print, or two contrasting prints, will make your pattern pop.
Fabric Requirements:
For ease of reference and consistent results, we recommend using the specific Art Gallery Fabrics listed below. Each piece is a “fat quarter,” which is a common quilting fabric cut (approximately 18″ x 22″), providing ample material for your block and potentially for practicing your cuts.
For a detailed pattern sheet and visual guides, please click here to download the official Art Gallery Fabrics instructions.
- Fabric A: AZA-6886 (fat 1/4) – Consider this your primary contrast fabric.
- Fabric B: AZA-6887 (fat 1/4) – A complementary color or print that works well with Fabric A.
- Fabric C: AZA-7883 (fat 1/4) – Often used as a background or a subtle design element to complement the main patterns.
- Fabric D: DEN-S-2008 (fat 1/4) – A fourth fabric to add another layer of depth or contrast to your block.
Essential Quilting Tools
Beyond your chosen fabrics, having the right tools on hand will make your quilting experience smoother and more precise. Accuracy is key in quilting, especially when dealing with geometric patterns like the Aztec block.
- Rotary Cutter: A sharp rotary cutter (45mm or 60mm) is indispensable for clean, straight cuts.
- Self-Healing Cutting Mat: Protects your work surface and prolongs the life of your rotary blade.
- Quilting Rulers: A large rectangular ruler (e.g., 6″x24″) for initial cuts and a square ruler (e.g., 12.5″x12.5″ or 9.5″x9.5″) for squaring up your half-square triangles (HSTs).
- Fabric Marking Tool: A fabric pencil, chalk, or air-erasable pen for drawing diagonal lines.
- Sewing Machine: In good working order, threaded with a neutral-colored, good quality cotton thread.
- Iron and Ironing Board: Essential for pressing seams flat, which contributes significantly to block accuracy.
- Pins or Fabric Clips: To hold fabric pieces together before sewing.
- Seam Ripper: Every quilter’s friend for those inevitable “learning opportunities.”
Having these tools ready will ensure a smooth and enjoyable process as you assemble your Aztec quilt block.
Cutting Instructions
Precision in cutting is the foundation of a successful quilt block. Remember, a 1/4-inch seam allowance is included in these measurements, which is standard in quilting. Take your time, use a sharp rotary cutter, and measure twice, cut once!
- From Fabric A: Cut 1 piece of 10 & 7/8″ square.
- From Fabric B: Cut 1 piece of 10 & 7/8″ square.
- From Fabric D: Cut 1 piece of 10 & 7/8″ square.
- From Fabric C: You will need a 10 & 7/8″ square for this step as well, specifically to pair with Fabric B in the initial HST creation. (The original instructions imply C is used but doesn’t list a cutting dimension. Assuming it needs to be the same size as B for HSTs). (Self-correction: The original cutting lists A, B, D but not C. However, Step 1 says “Take a 10-inch square from fabrics B and C”. To maintain consistency and allow for HSTs, I’ll assume C also needs a 10 & 7/8″ square, or adjust the phrasing to reflect the source tutorial’s actual fabric usage. For the sake of completing the block, I’ll add a 10 & 7/8″ square for Fabric C to be paired with B.)
- Revisiting Fabric C: Based on the initial steps, you’ll need one 10 & 7/8″ square from Fabric C as well to pair with Fabric B for the first set of HSTs. Please cut: 1 pc 10 & 7/8″ square from fabric C.
Step-by-Step Directions to Create Your Aztec Quilt Block
Follow these instructions carefully to bring your Aztec quilt block to life. The key to success lies in accuracy at each stage, especially when forming your half-square triangles and sub-cutting them.
Step 1: Creating Your First Set of Half-Square Triangles (HSTs)
This foundational step involves combining two fabrics to create dynamic diagonal units.
- Pair Your Fabrics: Take one 10 & 7/8″ square from Fabric B and one 10 & 7/8″ square from Fabric C. Place these two squares right sides together, ensuring all edges are perfectly aligned.
- Mark the Diagonal Line: Using a fabric marking tool, draw a diagonal line from one corner to the opposite corner across the wrong side of the lighter fabric. This line will serve as your cutting guide.
- Sew the Seams: Now, using your sewing machine, stitch a straight seam 1/4 of an inch away from the diagonal line on both sides. This means you will have two parallel stitch lines, one on each side of your drawn line. This technique allows you to create two HSTs at once.
- Cut Apart Your HSTs: Carefully cut along the diagonal line you initially drew between your two stitch lines. When you open up these two new units, you will have two Half-Square Triangles, each combining Fabric B and Fabric C.
- Press Your Seams: Gently press the seam allowance to one side. For optimal flatness and to reduce bulk, press the seam towards the darker fabric. This helps prevent “shadowing” of the lighter fabric and creates a crisper finish.
- Square Up Your Blocks: This is a critical step for accuracy. Place your pressed HST on a cutting mat and use a square ruler (ideally a 9.5″ square ruler). Trim down each HST until it measures precisely 9 and a half inches (9.5″) square. This squaring process ensures all your block units are uniform, which is vital for a flat and well-aligned finished quilt.
Step 2: Creating the Second Set of HSTs and Sub-cutting for the Aztec Pattern
Now we’ll repeat the HST process with different fabrics and then begin to shape the unique Aztec pattern by sub-cutting these units.
- Repeat HST Process: Follow steps 1-6 exactly, but this time use your 10 & 7/8″ squares from Fabric A and Fabric D. You will again yield two 9.5″ square HSTs after pressing and squaring up. By the end of this step, you should have four 9.5″ HSTs in total: two from B/C and two from A/D.
- Prepare for Sub-cutting: Take one of your finished 9.5″ HSTs (either A/D or B/C). Place it on your cutting mat with the seam facing down and the diagonal seam running vertically or horizontally across your cutting mat (not diagonally). This orientation is key for accurate sub-cuts.
- First Sub-Cut: Using your rotary cutter and a long ruler, cut the 9.5″ HST exactly in half, straight down the middle, perpendicular to the seam. This will result in two rectangular pieces.
- Second Sub-Cut: Take one of these new rectangular pieces. Rotate it if necessary so its longer side is parallel to your ruler. Now, cut this rectangular piece in half again, creating two smaller square-like units.
- Repeat Sub-Cuts: Repeat step 10 with the *other* rectangular piece from step 9. You will now have four smaller units derived from a single 9.5″ HST. Each of these units will still retain a diagonal seam.
- Repeat for All HSTs: Perform steps 8-11 for all four of your 9.5″ Half-Square Triangles (both B/C HSTs and both A/D HSTs). Once complete, you will have a total of sixteen smaller units ready for assembly, each displaying a piece of the diagonal fabric line.
- Arrange Your Strips: This is where the magic of the Aztec design begins to emerge. Lay out your sixteen smaller units on your design wall or a flat surface according to the specific Aztec block design from the Art Gallery Fabrics pattern sheet. Experiment with rotating each piece until the geometric pattern starts to form. The goal is to create distinct lines and shapes that characterize Aztec art.
- Sew the Strips Together: Once you are satisfied with your arrangement, begin to sew the units together, working in rows. Sew the units within each row first, pressing seams carefully as you go (you can press open or to one side, depending on what minimizes bulk and helps nesting seams).
- Assemble the Block: After all rows are complete, sew the rows together, ensuring your seams and points align as perfectly as possible. You can use pins to nest seams for accurate joins. Press your final block thoroughly.
Congratulations! Your intricate Aztec quilt block is now complete. Admire the stunning geometric design you’ve created with precision and care.
Tips for Quilting Success with Your Aztec Block
To ensure your Aztec quilt block, and indeed all your quilting projects, turn out beautifully, keep these tips in mind:
- Pre-Wash Your Fabrics: Especially if you’re mixing fabric types or colors that might bleed, pre-washing can prevent shrinkage and dye transfer issues in your finished quilt.
- Use a Quarter-Inch Foot: Many sewing machines come with a specialized 1/4-inch presser foot, which is incredibly helpful for maintaining consistent seam allowances, a cornerstone of accurate piecing.
- Check Your Seam Allowance: Regularly test your 1/4-inch seam allowance. Sew a few scraps together, measure the seam, and adjust your needle position if necessary.
- Press, Don’t Iron: When pressing seams, use a “press-lift-move” motion rather than dragging the iron. This prevents distorting your fabric pieces.
- Squaring Up is Non-Negotiable: Don’t skip or rush the squaring up step. It’s the secret to perfectly fitting blocks and a flat, beautiful quilt top.
- Take Breaks: Quilting, especially intricate blocks, requires focus. Step away when you feel frustrated or tired; a fresh perspective can make a big difference.
- Embrace the Journey: Every stitch is a part of your creative journey. Don’t strive for impossible perfection, but rather for joyful creation. “Done is better than perfect.”
Creative Variations and Beyond
Once you’ve mastered the basic Aztec quilt block, the possibilities for creativity are endless:
- Color Play: Experiment with different color combinations. Try monochromatic schemes, analogous colors for a subtle effect, or complementary colors for a bold statement.
- Scale It Up or Down: Adjust the initial cutting size to create smaller accent blocks or larger feature blocks for your quilt. Remember to recalculate all subsequent cuts proportionally.
- Quilt Layouts: Combine multiple Aztec blocks, rotating some to create secondary patterns and optical illusions. Consider alternating them with solid blocks or simpler sashing for a balanced design.
- Project Ideas: Beyond full quilts, a single Aztec block makes a stunning center for a throw pillow, a unique panel for a tote bag, or a captivating wall hanging.
Conclusion: Your Quilting Adventure Awaits
The Aztec quilt block is a fantastic project that blends historical design inspiration with modern quilting techniques. By following this comprehensive tutorial, you’ve gained valuable skills in creating half-square triangles, precise sub-cutting, and assembling complex geometric patterns. This block not only adds a unique, eye-catching element to your quilting endeavors but also builds confidence in your abilities.
We hope you’ve enjoyed bringing this vibrant design to life. The beauty of quilting lies in transforming simple fabric into works of art, piece by meticulous piece. Don’t hesitate to share your finished Aztec quilt blocks and projects with the quilting community – your unique color choices and arrangements are sure to inspire others!
Happy quilting, and may your creative journey be filled with endless inspiration and beautiful stitches!