
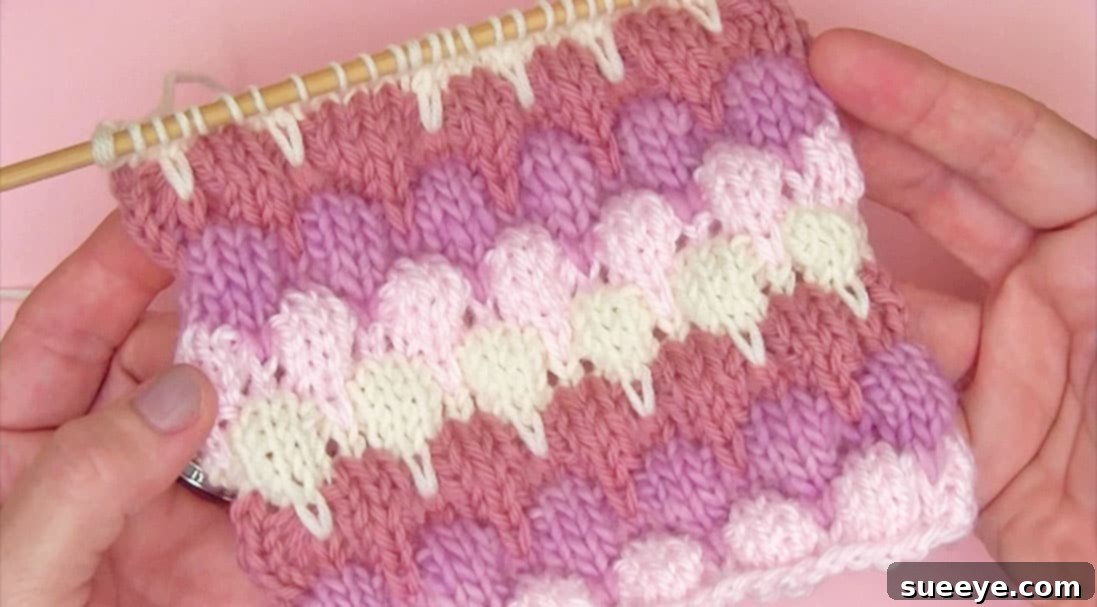
Master the Enchanting Bubble Stitch: A Comprehensive Knitting Guide for Unique Texture
For many of us, the joy of knitting is a lifelong passion. From those early days of learning the basic knit and purl stitches, crafting simple scarves, to venturing into more complex patterns, the journey of a knitter is filled with continuous discovery. There’s an undeniable satisfaction in transforming a skein of yarn into something tangible, beautiful, and often, incredibly cozy. As knitters, we’re always on the lookout for fresh ideas, innovative techniques, and stitches that can add that extra touch of flair to our handmade creations. Today, we’re delving into one such captivating technique that promises to elevate your knitting projects with unparalleled visual and tactile appeal: the incredible bubble stitch.
You might have encountered it before – a fabric adorned with delightful, puffy little bumps that seem to pop right off the surface. It often gives the impression of being incredibly intricate and complex, leading many knitters to believe it’s a technique reserved for the most advanced among us. However, the true beauty of the bubble stitch lies in its deceptive simplicity. While it delivers a sophisticated, three-dimensional effect, it’s surprisingly straightforward to learn and execute. If you’ve mastered the fundamental knit and purl stitches, you’re more than ready to add this stunning texture to your crafting repertoire.
What is the Bubble Stitch? Unveiling its Unique Charm
The bubble stitch, sometimes affectionately known as the “puffy stitch” (and distinct from a traditional popcorn or bobble stitch), is a knitting technique designed to create raised, rounded motifs on the surface of your knitted fabric. These individual “bubbles” can be arranged in various captivating patterns – scattered randomly, aligned in neat rows, or staggered for a more organic and dynamic feel. The resulting texture is not just visually appealing but also wonderfully tactile, adding a depth and interest that flat stitches simply cannot achieve. Imagine a cozy blanket with a playful array of soft bubbles, or a stylish beanie boasting a subtle yet pronounced three-dimensional design – the creative possibilities are truly boundless.
Why Embrace the Bubble Stitch in Your Next Knitting Project?
There are numerous compelling reasons why knitters of all skill levels should consider incorporating the bubble stitch into their next creation:
- Unmatched Texture and Depth: It instantly transforms a plain piece of knitting into a textured masterpiece, adding a tactile dimension that invites touch and exploration. This stitch makes your fabric feel rich and luxurious.
- Captivating Visual Interest: The raised bubbles create fascinating shadows and highlights, making your knitted fabric dynamic and engaging from every angle. It’s a true feast for the eyes.
- Remarkable Versatility: From soft, comforting baby blankets and heirloom throws to fashionable scarves, stylish hats, cozy cowls, and even chic sweaters, the bubble stitch adapts beautifully to a wide array of projects, enhancing each one with its unique charm.
- Looks Complex, Knits Simply: This is arguably its greatest allure. Despite its sophisticated and intricate appearance, the core technique involves simple manipulations of stitches you’ve probably already mastered, making it incredibly accessible.
- Ideal for Creative Color Play: The bubbles truly pop when worked in contrasting colors, allowing for creative designs and unique visual effects. Imagine a single row of vibrant bubbles against a neutral background, or a playful checkerboard of different hues!
- Engaging for All Skill Levels: While confident beginners can master it with a little dedicated practice, experienced knitters will deeply appreciate its potential for intricate pattern development, custom design variations, and adding a unique signature to their work.
- Adds Warmth and Body: The three-dimensional nature of the bubbles adds extra loft and thickness to your fabric, making items like blankets and garments even warmer and more substantial.
Preparing for Your Bubble Stitch Journey: Essential Tools and Materials
Before you embark on creating these delightful knitted bubbles, let’s ensure you have all the necessary tools and materials at hand. Having everything ready will make your learning process smoother, more enjoyable, and minimize interruptions.
- Yarn: The bubble stitch truly shines with yarns that possess good stitch definition. Smooth, worsted-weight, Aran, or bulky yarns are often highly recommended, as they allow the individual bubbles to stand out clearly and achieve their full puffy potential. Avoid overly fuzzy, highly textured, or extremely dark yarns initially, as they might obscure the beautiful bubble effect. Wool, acrylic, cotton, or blended fibers work wonderfully, with wool often providing the best elasticity for well-defined bubbles.
- Knitting Needles: Select a needle size appropriate for your chosen yarn, which is typically indicated on the yarn label. A good starting point is usually a size that creates a fabric with decent drape without being too loose (which can make bubbles less defined) or too stiff (which can make the fabric rigid). Circular needles can be helpful for larger projects like blankets.
- Tapestry Needle: An absolute essential for weaving in yarn ends neatly and seamlessly, ensuring a professional finish for your bubble stitch creations.
- Scissors: For cleanly cutting yarn when changing colors or finishing your project.
- Stitch Markers (Optional but Highly Recommended): These can be incredibly helpful for marking pattern repeats, indicating where bubbles should be placed, or designating the right side of your work, especially in more complex bubble stitch patterns. They ensure you maintain your stitch count and pattern integrity correctly.
- A Positive and Patient Attitude: As with mastering any new knitting skill, a little patience, a willingness to learn from mistakes, and a persistent attitude will go a long way in achieving beautiful results!
Understanding the Core Technique: How to Knit the Bubble Stitch
The magic of the bubble stitch is created through a clever manipulation of a few basic knitting actions: knitting a series of foundation rows, purposefully dropping stitches to create vertical ladders, and then knitting into these ladders to gather the yarn into a delightful puff. Let’s break down the general process in detail. Remember, specific patterns may vary in stitch count or row repeats, but the underlying principle of creating the bubble remains consistent.
The Basic Bubble Stitch Pattern Rundown:
- Cast On Your Stitches: Begin by casting on an appropriate number of stitches for your desired project. If you’re creating a swatch to practice, a multiple of stitches that allows for several bubbles with a few border stitches is ideal (e.g., a multiple of 6 stitches + 2 or 3 for edge stitches).
- Establish Your Foundation (Knit Regular Rows): Knit several rows in your chosen basic stitch, typically stockinette (knit on the right side, purl on the wrong side) or garter stitch (knit every row). A common practice is to knit 6 regular rows before you begin forming your first row of bubbles. These foundational rows provide the stable base fabric from which your bubbles will emerge and give them enough “height” to truly pop and stand out. This step is crucial for defining the bubble’s shape and ensuring it stands out distinctively from the background fabric.
- Prepare for the Bubble (Right Side Row): On a right-side row (or the row where you intend for your bubbles to appear), you will begin the intricate process of forming the bubbles. This typically involves knitting a few stitches according to your pattern, and then identifying the specific stitch where your bubble will be placed.
- Drop Stitches to Create the Ladder: This is the most unique and seemingly counter-intuitive part of the technique! Carefully, you will unravel (or drop) a vertical column of stitches directly below the stitch where you want your bubble to form. For instance, if you’ve knit 6 foundation rows, you might drop 4 of those vertical stitches, allowing the bottommost and topmost stitches to remain intact. This action intentionally creates a distinctive “ladder-like” pattern of loose horizontal strands of yarn extending downwards from your working needle. The number of rows you choose to drop directly influences the size and prominence of your finished bubble.
- Form the Bubble by Knitting Through the Ladder: Once your ladder of loose strands is formed, insert your right-hand needle into the designated stitch on your left-hand needle AND through all the horizontal strands of yarn from the dropped stitches in the ladder below it. Carefully yarn over with your working yarn and pull a loop through all of them (the stitch on your left needle and all the horizontal strands). This single knit stitch gathers all those loose strands into a compact, three-dimensional puff, effectively forming your bubble!
- Continue the Row and Secure Bubbles: Finish the remainder of the row by knitting or purling the remaining stitches as per your pattern instructions, spacing out your bubbles as desired. After completing a bubble row, it’s often recommended to knit a few more regular rows (e.g., 5-6 rows) before creating the next set of bubbles. This helps to secure the newly formed bubbles firmly in place and provides adequate spacing for the next iteration of bubbles, preventing them from becoming overcrowded. You can also stagger your bubbles in subsequent rows for an appealing checkerboard effect.
Essential Tips for Mastering the Bubble Stitch:
- Always Swatch First: Before committing to a large project, always knit a small swatch. This invaluable practice allows you to get a true feel for the stitch, experiment with different yarn types, adjust your tension, and fully understand how the bubbles form and appear in your chosen materials.
- Leverage Video Tutorials: Visual learning is incredibly effective for a technique like the bubble stitch. Watching a high-quality video tutorial (like the one from Studio Knit) will clarify the dropping and gathering process in a way that written instructions alone cannot fully convey.
- Count Stitches and Rows Diligently: Pay close attention to the number of rows you knit before forming a bubble, and the precise number of stitches you drop. Consistency in these counts is absolutely key for creating uniform, beautifully shaped bubbles throughout your project.
- Mind Your Tension: Maintaining an even and consistent tension throughout your knitting is vital. If your tension is too tight, your bubbles might appear stiff and flat; if it’s too loose, they might lack definition and sag. Aim for a relaxed, even tension.
- Embrace Dropping Stitches: It can feel counter-intuitive and even nerve-wracking to purposefully unravel stitches, but remember that this deliberate action is central to the bubble stitch technique. Perform it gently but with confidence.
- Fixing Mistakes: Don’t be discouraged if a bubble doesn’t form perfectly the first time. The beauty of knitting is that most mistakes can be unraveled and re-done. Practice makes perfect!
Unleash Your Creativity: Inspiring Project Ideas Featuring the Bubble Stitch
Once you’ve confidently mastered this delightful stitch, a vast world of creative possibilities opens up before you. Here are some inspiring project ideas where the unique texture of the bubble stitch truly shines, transforming ordinary items into extraordinary pieces:
- Baby Blankets and Clothing: The soft, puffy texture of the bubble stitch is absolutely perfect for delicate baby items, providing both warmth and a wonderfully comforting tactile experience that babies adore.
- Cozy Throws and Afghans: Imagine curling up on a chilly evening under a luxurious blanket adorned with a multitude of soft, inviting bubbles – it’s a truly opulent and inviting creation.
- Scarves and Cowls: Add a touch of whimsy, unparalleled texture, and extra warmth to your winter accessories. A bubble stitch scarf or cowl can easily become a standout statement piece in your wardrobe.
- Hats and Beanies: The stitch adds fantastic volume, delightful texture, and extra snugness, making your hats not only warmer but also incredibly stylish and unique.
- Pillows and Cushions: Transform plain home decor items into textured works of art with bubble stitch pillow covers that are simply irresistible to touch and admire.
- Washcloths and Dishcloths: Even practical household items can be beautiful! The textured surface of the bubble stitch is surprisingly effective for scrubbing, making these items both pretty and functional.
- Accent Panels in Garments: Integrate a striking panel of bubble stitch into a larger garment like a sweater, cardigan, or even a vest for a unique design element that adds a personalized touch and visual intrigue.
- Bags and Pouches: The sturdy, textured fabric created by the bubble stitch is excellent for knitting small bags, pouches, or even tote bags, adding durability and style.
Elevating Your Bubbles with Thoughtful Colorwork
One of the most exciting and transformative aspects of the bubble stitch is its incredible potential for stunning colorwork. While beautiful and elegant in a single solid color, strategically introducing different hues can make your bubbles truly spectacular and visually dynamic. Here are some creative ideas for incorporating color into your bubble stitch projects:
- Contrasting Bubbles: Work your main fabric in one solid color and then create the bubbles themselves in a vibrant, contrasting shade. This technique makes the bubbles visually pop and stand out dramatically, creating a bold and eye-catching effect.
- Striped Bubbles: Alternate the colors of your bubbles row by row, or create distinct stripes of bubbles in different sections of your project. This can add a playful or sophisticated striped element to your design.
- Variegated or Self-Striping Yarns: While not “colorwork” in the traditional sense of planned color changes, using a variegated or self-striping yarn can create an organic, multi-hued bubble effect that is truly unique and requires no frequent color changes. The color shifts within the yarn will naturally highlight the individual bubbles.
- Gradient Effects: Experiment with yarns that shift colors subtly. This can create a beautiful ombre or gradient effect within your rows of bubbles, adding another layer of visual interest.
Conclusion: Ready to Pop Some Bubbles and Transform Your Knitting?
The bubble stitch is far more than just another knitting technique; it’s an invitation to infuse personality, captivating texture, and a touch of playful sophistication into all your handmade creations. It beautifully dispels the common misconception that all intricate-looking stitches must be incredibly difficult to master, proving that stunning and elaborate results can be achieved with a clear understanding of basic principles, a little confidence, and some dedicated practice.
So, why delay? Grab your knitting needles and your favorite yarn, and embark on this delightful journey into the world of textured knitting. For those who benefit from visual guidance, we highly recommend watching Studio Knit’s incredibly helpful video tutorial. Seeing this mesmerizing stitch in action will undoubtedly provide a deeper understanding of its nuances and empower you to cast on with confidence. Once you’ve successfully mastered it, you’ll undoubtedly find yourself reaching for this versatile and charming stitch again and again, eager to transform ordinary knitted fabric into something truly extraordinary and uniquely yours.
Don’t keep this wonderful creative secret to yourself! Share this comprehensive guide and the excellent video tutorial with your fellow knitting enthusiasts, friends, and family so that they too can discover the immense joy, satisfaction, and charm of incorporating the beautiful bubble stitch into their own projects. Happy knitting, and may your bubbles always be perfectly puffy!