
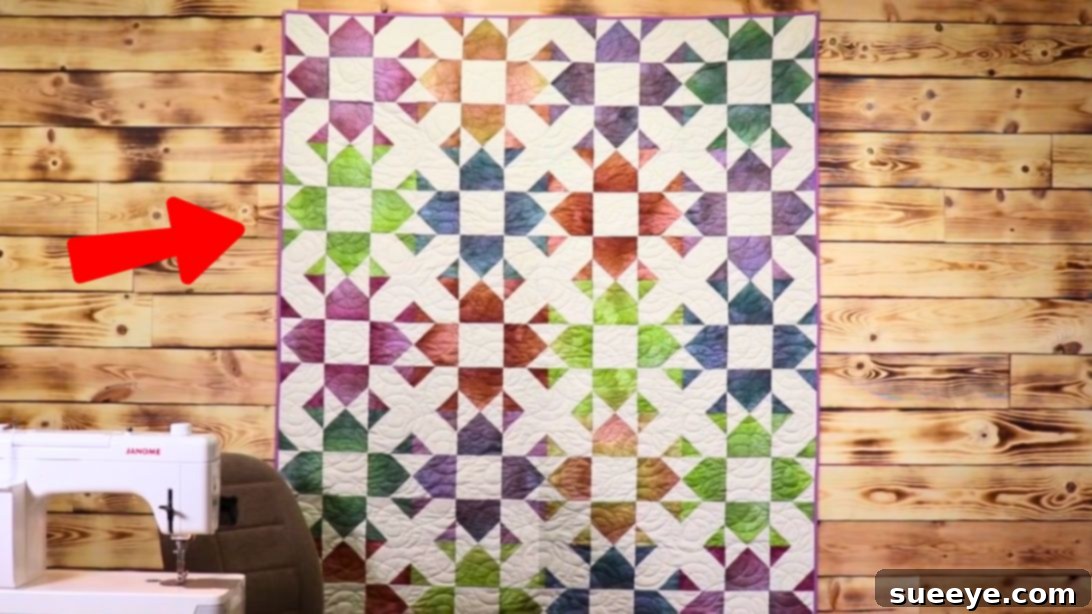
Embark on a delightful quilting journey with the mesmerizing “Lights Out Quilt” pattern, expertly designed by the creative minds at Sew Yeah. This particular quilt block stands out for its elegant simplicity and stunning visual impact, proving that breathtaking results don’t always require complex techniques. Perfect for quilters of all skill levels, especially those new to the craft, this project focuses on mastering just two fundamental block patterns. If you’re looking for a rewarding project that builds confidence and produces a beautiful, heirloom-quality piece, you’ve found it. Dive into this comprehensive guide, where we’ll walk you through each step, from fabric selection to the final stitch. Prepare to transform simple squares into a captivating quilt that will brighten any room.
The Lights Out Quilt: A Beginner-Friendly Masterpiece
The “Lights Out Quilt” is celebrated for its clever design that creates a striking optical illusion, giving the impression of light and shadow dancing across the fabric. This effect is achieved through strategic placement of contrasting fabrics, making it an excellent opportunity to experiment with color and value. What makes this pattern truly exceptional for beginners is its reliance on basic quilting principles: accurate cutting, consistent seam allowances, and careful pressing. You won’t encounter intimidating curves or intricate piecing here, just straightforward techniques that lay a solid foundation for your quilting future. Even seasoned quilters appreciate the speedy gratification and versatility of this block, which can be easily scaled to create anything from a charming throw to a grand bedspread. Let’s gather our supplies and prepare to bring this captivating design to life.
Materials and Tools for Your Lights Out Quilt
Before we begin piecing, let’s ensure we have all the necessary materials and tools. Precision in cutting and consistency in fabric choice are key to achieving the crisp, clean lines that define the “Lights Out” pattern. For this project, we recommend using high-quality 100% cotton quilting fabric, as it is easy to work with, holds its shape well, and will stand the test of time.
Fabric Requirements (for one complete block)
To create one “Lights Out” quilt block, you will need two distinct fabrics: a main Fabric A (your chosen color) and a contrasting Fabric B (the background). The interplay between these two will create the signature “lights out” effect.
Fabric A (Main Color)
- 4 pieces of 5″ square: These will form the central parts of your second block units and contribute to the overall color scheme.
- 8 pieces of 2 3/4″ square: These smaller squares are crucial for creating the “snowball” corners on your first block units.
Fabric B (Background Color)
- 5 pieces of 5″ square: One of these will serve as the central square for your main block assembly, while the others will form the core of your first block units.
- 8 pieces of 2 3/4″ square: These contrasting smaller squares will be used to create the “snowball” corners on your second block units.
Essential Quilting Tools
Having the right tools at hand will make your quilting experience smoother and more enjoyable, ensuring accuracy and efficiency:
- Sewing Machine: A reliable machine with a good 1/4-inch foot attachment is indispensable for consistent seams.
- Rotary Cutter: A sharp rotary cutter (45mm or 60mm) is crucial for precise, quick fabric cutting.
- Self-Healing Cutting Mat: Protects your work surface and your rotary cutter blade.
- Quilting Rulers: Clear acrylic rulers, especially a square one (e.g., 6.5″ or 12.5″) and a long rectangular one, aid in accurate measurement and cutting.
- Iron and Ironing Board: Essential for pressing seams flat and squaring up blocks. A dry iron is often preferred for quilting.
- Thread: High-quality 100% cotton thread that matches or blends with your fabrics.
- Pins or Fabric Clips: To hold fabric layers together securely before sewing.
- Fabric Marker or Pencil: For drawing diagonal lines on your smaller squares. A Hera marker can also be useful for creasing fabric.
- Seam Ripper: An inevitable but necessary tool for correcting any mistakes.
- Scissors: For snipping threads and occasional fabric adjustments.
A Note on Fabric Preparation: While some quilters skip this step, pre-washing and ironing your fabrics before cutting is highly recommended. This removes any sizing, preshrinks the fabric, and helps prevent color bleeding, ensuring your finished quilt remains beautiful for years to come.
Step-by-Step Instructions: Crafting Your Lights Out Quilt Block
The beauty of the “Lights Out Quilt” lies in its modular construction. We’ll start by creating two types of smaller units, then combine them to form the final striking block. Throughout these steps, remember the golden rule of quilting: a consistent 1/4-inch seam allowance. This precision is vital for your blocks to fit together perfectly.
Step 1: Preparing Your Corner Snowball Squares
This initial step sets the stage for creating the distinctive “snowball” corners that are central to the Lights Out design. You’ll work with all your smaller 2 3/4″ squares (8 pieces of Fabric A and 8 pieces of Fabric B).
Take each of the 2 3/4″ squares, both from Fabric A and Fabric B. Carefully fold each square in half diagonally, creating a perfect triangle. Press this fold with a hot iron to create a sharp, visible crease. This crease will serve as your guide for precise sewing in the subsequent steps. Alternatively, you can use a fabric marker or pencil to draw a diagonal line from one corner to the opposite corner on the wrong side of each square. This drawn line can often be easier to follow for beginners.
Step 2: Constructing the First Block Unit (Background-Centered)
You will create four of these units. These blocks will feature a Fabric B (background) center with Fabric A (main color) “snowball” corners, creating a contrast that defines the quilt’s aesthetic.
Get one 5″ square of Fabric B (background). Take two of your prepared 2 3/4″ Fabric A squares (folded or marked diagonally). Position these two smaller Fabric A squares on opposite corners of the larger 5″ Fabric B square. Ensure that the diagonal fold (or drawn line) of each small square runs from the outer edge of the large square towards its center. The raw edges of the smaller squares should align perfectly with the raw edges of the larger square.
Pin the smaller squares in place to prevent shifting. Stitch directly along the diagonal fold line you pressed or drew. If using a drawn line, sew precisely on this line. Once both smaller squares are stitched, carefully trim the excess fabric from the corner, leaving a 1/4-inch seam allowance beyond your stitched line. Open up the corners, fold back the smaller squares, and press them flat. Press the seam allowances towards the darker fabric (Fabric A) for a cleaner finish and to reduce bulk. You need to create four identical units of this first block type.
Step 3: Constructing the Second Block Unit (Color-Centered)
Similar to Step 2, you will also create four of these units. These blocks will feature a Fabric A (main color) center with Fabric B (background) “snowball” corners, providing the crucial contrast.
Take one 5″ square of Fabric A (your main color). Now, select two of your prepared 2 3/4″ Fabric B squares (folded or marked diagonally). Place these two smaller Fabric B squares on opposite corners of the larger 5″ Fabric A square. Again, ensure the diagonal fold or drawn line points towards the center of the larger square, and the raw edges align.
Pin, stitch, and trim as you did in Step 2. Sew directly on the diagonal line, trim the excess 1/4-inch away from your stitch line, fold open, and press flat. For consistency, press these seam allowances towards the darker fabric (Fabric A) as well. You will need to complete four of these second block units. By the end of this step, you should have four “First Block” units and four “Second Block” units, each with contrasting “snowballed” corners.
Step 4: Assembling the “Lights Out” Quilt Block (The 3×3 Grid)
Now comes the exciting part – bringing your individual units together to form the complete “Lights Out” block. This assembly will create the stunning visual effect.
Begin by laying out your components on a flat surface, arranging them into a 3×3 grid. In the very center of your grid, place one 5″ square of Fabric B (background). This square is the heart of your “Lights Out” block.
Next, take your four “First Block” units (the ones with the Fabric B center and Fabric A corners). These will be placed in the four corner positions of your 3×3 grid. Arrange them so that the Fabric A (colored) triangular points are directed towards the central Fabric B square. This specific orientation is crucial for achieving the “lights out” effect.
Finally, fill the remaining four spaces in your 3×3 grid with your “Second Block” units (the ones with the Fabric A center and Fabric B corners). Place them in the middle of each side, between the corner blocks. Observe how the Fabric B (background) triangular points from these blocks now point towards the center, completing the geometric pattern.
Once you are satisfied with your layout, it’s time to sew the block together. Working row by row is generally the most accurate method:
- Sew Rows: Take the three units from your top row, align them carefully, and sew them together, making sure to use a consistent 1/4-inch seam allowance. Press the seams for this row, perhaps alternating directions between blocks to help “nest” seams later. Repeat this process for the middle row and the bottom row, creating three complete strips of fabric.
- Join Rows: Now, take your three sewn rows. Carefully align the top row with the middle row, matching up all seams and points as precisely as possible. Pin generously, especially at seam intersections, to prevent shifting. Stitch them together with a 1/4-inch seam. Press this seam open or to one side. Repeat to attach the bottom row to the combined top and middle rows.
Once all rows are sewn together, give your finished block a final good press with an iron. Make sure the block lies flat and square. At this point, you should have one complete “Lights Out Quilt” block, measuring approximately 12.5 inches square (depending on your initial fabric sizes and seam allowances).
Assembling Your Lights Out Quilt Top
To create a full quilt, you will need to repeat the process of making individual “Lights Out” blocks. The original inspiration from Sew Yeah suggests a quilt layout of four blocks across and five blocks down. This means you would need a total of 20 individual “Lights Out” blocks to achieve that specific size.
Once you have all your blocks constructed, you’ll join them together to form the quilt top. You can choose to join them directly, block-to-block, or you might opt to add sashing (strips of fabric) between the blocks and/or borders around the entire quilt top. Sashing can enhance the design by providing visual separation and framing each block, while borders add size and a finishing touch.
Carefully lay out all your finished blocks on a large floor or design wall. This allows you to visualize the final arrangement, rotate blocks as needed for the desired effect, and ensure a balanced distribution of colors and patterns. Once satisfied, sew the blocks together into rows, pressing seams as you go. Then, join these rows together to complete your quilt top.
Finishing Your Quilt: The Final Touches
After your quilt top is complete, the next steps involve layering, quilting, and binding – transforming it from a flat piece of fabric into a soft, cuddly, and durable quilt.
- Layering: Create a “quilt sandwich” by laying your backing fabric (wrong side up) on a clean, flat surface, taping it down taut. Next, place your batting (the fluffy inner layer) smoothly on top of the backing. Finally, center your finished quilt top (right side up) over the batting.
- Basting: Secure all three layers together using safety pins, basting spray, or long hand stitches. This prevents shifting during the quilting process.
- Quilting: This is where you stitch through all three layers to hold them together and add texture. You can choose simple straight lines, stitch-in-the-ditch (quilting along the seam lines), free-motion quilting, or a combination of techniques. The quilting pattern you choose will significantly impact the final look and feel of your “Lights Out” quilt.
- Binding: Once quilted, trim the edges of your quilt square, leaving a consistent border. Create continuous strips of fabric (typically 2.5 inches wide) for your binding. Sew the binding to the front of the quilt, miter the corners, and then fold it over to the back, hand-stitching or machine-stitching it down for a clean, professional finish.
Conclusion: Your Quilting Adventure Continues
Congratulations on crafting your stunning “Lights Out Quilt”! This pattern is a fantastic introduction to the joys of quilting, offering both a straightforward process and a truly captivating outcome. The simple elegance of this design ensures that your finished quilt will be a cherished item, whether it’s draped over a sofa, warming a bed, or given as a heartfelt handmade gift. The ability to create such a beautiful piece using basic techniques is a testament to the power of thoughtful design and precise execution.
We hope this detailed tutorial has inspired you and equipped you with the confidence to explore more quilting projects. The journey of fabric, thread, and imagination is endless. Remember, practice makes perfect, and every stitch is a step forward in your creative growth. Did you enjoy bringing this simple yet striking pattern to life? If so, we highly recommend checking out Sew Yeah’s YouTube channel. They are a treasure trove of free, easy-to-follow video pattern tutorials that cater to quilters of all levels, offering endless inspiration for your next fabric adventure. Subscribe to their channel to discover even more beautiful designs and continue your wonderful quilting journey!