
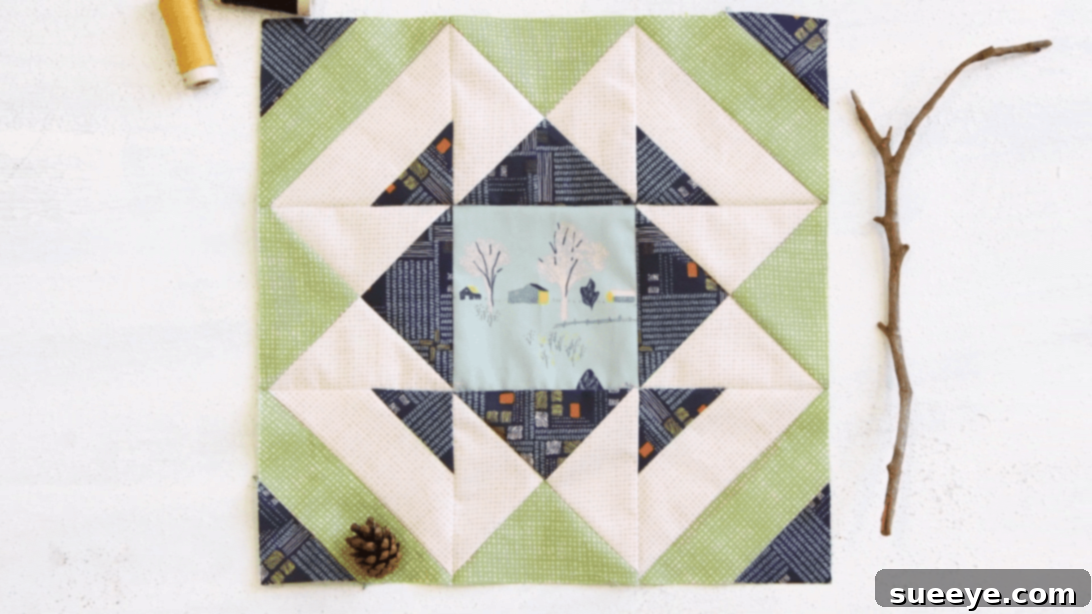
Embark on a rewarding quilting journey with the deceptively simple yet stunning Jackknife Quilt Block. Whether you’re a complete novice picking up a needle for the first time or a seasoned quilter seeking a quick and satisfying project, this design is an absolute delight. Many quilters are initially intimidated by its intricate appearance, assuming it requires advanced techniques and intricate cuts. However, we’re thrilled to show you just how straightforward and approachable this block truly is, often achievable in a single focused session. Inspired by the expert guidance of Art Gallery Fabrics on YouTube, this comprehensive tutorial will demystify the process, helping you create beautiful textile art with confidence and ease.
Master the Easy Jackknife Quilt Block: A Step-by-Step Guide for All Skill Levels
The Jackknife Quilt Block stands out as a personal favorite for its elegant design and incredible versatility. Its clean lines and geometric appeal make it a fantastic canvas for experimenting with various fabric combinations and color palettes. Imagine the possibilities – vibrant prints, subtle solids, or a harmonious blend of both, all coming together in a neat, eye-catching pattern that can transform any quilt. For experienced quilters, this block offers a wonderful opportunity for speed quilting, allowing you to assemble multiple blocks in a remarkably short amount of time, perfect for creating larger projects or quick gifts. Beginners, on the other hand, will find it an excellent foundation for mastering basic quilting techniques such as accurate cutting, precise piecing, and effective pressing, all without feeling overwhelmed by complexity. Let’s dive into this captivating project and discover the joy of creating a Jackknife Quilt Block that truly reflects your unique style. You’ll be amazed at how quickly you can bring this beautiful design to life and how satisfying it is to see it come together.
RELATED: If you enjoy simple yet impactful quilt patterns that yield impressive results, you might also like the Easy Jack-in-the-Box Quilt Block Tutorial for another quick-to-make project that adds a playful touch to your quilting repertoire.
Essential Materials for Your Jackknife Quilt Block
Before you embark on crafting this beautiful quilt block, gathering all your necessary tools and fabrics will ensure a smooth, efficient, and enjoyable experience. This meticulously curated list includes everything you’ll need, from your primary fabrics to your essential basic quilting supplies, guaranteeing you’re well-prepared for each step of the creation process. Having everything at hand will prevent interruptions and allow you to maintain your creative flow.
- Print or solid fabric, for the center (Choose a fabric that will pop and serve as a focal point, drawing the eye into the heart of your block!)
- Dark blue print fabric (Consider a shade that provides excellent contrast and definition against your other chosen colors, enhancing the “jackknife” effect.)
- Green print fabric (A complementary or contrasting color will significantly enhance the dynamic design of the block. Experiment with different shades to find your perfect palette.)
- White or low-volume print fabric (Essential for creating clear divisions, adding brightness, and providing a visual resting place within the design. Low-volume prints add subtle texture without overwhelming.)
- Marking pen, pencil, or chalk (For precise lines that guide your cuts and stitches. Ensure your chosen marker is easily visible on your fabric and will disappear cleanly.)
- Ruler (A clear acrylic quilting ruler with precise measurements is indispensable for accuracy. Consider one with ¼-inch markings for easier piecing.)
- Scissors or rotary cutter and a cutting mat (A sharp rotary cutter and a self-healing cutting mat significantly speed up the cutting process and improve precision, which is crucial in quilting.)
- Fabric pins (To hold your fabric pieces securely in place during stitching, preventing shifting and ensuring accurate alignment.)
- Needle and thread (High-quality, strong thread that matches or blends with your fabric colors will ensure durable seams and a professional finish.)
- Iron, for pressing (A hot iron and ironing board are crucial for achieving crisp seams and perfectly flat blocks, which are foundational for accurate piecing.)
- Sewing machine (A well-maintained sewing machine with a consistent ¼-inch seam allowance capability will make the piecing process much smoother and more enjoyable.)
Precise Cutting Requirements for the Jackknife Quilt Block
Accuracy in cutting is paramount in quilting, as it directly impacts how well your pieces fit together, the overall neatness of your finished block, and the precision of your points. Take your time with these measurements, ensuring each piece is cut perfectly for a seamless assembly. Remember, “measure twice, cut once” is a quilter’s golden rule!
- Center fabric – (1) 4½” square (This piece forms the central motif of your block.)
- Dark blue – (1) 5½” square and (2) 2½” x WOF strips (WOF stands for Width of Fabric, typically 42-44 inches, providing ample length for strip piecing.)
- Green – (1) 5½” square and (2) 2″ x WOF strips
- White – (2) 5½” squares and (1) 2″ x WOF strip
*Note: WOF (Width of Fabric) strips are incredibly efficient for creating repetitive units, and these dimensions are designed to minimize waste while providing enough material for the intricate elements of the Jackknife block. Always square up your fabric before cutting strips to ensure perfectly straight edges.
How to Make the Jackknife Quilt Block: A Detailed Guide
Step 1: Constructing the Strip Sets for Dynamic Angles
Begin by creating your foundational strip sets, which will form the distinctive angled elements of your Jackknife block. Take one of your dark blue 2½” x WOF strips and lay it horizontally on your clean, flat work surface. This will be your starting point and the top-most strip of your initial strip set. Next, carefully position one of the green 2″ x WOF strips directly beneath the dark blue strip, aligning the raw edges perfectly. Following this, place the white 2″ x WOF strip below the green strip, again ensuring all edges are flush and straight. Finally, complete this unit by adding the second dark blue 2½” x WOF strip at the very bottom. Pin these four strips together along their long edges at regular intervals to prevent shifting and maintain perfect alignment as you prepare for stitching. This meticulous alignment now will save you a lot of trouble later with uneven pieces and crooked lines.
Step 2: Stitching, Pressing, and Sub-Cutting Strip Sets
With your strips carefully pinned, it’s time to stitch them into a cohesive unit. Using a precise ¼-inch seam allowance, sew all four strips together along their pinned long edges. Take your time to ensure your seams are straight and consistent. Once stitched, proceed to press your seams. For this particular block, it’s often beneficial to press seams open or towards the darker fabric to minimize bulk, ensuring your block lies perfectly flat. A flat block is absolutely key to accurate subsequent piecing and achieving a professional, crisp finish. After pressing, your stitched strip unit should be smooth and even. Now, place your 4-inch square ruler on top of this strip unit. Following the clear demonstration in the Art Gallery Fabrics video, you’ll need to carefully rotate the ruler to achieve the specific diagonal cut required for the signature Jackknife pattern. Cut out multiple such strip units from your long pieced strip, ensuring each is precisely 4 inches square (or the specific measurement indicated in the video for your diagonal cuts). Repeat this entire process for any remaining strips, creating several identical units. These sub-cut units are critical components and should be set aside, ready for assembly in later steps; their accuracy will influence the entire block.
Step 3: Preparing Half-Square Triangles (HSTs)
This step involves creating half-square triangles (HSTs), which are fundamental building blocks in many quilt patterns, including the Jackknife block. Take one of your 5½” white squares and place it right sides together on top of a 5½” dark blue square. Similarly, take another 5½” white square and place it right sides together on top of a 5½” green square. Using your chosen marking tool (pen, pencil, or chalk), draw a single diagonal line precisely from one corner to the opposite corner on the back (wrong side) of each white square. These lines will serve as your cutting guides. Next, you’ll stitch on either side of each drawn diagonal line. Using a consistent ¼-inch seam allowance, sew a straight line parallel to and ¼ inch away from the drawn line on both sides. This efficient technique creates two potential HSTs from a single square pairing, effectively multiplying your units. Ensure your stitches are consistent, secure, and run perfectly straight along the length of the squares.
Step 4: Separating and Pressing Your Half-Square Triangles
Once you’ve finished stitching on both sides of the drawn diagonal lines in the previous step, it’s time to transform your stitched squares into individual half-square triangle units. Carefully cut each pair of squares apart directly along the diagonal line you drew earlier. This initial cut will yield two raw HST units from each original square pairing. Now, press your seams. For HSTs, it’s generally recommended to press the seams towards the darker fabric. This technique helps prevent “shadowing,” where the darker fabric shows through the lighter fabric, ensuring a clean and professional appearance. After pressing, your HSTs should be flat and crisp. The next crucial step is to cut these HST units in half *across* the seams. This means you will make a cut perpendicular to the seam line, effectively creating four smaller, yet still raw, HSTs from each initial paired square. Take extreme care to measure and cut accurately for uniform blocks, as consistency here is vital for the final square-up.
Step 5: Reassembling and Trimming HST Units
You now have several sets of smaller HSTs that will contribute to the dynamic movement of the Jackknife block. The next step is to carefully swap their matching halves. For instance, if you cut your dark blue/white units, you’ll have four individual units. You’ll take two units that are mirrors of each other and arrange them so that when stitched, they form a larger square with contrasting triangles creating a distinct pattern. Stitch these swapped halves together, again using a precise ¼-inch seam allowance. This combination will start to reveal the intricate design elements of the Jackknife block. Repeat this swapping and stitching process for all your remaining HST units, ensuring consistency in seam allowance and pressing. After stitching, press your seams once more, considering whether to press open or to one side for optimal flatness. Finally, and this is a critical step for accuracy, trim all of these newly pieced units to precisely 4½” squares. A square-up ruler is invaluable here to ensure perfect 4½” dimensions, making sure your corners are at right angles and your block is perfectly square. This precision trimming will make the final assembly of your quilt block much easier and more accurate.
Step 6: Final Assembly of the Jackknife Quilt Block
With all your individual units now meticulously cut, stitched, and trimmed, it’s time for the exciting final assembly of your Jackknife Quilt Block. Refer back to the Art Gallery Fabrics video tutorial for a clear visual guide on how to arrange all of your prepared block units. You’ll have your central 4½” square, your strip-pieced units with their diagonal cuts, and your precisely trimmed HST units. Lay them out carefully on your design wall or work surface, paying close attention to the orientation of each piece to ensure the Jackknife pattern emerges correctly. Once you are satisfied with the arrangement and all pieces are facing the right direction, begin stitching the units together, typically working row by row. Stitch the units within each row first, using your consistent ¼-inch seam allowance. As each row is completed, press the seams. For the rows, it’s often helpful to press the seams of alternating rows in opposite directions (e.g., row 1 to the left, row 2 to the right, row 3 to the left). This technique, known as “nesting” seams, allows the seam allowances to lock together when you join the rows, reducing bulk and promoting perfectly aligned points. Finally, stitch the completed rows to each other, again pressing your seams carefully after each join to achieve a flat, unified block. The culmination of your precise work will be a beautifully intricate and perfectly squared Jackknife Quilt Block, ready to be incorporated into a larger quilt project or showcased on its own.
Tips for Success in Making Your Jackknife Quilt Block
Achieving a beautiful and accurate Jackknife Quilt Block, while straightforward, benefits greatly from a few key quilting practices. Keep these expert tips in mind to elevate your results, ensure precision, and make your quilting experience even more enjoyable:
- Precision is Key: In quilting, even a slight inaccuracy in cutting or stitching can compound quickly and throw off your entire block. Invest in a good quality rotary cutter with a fresh blade, a self-healing mat, and a clear acrylic ruler with clear markings. Always double-check your measurements before making a cut, and strive for exactness.
- Consistent Seam Allowance: A perfect ¼-inch seam allowance is the quilter’s most reliable friend. Practice maintaining a consistent seam to ensure your blocks fit together perfectly with minimal fuss. Consider using a dedicated ¼-inch presser foot on your sewing machine, or mark a guide on your machine’s throat plate.
- Pressing Matters: Don’t underestimate the power of a good press! Pressing seams after each individual step, rather than waiting until the end, helps to keep your fabric flat, prevents bulk, and ensures your points align beautifully. Experiment with pressing seams open or to the side (usually towards the darker fabric to prevent shadowing) to see what works best for your specific project and fabric choices.
- Fabric Selection: The Jackknife block truly shines with good contrast, which helps highlight its dynamic angles. Choose fabrics where the different colors and patterns clearly stand out against each other. Consider value (lightness/darkness) as much as hue; a strong contrast in value will make your design pop.
- Watch the Video: While this guide provides comprehensive written instructions, the visual demonstration by Art Gallery Fabrics on YouTube is invaluable. Watching the video helps clarify techniques, provides visual cues for tricky steps, and offers additional tips you might otherwise miss.
- Stay Organized: Keep your cut pieces organized by step, color, or unit type. This prevents confusion, saves time, and keeps your workspace tidy, making the assembly process much smoother and less frustrating. Consider using small trays or design boards for individual block components.
- Don’t Rush: Quilting is a meditative and creative craft. Enjoy the process rather than focusing solely on the end product. Taking your time, being patient with yourself, and savoring each stitch will result in a more enjoyable experience and a higher quality finished product you’ll be proud of.
Creative Variations and Project Ideas
The beauty of the Jackknife Quilt Block lies not only in its ease of construction but also in its incredible adaptability and potential for endless creativity. Once you’ve mastered the basic block, a world of project possibilities and design variations opens up:
- Color Palette Play: Experiment fearlessly with different color combinations. Instead of dark blue and green, try warm autumnal tones, cool ocean hues, vibrant jewel tones, or bright, playful primaries. A monochromatic scheme using varying shades and tints of one color can be incredibly sophisticated and modern, while a scrappy approach using fabric remnants can add charm, a unique story, and an eco-friendly touch.
- Focal Fabric Center: Use a particularly special or fussy-cut fabric for the central 4½” square. This can highlight a unique novelty print, a cherished motif, or even an intricately embroidered element, making each block a mini-showcase and a personal statement.
- Larger Quilt Projects: Combine multiple Jackknife blocks to create stunning full-sized quilts of any dimension. Rotate alternating blocks for dynamic secondary patterns that appear as you piece them together, or intersperse them with solid squares or sashing strips for a more traditional, controlled look.
- Smaller Home Decor Items: This versatile block is perfectly sized for a myriad of smaller projects. Think about creating a set of personalized placemats, a decorative throw pillow cover that adds a pop of color to your sofa, a stylish table runner for your dining area, or even a unique tote bag. These smaller projects are excellent for quick gratification, thoughtful gifting, or simply personalizing your home decor.
- Mix and Match: Don’t be afraid to combine the Jackknife block with other complementary quilt blocks. Classic blocks like the Four Patch, Nine Patch, or even simple plain squares can be used alongside the Jackknife to create more complex, visually engaging, and unique quilt designs. Let your imagination be your guide!
*All image credit belongs to Art Gallery Fabrics via YouTube. Follow and subscribe to their channel for more inspiring quilting tutorials, tips, and fabric ideas!
Your Quilting Journey with the Jackknife Block
Congratulations on taking the first step towards creating your very own Jackknife Quilt Block! As we’ve thoroughly explored, this pattern is a brilliant testament to how simple techniques, when applied with care and precision, can yield stunning, complex-looking results that are deeply satisfying to create. Whether you’re a beginner building foundational skills and gaining confidence or an experienced quilter enjoying a quick, satisfying make that reignites your creative spark, the Jackknife block offers a rewarding and enjoyable creative experience for everyone. Its elegant design and endless possibilities for fabric customization truly make it a timeless and versatile addition to any quilter’s repertoire, promising many beautiful projects to come.
Don’t hesitate to dive in, gather your materials, and let your creativity flow. Remember to refer to the comprehensive video tutorial by Art Gallery Fabrics for continuous visual guidance, ensuring every stitch and cut brings you closer to a beautifully finished block. We encourage you to share your creations with the quilting community, inspire others with your unique fabric choices, and continue to explore the wonderful and boundless world of quilting. Happy stitching, and may your Jackknife blocks be perfectly pointed and pressed!