
The Ultimate Guide to Making an Easy 4-Patch Escape Quilt with a Jelly Roll
Are you staring at your beautiful jelly roll, wondering what magical creation it’s destined to become? Look no further! This comprehensive guide will walk you through transforming those lovely fabric strips into a stunning 4-Patch Escape Quilt. Designed by the talented folks at Sew Yeah, this project is not only incredibly rewarding but also remarkably beginner-friendly. If you’re eager to complete a captivating quilt top without feeling overwhelmed, this pattern is your perfect match.
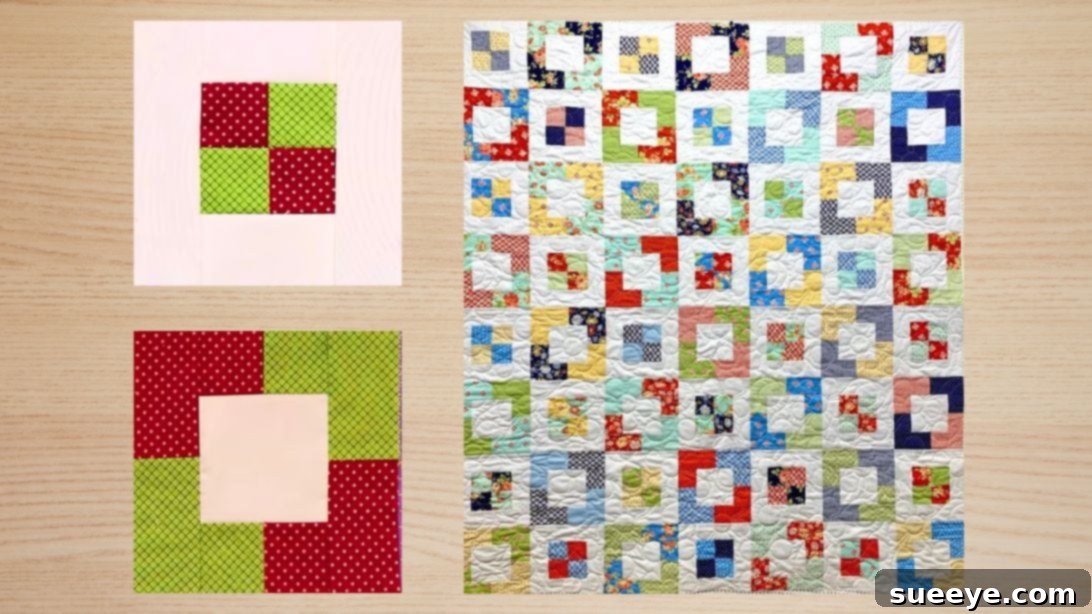
The 4-Patch Escape Quilt earns its name from the intriguing optical illusion created by two distinct yet complementary blocks. These blocks are arranged alternately in each row, producing a dynamic design that appears to “escape” or weave across the quilt surface. Both blocks feature a foundational 4 1/2-inch square at their heart, making the piecing process consistent and straightforward. By following these clear steps, you’ll gain confidence in your quilting skills and create a cherished heirloom in no time.
Why Choose the 4-Patch Escape Quilt for Your Next Project?
This particular quilt pattern offers numerous advantages, especially for those new to quilting or looking for a quick and satisfying make:
- Beginner-Friendly: The instructions are clear, and the block construction is repetitive, allowing you to master basic piecing techniques easily.
- Jelly Roll Friendly: Jelly rolls are pre-cut fabric strips that save you valuable time on cutting, making the process faster and more enjoyable. They also provide a beautiful, coordinated assortment of fabrics.
- Visually Striking: The alternating blocks create a captivating design that looks far more complex than it actually is. It’s a wonderful way to showcase your chosen fabrics.
- Quick to Finish: If you’re looking for a quilt top that can come together in a weekend or a few dedicated sewing sessions, this pattern delivers. The simplicity of the blocks allows for efficient chain piecing.
- Versatile Design: While we’ll focus on the classic two-block arrangement, the design lends itself to various color schemes and fabric choices, making each quilt unique.
Before diving into the steps, let’s explore some related patch quilt designs that you might also enjoy: Split 4-Patch Quilt Block Tutorial, Tilted Nine Patch Quilt With Jenny Doan, and Patchwork Blocks for Beginners.
Gathering Your Quilting Arsenal: Materials and Tools
Success in quilting often begins with having the right materials and tools at hand. For this project, a jelly roll is your star player, but precise background fabric, binding, and backing are equally crucial. Ensure you have good quality cotton fabrics for the best results and durability of your finished quilt.
Essential Materials:
- 1 Jelly Roll: A standard jelly roll consists of 40 individual fabric strips, each 2 1/2 inches wide and approximately 42 inches long (the width of fabric, or WOF). Choose a jelly roll with a good mix of contrasting and complementary colors to achieve the desired visual effect of the “escape” pattern.
- 2 1/4 yards of Background Fabric: This fabric will provide the crucial contrast that makes your jelly roll colors pop and defines the structure of your quilt blocks. A solid or subtle tone-on-tone print works beautifully.
- 1/2 yard for Binding: Binding is the fabric strip that finishes the edges of your quilt, providing a clean, durable border. Choose a fabric that complements your jelly roll and background, perhaps picking up one of the accent colors.
- 3 1/2 yards for Backing: The backing fabric is the foundational layer of your quilt. It should be comfortable and aesthetically pleasing, as it will be visible on the reverse side. Consider a soft flannel for extra warmth or a coordinating cotton print.
- Quilt Batting (approx. 60″ x 70″ or size appropriate for your quilt): This essential middle layer provides warmth, loft, and helps define the quilting stitches.
- Coordinating Thread: High-quality 100% cotton thread will ensure strong seams and blend seamlessly with your fabrics.
Recommended Tools:
- Sewing Machine: A reliable machine with a quarter-inch foot (or a good understanding of your quarter-inch seam allowance) is essential.
- Rotary Cutter, Mat, and Ruler: These are indispensable for achieving precise, straight cuts. An 18″ x 24″ mat and a 6″ x 24″ ruler are excellent starting points.
- Fabric Scissors: For trimming threads and occasional fabric adjustments.
- Iron and Ironing Board: Crucial for pressing seams flat and accurately, which greatly impacts the overall flatness and appearance of your quilt.
- Pins or Fabric Clips: To hold fabric pieces together before sewing, ensuring accuracy.
- Seam Ripper: Every quilter needs one! It’s an invaluable tool for correcting mistakes.
How to Make the 4-Patch Escape Quilt: A Step-by-Step Tutorial
Accuracy is key in quilting, especially with measurements and seam allowances. Always use a consistent 1/4-inch seam allowance throughout this project. Pressing your seams correctly will also make a significant difference in the final outcome of your quilt.
Step 1: Preparing Your Background Fabric
Begin by meticulously cutting your background fabric. Precision here sets the foundation for perfectly sized blocks. From your 2 1/4 yards of background fabric:
- Cut 21 strips, each measuring 2 1/2 inches by the width of fabric (WOF). WOF typically ranges from 42 to 44 inches.
- From these 21 strips, subcut 7 strips into 56 pieces of 4 1/2-inch x 2 1/2-inch rectangles. These will be used for framing parts of your blocks.
- Then, subcut the remaining 14 strips into 56 pieces of 8 1/2-inch x 2 1/2-inch rectangles. These longer rectangles will form the outer borders of Block A.
- Next, cut 4 pieces of 4 1/2-inch x WOF strips.
- From these 4 strips, subcut them into 28 pieces of 4 1/2-inch x 4 1/2-inch squares. These squares will be the central element of Block B.
Step 2: Preparing Your Jelly Roll Strips
Select your jelly roll strips. You’ll be working with a mix of light and dark or contrasting fabrics to achieve the “escape” effect. The original tutorial suggests selecting strips that contrast well with your background fabric for maximum visual impact.
- Take 28 strips from your jelly roll. Keep them folded in half as they often come, as this helps with quick cutting.
- From each of these 28 strips, cut 2 pieces of 4 1/2-inch x 2 1/2-inch rectangles.
- Also from each strip, cut 4 pieces of 2 1/2-inch x 2 1/2-inch squares. These smaller squares will be the building blocks of your four-patch units.
Step 3: Constructing Block A – The Framed Four-Patch
Block A is characterized by its colorful four-patch center, elegantly framed by the background fabric. You will make a total of 28 of these blocks.
- Create the Four-Patch Unit: Take one light 2 1/2-inch square (from your jelly roll) and one dark 2 1/2-inch square (also from your jelly roll). Sew them together along one side. Press the seam towards the darker fabric. Repeat this step to create a second identical 2-patch unit.
- Join the 2-Patch Units: Place one 2-patch unit on top of the other, ensuring that the colors alternate to form a classic four-patch design (e.g., light-dark on top, dark-light on bottom). Nest your seams carefully for a perfect intersection. Sew them together. Press this final seam open or to one side, aiming for a flat unit. This finished four-patch should now measure 4 1/2 inches square.
- Frame the Four-Patch with Background Fabric:
- Take two of your 4 1/2-inch x 2 1/2-inch background rectangles. Sew one to the top and one to the bottom of your four-patch unit. Press seams outwards, towards the background fabric.
- Next, take two of your 8 1/2-inch x 2 1/2-inch background rectangles. Sew one to the left side and one to the right side of the unit you just assembled. Ensure the long edges are aligned. Press seams outwards.
- Your completed Block A should now measure 8 1/2 inches square. Repeat these steps to create a total of 28 Block A units.
Step 4: Crafting Block B – The Background-Centered Design
Block B offers a striking contrast to Block A, featuring a background square in its center, bordered by vibrant colored fabrics from your jelly roll. You will also create 28 of these blocks.
- Assemble Two-Patch Units: Take one dark 2 1/2-inch square and one light 2 1/2-inch square from your jelly roll. Sew them together along one side. Press the seam towards the darker fabric. You will need a total of two of these 2-patch units for each Block B.
- Attach to the Central Background Square: Take one of your 4 1/2-inch x 4 1/2-inch background squares.
- Sew one of your 2-patch units to the top of the background square, making sure the dark fabric side is on the left. Press the seam towards the 2-patch unit.
- Sew the second 2-patch unit to the bottom of the background square, ensuring the dark fabric side is on the right. Press the seam towards the 2-patch unit.
- Frame the Sides with Rectangles:
- Take one dark 4 1/2-inch x 2 1/2-inch rectangle and one light 4 1/2-inch x 2 1/2-inch rectangle (both from your jelly roll strips). Sew them together along their short side (2 1/2-inch side) to create a longer rectangle unit. Press the seam open or to one side.
- Repeat this step to create a second identical long rectangle unit.
- Sew these two longer rectangle units to the sides of the block you’ve been assembling. Carefully match the colors at the seams to maintain the pattern. Press seams outwards.
- Your finished Block B should also measure 8 1/2 inches square. Complete a total of 28 Block B units.
Step 5: Assembling the Quilt Top – Rows and Harmony
Now comes the exciting part: seeing your blocks come together to form the quilt top! The magic of the “escape” pattern truly emerges in this step as the alternating blocks create a beautiful sense of movement.
- Create Quilt Rows: You will be creating 8 rows for your quilt. Each row will consist of 7 blocks sewn across. The key is to alternate Block B and Block A in each row to create the visual effect.
- Row 1 Pattern: Start with Block B, then sew Block A, then Block B, and so on, until you have 7 blocks in the row. So, Row 1 will be B – A – B – A – B – A – B.
- Row 2 Pattern: For the next row, reverse the starting block. Begin with Block A, then B, then A, and so on. So, Row 2 will be A – B – A – B – A – B – A.
- Repeat for All Rows: Continue alternating the starting block for each subsequent row. Row 3 will be like Row 1 (B-A-B-A-B-A-B), Row 4 like Row 2 (A-B-A-B-A-B-A), and so on, until you have 8 completed rows.
- Sew Rows Together: Once all 8 rows are assembled, carefully sew them together, aligning your seams and nesting them where possible to ensure points meet neatly. Press all seams in one direction for one row and the opposite direction for the next. This will help them “lock” together when you join the rows, reducing bulk.
At this stage, your quilt top is complete! It should measure approximately 56 inches by 64 inches, a lovely throw size perfect for snuggling.
Step 6: Bringing Your Quilt to Life – Finishing Touches
A quilt isn’t truly finished until it’s layered, quilted, and bound. These steps add durability, warmth, and the final professional touch.
- Layering (Quilt Sandwich): Lay your backing fabric flat on a clean surface, wrong side up, and secure it with painter’s tape. Place your batting smoothly over the backing. Finally, center your completed quilt top (right side up) on top of the batting. Smooth out any wrinkles.
- Basting: Secure the three layers together. You can use safety pins (quilting pins), basting spray, or long hand stitches. Ensure the layers are securely fastened every 4-6 inches to prevent shifting during quilting.
- Quilting: This is where you stitch through all three layers to hold them together permanently. You can machine quilt using a walking foot or free-motion quilting, or you can hand quilt for a more traditional look. Simple straight lines following the seams of your blocks, or a grid pattern, work beautifully for this design and are beginner-friendly.
- Trimming: Once quilted, trim the excess batting and backing fabric, squaring up your quilt edges neatly.
- Binding: Prepare your binding strips from the 1/2 yard of fabric. Sew them together end-to-end to create one continuous strip. Attach the binding to the front of your quilt, then fold it over to the back and hand-stitch or machine-stitch it down. This encloses the raw edges and provides a beautiful finish.
- Final Wash: Give your finished quilt a gentle wash to soften the fabric and create that lovely crinkly texture characteristic of well-loved quilts.
Tips for a Flawless 4-Patch Escape Quilt
- Precision is Paramount: A quarter-inch seam allowance is crucial. Invest in a good quarter-inch presser foot for your machine.
- Pressing Matters: Always press seams after each step. This creates flat, accurate blocks and a smooth quilt top. Pressing to the dark side often works well for concealing threads.
- Chain Piecing: To speed up the process, use chain piecing where possible. Sew multiple units one after another without cutting threads between them, then clip them apart.
- Audition Fabrics: Lay out your jelly roll strips and background fabric before cutting to ensure you love the color combinations.
- Square Up Blocks: After assembling each Block A and Block B, use your ruler and rotary cutter to carefully square them up to 8 1/2 inches, if needed. This step ensures your rows will match up perfectly.
Personalizing Your 4-Patch Escape Quilt
While this tutorial provides a fantastic foundation, feel free to make this quilt your own:
- Fabric Choice: Experiment with different jelly roll themes – solids, florals, geometrics, or even a scrappy mix from your stash.
- Size Adjustments: To make a larger or smaller quilt, simply adjust the number of blocks per row and the number of rows.
- Borders: Add an outer border (or multiple borders) around your quilt top before batting and backing to increase its size and add another design element.
Conclusion: Your Beautiful 4-Patch Escape Quilt Awaits!
Congratulations! You’ve successfully navigated the steps to create a stunning 4-Patch Escape Quilt. This project is a testament to how simple techniques can yield incredibly beautiful results, especially when paired with the charm of a jelly roll. We hope this tutorial has empowered you to embrace the joy of quilting and inspired you to continue exploring your creativity.
Now that your masterpiece is complete, share your creation with fellow quilters and inspire others to embark on their own quilting adventures. Happy sewing!