
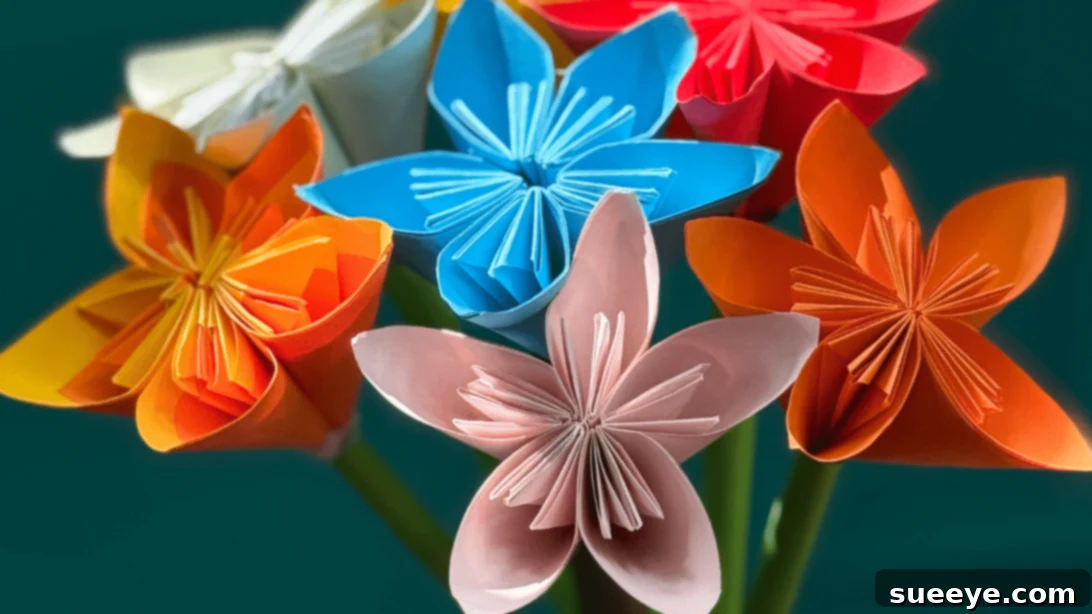
Mastering Origami: A Simple Guide to Crafting Beautiful Paper Daffodils
Embark on a captivating journey into the ancient Japanese art of origami, where simple sheets of paper are transformed into intricate three-dimensional masterpieces. Originating in Japan, origami, meaning “folding paper,” is more than just a craft; it’s a mindful activity that sharpens focus, boosts creativity, and provides a wonderfully relaxing escape from daily stresses. With just paper and a few fundamental folding techniques, you can bring almost any shape, form, or object imaginable to life.
The beauty of origami lies in its universal appeal and adaptability. Projects range from remarkably easy designs, perfect for introducing beginners to the foundational principles of paper folding, to incredibly complex creations that challenge even the most seasoned paper artists. Regardless of your age or skill level, there’s an origami project waiting to spark your interest and ignite your creative spirit. It’s a fun, accessible hobby that promises endless hours of engaging activity and the immense satisfaction of creating something beautiful with your own hands.
RELATED: How to Make a Simple Paper Heart
Discover the Enduring Charm of Paper Daffodils
As an enthusiastic crafter, I’ve had the pleasure of exploring numerous origami projects, and my fascination with this art form shows no signs of waning. There’s a particular magic in watching a flat sheet of paper transform into something intricate and beautiful with each deliberate fold. While a vast world of advanced origami designs still beckons, I often gravitate towards simpler, yet equally stunning projects – especially when I desire a quick creative boost or a peaceful way to unwind. This is precisely why the paper daffodil has become one of my absolute favorites.
Daffodils, with their vibrant yellow, white, or orange hues and distinctive trumpet-shaped centers, are iconic symbols of spring, joy, and new beginnings. Recreating these cheerful blossoms in paper allows you to capture their timeless beauty and enjoy their radiant presence all year long, without the need for watering or sunlight! Despite the delicate and detailed appearance of these paper daffodils, I can assure you that the crafting process is remarkably straightforward. It’s so easy, in fact, that you’re likely to achieve a perfectly charming result on your very first try. Don’t just take my word for it; follow along and witness the magic for yourself!
Essential Materials for Your DIY Paper Daffodils
One of the many delights of origami is its minimalist approach to materials. You don’t need a vast array of specialized tools to create something truly spectacular. For this paper daffodil project, you’ll find most items are already on hand or easily accessible. Gathering your materials is the exciting first step towards bringing your beautiful paper flowers to life:
- Colored Paper: The heart of your daffodil! Choose vibrant yellow, cheerful orange, pristine white, or soft cream for the petals. For the central trumpet, a slightly darker or contrasting shade will add depth. Standard origami paper, typically 6×6 inches (15×15 cm), is ideal due to its perfect square shape and consistent weight. However, any square paper of medium weight (e.g., printer paper, construction paper, or light cardstock) will work beautifully. Feel free to experiment with different textures or subtle patterns to give your daffodils a unique character.
- Ruler: Crucial for precision! A ruler will ensure your initial paper squares are perfectly sized and your subsequent folds are accurate. In origami, precision leads to symmetrical and professional-looking results.
- Scissors: A sharp pair of scissors is essential for clean, straight cuts when preparing your paper squares. Clean edges contribute significantly to the overall neatness of your finished flower.
- Glue: While traditional origami often relies on interlocking folds, a little adhesive is key for securely assembling the petals of your daffodil. A standard craft glue stick, white school glue, or even a hot glue gun (especially recommended for thicker papers) will work wonderfully to ensure your petals stay firmly joined.
- Pencil: Handy for marking precise cut lines before you start, or for lightly drawing guidelines for folds if you’re a beginner. Remember to use a light touch to avoid leaving visible marks on your finished daffodil. You might also use it for gentle shaping.
Step-by-Step Guide: Crafting Your Own Paper Daffodil
Now that you have all your materials ready, let’s dive into the fascinating process of folding. Follow these detailed instructions carefully, taking your time with each step, and you’ll soon have a beautiful paper daffodil in your hands. Remember, patience and precision are your greatest allies in origami!
- Step 1: Prepare Your Paper Squares.
Begin by taking your chosen colored paper. For one complete daffodil, you will need five individual square pieces of paper, each for a single petal. A good starting size for a noticeable daffodil is approximately 6×6 inches (15×15 cm). Use your ruler and pencil to meticulously mark out your squares, then cut them cleanly with your scissors. Accuracy here is crucial, as perfectly square paper is the foundation for a well-formed origami creation. Set aside five identical squares. - Step 2: Initiate the Diagonal Fold.
Take one of your freshly cut paper squares. Position it in front of you so that it looks like a diamond – with one corner pointing directly upwards. Carefully fold the paper diagonally in half, bringing the bottom corner upwards to meet the top corner. Press firmly along the resulting crease with your fingers (or a bone folder) to create a sharp, defined fold. This action will transform your square into a perfect triangle. - Step 3: Create the Upward Corner Folds.
Keep your folded triangle oriented with its longest, open edge at the bottom and the single, closed point facing upwards. Now, take the bottom-left corner of the triangle and fold it upwards, aligning its edge neatly along the central vertical crease of the triangle. Repeat this exact fold with the bottom-right corner, bringing it up to meet the center line as well. You should now have a shape that somewhat resembles a smaller diamond or a house roof atop the base. Ensure both folds are symmetrical and perfectly centered. - Step 4: Unfold and Prepare for Side Folds.
Gently unfold the two corners you just folded in Step 3. You will now clearly see the crease lines you created. Next, focus on the left section of the paper. Fold this section inwards along its natural crease, essentially bringing the outer edge towards the central vertical line. Repeat this precise fold for the right section, also folding it inwards along its corresponding crease. The goal here is to create a narrower, elongated shape, preparing the petal for its more three-dimensional aspects. - Step 5: Open and Form the Inner Shape.
This step introduces a crucial three-dimensional element. Carefully open both of the sides you just folded in Step 4. Now, gently insert your finger into the pocket created by each fold. As you insert your finger, carefully flatten the paper outwards, pushing the inner corner down to create a new, distinct triangular flap on each side. This action transforms the flat folds into volumetric components, giving your petal its initial curved form. - Step 6: Fold into a Tulip Position.
With the inner shapes formed, take the entire structure and fold it upwards along a central horizontal line. This specific fold will position the flaps in a way that creates a curved, layered look, often referred to as a “tulip position.” This gives the petal a natural, slightly cupped appearance, which is essential for achieving the characteristic daffodil shape. Ensure your crease is firm and even. - Step 7: Refine the Pointed Corners.
Observe your structure in the tulip position. You’ll notice there are pointed corners on the sides. Carefully fold these pointed corners inwards and slightly downwards. This subtle but important fold helps to soften the edges of your petal, giving it a more rounded, organic, and realistic shape, much like a natural daffodil petal. Strive for symmetry here to ensure all your petals have a uniform look. - Step 8: Re-fold the Left and Right Sections.
To further define and reinforce the petal’s structure, revisit the left and right sections that you previously worked with in Step 4. Re-fold these sections inwards, in half. This time, these folds will be tighter and sharper, contributing to the petal’s final contoured shape and adding a sense of dimension. Ensure these folds are crisp and neat for a polished finish. - Step 9: Secure the Edges with Glue.
With your petal now fully shaped, it’s time to make it permanent. Apply a small, neat amount of glue along the inner edges of the folds you created in Step 8. Carefully press these edges together, holding them firmly for a few seconds until the glue begins to set. This will create a sturdy, individual petal unit that holds its form beautifully. Repeat this gluing process for all five petals to ensure they are robust. - Step 10: Craft All Five Petals.
Congratulations! You’ve successfully completed one daffodil petal. To form a complete, classic daffodil, you will need five such petals. Now, repeat Steps 1 through 9 for your remaining four paper squares. Take your time with each one, enjoying the rhythmic process of folding. This repetition will not only give you the necessary components but also help you perfect your folding technique, making each subsequent petal even better. - Step 11: Assemble Your Daffodil Petals.
Now for the exciting final step: assembling your beautiful petals into a complete daffodil! Lay out your five finished petals. Take two petals and apply a thin, even line of glue along one of the flat side edges of the first petal. Carefully press the corresponding flat side edge of the second petal against the glued edge of the first, aligning them perfectly. Hold firmly for a few moments until the glue creates a strong bond. Continue this process, gluing each subsequent petal to the last, until all five are joined together in a circular formation, completing the main flower head of your stunning paper daffodil.
Your Beautiful Paper Daffodil is Complete!
And there you have it! A truly stunning, handcrafted paper daffodil, brought to life through your own skillful folds and careful assembly. Take a moment to admire your creation – the intricate details, the vibrant colors you chose, and the delicate, yet sturdy, form. This project not only yields a beautiful result but also deepens your appreciation for the elegant simplicity and profound artistry of origami. Each petal is a testament to your patience and creativity.

Creative Ways to Display Your Paper Daffodils
Now that you’ve mastered the delightful art of folding these cheerful daffodils, it’s time to showcase your beautiful creations! These versatile paper flowers can add a touch of handmade elegance and vibrant charm to various settings. Here are some inspiring ideas for how you can incorporate your origami daffodils into your home decor, special occasions, and thoughtful gifts:
Home Decoration
- Elegant Bouquets and Centerpieces: Arrange a collection of your origami daffodils in a stylish vase or pitcher to create a stunning, long-lasting centerpiece for your dining table, mantelpiece, or entryway. Unlike real flowers, these will never wilt, bringing perpetual cheer and a touch of spring to your home, no matter the season.
- Wreath Enhancements: Infuse a burst of spring into your front door decor by carefully attaching a few well-placed paper daffodils to a simple greenery wreath. They can complement artificial foliage or stand alone as a vibrant, minimalist statement piece.
- Wall Art and Garlands: For a unique touch, mount a series of varying-sized daffodils on a canvas or within a shadow box to create an eye-catching piece of 3D wall art. Alternatively, string several together on a delicate twine to form a charming garland that can adorn a window, fireplace, or even a nursery wall.
- Shelf and Desk Accents: A single, perfectly folded daffodil, or a small cluster, can instantly brighten up a bookshelf, home office desk, or bedside table, adding a personalized, artistic touch to your everyday spaces and infusing them with a sense of handmade warmth.
Special Occasions
- Wedding Decor: Incorporate these elegant paper flowers into wedding favors, use them to adorn escort card displays, or even add them as charming, sustainable additions to bridal bouquets for a truly unique and handmade touch that guests will cherish as a keepsake.
- Easter Celebrations: Daffodils are synonymous with the renewal and joy of Easter. Use them to decorate your Easter baskets, create festive table settings, craft charming place cards for your holiday meal, or even hide them as part of an indoor Easter egg hunt for a delightful surprise.
- Mother’s Day Tributes: Present a beautifully handcrafted bouquet of paper daffodils to Mom, or use them to adorn a special Mother’s Day brunch table. It’s a thoughtful, personal gift that conveys immense care and appreciation, lasting far longer than fresh blooms.
- Birthday Parties: Brighten up any birthday celebration by using paper daffodils as whimsical party decorations, securing them as cupcake toppers (ensure they are food-safe), or adding them as unique embellishments for gift bags. They can effortlessly match a variety of party themes.
- Baby Showers: Celebrate new beginnings and the arrival of a little one with cheerful daffodil decorations, perfect for spring-themed baby showers, symbolizing growth, happiness, and innocence.
Thoughtful Gifts
- Greeting Card Embellishments: Elevate a simple greeting card by attaching a mini paper daffodil to the front. It transforms a flat card into a memorable, three-dimensional keepsake that feels truly special and personalized.
- Gift Box Toppers: Replace traditional plastic bows with a beautiful, handmade paper daffodil for an eco-friendly and uniquely personalized gift-wrapping touch. It adds an extra layer of thoughtfulness to any present.
- Bookmarks: Attach a small, flattened daffodil to a sturdy strip of cardstock for a charming handmade bookmark – a perfect and practical gift for avid readers and book lovers.
- Keepsakes and Mementos: Frame a perfectly folded daffodil or incorporate it into a scrapbook or memory box to preserve a beautiful moment, mark a special occasion, or simply cherish a handcrafted piece of art.
- Small Tokens of Appreciation: A single paper daffodil can be a wonderful small token of appreciation for a teacher, a neighbor, or a colleague, showing you took the time to create something special.
If you’ve thoroughly enjoyed this crafting adventure and are eager to explore more creative DIY projects, we warmly invite you to join our vibrant community! Visit our official website for a treasure trove of inspiring ideas and tutorials. For daily doses of crafting inspiration, follow our Facebook page, where we share new projects and engaging content regularly. And for immersive, step-by-step video guides that bring crafts to life, be sure to subscribe to our YouTube channel. Let’s create something wonderful together!

Pro Tips for Perfect Paper Daffodils
Elevate your origami daffodil crafting with these expert tips and tricks. Whether you’re aiming for a flawless finish or looking to experiment with new creative avenues, these insights will help you achieve the best results and truly personalize your paper flowers:
- Choosing the Right Adhesive: The type of glue can make a significant difference. While a standard craft glue stick or white school glue works well for regular paper, if you’re working with thicker cardstock or textured art paper, a hot glue gun will provide a stronger, faster bond when joining the petals. Apply small, controlled dots of hot glue to avoid excess bulk. For delicate or thin papers, a clear-drying liquid craft glue is often sufficient and leaves no residue.
- Paper Weight Matters: The weight of your paper directly impacts the final appearance and durability of your daffodil. A heavier paper (e.g., cardstock, specialized origami paper, or even scrapbook paper) will give your daffodil more rigidity and a professional, sculptural finish, helping it maintain its shape beautifully over time. However, thicker paper can be more challenging to fold precisely and requires extra pressure for sharp creases. Conversely, lighter paper is easier to fold but might result in a less durable flower. Experiment with different weights to find your preferred balance of ease of folding and structural integrity.
- Layering for Depth and Variety: Don’t limit yourself to single-color petals! For a more intricate and realistic daffodil, try layering two different shades or even textures of paper for each petal before you begin folding. For example, a slightly darker yellow on top of a lighter yellow. You could also create smaller “inner” petals from a contrasting color (like orange or a deeper yellow) to form the central trumpet, giving your daffodil a multi-dimensional, more authentic look. Simply align the two pieces of paper and follow the folding steps as usual.
- Adding Stems and Leaves: To transform your individual daffodils into a complete bouquet or a more lifelike display, consider adding paper stems and leaves. You can easily create stems by tightly rolling strips of green paper or by using floral wire wrapped in green floral tape for more flexibility. For leaves, simply cut elongated oval or blade-like shapes from green paper and attach them to the base of your flower or along the stem with a dab of glue.
- Color Palette Exploration: While classic yellows and oranges are the traditional choice for daffodils, don’t hesitate to unleash your creativity and experiment with unconventional color palettes! Imagine a stunning bouquet of soft pink, serene lavender, elegant metallic gold, or even a mixed assortment of pastel paper daffodils for a truly unique and modern aesthetic that perfectly matches your decor or mood.
- Practice Makes Perfect: Origami is a skill that refines with practice. Don’t be discouraged if your first few attempts aren’t absolutely flawless. Each fold teaches you something new about paper manipulation and precision. Start with less expensive scrap paper to get a feel for the steps and techniques before using your best colored sheets for the final products.
- Troubleshooting Common Folds: If you find a particular fold difficult to achieve, pause, re-examine the image or instructions, and try again. Sometimes, a slight adjustment in the angle or the amount of pressure applied makes all the difference. For very crisp folds, especially with thicker papers, you can use a bone folder or the blunt edge of a ruler to press along the creases firmly.
Embrace the Art of Origami Daffodils
Creating origami daffodils is a truly rewarding and enriching experience, perfectly blending simple, accessible techniques with surprisingly stunning results. This project offers a fantastic entry point into the enchanting world of paper folding, proving that beautiful, intricate art doesn’t require complex tools, expensive materials, or years of practice. The journey of transforming a flat sheet of paper into a vibrant, three-dimensional flower is a testament to the magic and accessibility of origami.
Whether you’re crafting these cheerful blossoms for elegant home decor, as thoughtful and personalized gifts for loved ones, or simply for the meditative joy and satisfaction of creation, these paper daffodils are sure to bring a smile to your face and brighten the days of those around you. We sincerely hope this comprehensive guide has inspired you to pick up some paper and embark on your own folding adventure. Gather your materials, follow the steps, and let your creativity blossom!