
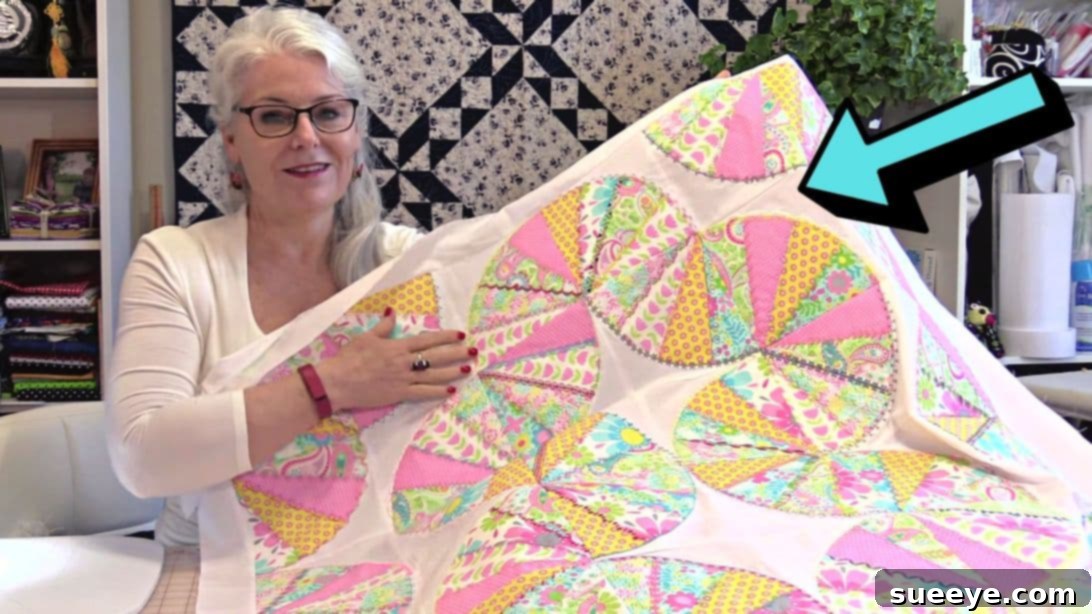
Embark on a creative journey into the world of quilting with this beautifully designed, yet remarkably simple, modern crazy quilt block project. Brought to you by the expert quilters at SewVeryEasy on YouTube, this tutorial transforms humble fat quarters and a complementary background fabric into a captivating piece of textile art. Whether you’re a seasoned quilter looking for a quick and satisfying project or a beginner eager to dive into the joys of sewing, this guide promises an engaging experience. The beauty of this quilt lies in its versatility and ease of construction, allowing you to personalize every aspect. Once complete, these charming blocks can be assembled into a unique gift for a loved one, or they can become a cherished addition to your own home decor. No matter your intention, crafting this modern crazy quilt is an endeavor you’ll truly enjoy and find immensely rewarding.
The Enduring Charm of Crazy Quilting: A Modern Twist
Crazy quilting, a beloved technique with roots stretching back centuries, is known for its asymmetrical blocks and often elaborate embellishments. Traditionally, crazy quilts were a way to utilize fabric scraps, often from luxurious materials like silk, velvet, and satin, combined with intricate embroidery to create a rich, tapestry-like effect. While these historical pieces are stunning, the term “crazy” can sometimes intimidate new quilters. This tutorial, however, introduces a delightful “modern way” to crazy quilt, simplifying the process without sacrificing its unique visual appeal.
The modern crazy quilt block focuses on clean lines, strategic fabric placement, and a more understated approach to embellishment, making it much more accessible for contemporary crafters. Instead of focusing on dozens of tiny, irregularly shaped pieces and intricate handwork, this method uses a structured approach to create a visually dynamic block that still embodies the “crazy” spirit of spontaneous design. It’s an excellent way to experiment with color, pattern, and texture, making the most of your fat quarter stash or even those cherished fabric scraps you’ve been saving.
Essential Materials for Your Modern Crazy Quilt Project
Before you begin sewing, gathering all your materials is key to a smooth and enjoyable crafting process. This project is particularly appealing because it makes excellent use of fat quarters, which are pre-cut fabric pieces (typically 18×22 inches) perfect for smaller projects and building a diverse fabric collection. Here’s what you’ll need:
- Fat Quarters: These will form the “crazy” elements of your blocks. Choose a variety of prints and colors that complement each other. Consider a mix of large and small prints, solids, and tone-on-tones to add visual interest. The number of fat quarters will depend on how many blocks you plan to make and how “scrappy” you want your quilt to look.
- Background Fabric: This fabric provides a consistent base for your blocks, allowing the “crazy” sections to truly pop. A solid color, a subtle print, or a low-volume print (one that reads as a solid from a distance) often works best to unify the design and provide a calming contrast to the busy fat quarter pieces.
- Ruler: A clear acrylic ruler with precise measurements is indispensable for accurate cutting. A larger ruler (e.g., 6×24 inches) is helpful for initial cuts, while a smaller square ruler (e.g., 6.5×6.5 inches) can be useful for squaring up blocks.
- Scissors or Rotary Cutter and a Cutting Mat: For efficiency and precision, a rotary cutter and self-healing mat are highly recommended. They allow for quick, straight cuts through multiple layers of fabric. Sharp fabric scissors are also essential for trimming threads and smaller cuts.
- Needle and Thread: All-purpose polyester thread is suitable for quilting. Choose a neutral color (like grey or beige) that blends with most fabrics, or select a thread color that matches your background fabric.
- Iron, for pressing: A good iron and ironing board are crucial. Proper pressing at each stage helps your seams lay flat, ensures accurate piecing, and gives your finished blocks a professional appearance.
- Sewing Machine: A functional sewing machine is at the heart of this project. Ensure it’s in good working order and has a fresh needle suitable for quilting (a universal or sharp needle, size 80/12 or 90/14, is usually appropriate).
- Pattern: (Click here to download the pattern) The downloadable pattern provides the specific template needed for shaping your crazy quilt blocks, ensuring consistent results. Print it accurately and cut it out carefully.
Step-by-Step Guide: Crafting Your Modern Crazy Quilt Block
Let’s dive into the exciting process of bringing your fabric to life. Follow these detailed steps to construct your beautiful modern crazy quilt blocks.
Step 1: Preparing Your Fabric and Assembling Triangle Units
The foundation of a great quilt lies in meticulous preparation. Begin by pressing all your chosen fat quarters and background fabric until they are wonderfully smooth and flat. This removes any creases or wrinkles that could distort your measurements and affect the accuracy of your cuts.
Next, carefully cut your fat quarters. From each fat quarter, you will need to cut 12 rectangular pieces, each measuring approximately 3¼ inches by 8 inches. The precision here is important for the subsequent steps. Once you have your rectangles, take each piece and cut it in half diagonally. This will yield two identical triangles from each rectangle. Repeat this process until you have a good selection of triangles from various fat quarters.
Now, select two triangles that feature different patterns and colors. This contrast will be key to creating the “crazy” visual effect. Place these two triangles together, ensuring their right sides are facing each other. Carefully align their pointed edges so they match up perfectly, as demonstrated clearly in the SewVeryEasy video tutorial. This precise alignment is crucial for forming neat corners. With your triangles aligned, sew them together down one of their long sides, using a consistent ¼-inch seam allowance. After stitching, take your unit to the ironing board and press the seam open. Pressing seams open helps to reduce bulk, ensuring your block lays flat and smooth. Repeat this entire process to create a second identical unit.
Step 2: Constructing the Block and Adding Decorative Touches
With your two triangle units prepared, it’s time to bring them together to form the core of your crazy quilt block. Place the two units you just created together, with their right sides facing. Carefully align their raw edges and sew them together down one side, again maintaining that precise ¼-inch seam allowance. Once stitched, press this newly formed seam open, ensuring your patchwork lies as flat as possible. This meticulous pressing routine is a hallmark of professional-looking quilt blocks.
Now, retrieve your printed pattern template. Lay this template directly on top of your assembled patchwork unit. The template is designed to guide you in creating the distinctive curved shape of the modern crazy quilt block. Using your sewing machine, carefully sew along the curved line indicated on the template. This step requires a steady hand and possibly a slower speed to navigate the curve smoothly. After sewing, precisely trim off any excess fabric that extends beyond the sewn curved line. This will reveal the initial curved edge of your block.
Take the sewn template and fold it over to the other side of your patchwork. Next, lay this entire unit on top of a chosen background fabric square. The background fabric will frame your crazy piecing and give the block a cohesive feel. This is where you can add your personal touch! Using either topstitching or embroidery, sew along the newly formed curves and each of the seams within your patchwork. This not only secures the pieces to the background fabric but also adds beautiful decorative detail, enhancing the “crazy” aesthetic in a controlled, modern way. You can choose a contrasting thread color for your topstitching to make it stand out, or a matching thread for a more subtle texture.
Once you’ve added your decorative stitching, press both sides of the block flat and nicely. Then, using your ruler and rotary cutter, carefully square up the sides of the block. This means trimming the edges so that the block forms a perfect square, typically to a standard size (e.g., 10.5 inches or 12.5 inches, depending on your desired final block size and the template dimensions). Squaring up is vital for ensuring all your blocks will fit together seamlessly when it’s time to assemble your quilt top. Repeat this entire process to create as many blocks as you need for your desired quilt project.
Finally, once you have a collection of these stunning blocks, you can lay them out and assemble them however you wish. Experiment with different arrangements on the floor or a design wall until you find a layout that speaks to you. Then, stitch them together piece by piece, row by row, to form your complete quilt top. And just like that, you’re all done with the main construction!
Tips for a Flawless and Enjoyable Quilting Experience
To ensure your modern crazy quilt project is both successful and fun, consider these additional tips:
- Consistent Seam Allowance: The ¼-inch seam allowance is a quilter’s best friend. Strive for consistency in every stitch. A quarter-inch foot for your sewing machine can be incredibly helpful.
- Sharp Tools: Always use a sharp rotary cutter blade and a fresh sewing machine needle. Dull tools can lead to inaccurate cuts, fabric snags, and frustration.
- Chain Piecing: To save time, especially when creating multiple units in Step 1, consider chain piecing. This involves sewing pieces one after another without cutting the thread in between, creating a “chain” of units.
- Test Stitching: Before starting on your actual fabric, do a few test stitches on a scrap piece to check your tension and stitch length.
- Pressing vs. Ironing: Remember that in quilting, we typically “press” (lift and place the iron) rather than “iron” (slide the iron back and forth). Pressing helps to set seams and prevents fabric distortion.
- Fabric Scraps: This project is fantastic for using up those smaller fabric scraps from other projects. Don’t be afraid to mix and match patterns and colors for a truly unique look.
- Take Your Time: Quilting is a journey, not a race. Enjoy each step, and don’t hesitate to pause if you feel overwhelmed.
Creative Variations and Personalizing Your Quilt
One of the greatest joys of quilting is the ability to infuse your personal style into every project. The modern crazy quilt block is highly adaptable:
- Color Palettes: Experiment with different color schemes. Go for a monochromatic look, a vibrant rainbow, or a sophisticated collection of neutrals. The choice of fat quarters can dramatically change the quilt’s overall feel.
- Embellishments: While the “modern” approach often means simpler embellishments, you can still add a touch of sparkle. Consider subtle beads, decorative stitches by hand, or even small fabric yo-yos to some of your blocks.
- Quilt Size: Assemble just a few blocks for a charming table runner or a decorative wall hanging. Combine many blocks to create a cozy throw, a baby quilt, or even a full-sized bed quilt.
- Border Ideas: Frame your assembled quilt top with various borders. A simple solid border can highlight the “crazy” blocks, while pieced borders can add extra complexity and visual interest.
Why Choose This Modern Crazy Quilt Block Project?
This SewVeryEasy modern crazy quilt block project stands out for several compelling reasons. It’s an accessible entry point for beginners to learn fundamental quilting skills like accurate cutting, precise piecing, and effective pressing. For experienced quilters, it offers a quick and satisfying project that yields stunning results with minimal effort. The use of fat quarters makes fabric selection fun and manageable, often utilizing fabrics that might otherwise sit unused. Ultimately, the ability to create something beautiful, functional, and deeply personal with your own hands is an incredibly rewarding experience. Each block you create is a small masterpiece, and together, they tell a unique story of creativity and craftsmanship.
Further Learning and Inspiration from SewVeryEasy
The clear and encouraging instructions provided by SewVeryEasy make this project an absolute delight. Her YouTube channel is a treasure trove of quilting and sewing tutorials, offering a wide array of projects for all skill levels. If you enjoyed creating this modern crazy quilt block, we highly recommend exploring her other videos for more inspiration, innovative techniques, and helpful tips to expand your sewing repertoire.
*All image credit belongs to SewVeryEasy via YouTube. Follow and subscribe to her channel for more amazing tutorials and creative ideas!