
Craft Your Own Enchanting Tree Fairy Garden: A Complete DIY Guide
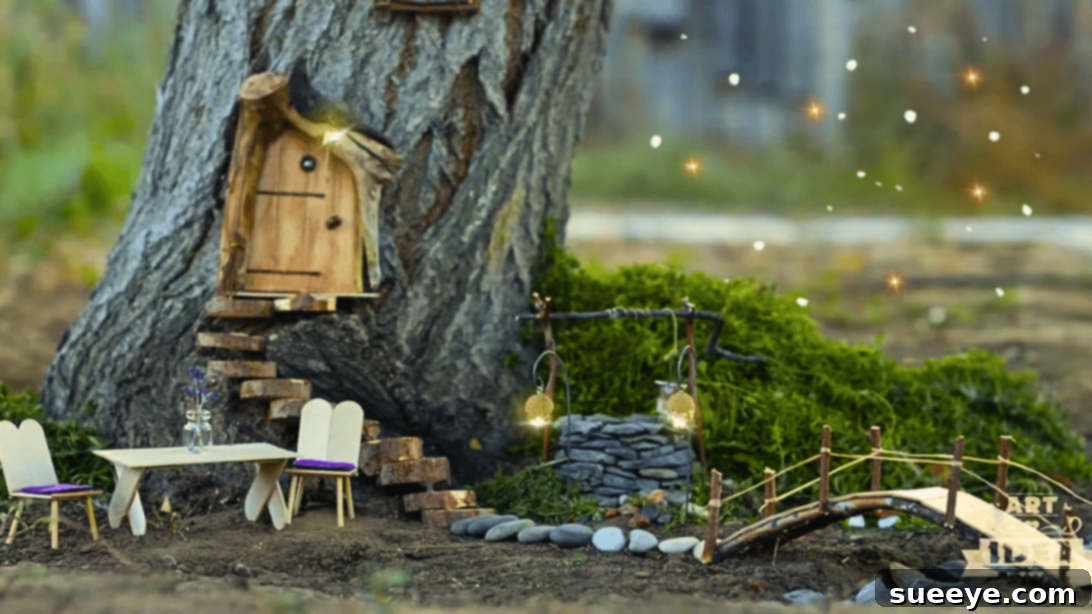
If you’ve ever dreamt of adding a touch of magic and whimsy to your outdoor space, building a fairy garden on a tree or tree stump is an absolutely enchanting project. This delightful craft allows you to create a miniature world where tiny mythical creatures might reside, bringing a sense of wonder to your backyard, patio, or garden. Whether you’re a seasoned crafter or looking for a fun, creative activity to do with family, this comprehensive guide will walk you through transforming an ordinary tree into an extraordinary, captivating fairy realm.
This fantastic project idea, inspired by the creative minds at Art IDEA on YouTube, is perfect for anyone who loves fairy-themed crafts. It’s also an excellent opportunity to put those ready-made fairy pieces you’ve collected to good use. If you have a sturdy tree in your yard, a weathered old tree stump, or even a large planter, you have the ideal canvas for this magical endeavor. Imagine the joy of discovering a tiny bridge, a miniature cottage, and a charming seating area nestled against the bark of your favorite tree!
Creating a magical fairy garden is surprisingly straightforward and doesn’t require advanced crafting skills. One of the most rewarding aspects of this DIY project is the potential for repurposing. You can craft many fairy pieces from everyday items often considered trash, like small tree branches, shells, pebbles, or even broken pottery shards. The more items you can reuse and transform, the more unique and eco-friendly your fairy garden will be. This approach not only saves money but also adds a personal touch and story to each element. For a deeper dive into crafting charming tree stump fairy houses, you might find this related guide insightful: How to Make a DIY Tree Stump Fairy House.
Why Bring a Fairy Garden to Your Tree?
There’s something inherently magical about miniature worlds, and a fairy garden offers a unique blend of creativity, nature connection, and imaginative play. Building one on a tree or tree stump enhances this appeal by integrating the natural landscape directly into your fantasy creation. The rugged bark of a tree provides a wonderfully textured backdrop, making the miniature structures feel perfectly at home. It’s an ideal project for all ages, encouraging creativity in children and providing a serene, engaging hobby for adults. Beyond the aesthetic appeal, a fairy garden can become a focal point, drawing eyes and sparking conversations, and it’s a fantastic way to utilize an otherwise overlooked part of your garden. It invites you to slow down, observe nature, and add a personal touch to your outdoor sanctuary, fostering a sense of peace and wonder.
Furthermore, fairy gardens offer a chance to embrace sustainable crafting. By using natural materials like small stones, twigs, moss, and leaves, alongside repurposed items, you minimize waste and connect more deeply with your environment. It’s a project that evolves over time, allowing for seasonal updates and new additions, keeping the magic alive year-round. This encourages ongoing engagement with your garden space and nurtures a connection to the changing seasons, making it a truly dynamic and fulfilling hobby.
Gather Your Enchanting Materials and Essential Tools
Before embarking on your journey to create a miniature wonderland, gathering all your materials and tools is crucial. You have the flexibility to either purchase ready-made fairy garden accessories from craft stores or dollar stores, which offer convenience and a wide variety of designs, or unleash your creativity by making many pieces from scratch. Crafting your own elements adds a truly unique and personalized touch that store-bought items simply can’t replicate, imbuing your garden with your own artistic flair.
Essential Materials for Your Tree Fairy Garden:
- Craft Wood Slices: These versatile pieces will form the stairs leading up to your fairy house, creating a charming and rustic path. Look for various sizes; smaller ones can be used for individual steps, while larger, flatter ones can serve as platforms or landing areas. You can find these readily at craft stores, or if you’re feeling resourceful and have access to fallen branches, slice thin pieces yourself for an even more natural feel.
- Fairy House: The undisputed centerpiece of your garden! You can purchase a ready-made house from places like Dollar Tree, specialty craft stores, or online retailers. Alternatively, get wonderfully creative and build one from natural materials like bark, sturdy twigs, acorn caps, small gourds, or even repurposed tin cans decorated with natural elements. A handmade house adds immense character and a unique story to your fairy dwelling.
- Fairy Window: A tiny window attached to your tree or house adds depth, realism, and a touch of whimsy. Again, these are often available at craft stores. For a DIY approach, you can craft one from thin wood, sturdy cardboard, or even painted popsicle sticks, giving it a truly bespoke look.
- Miniature Bridge: A small bridge creates a sense of journey and connects different parts of your garden’s landscape. Look for mini wooden bridges in craft stores or fashion one yourself from small, sturdy twigs carefully glued together to form a charming arch.
- Chair and Table Set: Every discerning fairy needs a place to rest and gather! These miniature furniture pieces can be bought as a set, offering instant charm, or easily made. Popsicle sticks, small flat stones, bottle caps, or even intricately carved bark can be transformed into charming chairs and tables, allowing for endless customization.
- Water Well: A tiny wishing well adds an adorable and classic focal point to any fairy garden. Craft stores often carry these ready-made. Alternatively, you can construct one from small stones, pebbles, or a section of a small PVC pipe decorated with natural elements like moss and twigs to mimic an ancient structure.
- Decorative Rocks and Pebbles: These are absolutely essential for pathways, borders, defining different areas, and general landscaping within your miniature world. Collect various sizes and colors from your garden, a nearby stream, or purchase decorative gravel from a garden center. They add crucial texture and help delineate spaces within your miniature landscape, creating visual interest.
- Greenery: Bring your garden to life with lush miniature plants! This can include living moss (which thrives in shaded, damp conditions), small hardy succulents (for sunnier spots), tiny ferns, or high-quality artificial greenery designed for model landscapes. Moss is particularly effective for creating a rich, ancient, and enchanting forest floor feel, making your garden truly magical.
Tools You’ll Need:
- Hot Glue Gun and Glue Sticks: This will be your primary tool for attaching pieces securely to the tree trunk and to each other. Ensure you have a generous supply of glue sticks on hand, as you’ll be doing a lot of attaching. Always exercise caution when using a hot glue gun to prevent burns.
- Small Shovel or Trowel (Optional): This can be incredibly useful if you plan to dig shallow paths or indentations in the soil around the base of the tree for your landscape elements, ensuring they sit naturally.
- Craft Knife or Scissors (Optional): Handy for trimming excess materials, shaping smaller pieces, or refining details, especially if you’re making elements from scratch. A sharp knife can also help in scoring wood slices if needed.
How to Craft Your Magical Tree Fairy Garden: A Step-by-Step Guide
With your materials gathered and your imagination ready to take flight, it’s time to bring your fairy garden to life! Follow these carefully detailed steps to build an enchanting miniature world directly onto your chosen tree or tree stump. Remember, creativity is paramount, so feel free to adapt these instructions to suit your unique vision, available materials, and the specific characteristics of your tree.
Step 1: Laying the Foundation – Creating Charming Stairs and the House Base
The very first step in inviting fairies to your tree is to provide them with a welcoming and sturdy entrance. Begin by carefully selecting the ideal spot on your tree where you envision the main gateway to your fairy realm. This could be near the base, nestled amongst roots, or slightly higher up if your tree has interesting crevices or a flat area that provides a natural shelf. Take your craft wood slices and, using a generous amount of hot glue, carefully adhere them along the bottom of the tree trunk, forming a series of charming steps. Start with larger, more stable slices at the bottom and gradually use smaller ones as you ascend, creating a natural-looking and organic staircase. Ensure each slice is firmly attached to the tree bark, capable of withstanding the elements and remaining secure over time.
Once your whimsical stairs are securely in place, adhere a slightly larger, flatter wood slice beside the top of the stairs. This piece will serve as a small landing or a miniature patio area, providing a transition point. On this newly created landing, place a solid, small piece of wood or a flat, stable stone to act as the base for your fairy house. This base is crucial as it will elevate the house slightly, protecting it from ground moisture and providing a perfectly level surface for the secure placement of your fairy dwelling. Take your time with this foundational step, as a well-constructed base sets the stable stage for the entire enchanting garden.
Step 2: Building the Fairy Home and Designing Water Features
Now comes the most exciting part: constructing the heart of your fairy garden – the house itself! Apply a generous and even amount of hot glue to the bottom of your chosen fairy house and firmly stick it onto the prepared base you created in Step 1. Hold it in place for several moments, applying gentle pressure, until the glue cools and sets completely, ensuring a strong bond. Next, enhance the dwelling’s appeal by attaching a miniature window to the side of the house or directly onto the tree trunk nearby, positioned as if tiny eyes are peeking into the fairy abode. This small, intricate detail adds immense charm and believability to your miniature world.
On the side of the bottom of the stairs, find a suitable and aesthetically pleasing spot to place your miniature water well. Secure it firmly with hot glue to the ground or a small, flat stone base. To enhance its natural appeal and make it look truly integrated, decorate the well with more small rocks and bits of greenery, such as moss or tiny plant cuttings, arranged artfully around its base. This makes it appear as though it has been there for ages, a natural part of the ancient woodland. To create a natural-looking path leading away from the stairs and the well, gently dig a shallow indentation or groove in the soil near the base of the stairs. Fill this carefully sculpted path with decorative rocks and pebbles, creating a realistic and inviting miniature walkway for the fairies to stroll along.
Step 3: Connecting Worlds – Adding a Bridge, Furniture, and Magical Details
With the main structures firmly in place, it’s time to add connectivity and functional living spaces to your fairy garden. Place your miniature bridge gracefully over the rock-filled path you just created, ensuring it spans the gap naturally. Secure both ends with hot glue to the surrounding rocks or directly to the ground, making sure it’s stable. Add more decorative rocks and pebbles to seamlessly connect the bridge to the base of the stairs and the path, making it look like a natural and integral part of the overall miniature landscape. This creates a cohesive and flowing design.
To truly bring your fairy garden to life, consider adding some enchanting DIY lights. These could be discreet, battery-operated LED fairy lights woven amongst the greenery, or even tiny handcrafted lanterns made from beads, wire, or translucent paper, giving your garden a magical, soft glow at dusk. Next, create a cozy outdoor living area for your fairy residents. You can easily make a charming table and chairs using small craft sticks (like popsicle sticks), sturdy twigs, or flat pebbles. Place this miniature furniture set strategically on the side of the bottom of the stairs, perhaps opposite the water well, creating a balanced and inviting scene for imaginary gatherings.
Finally, continue to add more decorations and personal touches to your fairy garden. This is where your imagination can truly flourish! Think about incorporating tiny handcrafted mushrooms, miniature garden tools, tiny clotheslines with minuscule laundry, or even small animal figurines to populate your world. Arrange pieces of greenery and moss strategically to create lush landscapes, hidden nooks, and secret hideaways. Each additional detail makes your fairy garden more personal, more intricate, and utterly enchanting, inviting endless storytelling and wonder.
Personalizing Your Enchanted Realm: Tips for Customization
The true beauty of a DIY fairy garden lies in its boundless ability to reflect your personal style and imagination. Don’t be afraid to experiment with different themes and aesthetics. Perhaps your resident fairies are ancient woodland sprites who thrive on natural elements and earthy tones, or maybe they’re whimsical adventurers who appreciate vibrant colors and quirky details. Consider adding seasonal touches to keep your garden dynamic and fresh: tiny pumpkins for autumn harvest festivals, miniature snowmen and icicles for a winter wonderland, or vibrant faux flowers for a burst of spring and summer cheer. Incorporate tiny living plants like delicate mosses, resilient air plants, or small succulents to add organic beauty and a touch of life that naturally grows and changes over time, bringing genuine vibrancy to your miniature world. You can also build miniature fences, delightful swings, or even tiny signposts to playfully guide human visitors and imaginary creatures alike through your magical landscape. The possibilities for personalization are truly endless, limited only by the extent of your creative spirit!
Maintaining Your Miniature Wonderland for Lasting Magic
To ensure your tree fairy garden remains a source of joy and enchantment for seasons to come, a little thoughtful maintenance goes a long way. Regularly check for any pieces that might have come loose due to weather exposure, natural tree growth, or the playful curiosity of local critters, and promptly re-glue them as needed to prevent loss or damage. If you’ve used natural elements like living moss, mist them occasionally with water to keep them fresh, green, and vibrant, especially during dry spells. Protect your delicate garden from harsh weather conditions; extreme rain can dislodge items, while prolonged direct sun can fade colors or cause certain materials to degrade. Consider applying a clear, waterproof sealant to wooden or painted elements for added durability and weather resistance.
Over time, you might find joy in refreshing the greenery, introducing new miniature elements, or even rearranging existing pieces to create new narratives. This keeps the garden dynamic, perpetually enchanting, and reflective of your evolving creativity. Remember, this isn’t just a static display; it’s a living piece of art, and it will charmingly evolve alongside your imagination and the ever-changing natural world around it. Enjoy the ongoing process of nurturing your miniature wonderland!
All inspiring images for this captivating DIY project are graciously credited to Art IDEA via YouTube. We extend our sincere gratitude to their channel for sharing such wonderful craft ideas and inspiring creativity. We highly recommend visiting their channel for more inspiring DIY projects and subscribing to stay updated with their latest enchanting creations!