
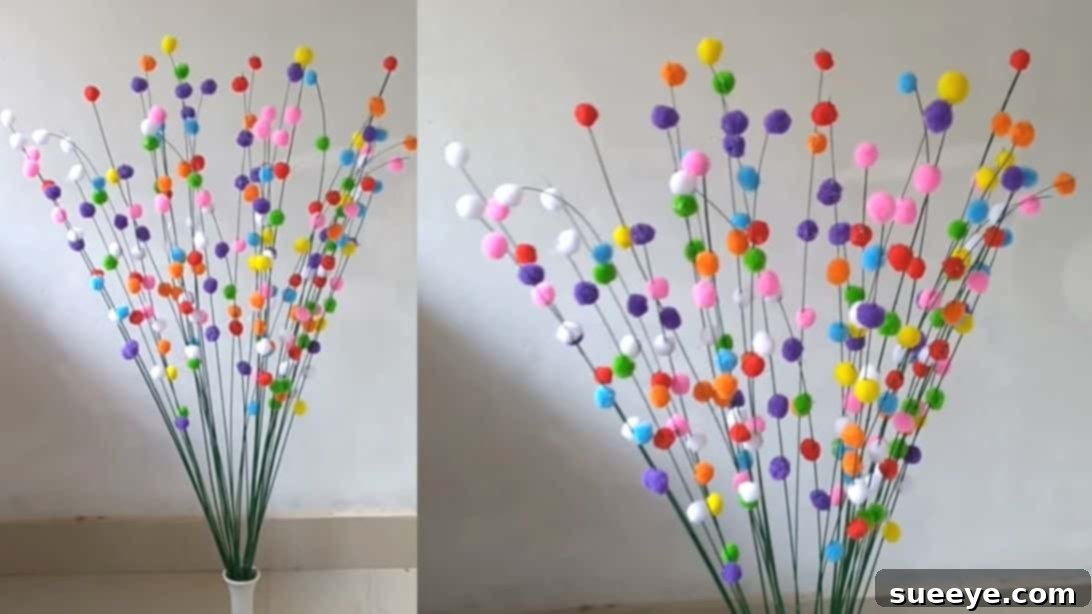
DIY Colorful Broomstick Craft: Easy & Vibrant Home Decor Ideas
Are you searching for that perfect decorative piece to infuse a burst of color into a dull or understated corner of your home? Look no further! This delightful and vibrant broomstick craft DIY by Yami Crafting on YouTube offers an incredibly simple yet highly impactful solution. We are absolutely captivated by this project; it’s astonishingly easy to create and promises to instantly enliven any space with its playful charm. Best of all, you only need a handful of readily available materials to bring this captivating decor to life.
Gone are the days of sterile, uninspired home decor. Embrace the joy of crafting and personalize your living environment with this unique broomstick project. Whether you’re a seasoned DIY enthusiast or a beginner looking for a fun weekend activity, this guide will walk you through every step, ensuring a beautiful result that reflects your personal style. Imagine a dull entryway or a forgotten shelf suddenly becoming a focal point, radiating warmth and creativity. This craft isn’t just about making something pretty; it’s about adding personality and a handmade touch that mass-produced items simply can’t replicate.
Why Choose This Colorful Broomstick Decor?
In a world brimming with off-the-shelf decorations, a handmade piece like this vibrant broomstick craft stands out. Here’s why this DIY project is an absolute must-try for anyone looking to refresh their home:
- Unleash Your Creativity: This project offers boundless opportunities for personalization. From the colors of paint to the arrangement of pompoms, every choice you make contributes to a truly unique piece.
- Instant Mood Booster: Colors have a profound impact on our mood. Incorporating bright, cheerful hues through this decor can transform the ambiance of a room, making it feel more inviting and joyful.
- Budget-Friendly Elegance: Achieve a high-end look without breaking the bank. The primary materials are inexpensive and easily sourced, making this an economical way to upgrade your home decor.
- Simplicity for All Skill Levels: You don’t need any special crafting skills to master this project. The steps are straightforward and designed for success, even for absolute beginners.
- Sustainable & Repurposed: Utilizing natural broomsticks gives this craft an earthy, rustic appeal while offering a creative way to repurpose simple items into something extraordinary.
- Versatile Placement: These colorful broomsticks aren’t limited to just one spot. They can brighten a living room, add whimsy to a child’s bedroom, or bring a welcoming touch to an entryway.
This project goes beyond mere decoration; it’s an expression of your artistic flair and a testament to the beauty of handmade items. It’s a craft that not only enhances your home but also provides a fulfilling and enjoyable creative process.
Gathering Your Crafting Essentials
Before diving into the creative process, ensure you have all your materials ready. The beauty of this project lies in its simplicity and the accessibility of its components. Here’s a detailed list of what you’ll need:
- Coconut Broomsticks (as many as you like): These natural, thin sticks are perfect for their rustic texture and flexibility. The quantity depends on how full you want your vase arrangement to be. Aim for at least 5-7 sticks for a decent display. You can often find these at local markets or craft stores.
- Green Paint (or any preferred color): Acrylic paints work wonderfully due to their vibrant pigments and quick drying time. Feel free to experiment beyond green – think bold blues, sunny yellows, fiery reds, or even a mix of pastel shades to create a rainbow effect. Consider matte, satin, or gloss finishes based on your desired look.
- Paintbrush: A medium-sized brush (around 1/2 to 1 inch wide) will be ideal for covering the broomsticks evenly. Ensure it’s clean and in good condition for smooth application.
- Small Pompoms in Different Colors: These cheerful little spheres are the heart of this craft. A variety of colors and even slightly varying sizes will add depth and playfulness to your design. Craft stores typically offer bags of assorted pompoms, which are perfect for this project.
- Hot Glue Gun & Glue Sticks: A hot glue gun is essential for securely attaching the pompoms to the broomsticks. Make sure you have enough glue sticks to complete your project. Its quick-drying nature makes it ideal for this type of detailed work.
- Gloves for Safety: Highly recommended to protect your hands from hot glue burns and paint stains. Disposable latex or nitrile gloves are excellent choices.
- Narrow Neck Vase: A vase with a narrow opening will help hold the broomsticks upright and clustered together, creating a beautiful, cohesive display. The height of the vase should complement the length of your broomsticks, ideally holding them about one-third to one-half of their length. Glass, ceramic, or even a repurposed bottle can work beautifully.
- Optional: Glitter, ribbons, decorative beads, or other small embellishments if you wish to add extra sparkle or texture to your finished pieces.
Having all these items laid out before you begin will make the crafting process much smoother and more enjoyable. Now, let’s get ready to transform these simple materials into a stunning piece of home decor!
Step-by-Step Guide to Crafting Your Vibrant Decor
Step 1: Preparing Your Broomsticks with a Splash of Color
The foundation of your colorful decor begins with preparing and painting the broomsticks. This step allows for immense creativity, so let your imagination guide your color choices!
- Clean the Broomsticks Thoroughly: Start by gently wiping down each coconut broomstick with a dry cloth to remove any dust, dirt, or debris. A clean surface ensures better paint adhesion and a smoother finish.
- Prepare Your Workspace: Lay down newspaper, an old sheet, or a plastic tarp to protect your working surface from paint spills. It’s also wise to wear your gloves at this stage to keep your hands clean.
- Apply Your Chosen Paint: Dip your paintbrush into the green paint (or your chosen color). With steady, even strokes, apply the paint along the entire length of each broomstick. Ensure complete coverage, paying attention to all sides of the stick. If you’re opting for a uniform look, ensure all sticks receive the same treatment.
- Embrace Creative Color Variations:
- Monochromatic Magic: Stick to one vibrant color for all your broomsticks for a bold, cohesive statement.
- Playful Rainbow: For a more whimsical and eye-catching display, paint each broomstick a different color of the rainbow. Imagine alternating reds, oranges, yellows, greens, blues, and purples!
- Ombre Effect: You could even attempt an ombre effect by gradually lightening or darkening a single color across different sticks or even along the length of one stick.
- Sparkle and Shine: If you desire an extra touch of glamour, consider mixing fine glitter into your wet paint or sprinkling it over the freshly painted sticks before they dry. This adds a captivating shimmer that catches the light beautifully.
- Allow for Complete Drying: Once painted, carefully set the broomsticks aside in a well-ventilated area to dry completely. Depending on the type of paint and humidity, this could take anywhere from 30 minutes to a few hours. Patience is key here; rushing this step can lead to smudged paint and a less polished final product. Ensure they are bone dry before moving on to the next embellishment stage.
Step 2: Adorning Your Sticks with Playful Pompoms
Now for the fun part: adding the vibrant pompoms that truly bring these broomsticks to life! This step is where your creativity in color arrangement will shine.
- Prioritize Safety with Your Hot Glue Gun: Before you even plug in your hot glue gun, make sure you have your gloves on. Hot glue can cause burns, so exercising caution is paramount. Allow the glue gun to heat up fully before use.
- Begin Pompom Placement: Select your first small pompom. Apply a small dab of hot glue to its center. Carefully press this pompom onto the thinner, upper end of one of your painted broomsticks. Hold it firmly for a few seconds to ensure it adheres properly.
- Continue Adding Pompoms with Even Spacing: Take another pompom and apply glue to its center. Place it further down the broomstick, ensuring there’s enough consistent space between the first and second pompom. The goal is to create a visually appealing pattern with uniform gaps.
- Determine Pompom Coverage: Continue this process until you have covered approximately three-quarters of the broomstick’s length. It’s crucial not to glue pompoms all the way to the very bottom. This unadorned section will be inserted into the vase, providing stability and a clean look. The exact length you leave bare will depend on the height of your chosen vase.
- Explore Pompom Color Combinations: This is an excellent opportunity to experiment with different color schemes:
- Monochromatic Charm: Use pompoms of a single color on each stick for a sleek and elegant look.
- Alternating Colors: Create dynamic patterns by alternating two or three different colors of pompoms down a single stick.
- Rainbow Delight: Arrange a full spectrum of colors on each stick, or dedicate each stick to a particular color family for a rainbow effect across your entire collection.
- Random & Whimsical: Embrace an eclectic style by randomly placing different colored pompoms, creating a truly unique and playful arrangement.
- Repeat for All Broomsticks: Apply the same meticulous process to all your remaining broomsticks and pompoms. Take your time to ensure each stick is adorned to your satisfaction.
- Allow Glue to Dry Completely: Once all pompoms are in place, set the decorated broomsticks aside. Let the hot glue cool and dry completely, which usually only takes a few minutes, but ensuring full curing will prevent any pompoms from detaching later.
By carefully following these steps, you’ll transform plain sticks into enchanting, colorful wands ready for display.
Step 3: Assembling Your Masterpiece in a Vase
The final step brings all your beautifully crafted elements together, creating a stunning visual display that will undoubtedly capture attention.
- Select the Perfect Vase: Revisit your narrow neck vase. Ensure its height and stability are suitable for holding your collection of decorated broomsticks. A narrow neck is crucial as it keeps the sticks clustered tightly, preventing them from splaying out too much and maintaining a cohesive “bouquet” appearance.
- Gather Your Decorated Broomsticks: Carefully collect all the broomsticks you’ve painstakingly painted and adorned with pompoms.
- Arrange the Broomsticks Artfully: Begin inserting the broomsticks into the vase. Don’t just drop them in; take a moment to arrange them thoughtfully.
- Staggered Heights: For a more dynamic and natural look, try to vary the heights of the sticks slightly within the vase. Some can stand taller, while others are a bit shorter.
- Even Distribution of Colors: If you used various colors, ensure they are distributed evenly throughout the arrangement for a balanced and vibrant display. Avoid clumping all of one color together.
- Fullness and Density: Adjust the number of sticks until you achieve the desired fullness in your vase. You want it to look substantial but not overcrowded.
- Final Adjustments: Once all sticks are in place, step back and examine your arrangement. Gently shift and rotate individual sticks until you are completely satisfied with the overall composition. Ensure the most attractive sides of your pompom arrangements are facing outward.
- Find Its Perfect Home: Place your newly created broomstick decor in that chosen plain corner, on a mantelpiece, a side table, or any spot that could use a touch of color and whimsical charm. Consider areas with good lighting to highlight the vibrant colors and playful pompoms.
And there you have it! A simple, budget-friendly, and incredibly charming piece of DIY home decor, ready to brighten your space and spark joy.
Tips for Personalizing Your Broomstick Craft Even Further
While the basic steps provide a fantastic foundation, don’t hesitate to infuse more of your personality into this craft. Here are some ideas to help you customize your broomstick decor:
- Explore Different Textures: Instead of standard pompoms, consider using felt balls, small yarn tassels, or even dried flowers for a different tactile experience and aesthetic.
- Seasonal Themes: Adapt your broomsticks for holidays or seasons. Use red and green for Christmas, pastels for Easter, or autumnal colors for Fall.
- Metallic Accents: Introduce metallic paints (gold, silver, copper) or glitter for a touch of elegance and sophistication, contrasting with the playful pompoms.
- Patterned Broomsticks: Instead of solid colors, try painting stripes, polka dots, or simple geometric patterns on your broomsticks before adding pompoms.
- Vase Alternatives: Get creative with what holds your sticks. Repurpose an old glass bottle, a rustic tin can, or even a small ceramic planter. Ensure it has a narrow opening or consider adding filler (like pebbles or sand) to keep the sticks upright.
- Embellish the Vase: Don’t forget the vase itself! You can paint it, wrap it with twine, tie a ribbon around its neck, or even glue a few matching pompoms to its surface for a cohesive look.
- Fragrant Sticks: Lightly spray your finished sticks with an essential oil blend or a fabric refresher for a subtle, pleasing aroma in your room.
- Mixed Mediums: Combine broomsticks with other natural elements like dried branches, bamboo skewers, or even thin dowels for varied heights and textures.
The possibilities are truly endless when it comes to personalizing this broomstick craft. Let your imagination run wild and create a piece that is uniquely yours!
Where to Display Your New Broomstick Decor
Once your colorful broomstick creation is complete, the next exciting step is finding the perfect spot to showcase its charm. Its versatile appeal means it can complement a variety of settings:
- Living Room Corner: Brighten up a dull corner that feels a bit empty. It adds a pop of color and personality without taking up much floor space.
- Entryway Console Table: Create a warm and welcoming first impression for guests by placing it on a console table near your front door.
- Bedroom Nightstand or Dresser: Infuse your personal sanctuary with cheerful colors. It can serve as a whimsical accent that promotes relaxation and good vibes.
- Home Office Shelf: Bring a touch of creativity and color to your workspace, making your home office a more inspiring environment.
- Kids’ Room Decor: The playful nature of pompoms makes this an ideal decoration for a child’s bedroom or playroom, adding a vibrant and imaginative element.
- Kitchen or Dining Area: Place it on a kitchen counter or a dining room sideboard to add a unexpected burst of color to these functional spaces.
- Covered Patio or Balcony: If protected from the elements, these can also make charming additions to an outdoor seating area, bringing indoor coziness outside.
- As a Gift: Don’t forget, this thoughtful and handmade decor makes a wonderful gift for friends and family for any occasion!
Consider the existing color scheme and decor style of your room to choose a placement that enhances its beauty. The goal is to highlight the broomstick craft as a focal point, drawing the eye and bringing joy to the space.
Caring for Your Colorful Broomstick Decor
To ensure your beautiful, handmade broomstick decor remains vibrant and charming for years to come, a little care and maintenance go a long way:
- Dust Regularly: Like any decorative item, your broomstick display will gather dust. Use a soft, dry cloth, a feather duster, or a soft brush to gently remove dust from the sticks and pompoms. Avoid harsh chemicals as they might damage the paint or glue.
- Avoid Direct Sunlight: Prolonged exposure to direct sunlight can cause the paint colors to fade over time. Position your vase in a spot where it receives plenty of light but is not constantly bathed in direct sunbeams.
- Handle with Care: While hot glue creates a strong bond, excessive pulling or rough handling of the pompoms can cause them to detach. If a pompom does come loose, a tiny dab of hot glue will quickly reattach it.
- Protect from Moisture: Keep your decor away from areas with high humidity or direct contact with water, as moisture can affect the paint, glue, and the natural broomstick material.
- Occasional Refresh: If you ever feel your decor needs a refresh, you can always repaint the sticks or replace the pompoms with new colors to match a changing interior theme or simply to give it a renewed look.
By following these simple care tips, your DIY colorful broomstick craft will continue to bring brightness and a personal touch to your home for a long time.
Conclusion: Embrace the Joy of DIY with Your Broomstick Craft
Crafting your own home decor is an incredibly rewarding experience, and this colorful broomstick DIY project is a perfect testament to that. With just a few simple materials, a splash of paint, and some playful pompoms, you can transform ordinary coconut broomsticks into a captivating piece of art that radiates joy and personality throughout your home. We’ve walked through every step, from selecting your materials and painting with creative flair, to adorning each stick with vibrant pompoms, and finally, arranging your masterpiece in a vase.
This project, inspired by the wonderful Yami Crafting, not only adds a unique visual element to your living space but also serves as a beautiful reminder of your own creativity. It’s an easy, budget-friendly way to introduce a focal point, brighten a dull corner, or simply infuse a room with cheerful energy. Remember, the true beauty of DIY lies in the ability to customize and make something truly your own, reflecting your taste and style.
So, why wait? Gather your materials, unleash your inner artist, and embark on this delightful crafting journey. We encourage you to experiment with different color palettes, pompom arrangements, and even other embellishments to make your broomstick decor truly one-of-a-kind. Share your creations and inspire others to discover the simple pleasure of making something beautiful with their own hands. Happy crafting!