
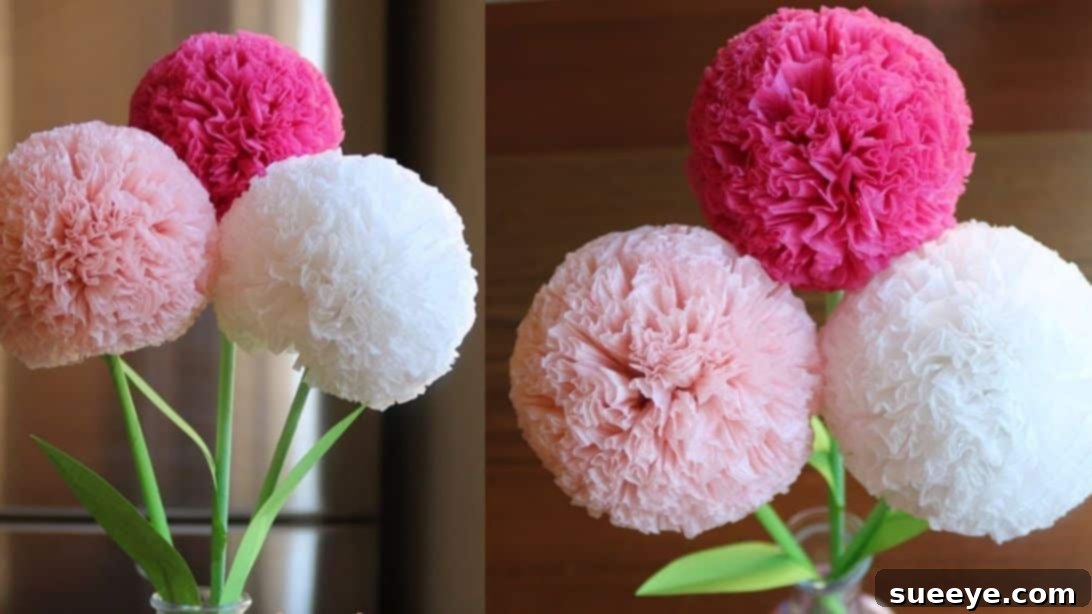
Are you searching for a budget-friendly yet incredibly charming way to infuse beauty into your living space or event decorations? Look no further! This comprehensive guide will walk you through creating stunning, voluminous tissue paper flowers, inspired by the fantastic tutorial from Being Artistic on YouTube. These DIY paper blooms are not only super easy and fun to craft but also offer an elegant touch to any setting. Imagine transforming simple sheets of colored tissue paper into vibrant, lifelike floral arrangements that never wilt! They’re perfect for sprucing up an empty vase, adding a festive touch to a party, or even as a thoughtful handmade gift.
This craft is also a wonderful activity for all ages. If you have children at home, gather them around and make it a family project; they’ll absolutely adore the process of creating these beautiful decorations. The joy of seeing their own handcrafted flowers come to life is truly rewarding. Plus, the versatility of tissue paper allows for endless color combinations and design variations, meaning you can create a truly unique bouquet or decorative piece tailored to your taste. Whether you’re planning a birthday party, a baby shower, a wedding, or simply want to brighten up your home, these handmade tissue paper flowers are an excellent choice. Let’s dive into the simple steps and unleash your creativity!
Why Choose DIY Tissue Paper Flowers?
There are numerous compelling reasons to opt for crafting your own tissue paper flowers over traditional fresh or store-bought alternatives. Firstly, they are incredibly cost-effective. Tissue paper is readily available and inexpensive, allowing you to create a grand display without breaking the bank. This makes them an ideal solution for large events or when you need a substantial amount of decor. Secondly, these flowers are remarkably durable. Unlike real flowers that wilt and fade, tissue paper flowers maintain their beauty for an extended period, making them a lasting decoration or keepsake. You can craft them well in advance of an event, alleviating last-minute stress.
Thirdly, the customization options are limitless. You have complete control over the colors, sizes, and even the “species” of your flowers. Want a vibrant rainbow bouquet? Easy! Need specific shades to match your party theme? No problem! This level of personalization is hard to achieve with other floral options. Furthermore, crafting provides a wonderful therapeutic outlet, a chance to relax and engage in a creative activity. It’s also an eco-friendlier option in many cases, especially if you repurpose materials or choose recyclable tissue paper. Finally, the sense of accomplishment and pride you’ll feel displaying something you’ve made with your own hands is truly priceless. These round tissue paper flowers bring warmth, charm, and a personal touch wherever they are placed.
Materials for Your Tissue Paper Flower Project:
Gathering your materials is the first step to a successful crafting session. Fortunately, you’ll find these items are simple, affordable, and likely already in your craft stash.
- Colored Tissue Paper: The star of our project! Choose your favorite colors or mix and match for a vibrant display. Lighter, brighter colors tend to look more delicate and airy. Ensure the paper is pliable and not too stiff for easy folding and shaping.
- Craft Wire: This will be used to secure the individual flower components and bind them together. Floral wire or any thin, bendable wire will work perfectly. It should be sturdy enough to hold its shape but flexible enough to twist easily.
- Colored Bond Paper or Printed Paper: Essential for creating the sturdy stem and elegant leaves for your flowers. Green is the classic choice for leaves and stems, but feel free to get creative with other colors if you’re aiming for a whimsical or artistic look. Cardstock or construction paper can also be used for added durability.
- Scissors: A good pair of sharp scissors will ensure clean cuts and precise shaping, especially when working with multiple layers of delicate tissue paper.
- Craft Glue: Any standard quick-drying craft glue will suffice for attaching the stem and leaves. A glue stick can also work for some parts, but liquid craft glue offers a stronger bond for the stem.
With these few simple items, you’re ready to embark on a delightful crafting journey to create stunning paper floral decor!
Instructions: Step-by-Step Guide to Making Tissue Paper Flowers
Follow these detailed steps carefully, and you’ll soon have a beautiful bouquet of handmade tissue paper flowers to admire!
Step 1: Preparing Your Tissue Paper Petals
Begin by taking your chosen colored tissue paper. You’ll need to cut it into four uniform rectangular pieces. Each piece should measure approximately 3.94 inches by 12.6 inches (or about 10 cm x 32 cm). Precision in this step is key for symmetrical flowers, so take your time measuring and cutting. Once you have your four rectangles, carefully stack them on top of each other, aligning all the edges perfectly. Now, you’ll create an accordion fold. Start at one of the shorter ends and fold a small strip (about 0.5 to 0.75 inches or 1.5-2 cm) over. Flip the stack of paper over and fold another strip of the same width in the opposite direction. Continue this zigzag pattern, folding back and forth, until you’ve folded the entire length of the tissue paper stack. The goal is to create neat, even folds, which will ultimately form the delicate petals of your flower.
Step 2: Securing and Shaping the Individual Flowers
With your neatly accordion-folded tissue paper stack, locate the exact middle point. Take a piece of craft wire, about 4-6 inches long, and carefully tie it tightly around the center of the folded paper. Twist the ends of the wire together to secure it firmly; this will become the core of your individual flower and provides a base for further assembly. Once secured, it’s time to start creating the bloom. Carefully begin to separate each layer of tissue paper, gently pulling them upwards and towards the center. Work slowly and meticulously, layer by layer, to avoid tearing the delicate paper. As you pull each layer, fluff and shape it to create a soft, rounded, and petal-like appearance. This process will transform the flat accordion into a beautiful, fluffy, half-sphere flower. Repeat this entire process – cutting, folding, tying, and fluffing – three more times, so you have a total of four individual tissue paper flower components. These will be the building blocks for your complete, round flower.
Step 3: Assembling and Shaping Your Full Flower
Now that you have four individual tissue paper flower components, it’s time to assemble them into one magnificent, full bloom. Take two of your fluffed flowers and align their wired centers. Twist the craft wires from both flowers together as closely and tightly as possible to create a secure, seamless connection. This will form the base of your large round flower. Next, take a third flower component and attach it to one side of the joined pair, again twisting its wire securely around the central wires. Finally, attach the fourth and last flower component to the opposite side, ensuring all wires are tightly intertwined. Once all four are connected, carefully open up and fluff each of the tissue paper layers even further. Gently separate the layers and push them outwards to create a fuller, more rounded, and opulent appearance. Don’t be afraid to gently manipulate the paper to achieve the desired volume. After fluffing, you might notice some uneven edges. Use your scissors to carefully trim off any excess tissue paper, shaping the entire arrangement into a beautiful, perfectly rounded flower. This final shaping step ensures a polished and professional look for your handmade bloom.
Step 4: Crafting the Delicate Green Leaf
Every beautiful flower deserves a complementary leaf! Take your green-colored bond paper or printed paper. Cut a rectangular piece measuring approximately 1.18 inches by 4.72 inches (or about 3 cm x 12 cm). Fold this paper in half lengthwise. With the paper still folded, use your scissors to cut a nice, gentle, rounded curve along the open edge, starting from the folded edge and curving towards the tip. When you unfold the paper, you should have a perfectly symmetrical leaf shape. Experiment with different curve styles to create various leaf designs; a subtle point or a broader curve can change the overall aesthetic. This step adds a touch of realism and completes the natural look of your paper flower.
Step 5: Creating the Stem and Final Assembly
For the stem, cut a larger piece of green-colored paper, measuring approximately 2.75 inches by 11.81 inches (or about 7 cm x 30 cm). Lay the paper flat and begin rolling it tightly from one corner, diagonally, towards the opposite corner. Keep the roll as tight and even as possible to create a sturdy, round stem. Once rolled, secure the end with a small dab of craft glue to prevent it from unraveling. Allow the glue to dry completely. Now, take your beautifully assembled tissue paper flower. Insert the twisted craft wires from the flower into one end of your newly crafted paper stem. You may need to create a small hole in the stem with the wire itself or a skewer. Twist the wires around the top of the stem to firmly attach the flower, ensuring it stands upright and secure. Finally, take your green leaf from Step 4 and glue it onto the stem, just below where the flower attaches. Press firmly and allow the glue to dry. And just like that, you are done! Step back and admire your stunning, handcrafted tissue paper flower. Remember, you can easily replicate this process to create an entire bouquet in different colors and sizes to match any decor or occasion.
Tips for Perfect Tissue Paper Flowers
- Quality Tissue Paper: While any tissue paper works, higher quality, slightly thicker tissue paper (like those used for gift wrapping) can yield more robust and less tear-prone flowers.
- Even Folds: The key to a symmetrical and beautiful flower lies in consistent accordion folds. Take your time to make each fold even in width.
- Secure Wiring: Ensure the craft wire is tied very tightly around the center of your folded paper. A loose wire can lead to a floppy flower.
- Gentle Fluffing: Tissue paper is delicate. Separate the layers slowly and gently to avoid tearing. If a layer tears slightly, you can usually conceal it by fluffing other layers around it.
- Experiment with Shapes: While this tutorial focuses on a rounded flower, you can experiment with cutting the ends of your accordion-folded paper into different shapes (e.g., pointed, scalloped) before fluffing to create varied petal designs.
- Size Variations: Adjust the initial dimensions of your tissue paper rectangles to create flowers of different sizes, adding more depth and interest to your arrangements.
- Use Double-Sided Tape: For quicker stem and leaf assembly, double-sided tape can sometimes be faster than liquid glue, especially for securing the stem roll.
Creative Variations and Uses for Your Paper Blooms
Once you’ve mastered the basic technique, the possibilities for these tissue paper flowers are endless!
- Color Palettes: Experiment with ombre effects by using shades of the same color, or create vibrant rainbow arrangements. Consider seasonal colors for holiday decor.
- Bouquets and Centerpieces: Combine several flowers of varying sizes and colors to create breathtaking bouquets for vases, or arrange them as eye-catching centerpieces for tables.
- Garlands and Banners: String multiple flowers together to create beautiful garlands for parties, nurseries, or mantel decorations.
- Wall Decor: Attach them directly to a wall to create a stunning floral backdrop for events, photo booths, or a charming accent in a child’s room.
- Gift Toppers: Replace traditional bows with a mini tissue paper flower for a personalized and elegant touch to gifts.
- Wreaths: Adorn a plain craft wreath form with an assortment of your handmade flowers for a festive and welcoming front door decoration.
- Hair Accessories: Smaller versions of these flowers can be attached to hair clips or headbands for a whimsical look.
- Event Decor: From weddings to baby showers, these flowers can be used to decorate chairs, aisles, tables, or create stunning entrance displays without the high cost of fresh flowers.
Let your imagination run wild and discover all the wonderful ways these simple tissue paper flowers can enhance your home and celebrations!
Caring for Your DIY Paper Flowers
One of the greatest advantages of paper flowers is their longevity. To keep your beautiful creations looking fresh and vibrant, simply dust them gently with a soft brush or a hairdryer on a cool, low setting occasionally. Avoid exposing them to direct sunlight for prolonged periods, as this can cause the colors to fade over time. Keep them away from moisture and humidity to prevent damage to the paper. With minimal care, your handmade tissue paper flowers will continue to brighten your space for months, even years, to come.
Conclusion
Crafting these gorgeous round tissue paper flowers is a delightful and rewarding experience. From selecting your favorite colors to watching the delicate layers transform into a full bloom, each step is imbued with creative satisfaction. This DIY project proves that you don’t need expensive materials or advanced skills to create truly beautiful decorations. These versatile paper flowers are perfect for adding a touch of handmade charm to your home, celebrating special occasions, or even as heartfelt gifts. We encourage you to try this tutorial and let your imagination flourish. Don’t forget to share your amazing creations with us! Happy crafting!