
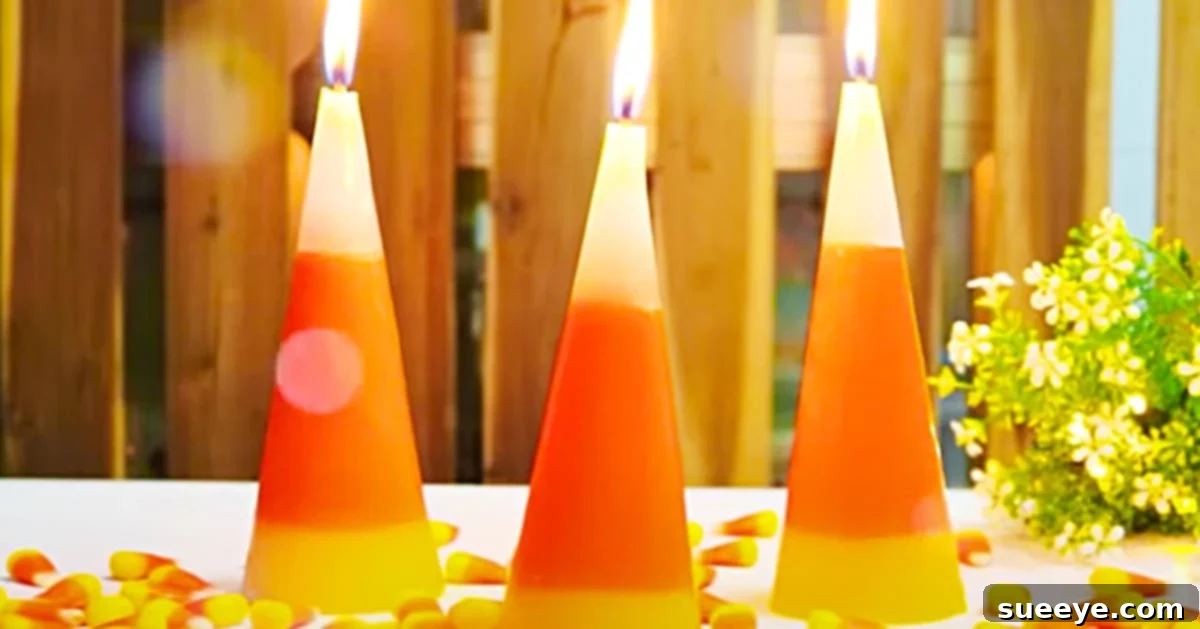
DIY Candy Corn Candles: A Sweet & Easy Halloween Decor Tutorial
As the leaves begin to turn vibrant shades of orange and yellow, and a crisp chill fills the air, the magic of Halloween draws near! While some revel in spooky specters and ghoulish delights, there’s a distinct charm in celebrating the sweeter, more whimsical side of the season. For many, Halloween isn’t just about scares; it’s about cozy nights, festive gatherings, and, of course, the iconic delight of candy corn. If you share a love for this tri-colored treat and are looking to infuse your home with some charming, non-scary Halloween decorations, then you’re in for a treat with this DIY Candy Corn Candle tutorial. Inspired by the incredibly creative Aira Tran on YouTube, this project transforms simple wax into delightful, giant candy corn replicas that promise to be a standout feature in your seasonal display. Forget the scary monsters for a moment; let’s create something truly sweet and heartwarming for your fall decor.
Why Craft Your Own Candy Corn Candles?
There’s an undeniable satisfaction that comes with creating your own home decor, especially when it’s as unique and charming as these candy corn candles. Opting for a DIY approach offers numerous benefits:
- Personalized Touch: You can customize the size, hue intensity, and even add a subtle scent to match your personal style and home fragrance preferences.
- Cost-Effective Decor: Using readily available materials, often repurposed from items you already have, makes this a budget-friendly option compared to buying commercial decorations.
- A Unique Statement: While candy corn is a classic, handmade candles in this iconic shape are a truly distinctive piece that will capture attention and spark conversation.
- Therapeutic Crafting: Engaging in a hands-on project like candle making can be incredibly relaxing and rewarding, offering a delightful break from daily routines.
- Family Fun: This project is simple enough to involve older children, making it a wonderful activity to share and create lasting Halloween memories together.
Moving away from the traditional scary themes, these candy corn candles offer a refreshing aesthetic that’s perfect for those who prefer their Halloween decor with a side of charm and nostalgia.
Gathering Your Crafting Essentials: Materials for DIY Candy Corn Candles
One of the best aspects of this DIY project is that it requires only a handful of accessible materials. You might already have many of these items around your home, making it incredibly convenient to start crafting. Here’s what you’ll need to embark on your candy corn candle journey:
- An Old Candle or Wax Flakes: Repurposing an old candle is a fantastic way to recycle and keep costs down. You can use any color, as we’ll be adding new colors. Alternatively, paraffin or soy wax flakes can be purchased specifically for candle making. Approximately 1-2 cups of wax per medium-sized candy corn candle should suffice.
- A Piece of Card Stock: This will serve as your mold. An old cereal box, a manila folder, or any medium-weight cardboard will work perfectly. The stiffness is important for holding the cone shape during the pouring process.
- A Stick or Pencil: Essential for holding your wick centered while the wax sets. A skewer, a chopstick, or even a sturdy pencil will do the trick.
- A Wick with a Metal Base: If you’re using wax flakes, you’ll need new wicks. If repurposing an old candle, carefully extract its wick if it’s still in good condition, or purchase candle wicks with metal tabs for stability.
- A Hot Glue Gun and Glue Sticks: Crucial for sealing the mold and securing the wick, preventing any wax leakage.
- Crayons (Orange and Yellow): These are your vibrant colorants! While specialized candle dyes exist, crayons are an excellent and affordable alternative for achieving those classic candy corn hues. You’ll also need some white wax, which can be the natural color of your wax or achieved by adding a white crayon.
- Twine (Optional): For a rustic, decorative touch once your candle is complete.
- Tape (Strong Adhesive): To securely hold your cardstock mold together. Masking tape or painter’s tape can work, but a stronger adhesive tape like duct tape might offer more security for the seams.
- Heat-Safe Containers: You’ll need at least three separate containers (like old tin cans or heat-safe glass jars) for melting and coloring your wax layers.
- A Double Boiler Setup: A saucepan with a few inches of water and a heat-safe bowl placed on top is ideal for safely melting wax without direct heat, which can be dangerous.
Having all your materials ready before you start will ensure a smooth and enjoyable crafting experience.
Step-by-Step Guide: Crafting Your Own Candy Corn Candles
This delightful candy corn candle tutorial, famously shared by Aira Tran on YouTube, guides you through a few simple yet rewarding steps to create these charming seasonal decorations. Let’s break down the process into easy-to-follow instructions.

1. Preparing Your Candy Corn Mold
The foundation of your candy corn candle is a sturdy, cone-shaped mold. Take your piece of card stock and roll it into a cone shape, similar to how you’d make a party hat. Ensure the cone has a relatively wide base and a pointed top. Use strong tape to secure the seam of the cone from top to bottom, making sure there are no gaps. Crucially, hot glue the very tip of the cone to seal any potential openings where wax could leak out. This step is vital for a smooth, perfect candy corn shape.
2. Setting Up Your Wick
Once your mold is ready, it’s time to prepare the wick. If you’re using a wick with a metal base, hot glue the metal tab to the inside center of the cone’s tip (which will be the bottom of your candle). If your wick doesn’t have a base, you can dip the end in melted wax and press it to the tip. To keep the wick centered and taut, drape the other end over the top opening of your cone and secure it in place with your stick or pencil. Position the stick horizontally across the cone’s opening, taping the wick firmly to it so it hangs straight down the middle of the mold.
3. Melting and Coloring Your Wax Safely
This is where the magic of color begins! Carefully chop or break your old candle wax (or use wax flakes) into smaller pieces. Set up your double boiler: place your heat-safe containers (like old tin cans) into a larger pot with about 2-3 inches of simmering water. Divide your wax into three separate containers. For coloring, shave small pieces of orange crayon into one container, yellow crayon into another, and keep the third container for white wax (or add a white crayon for a more opaque finish). Stir gently until the wax is completely melted and the crayon color is fully incorporated. Always melt wax slowly and never leave it unattended.
4. Layering the Candy Corn Magic
Now, it’s time to create the iconic candy corn layers. Precision and patience are key here:
- Yellow Layer: Carefully pour the yellow melted wax into your cone mold, filling it about one-third of the way up. Allow this layer to cool and harden completely before moving on. This could take 30 minutes to an hour, depending on the thickness. A partially set layer can cause the colors to bleed.
- Orange Layer: Once the yellow layer is solid, gently pour the orange melted wax on top, filling another third of the cone. Again, wait for this layer to fully solidify. Ensure the surface of the yellow layer is firm to the touch before adding the orange.
- White Layer: Finally, pour the white melted wax to fill the remaining top third of the cone. Allow the entire candle to cool and harden thoroughly, ideally for several hours or even overnight, to ensure maximum firmness and easy demolding.
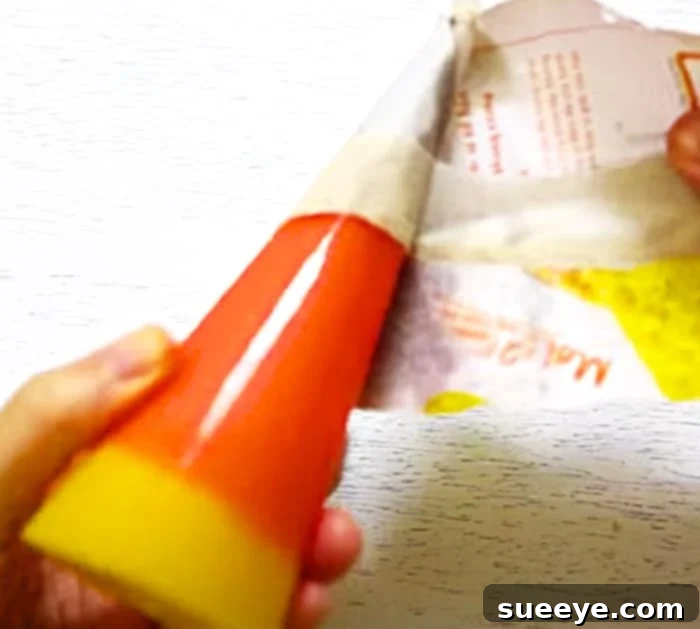
5. The Grand Reveal: Demolding Your Candle
Once your candle is completely cooled and solid, it’s time for the exciting reveal! Gently peel away the tape and then carefully tear off the card stock mold. Because you used paper, it should come away easily without damaging your perfectly shaped candy corn candle. Like magic, you will have a beautiful, giant candy corn ready to brighten your Halloween decor!
6. Finishing Touches and Display
Trim your wick to about 1/4 inch above the top of the candle for optimal burning. If you wish, tie a piece of rustic twine around the base for an added touch of charm. These handmade candy corn candles are perfect for decorating mantels, dining tables, or any cozy nook in your home. They make fantastic centerpieces for fall gatherings or a delightful gift for a fellow Halloween enthusiast.
Pro Tips for Perfect Homemade Candles
To ensure your DIY candy corn candles turn out beautifully every time, consider these expert tips:
- Temperature Control: Melting wax at the right temperature (usually between 180-200°F or 82-93°C for paraffin) is crucial. Use a thermometer if possible. Overheating wax can lead to discoloration or a weaker scent throw if you add fragrance.
- Avoid Air Bubbles: Pour your wax slowly and steadily to minimize air bubbles. If you notice any, a quick poke with a thin stick can help release them before the wax sets.
- Wick Selection Matters: Ensure you use the correct wick size for the diameter of your candle. A wick that’s too small will tunnel, while one that’s too large will burn too quickly and produce excessive smoke. For these candy corn candles, a medium-sized wick should work well.
- Adding Fragrance: For scented candles, add fragrance oil just before pouring your wax layers. Follow the manufacturer’s recommendations for the correct percentage, usually around 6-10% of the wax weight. Stir it in thoroughly but gently.
- Leveling Layers: If your layers aren’t perfectly flat, gently warm the top of the previous layer with a heat gun or hairdryer for a few seconds before pouring the next. This can help create a smoother bond and a more even surface.
- Patience is a Virtue: Rushing the cooling process between layers can lead to layers separating or colors bleeding. Always allow ample time for each layer to solidify completely.
- Safety First: Never leave melting wax unattended. Always use a double boiler method to prevent wax from overheating and catching fire. Keep a fire extinguisher or baking soda nearby.
Beyond Candy Corn: Customization and Creativity
While the classic candy corn motif is undoubtedly charming, don’t hesitate to unleash your creativity! You can experiment with different color combinations to match other holidays or personal preferences. Imagine pastel colors for Easter, vibrant reds and greens for Christmas, or even monochromatic shades for a minimalist look. You could also vary the size of your molds to create a collection of different-sized candy corn candles, or add a touch of fine glitter to the wax for a sparkling effect. Incorporating essential oils or fragrance oils can transform your candles into a delightful aromatherapy experience, adding another dimension to your handmade creations.
Conclusion: Light Up Your Halloween with Handmade Charm
There’s something uniquely satisfying about adorning your home with decorations you’ve crafted yourself, and these DIY Candy Corn Candles are no exception. They offer a delightful blend of whimsical charm and personal touch, perfect for celebrating Halloween and the wider fall season without resorting to anything too scary. Thanks to the brilliant inspiration from Aira Tran, this project is not only easy and affordable but also incredibly rewarding. So, gather your materials, embrace your inner crafter, and light up your home with the warm, inviting glow of your very own handmade candy corn candles. They’re sure to bring a smile to everyone’s face and create a truly sweet atmosphere for your holiday festivities. Happy crafting!