
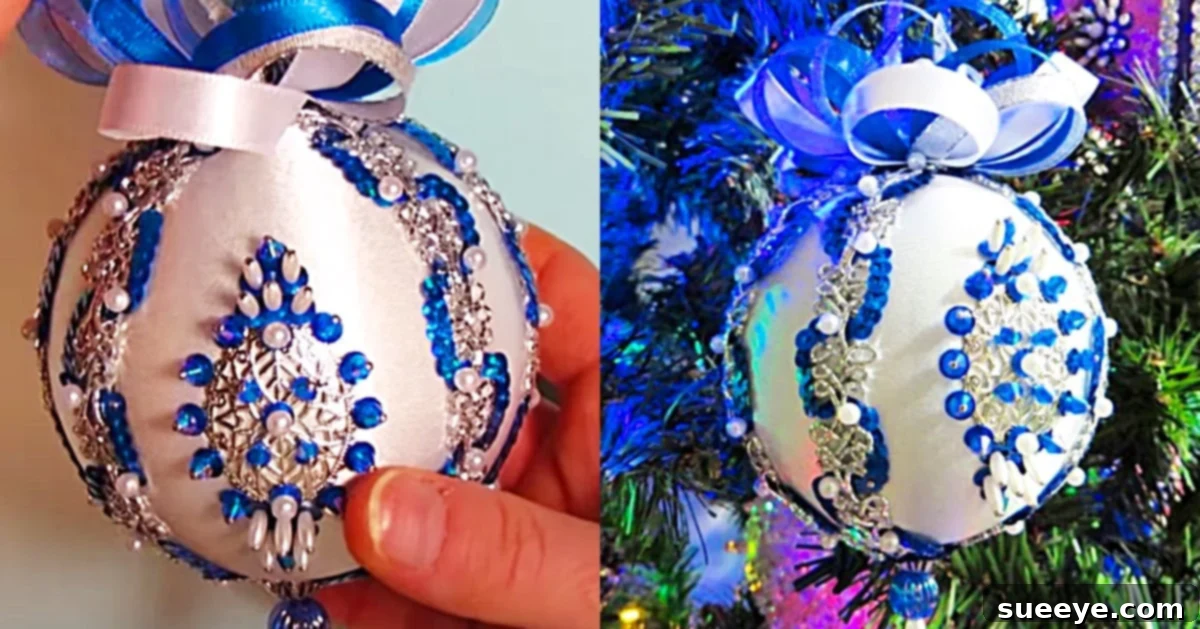
How To Make Stunning Satin Beaded Christmas Ornaments: A DIY Guide
The magic of Christmas is often found in the cherished traditions and personalized touches that make the season truly special. Among these, handmade Christmas ornaments hold a unique place, embodying memories, love, and a personal touch that store-bought decorations simply can’t replicate. I have a particularly fond memory of such ornaments, stemming from my sister-in-law’s florist shop, where exquisitely personalized beaded Christmas ornaments were a specialty. I was fortunate enough to learn the intricate craft directly from them, creating pieces that became precious parts of my own festive collection.
Years ago, a deeply disheartening event led to the loss of my entire box of beloved Christmas ornaments, including those magnificent handmade pieces, stolen sometime in the nineties. The void left by those fabulous ornaments was immense, and for a long time, I thought they were irreplaceable. However, a spark of hope was reignited recently when I stumbled upon a fantastic satin beaded Christmas ornaments video tutorial by Ornament Designs on YouTube. This discovery felt like a sign, a chance to not only recreate what was lost but to infuse new memories into new creations. While these new ornaments won’t ever truly replace the originals, the act of making them promises a comforting sense of healing and the joy of crafting something beautiful once more.
The Enduring Charm of Handmade Christmas Ornaments
There’s an undeniable allure to handmade Christmas ornaments. Unlike mass-produced items, each handcrafted piece carries a story, a touch of the artisan’s soul, and a unique character. They transform a simple Christmas tree into a personalized gallery of memories and creativity. For many, these ornaments become treasured family heirlooms, passed down through generations, each telling a tale of past Christmases. Creating them yourself offers not just a beautiful decoration but an engaging activity that can be enjoyed solo or with loved ones, fostering a deeper connection to the holiday spirit.
The act of crafting itself is therapeutic, a meditative process that allows you to slow down amidst the holiday rush and focus on the joy of creation. Imagine hanging an ornament you’ve meticulously crafted, knowing every bead, every pin, and every fold was placed by your own hands. This sense of accomplishment adds an extra layer of warmth and meaning to your festive decor, making your home feel even more inviting and special during the most wonderful time of the year.
Essential Materials For Your Satin Beaded Ornaments
Before embarking on this delightful crafting journey, gathering all your materials is key. A well-stocked workspace ensures a smooth and enjoyable process. Here’s a detailed look at what you’ll need to create your own stunning satin beaded Christmas ornaments:
- Satin Christmas Balls (or Styrofoam Balls): The foundation of your ornament. Pre-covered satin balls are convenient, offering an immediate luxurious base. If you opt for plain styrofoam balls, you’ll have the creative freedom to cover them with satin fabric of your choice, allowing for greater customization in color and texture. Ensure they are smooth and free of imperfections.
- A Pen: Essential for marking guidelines on your ornament, helping you achieve symmetrical and balanced designs. A fine-tipped pen is ideal for precision.
- A Measuring Tape: Crucial for accurate measurements when dividing your ball into sections, ensuring your trim and bead patterns are evenly spaced.
- A Craft Knife: Used for creating small, precise incisions on styrofoam balls, especially if you are tucking fabric or trim into the surface. Always exercise caution when handling.
- Tucking Tool: A specialized tool (or even a blunt butter knife or a thin piece of wood) used to gently push fabric or trim edges into the grooves created by the craft knife, resulting in a clean, professional finish.
- A Pair of Scissors: Sharp craft scissors are indispensable for cutting satin fabric, various trims, and any other decorative elements precisely.
- Craft Glue: A reliable, clear-drying craft glue is perfect for securing fabric edges, small embellishments, and ensuring your trims stay put permanently.
- A Lighter (Optional): Useful for carefully singeing the ends of satin ribbons or synthetic trims to prevent fraying. Use with extreme caution and in a well-ventilated area.
- A Hot Glue Gun & Glue Sticks: Provides a strong, fast-drying bond, ideal for attaching heavier embellishments, securing larger trims, or quickly fixing components.
- Pearl-Ended Pins: These are not just functional for attaching beads and trims but also add an elegant decorative touch. They come in various colors and sizes, allowing for further personalization.
- Trims: This category encompasses a wide array of decorative elements like brocade ribbons, decorative cords, lace, braid, or sequined trims. Choose trims that complement your color scheme and design vision.
- Beads: The sparkling heart of your ornament! Select an assortment of beads – seed beads, pearl beads, crystal beads, bugle beads – in different sizes, shapes, and colors. These will be arranged to create intricate patterns and add dazzling texture.
Step-by-Step Guide to Crafting Your Beaded Masterpiece
While the video tutorial by Ornament Designs provides an excellent visual guide, understanding each step in detail will empower you to customize and perfect your creations. Here’s a comprehensive breakdown of the process to craft your own satin beaded Christmas ornaments:
Step 1: Preparing Your Ornament Base
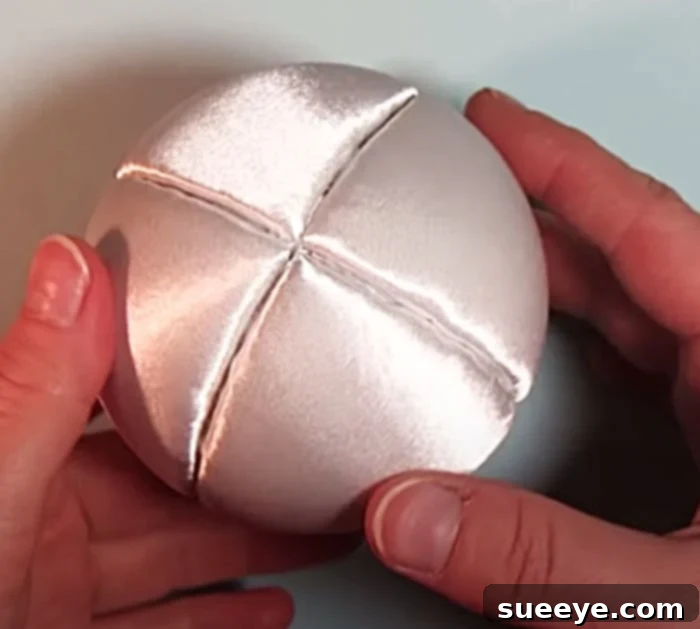
If you’re using pre-covered satin Christmas balls, you can skip directly to sectioning. If working with plain styrofoam balls, your first task is to cover them neatly with satin fabric. Cut your chosen satin fabric into strips or squares, large enough to cover the ball. Using your craft knife, make shallow, even incisions around the ball, creating sections (like segments of an orange). Apply a thin line of craft glue along these incisions, then carefully tuck the edges of your satin fabric into these grooves using your tucking tool. Work slowly to ensure a smooth, wrinkle-free finish, creating a flawless satin canvas for your embellishments. Once covered, ensure the fabric is fully adhered and dry.
Step 2: Sectioning for Design Precision
Achieving a balanced and beautiful design starts with accurate sectioning. Use your pen and measuring tape to meticulously mark the surface of your satin-covered ball. Depending on your desired pattern, you might divide it into quadrants, octants, or even more intricate sections. These lines will serve as your guides for applying trims and beads, ensuring symmetry and order in your design. Take your time with this step, as precision here will directly impact the final appearance of your ornament.
Step 3: Applying the Base Trims and Brocade
With your ornament sectioned, it’s time to introduce the first layer of decorative trims. Often, wider trims like brocade or patterned ribbons are used to define the main divisions you’ve marked. Apply a small amount of craft glue or hot glue along your pen lines, then carefully press your chosen trim onto these lines. Use pearl-ended pins to secure the trim temporarily while the glue dries, or to add extra decorative flair by pinning through the trim at intervals. As shown in the Ornament Designs video tutorial, you will strategically pin your selected brocade trim to form the foundational patterns.
Step 4: Embellishing with Beads and Additional Trims
This is where the ornament truly comes to life! Begin adding your beautiful beads and finer trims. There are endless possibilities for design:
- Bead Clusters: Group small beads together, securing them with a single pearl-ended pin for a clustered effect.
- Bead Lines: Create elegant lines of beads along the edges of your existing trims or within the satin sections.
- Geometric Patterns: Use pins and beads to form diamond shapes, stars, or other geometric designs.
- Scattered Effect: Randomly place beads for a whimsical, sparkling finish.
Use your pearl-ended pins to attach beads and trims firmly. You can push the pins directly into the styrofoam, or if using a pre-made satin ball, ensure the pins are long enough to hold securely. Experiment with different bead sizes and colors to create contrast and visual interest. The objective is to keep adding details until you are completely pleased with the ornament’s luxurious and intricate appearance.
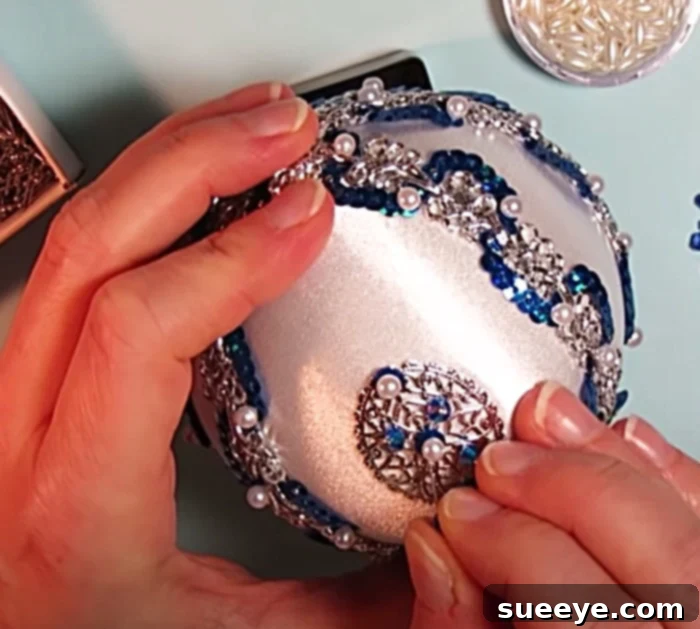
As you work, remember that patience and attention to detail are your best allies. Each bead and pin contributes to the overall splendor, transforming a simple ball into a dazzling display of craftsmanship.
Step 5: Finishing Touches and Hanging
Once all your trims and beads are securely in place and you’re happy with the design, ensure all glue has dried completely. You may want to add a final layer of embellishments, such as a decorative bow at the top, or a small charm. Finally, attach a hanging loop if your ornament doesn’t already have one. A beautiful satin ribbon, a metallic cord, or a strong piece of string can be looped through the top and secured with glue or a knot. Give your masterpiece a final inspection, trimming any loose threads or ensuring all elements are firmly attached. Your exquisite satin beaded Christmas ornament is now complete and ready to adorn your tree!
Customization and Creativity: Making Each Ornament Uniquely Yours
The true beauty of crafting these ornaments lies in the endless possibilities for personalization. Don’t feel limited by traditional designs or color schemes. Here are some ideas to spark your creativity:
- Color Palettes: Experiment with unconventional color combinations. Beyond classic reds and greens, consider icy blues and silvers for a winter wonderland theme, rich jewel tones for an opulent look, or pastels for a whimsical touch.
- Themed Ornaments: Create themed sets. Perhaps a vintage-inspired collection using antique-style beads and lace, or a nature-themed set with earthy tones and leaf-shaped beads.
- Material Mix: Introduce other small embellishments like sequins, glitter, tiny charms, or even dried flowers (if carefully preserved and applied) to add more texture and visual interest.
- Personalized Gifts: These handmade ornaments make incredibly thoughtful gifts. Tailor the colors and designs to match the recipient’s home decor or personal preferences for a truly unique present. You could even add a small, personalized tag with the year it was made.
Let your imagination be your guide. Each ornament you create can be a reflection of your own style and the festive spirit you wish to evoke.
Beyond the Craft: The Joy and Benefits of DIY
Engaging in DIY projects like making satin beaded Christmas ornaments offers a wealth of benefits beyond just acquiring a beautiful decoration. It’s an opportunity for stress relief, a chance to practice mindfulness, and a wonderful way to develop new skills. The focus required for intricate beadwork can be incredibly calming, allowing you to momentarily escape the everyday hustle and bustle.
Moreover, crafting your own decor can be more cost-effective than purchasing high-end, mass-produced items, especially when you can find materials at craft stores or even repurpose items. It also provides a sense of accomplishment and pride that comes from creating something beautiful with your own hands. These ornaments aren’t just decorations; they’re tangible memories, filled with the effort and care you poured into them, ready to become part of your family’s holiday narrative for years to come.
These ornaments are truly enchanting, and I am filled with joy at the prospect of bringing them back into my life. The journey of rediscovery, learning, and creation has been incredibly fulfilling. I genuinely believe that these handmade pieces will not only adorn my Christmas tree with unparalleled beauty but will also become cherished family heirlooms, holding new memories and celebrating the enduring spirit of the holidays. I encourage you to embark on this delightful crafting adventure yourself. You might just find the process as rewarding as the stunning ornaments you’ll create.