
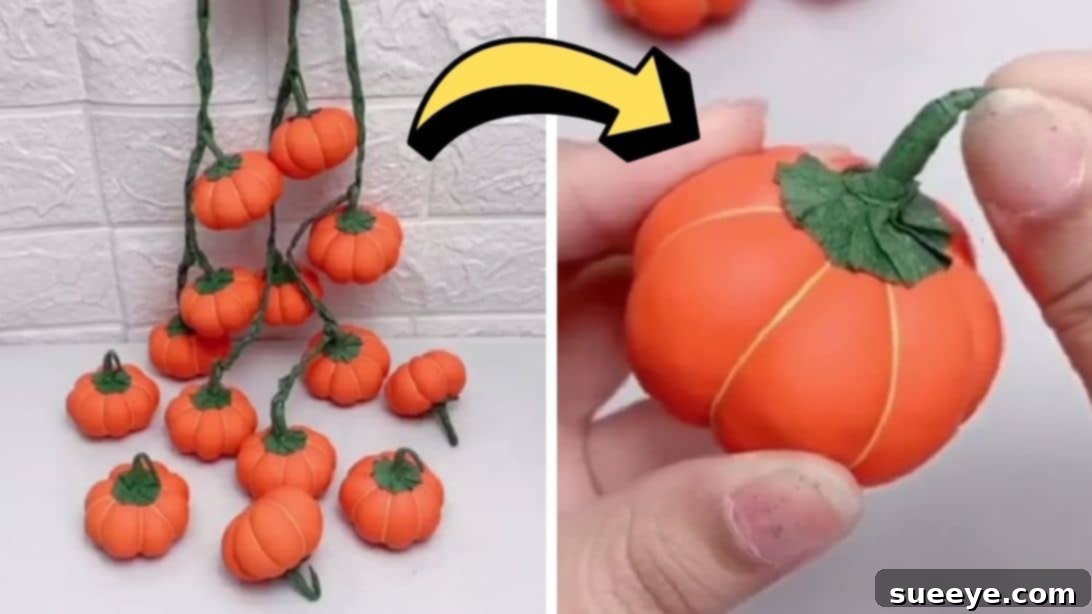
As the days grow shorter and a crisp breeze fills the air, there’s no denying that Fall is officially here! This beloved season brings with it a desire for warm, inviting decor that transforms our homes into cozy havens. If you’re searching for charming yet incredibly simple DIY projects to adorn your space this autumn, look no further than these delightful balloon pumpkins. Inspired by the creative genius of officialholidayhub on TikTok, this craft is not only super easy and budget-friendly but also yields adorably rustic decorations perfect for any Fall setting.
Whether you envision a whimsical garland draped across your mantle, a scattering of miniature gourds gracing your display table, or unique accents nestled among other seasonal pieces, these DIY balloon pumpkins offer unparalleled versatility. You can craft them in various sizes, experiment with different colors, and produce as many as your heart desires. They’re a fantastic project for crafters of all skill levels, making them an ideal activity for a cozy afternoon. Dive into this step-by-step guide and discover how to bring these charming decorations to life!
Embrace the Autumn Spirit: Why DIY Balloon Pumpkins Are Your Go-To Fall Craft
There’s something uniquely satisfying about handmade decor, and these balloon pumpkins are no exception. Beyond their aesthetic appeal, they offer a multitude of benefits that make them a standout choice for your Fall crafting endeavors:
- Budget-Friendly Decor: Forget expensive store-bought decorations. This project utilizes common, inexpensive materials, allowing you to create a bountiful harvest of pumpkins without breaking the bank.
- Customization at Its Best: Unlike mass-produced items, DIY allows for complete creative control. Choose your favorite balloon colors, experiment with different thread hues, and even add unique embellishments to match your home’s specific aesthetic.
- Perfect for All Skill Levels: From seasoned crafters to crafting novices, the simplicity of this project makes it accessible and enjoyable for everyone. It’s a fantastic entry point into the world of DIY decor.
- Versatile Display Options: These little pumpkins aren’t limited to one spot. They can be strung into garlands, arranged in centerpieces, tucked into shelves, or even used as unique gift toppers. Their adaptability makes them a valuable addition to any autumn display.
- Family-Friendly Fun: This craft is engaging enough for older children (with adult supervision for scissors and glue) and offers a wonderful opportunity for families to create together, making cherished memories along with beautiful decor.
- Unique and Charming: Stand out from the crowd with unique, handmade items that reflect your personal style. These balloon pumpkins offer a whimsical touch that store-bought items often lack.
Essential Materials: Gathering Your Crafting Supplies
Before you embark on your pumpkin-making adventure, ensure you have all the necessary materials. Most of these items can be found at your local craft store, dollar store, or even around your home. Here’s what you’ll need:
- Small Balloons: Opt for standard party balloons, typically 5-inch or 9-inch, as they provide a good base for mini pumpkins. You can choose traditional orange, white, cream, or even subtle pastel balloons for a unique look. The size of your balloon will dictate the final size of your pumpkin.
- Scissors: A good pair of sharp scissors is crucial for clean cuts, especially when trimming the balloon and crepe paper. Crafting scissors work best.
- Poly-fil Fiberfill: This soft, fluffy material is perfect for stuffing your balloons, giving the pumpkins their plush, full shape. If you don’t have Poly-fil, cotton balls, scrap fabric pieces, or even dryer lint can work as alternatives, though Poly-fil provides the smoothest finish.
- Thread: Strong, durable thread is essential for creating the pumpkin’s distinctive indentations. Embroidery floss, twine, or even thin yarn can be used. Earthy tones like brown, green, or even black thread will complement the natural pumpkin look, but feel free to experiment with contrasting colors for a fun twist.
- Crepe Paper: This will form the pumpkin’s stem. Green or brown crepe paper is ideal for a realistic touch. You can also use construction paper, felt, or even a small twig for an alternative stem.
- Glue: A quick-drying craft glue or fabric glue is perfect for securing the thread and crepe paper. Hot glue can also be used, but exercise caution, especially if crafting with children.
- Craft Wire: A flexible piece of craft wire is used to help shape the balloon and secure the thread. A floral wire or any thin, bendable wire will work. This also forms the sturdy core of your pumpkin’s stem.
Step-by-Step Guide: Crafting Your Adorable Balloon Pumpkins
Creating these charming balloon pumpkins is a straightforward process, broken down into two main steps. Follow these detailed instructions, and you’ll have a delightful collection of autumn decor in no time!
Step 1: Preparing the Base and Initial Shaping
This first step focuses on transforming your balloon and fiberfill into the foundational sphere of your pumpkin, ready for its signature indentations.
- Prepare the Balloon: Begin by taking one of your small balloons. Using your scissors, carefully cut off most of the opening part, leaving only about half an inch from the round base of the balloon. This creates a larger opening for stuffing and helps in closing the pumpkin later.
- Stuff with Fiberfill: Gently begin stuffing the balloon with your poly-fil fiberfill. You want to fill it enough so that the balloon becomes a plump, round ball, but not so much that it’s overly taut or might burst. The goal is a soft, squishy yet firm sphere. If you find it hard to push the fiberfill in, use a piece of craft wire or a blunt pencil to carefully help guide and push the stuffing into place. Continue until you achieve a nicely rounded shape.
- Insert and Secure the Wire: Take a length of craft wire (about 6-8 inches, depending on your desired stem height). Insert one end of this wire into the center of the stuffed balloon. Position it so that it extends slightly from the opening where you’ll form the stem. Hold the wire firmly at the center, ensuring it’s nestled within the fiberfill and also securely held together with the trimmed opening part of the balloon.
- Initial Thread Wrapping: Now, take your chosen thread. Begin wrapping the thread tightly around the base where the wire and the balloon opening meet. This initial wrapping helps to secure the fiberfill inside, close off the balloon opening, and provides a starting point for creating the pumpkin’s segments. Wrap several times, ensuring it’s snug, but don’t cut the thread yet. This continuous thread will be used for the next steps.
Step 2: Creating the Iconic Pumpkin Indentations and Finishing Touches
This is where your balloon ball truly transforms into a recognizable pumpkin, complete with its characteristic ridges and a charming stem.
- Create Indentations: With the thread still attached from the previous step, begin wrapping it around the stuffed ball to create the characteristic pumpkin indentations or segments. To do this, wrap the thread from the top (where the wire emerges) down around the side of the ball, then loop it underneath, and bring it back up to the top. Each time you loop the thread around, pull it gently but firmly to create a visible ridge in the fiberfill. Aim for 4-6 even segments, rotating the pumpkin as you go to ensure symmetry. This creates the classic ribbed appearance of a pumpkin.
- Secure the Thread: Once you’ve created all your desired indentations and are satisfied with the pumpkin’s shape, continue to wrap the thread several more times securely around the top of the wire (which will become the stem). Apply a small dab of craft glue to this wrapped section to hold all the threads firmly in place. This prevents the threads from unraveling and helps maintain the pumpkin’s form. Once the glue is dry, you can snip the excess thread.
- Craft the Crepe Paper Stem: Cut a small rectangular piece of green or brown crepe paper, roughly 1-1.5 inches wide and a few inches long (adjust based on desired stem thickness). Apply a thin line of glue along one edge of the crepe paper. Starting at the base of the wire stem, begin wrapping the crepe paper tightly around the craft wire. As you wrap, continuously dab small amounts of glue to ensure the crepe paper adheres smoothly and securely. Continue wrapping until the entire visible length of the craft wire is covered, creating a neat, realistic stem.
- Final Bend and Admire: Once the glue on the crepe paper stem has dried, you can gently bend the top part of the wire stem into a slight curl or a natural curve. This adds a charming, organic touch to your finished pumpkin. And just like that, your adorable DIY balloon pumpkin is complete!
Creative Ways to Display Your Handmade Balloon Pumpkins
Now that you’ve crafted your collection of charming balloon pumpkins, it’s time to unleash your creativity and incorporate them into your Fall decor. Their versatility allows for endless display possibilities:
- Rustic Garlands: String several pumpkins together with twine or ribbon to create a lovely garland for your fireplace mantle, stair banister, or doorframe.
- Charming Centerpieces: Arrange a cluster of varying sized pumpkins in a decorative bowl, basket, or on a wooden tray. Add some faux autumn leaves, pinecones, or battery-operated fairy lights for an enchanting tablescape.
- Tiered Tray Delights: These mini pumpkins are perfect for adding seasonal flair to tiered trays, alongside small candles, ceramic mugs, and other Fall accents.
- Window Sill Wonders: Line them up on a window sill to add a pop of autumn color and warmth to any room.
- Shelf and Bookshelf Accents: Tuck them among your books or decorative objects on shelves to infuse your living space with seasonal charm.
- Unique Gift Toppers: Attach a small balloon pumpkin to a wrapped gift for a thoughtful, handmade touch that makes the present extra special for Thanksgiving hosts or Fall birthdays.
- Kids’ Room Decor: Safe and soft, these pumpkins are perfect for decorating a child’s room or play area for the season.
Tips for Success and Customization
Elevate your DIY balloon pumpkins even further with these helpful tips and ideas for personalization:
- Vary Sizes for Visual Interest: Don’t stick to just one balloon size! Mixing small, medium, and slightly larger balloons will create a more dynamic and visually appealing display.
- Experiment with Colors: While classic orange is lovely, consider using white, cream, soft green, or even blush-toned balloons for a farmhouse or modern autumn aesthetic. Different colored threads can also add subtle contrasts.
- Add Embellishments: For extra sparkle, brush a little craft glitter onto the pumpkins. You can also glue on small faux leaves, tiny beads, or even use a fine-tip marker to draw delicate patterns.
- Consider Scents: For an extra sensory experience, you could lightly spray your finished pumpkins with a fall-themed essential oil blend (like cinnamon or pumpkin spice) from a distance.
- Involve the Family: This is a fantastic project for all ages. Younger children can help with stuffing the balloons (under supervision), while older kids can assist with wrapping and stem creation.
- Troubleshooting: If your balloon isn’t perfectly round, gently mold the fiberfill with your fingers. If threads slip, a tiny dot of glue can help secure them. Don’t be afraid to adjust until you love the look!
Your Autumn Home Awaits!
With just a few simple materials and a little bit of creativity, you can transform ordinary balloons into an enchanting collection of DIY pumpkins. These delightful decorations are not only easy to make but also bring a unique warmth and handmade charm to your home throughout the Fall season. They’re perfect for Thanksgiving, Halloween, or simply celebrating the beauty of autumn.
So, gather your supplies, follow these straightforward steps, and get ready to infuse your living space with the cozy spirit of the harvest. We hope you enjoy crafting these mini balloon pumpkins as much as we do, and watching your home blossom with festive Fall decor! A huge thank you to officialholidayhub on TikTok for sharing this brilliant and inspiring DIY project. If you loved this easy decor idea, be sure to visit her account and give her a follow for more wonderful video tutorials!