
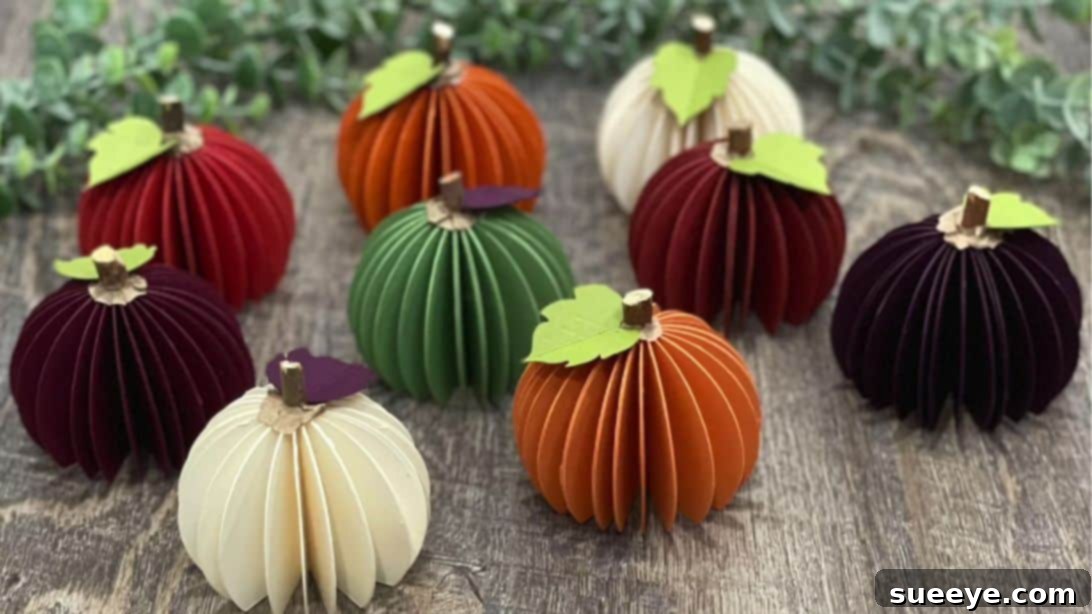
DIY Paper Pumpkins: Craft Your Own Adorable Fall Decor
Autumn brings with it a delightful array of colors, cozy vibes, and the perfect excuse for creative crafting. Among the most iconic symbols of fall are pumpkins, and what better way to celebrate the season than by creating your very own charming paper pumpkins? These mini, origami-inspired paper pumpkins are not only incredibly cute but also surprisingly easy to make, offering a fantastic project for crafters of all skill levels. Whether you’re looking to enhance your seasonal centerpiece, craft a festive garland, or simply enjoy a relaxing weekend activity, this comprehensive guide will walk you through every step of making these delightful autumn decorations. Let’s transform simple cardstock into beautiful, lasting fall decor that will add a handmade touch to any space!
Embrace the true spirit of fall with this fun and rewarding DIY paper pumpkin project. These versatile creations make perfect additions to your tabletop displays, windowsills, mantelpieces, or even as unique gift toppers. The crafting process is straightforward, wonderfully therapeutic, and yields stunning results that will infuse your home with warmth and charm. For those who prefer a visual learning experience, we highly recommend watching the detailed video tutorial by Patti J. Good on YouTube, which perfectly complements these written instructions and provides valuable insights.
Essential Materials for Your Paper Pumpkin Craft
Before embarking on your paper pumpkin crafting journey, gathering all the necessary materials will ensure a smooth and enjoyable experience. Most items are readily available at local craft stores, making this an accessible project for everyone.
- Pattern: While a specific pattern isn’t provided for the circles (as a punch is used), this might refer to a template for the leaf or a general guide for assembly. For the leaf, a simple hand-drawn or printed template can be very helpful.
- Thick Cardstock: You’ll need sheets approximately 8½ x 11 inches, specifically in vibrant orange for the pumpkin body and a natural green for the leaf. Opting for thick cardstock (65lb or 80lb weight is ideal) is crucial as it ensures your pumpkins hold their shape beautifully, provide durability, and withstand the gluing process without warping.
- Circle Punch: A 2½-inch circle punch is specified, which is perfect for creating uniformly sized pumpkin segments. Using a precise punch guarantees consistency, leading to a symmetrical and well-formed pumpkin. For different sized pumpkins, you can experiment with larger or smaller punches.
- Sharp Scissors: Essential for precise cuts, especially when trimming the straight edge of the circles and meticulously shaping the pumpkin leaf and Kraft paper vine. Sharp scissors prevent jagged edges and ensure a clean finish.
- Scoring Board and Tool: This specialized crafting tool is invaluable for creating crisp, clean folds on your cardstock circles. A scoring board helps achieve professional-looking creases, which are key for the accordion-like structure of the pumpkin. If you don’t have a dedicated scoring tool, a ruler and a dull butter knife or a bone folder can serve as effective substitutes.
- Small Stick: A natural twig found outdoors (cleaned and dried) or a small craft stick (like a lollipop stick) will serve as the realistic stem for your paper pumpkin. Aim for a stick that is about 2-3 inches long and proportional to your pumpkin’s size.
- Kraft Paper: A small piece of Kraft paper is used to create a charming, rustic vine accent for your pumpkin. Its earthy tone and texture add an authentic, natural touch.
- Craft Glue: A good quality liquid craft glue that dries clear and strong is perfect for securely assembling the numerous paper segments of the pumpkin body. Look for quick-drying formulas for efficiency.
- Hot Glue Gun and Glue Sticks: An indispensable tool for quick and secure attachment of the stick stem, Kraft paper vine, and green leaf. Hot glue provides an instant bond, making the final assembly process efficient.
Step-by-Step Guide: Crafting Your DIY Paper Pumpkins
Creating these charming paper pumpkins is a process that rewards patience and precision. Follow these detailed instructions carefully to ensure your handmade decorations turn out beautifully and stand the test of time. Each phase is broken down to make the project manageable and enjoyable.
Phase 1: Preparing the Pumpkin Body Segments
Step 1: Preparing the Cardstock Circles
Begin by taking your chosen orange cardstock. Using your 2½-inch circle punch, meticulously create a total of 24 perfectly round circles. Precision here is key for a symmetrical final pumpkin. As you punch, try to get clean cuts without tearing the paper. After punching all 24 circles, lay them out flat on your workspace. For each circle, carefully measure and trim off exactly half an inch from one side of the bottom edge. Ensure these cuts are straight across. This step is crucial because it creates a flat base, allowing your finished pumpkin to stand upright steadily, and also helps in the uniform assembly of the segments.
Next, it’s time to prepare these circles for folding and assembly. Using a scoring board and its corresponding scoring tool, carefully score each of the 24 circles precisely in half. A clean and distinct score line will ensure a crisp, even fold, which is vital for the accordion-like structure of the pumpkin. If you do not have a scoring tool or board, you can achieve a similar effect by simply folding each circle in half by hand. Take extra care to align the edges perfectly before pressing down firmly with your thumb or a bone folder to create a sharp, neat crease. Once all 24 circles are scored or manually folded, you will have 24 semi-circular segments ready for the next stage of assembly.
Step 2: Assembling and Gluing the Folded Segments
Now, gather all 24 of your folded cardstock segments. The next critical step is to stack them together meticulously. Ensure that all the folded edges are perfectly aligned along one side, and simultaneously, make sure the trimmed straight bases are also perfectly lined up at the bottom. This precise alignment is absolutely vital for ensuring your finished paper pumpkin is symmetrical and well-formed. Once they are stacked and aligned, gently but firmly squeeze the stack together with your hand. This helps to temporarily hold them in their correct position during the initial gluing phase and prevents shifting.
Begin the gluing process by carefully applying a thin, even layer of your liquid craft glue to one half of a folded segment. Immediately press another folded segment directly on top, ensuring that all edges, both the folded and the trimmed straight edges, are perfectly aligned with the previous piece. Repeat this process diligently, gluing each subsequent folded piece together onto the growing stack. Work methodically and take your time, making certain that each new piece is precisely lined up before applying pressure. The objective is to create a thick, bonded stack of all 24 folded segments. Once all pieces are glued, allow the entire assembly to dry completely. This is a crucial step that cannot be rushed; depending on your glue type and ambient humidity, this might take several hours or even overnight. Rushing the drying process can compromise the structural integrity, leading to a pumpkin that falls apart or loses its shape.
Step 3: Forming the Pumpkin’s Full Shape
Once the stacked segments are thoroughly dry and securely bonded into a single, thick block of paper, you are ready to form the complete pumpkin shape. Carefully take the fanned-out block. The final step in creating the main pumpkin body involves bringing the two outermost ends of your glued stack together. Apply a generous but even layer of craft glue to the outer half of the very last folded segment. Then, carefully bring the outer half of the very first folded segment to meet and adhere firmly to it. Press these two ends together, holding them in place until the glue begins to set sufficiently to maintain the circular shape. You might need to hold it for a minute or two, or use a clip if necessary, but be careful not to dent the paper.
Once the final bond is secure, gently open the paper up. You will see your beautifully accordion-folded, circular pumpkin shape begin to emerge. The segments will fan out to create a volumetric, rounded form. Set this piece aside to ensure that this final seal is completely dry and robust before you proceed to add any embellishments. A strong, fully dry bond at this stage is essential for the pumpkin to retain its structure and stand upright.
Phase 2: Adding the Stem and Leaf Details
Step 4: Crafting the Decorative Pumpkin Leaf
With the main pumpkin body prepared, it’s time to add the iconic autumn leaf that will give your paper pumpkin an authentic and finished look. Take your green cardstock. Carefully cut out a pumpkin leaf shape. You have creative freedom here: you can freehand a classic maple, oak, or simple generic leaf design, or if you prefer perfect symmetry, you can use a stencil or print a template. Once your leaf shape is cut out, fold it precisely in half lengthwise. This fold will create a natural-looking central vein for the leaf, adding realism.
To further enhance its realistic appearance and add dimension, use your scoring tool to gently score a few additional lines radiating outwards from the central fold. These score lines mimic the intricate natural veins found in real leaves, giving your green accent a more detailed and lifelike texture. Set the finished leaf aside momentarily.
Step 5: Preparing the Rustic Vine Accent (Kraft Paper Swirl)
Next, let’s create a charming, rustic vine-like accent using the Kraft paper. Cut a small square from the Kraft paper, approximately 1.5 to 2 inches per side. Find the precise center of this square and carefully punch a small hole. If you don’t have a small hole punch, you can meticulously use the tip of your scissors to create a tiny pilot hole. From this central hole, begin cutting outwards in a gentle spiral or a whimsical wavy pattern, gradually creating a circular shape with irregular, wavy edges. Aim to maintain a consistent distance of about half an inch from the center as you slowly spiral outwards, creating a continuous strip.
Once cut, gently wrinkle the entire piece of Kraft paper. Crumple it softly in your hand, then carefully open it back up. This gives the paper a wonderfully organic, crinkled texture, adding a rustic and natural charm that beautifully mimics a dried vine or a sepulcher. Set this textured piece aside with your green leaf.
Step 6: Attaching the Pumpkin Stem
Retrieve your fully dried and prepared paper pumpkin body. Take your chosen stick – whether it’s a natural twig you found or a craft stick – and gently insert it down through the center hole of the paper pumpkin. The stick should pass through the small gap created by the folds right in the heart of the pumpkin. Adjust its length as needed, trimming any excess from the bottom or top to ensure it is perfectly proportional to your pumpkin. A good length typically sees about 1.5 to 2 inches extending from the top of the pumpkin’s surface. Once you are satisfied with the stem’s length and placement, use your hot glue gun to securely adhere the stick in place. Apply a generous dab of hot glue around the base of the stick where it meets the pumpkin, ensuring it’s firmly anchored.
To further secure the stick and help the pumpkin maintain its full, rounded, and expanded shape, gently squeeze all the paper segments together around the stick. Then, carefully apply small dabs of hot glue between the inner folds of the paper segments, adhering them directly to the stick. This technique ensures the stem is robustly secured and helps reinforce the pumpkin’s overall structure, preventing it from collapsing inwards.
Step 7: Adding the Vine and Leaf Finishing Touches
With the stem now securely in place, it’s time to add the final, charming details that complete your paper pumpkin. Take your wrinkled Kraft paper piece (the vine accent). Carefully insert it over the stick, pushing it down until it rests snugly at the base of the stick, on top of the pumpkin. Apply a small but sufficient amount of hot glue to the underside of the Kraft paper piece to secure it firmly to both the pumpkin’s top surface and the base of the stem. This crumpled piece adds wonderful texture and character, truly resembling a dried vine or the sepulcher of a real pumpkin.
Lastly, take your green paper leaf. Apply a small bead of hot glue to the bottom portion of the leaf. Carefully attach it to the top of the wrinkled Kraft paper, positioning it slightly to the side of the stick. Position it naturally, as if it’s gracefully growing from the pumpkin itself. Press gently to ensure a good bond. And there you have it – your beautifully crafted, adorable DIY paper pumpkin is complete, ready to adorn your home with handmade charm!
Why DIY Paper Pumpkins Are a Must-Try Craft for Fall
Creating your own paper pumpkins offers a multitude of benefits that extend far beyond simply decorating your home. It’s an activity that sparks creativity, provides a deep sense of accomplishment, and allows for personalized touches that mass-produced decor often lacks. Here’s why this craft is an absolute must-try this autumn:
- Cost-Effective Decor: Paper and glue are remarkably inexpensive materials, making this a highly budget-friendly way to refresh and enhance your fall decorations without breaking the bank. You can achieve a high-end look for a fraction of the cost.
- Eco-Friendly Option: By choosing to craft with paper, especially if you opt for recycled or sustainably sourced cardstock, you’re making a more environmentally conscious decorating choice. Unlike real pumpkins, these won’t contribute to waste after the season.
- Limitless Customization: The beauty of DIY lies in personalization. Experiment with an endless array of colors, patterns, and even different types of cardstock to match your specific interior design theme. Add glitter, paint details, stamps, or other embellishments to make each pumpkin uniquely yours. You can also create miniature pumpkins for place settings or large statement pieces for dramatic effect.
- Safe and Fun for All Ages: With appropriate supervision, this craft is safe, simple, and incredibly enjoyable for children. It makes for a wonderful family activity, fostering creativity and fine motor skills in younger crafters.
- Durable and Reusable: Unlike real pumpkins that quickly rot and attract pests, well-made paper pumpkins are incredibly durable. They can be carefully stored away at the end of the season and joyfully reused for many years to come, becoming cherished parts of your annual fall decor.
- Therapeutic Creative Outlet: Engaging in crafting is a fantastic way to relax, de-stress, and express your artistic side. The repetitive motions and focus required can be meditative, providing a much-needed break from daily routines.
- Allergy-Friendly: For those with allergies to real plants or molds often associated with natural pumpkins, paper pumpkins offer a beautiful, hypoallergenic alternative.
Creative Ways to Display Your Handmade Paper Pumpkins
Once you’ve crafted your beautiful collection of paper pumpkins, the creative fun doesn’t have to stop there! Their versatile nature allows for countless display options, enabling you to infuse every corner of your home with autumnal charm. Here are some inspiring ideas to incorporate them into your fall home decor:
- Charming Centerpieces: Arrange a cluster of varying sized paper pumpkins (you can make different sizes by using various circle punch dimensions) in the center of your dining table, coffee table, or kitchen island. Enhance the display with natural elements like autumn leaves, acorns, pinecones, or warm, flameless LED candles for a cozy ambiance.
- Festive Garlands: String several pumpkins together using twine, raffia, or a rustic ribbon. Create a unique and eye-catching garland for your mantelpiece, across a window frame, along a staircase banister, or draped over a doorway.
- Window or Bookshelf Accents: Place individual pumpkins on windowsills, bookshelves, side tables, or even floating shelves to add delightful pops of fall color and texture throughout your home. They can fill small empty spaces with seasonal cheer.
- Unique Place Settings: Craft smaller versions of these paper pumpkins to adorn each guest’s place setting at your Thanksgiving dinner, harvest festival, or any fall-themed gathering. They can also serve as charming name card holders.
- Thoughtful Gift Toppers: Attach a mini paper pumpkin to a wrapped gift with a ribbon for a personalized, festive, and thoughtful touch that will delight the recipient.
- Wreath Enhancements: Hot glue them onto a plain autumn wreath (whether it’s grapevine, burlap, or artificial foliage) for added dimension, texture, and a burst of vibrant color.
- Nursery or Kids’ Room Decor: These cute, soft, and unbreakable paper pumpkins are perfect for decorating a child’s room or nursery without the worry of breakage or sharp edges.
- Tiered Tray Styling: Arrange them artfully on a tiered decorative tray along with other small fall-themed items like mini gourds, fairy lights, and tiny signs for an inviting vignette.
Tips for Crafting Success: Mastering Your Paper Pumpkins
To ensure your paper pumpkin project goes smoothly and yields the most beautiful and durable results, keep these helpful tips in mind. Even small details can make a big difference in the final outcome:
- Invest in Quality Materials: Always opt for good quality cardstock. For the pumpkin body, a weight of 65lb or 80lb is ideal as it provides excellent vibrancy and durability. Thicker cardstock holds its shape better and resists tearing during assembly.
- Keep Tools Sharp and Clean: Use sharp scissors and a high-quality circle punch for all your cuts. Dull tools can lead to frayed edges, uneven shapes, and a less polished finished product. Clean your tools regularly, especially if glue gets on them.
- Patience with Drying Times: This is perhaps the most crucial tip. Allow ample drying time for the liquid craft glue, especially during the stacking phase. Rushing this step can lead to segments detaching or the pumpkin losing its structural integrity. Hot glue is excellent for instant hold on the stem and leaf, but liquid craft glue provides a stronger, more permanent bond for the main paper body.
- Precision in Scoring and Folding: Take your time to score and fold each circle exactly in half. This precision ensures that your pumpkin expands evenly and symmetrically, resulting in a perfectly rounded and aesthetically pleasing shape.
- Experiment with Colors and Textures: Don’t limit yourself to traditional orange. Try making pumpkins in white, cream, gold, silver, metallic, or even patterned cardstock for unique designs that complement your specific decor. Different paper textures can also add visual interest.
- Varying Sizes for Visual Interest: Create a dynamic display by crafting pumpkins of different sizes. Use various circle punch sizes to make small, medium, and large pumpkins that can be grouped together for a richer aesthetic.
- Practice Makes Perfect: If you’re new to using a scoring board or a hot glue gun, consider doing a quick practice run on scrap paper first. This helps you get a feel for the tools and techniques before working on your main project.
- Work in a Well-Ventilated Area: When using hot glue or certain craft glues, ensure your workspace is well-ventilated.
Troubleshooting Common Paper Pumpkin Issues
Even seasoned crafters encounter minor hurdles. Here’s how to tackle some common problems you might face while creating your DIY paper pumpkins, ensuring a successful and satisfying crafting experience:
- Pumpkin Doesn’t Hold Its Shape Well: This is a common issue and usually indicates that the craft glue didn’t dry completely before you tried to open the pumpkin, or not enough glue was used between segments. To fix this, carefully reapply glue to any loose segments, press them firmly together, and allow extended drying time. Use clips if needed to hold pieces together while drying.
- Uneven or Lopsided Expansion: If your assembled pumpkin looks lopsided or expands unevenly, it’s likely due to inconsistent scoring or folding, or misalignment during the initial gluing of the segments. Try to gently adjust the segments, carefully easing them into a more uniform position. If the issue is too severe, consider using the existing pieces as practice and starting a new batch with extra attention to alignment.
- Stem Detaches Easily: Ensure you use enough hot glue around the very base of the stick where it meets the pumpkin. More importantly, remember to apply hot glue generously between the inner folds of the pumpkin segments that adhere directly to the stick. This anchors the stem much more securely. Let the hot glue cool and harden completely before handling or moving the pumpkin.
- Leaf or Vine Falls Off: Similar to the stem, good hot glue adhesion is key. Make sure the surfaces you are gluing are clean and dry. You might need to rough up the surface of the paper slightly with fine-grit sandpaper (or scratch lightly with a scissor tip) where the glue will be applied to give it better grip, especially on smooth cardstock.
- Edges Fraying or Tearing After Cutting: If your cardstock edges are fraying or tearing, especially during punching or trimming, your scissors or circle punch might be dull. Sharpen your scissors or consider replacing your punch for cleaner, crisper cuts that result in a more professional finish.
- Glue Bleeding Through Paper: If you notice your liquid craft glue bleeding through the cardstock, you might be using too much. Apply thinner, more even layers of glue. Also, consider using a thicker cardstock which is less prone to glue bleed-through.
*These amazing images and the inspiring tutorial are all credited to Patti J. Good via YouTube. Be sure to check out her other creative content and follow her channel for more fantastic DIY ideas and crafting inspiration!
Embrace the Autumn Spirit with Your Own DIY Paper Pumpkins
Making these DIY paper pumpkins is more than just a craft; it’s a delightful opportunity to infuse your home with personalized charm, warmth, and the cozy spirit of autumn. They are simple to construct, elegant in their final form, and provide endless possibilities for customization, allowing your unique style to shine through. Whether you’re an experienced crafter looking for a new project or just starting your DIY journey, these paper pumpkins offer a rewarding and enjoyable experience that will leave you with beautiful, handmade decorations to cherish season after season.
So, gather your materials, put on some festive autumn music, and immerse yourself in the creative process. Enjoy the satisfaction of bringing these adorable fall accents to life with your own hands. These charming paper pumpkins are sure to become a beloved part of your seasonal decor, welcoming the beauty of fall into your home in a truly special way.