
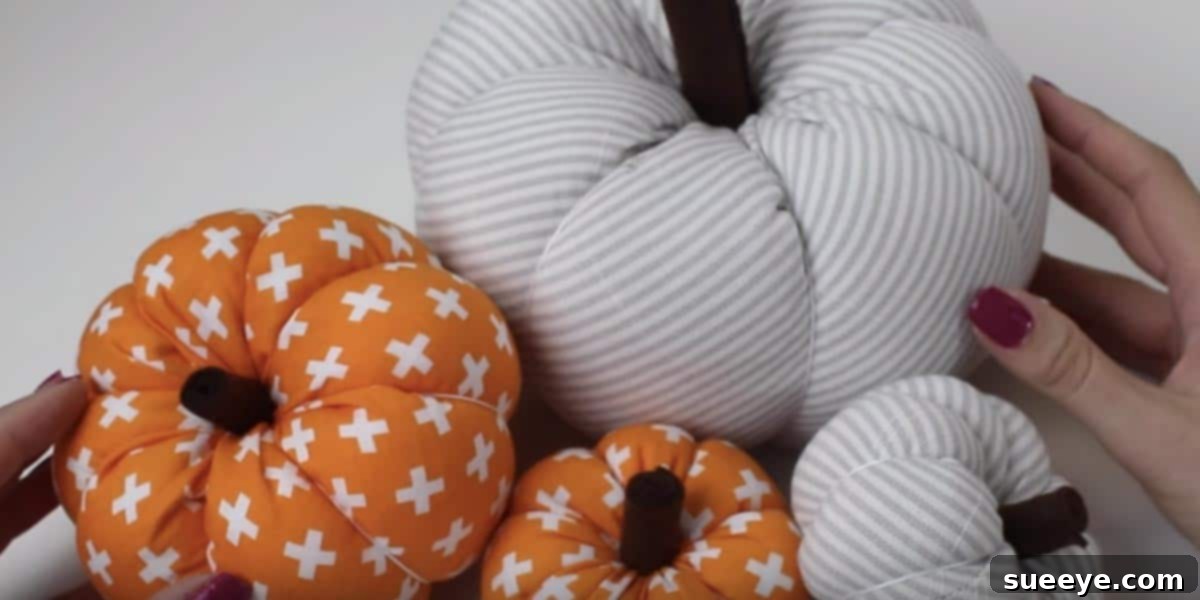
DIY Fabric Pumpkins: Craft Charming Autumn Decor That Lasts Season After Season
As the leaves begin to turn vibrant shades of crimson and gold, and a crisp coolness fills the air, it’s the perfect time to infuse your home with the cozy spirit of autumn. While real pumpkins are undoubtedly beautiful, they are fleeting. Imagine having a collection of charming pumpkins that you can bring out year after year, perfectly matching your home’s aesthetic, and never succumbing to rot or decay. This dream becomes a reality with DIY fabric pumpkins!
Whether you’re a seasoned sewing enthusiast or just starting your crafting journey, this comprehensive tutorial will guide you through creating your own adorable fabric pumpkins. We’ll explore various sizes – small, medium, and large – and even share tips for customizing your own unique dimensions. You can choose to use your trusty sewing machine for speed and efficiency, or opt for the therapeutic rhythm of hand-sewing. Get ready to transform your home into an autumnal haven with these delightful, long-lasting decorations!
Why Fabric Pumpkins are the Ultimate Fall Decor
The allure of fabric pumpkins extends far beyond their charming appearance. They offer numerous advantages that make them a superior choice for seasonal decorating:
- Unmatched Longevity: Unlike their real counterparts, fabric pumpkins last indefinitely. Once crafted, they become a cherished part of your autumn decor collection for years to come, saving you time and money on annual replacements.
- Endless Customization: The creative possibilities are truly limitless. From rustic burlap to luxurious velvet, vibrant cotton prints to muted linen, you can select fabrics that perfectly complement your home’s color palette and style. Experiment with textures, patterns, and embellishments to create a truly personalized display.
- Cost-Effective Creativity: While there’s an initial investment in materials, the reusable nature of fabric pumpkins makes them highly economical in the long run. Plus, you can often repurpose fabric scraps or old clothing, turning them into beautiful new decor.
- Safe & Clean: No worrying about pests, mold, or the messy decomposition of real pumpkins. Fabric pumpkins are a clean, family-friendly decor option, safe for homes with pets and children.
- Therapeutic Crafting: Engaging in a DIY project like making fabric pumpkins is not only productive but also incredibly relaxing and rewarding. It’s a wonderful way to express your creativity and unwind.
- Versatile & Adaptable: These charming creations can be used in countless ways, from elegant centerpieces to cozy mantel accents, or even as unique gifts. Their lightweight nature also makes them easy to move and rearrange as your decorating whims change.
Think about it: while it takes 75 to 100 frost-free days for a real pumpkin to grow, you can fill your home with a “patch” of beautiful, custom fabric pumpkins in just a single afternoon! Let’s gather our supplies and start crafting.
Essential Materials for Your Fabric Pumpkin Project
The beauty of this project lies in its simplicity and the wide range of materials you can use. Here’s a detailed list of what you’ll need to get started:
Fabric Choices: The Heart of Your Pumpkin’s Personality
The fabric you choose will largely dictate the overall look and feel of your pumpkin. Don’t be afraid to mix and match textures for added visual interest!
- Burlap: Perfect for a rustic, farmhouse, or natural aesthetic. Its coarse texture adds charm.
- Silk or Satin: For a touch of elegance and luxury. These fabrics create a soft sheen that catches the light beautifully.
- Cotton Duck or Canvas: Durable, versatile, and holds its shape well. Excellent for painting or stenciling designs.
- Linen: Offers a refined, natural, and slightly textured look, ideal for a minimalist or coastal fall theme.
- Velvet: Provides a rich, opulent feel, especially in deep jewel tones like burgundy, forest green, or sapphire blue.
- Flannel or Corduroy: Adds a cozy, warm texture, perfect for a snug autumnal vibe.
- Repurposed Fabrics: Old sweaters, shirts, jeans, or even blankets can be given a new life as unique pumpkins.
Tip: For a medium-sized pumpkin (roughly 6-8 inches in diameter), you’ll generally need a fabric circle of about 15-20 inches in diameter. Adjust larger or smaller for different pumpkin sizes.
Stuffing: Giving Your Pumpkins Shape
- Polyester Fiberfill: The most common and easiest option for a soft, fluffy pumpkin.
- Fabric Scraps: A great way to recycle and create a firmer, denser pumpkin.
- Rice or Dried Beans: Can be added to the bottom of the pumpkin (often in a small bag or stocking) before fiberfill to give it weight and stability, preventing it from toppling over.
Stems: The Finishing Touch
The stem truly brings your fabric pumpkin to life. Get creative with these options:
- Natural Tree Branches: Collect small, sturdy twigs from your yard or a park. Look for interesting shapes and textures. Ensure they are dry and clean. You’ll need a small saw or strong clippers to cut them to size (1-3 inches works well).
- Cinnamon Sticks: Offer a delightful scent and a charming, rustic look.
- Wine Corks: A quirky and eco-friendly option.
- Twisted Jute or Rope: Creates a textured, natural stem.
- Fabric-Covered Wire: Bend floral wire into a stem shape and wrap it with coordinating fabric strips.
Tools You’ll Need
- Sewing Machine (Optional, but Recommended): For faster and stronger seams, especially if making multiple pumpkins.
- Hand Sewing Needles: For those who prefer to sew by hand, or for closing the final stitches. A long doll-making needle is helpful for shaping.
- Strong Thread: Matching or contrasting color, suitable for gathering and sculpting.
- Fabric Scissors: Sharp scissors are essential for clean cuts.
- Pins: To hold fabric in place.
- Fabric Marker or Chalk: For marking your circle pattern.
- Hot Glue Gun and Glue Sticks: Indispensable for attaching stems and embellishments.
- Wire Cutters: If using floral wire for vines.
- Measuring Tape or Ruler: For accurate sizing.
Crafting Your Fabric Pumpkin: A Step-by-Step Guide
This tutorial breaks down the process into manageable steps, making it easy for anyone to follow along. While a video tutorial can offer visual guidance (like the one from “Made to Sew” mentioned in the original inspiration), these written instructions provide all the details you need to succeed.
Step 1: Preparing Your Fabric Circle
- Determine Your Pumpkin Size:
- Small Pumpkin (3-4 inches diameter): Cut a fabric circle approximately 8-10 inches in diameter.
- Medium Pumpkin (6-8 inches diameter): Cut a fabric circle approximately 15-20 inches in diameter.
- Large Pumpkin (10-12 inches diameter): Cut a fabric circle approximately 25-30 inches in diameter.
- Custom Sizes: For any desired finished pumpkin diameter, generally multiply that by 2.5 to 3 to get the fabric circle diameter you need.
- Mark Your Circle: Lay your chosen fabric flat. You can use a dinner plate, a compass, or even a piece of string tied to a pencil to draw a perfect circle. For a string method, tie one end to your pencil, hold the other end at the center point of your fabric, and draw a circle, keeping the string taut.
- Cut Your Fabric: Carefully cut along the marked line. Precision helps ensure a well-shaped pumpkin.
Step 2: Sewing the Pumpkin Body
This is where the magic happens, transforming a flat circle into a three-dimensional form.
- Prepare for Gathering: Take your needle and strong thread. Starting from anywhere along the outer edge of your fabric circle, begin to sew a running stitch (a simple in-and-out stitch) about 1/4 to 1/2 inch from the edge. Continue sewing all the way around the entire circumference of the circle. Do not tie off the thread; leave long tails on both ends.
- Gather the Fabric: Gently pull both ends of the thread simultaneously. As you pull, the fabric circle will begin to gather and pucker, forming a pouch. This will create the base and sides of your pumpkin.
- Stuff Your Pumpkin: Once the opening is small enough, begin filling the pouch with your chosen stuffing material. Start with a firm base, adding polyester fiberfill until the pumpkin is plump and feels dense but still has some give. If using rice or beans for weight, place a small bag of them at the bottom before adding fiberfill. Ensure it’s evenly distributed for a good shape.
- Close the Opening: Continue to pull the gathering threads tight until the opening is completely closed. Neatly stitch across the gathered opening several times to secure it firmly. Knot the thread securely and trim any excess. You now have a basic stuffed fabric ball!
Step 3: Shaping the Pumpkin (Optional but Highly Recommended)
This step gives your pumpkin its characteristic segmented look, adding depth and realism.
- Thread Your Needle: Use a long, strong needle (like a doll-making needle) and extra-strong thread (upholstery thread works well). Make a large knot at one end of your thread.
- Create Segments: Insert the needle through the center of the pumpkin, starting from the closed bottom (where your gathering stitches are) and pushing it all the way through to the top center.
- Wrap and Pull: Wrap the thread around the outside of the pumpkin, pulling it down into one of the natural indentations. Reinsert the needle through the bottom center again, pulling it tightly. Repeat this process 4-6 times around the pumpkin, creating distinct “segments” or ridges. Pull the thread taut after each segment to create a nice, deep indentation.
- Secure the Shape: Once you’re happy with the segmentation, knot the thread securely at the bottom of the pumpkin and trim.
Step 4: Attaching the Stem
The stem is the crowning glory of your fabric pumpkin.
- Prepare Your Stem: If using a natural branch, ensure it’s clean and cut to your desired length (usually 1-3 inches).
- Apply Hot Glue: Apply a generous amount of hot glue to the bottom of your chosen stem.
- Attach Firmly: Press the stem firmly into the top center of your fabric pumpkin, holding it in place for a few seconds until the glue sets.
Step 5: Adding Embellishments (Unleash Your Creativity!)
This is where your fabric pumpkins truly come to life with personality and charm.
- Twisted Vines: These add a whimsical, natural touch. Using naturally wired brown floral wire and wire cutters, cut off three 30-inch pieces. Take one piece and gently twist it around your fingers or a pencil to create a curly, vine-like effect. Secure the base of the vine to the pumpkin near the stem with a dab of hot glue. Repeat with the other pieces, arranging them artistically. Craft stores often sell pre-packaged wired vines for convenience.
- Ribbons and Bows: Tie a festive bow around the stem using burlap ribbon, velvet ribbon, plaid fabric strips, or lace for an elegant touch.
- Faux Leaves and Berries: Hot glue small silk autumn leaves or faux berry sprigs around the base of the stem for a touch of natural color.
- Buttons and Beads: Add small decorative buttons or strings of beads for a unique texture or shimmer.
- Personalized Tags: Attach small handwritten tags with fall-themed words (“Grateful,” “Harvest,” “Autumn Blessings”) for a thoughtful touch.
- Cinnamon Sticks and Dried Oranges: Incorporate these for a sensory experience, adding a lovely aroma to your decor.
Customizing Your Pumpkins: Size, Style, and Palette
One of the greatest joys of making fabric pumpkins is the ability to customize every aspect to suit your personal taste and existing decor. Don’t feel limited to traditional orange!
- Varying Sizes: As discussed, you can create a charming collection by making pumpkins of different sizes. Cluster small, medium, and large pumpkins together for a dynamic display.
- Fabric Textures & Patterns: Mix smooth cottons with coarse burlap, or soft flannel with structured linen. Experiment with solids, plaids, stripes, gingham, or even delicate floral patterns for a truly unique ensemble.
- Color Palettes:
- Traditional Autumn: Embrace the classic oranges, deep reds, golden yellows, and rich browns.
- Modern Farmhouse: Opt for neutrals like cream, grey, dusty rose, and muted blues.
- Elegant & Glamorous: Choose velvet in jewel tones, metallics (gold, silver, copper), or deep eggplant.
- Whimsical: Play with pastels, bright patterns, or even polka dots for a playful touch.
- Stem Variations: Beyond natural branches, consider cinnamon sticks for a fragrant option, twisted rope for a nautical touch, or even a collection of wine corks for an eco-chic look.
- Embellishment Styles: From rustic jute bows to sophisticated lace trimmings, choose embellishments that align with your desired aesthetic.
Decorating with Your Fabric Pumpkins: Inspire Your Autumn Home
Now that you’ve crafted your beautiful fabric pumpkins, it’s time to display them! Their versatility means they can enhance almost any area of your home.
- Charming Centerpieces: Arrange a cluster of varying sized pumpkins in the center of your dining table or coffee table. Add some faux fall leaves, pinecones, and perhaps a candle for a warm, inviting focal point.
- Cozy Mantel Displays: Line your fireplace mantel with pumpkins alongside garlands, family photos, or other seasonal accents.
- Welcoming Entryways: Place a few pumpkins on an entryway table or bench to greet guests with autumnal cheer.
- Shelf and Nook Accents: Tuck smaller pumpkins onto bookshelves, window sills, or open shelving units to add subtle touches of fall throughout your living space.
- Festive Tabletops: Create vignettes on side tables, nightstands, or even bathroom counters. Combine them with small vases of dried flowers, vintage books, or decorative trays.
- Seasonal Wreaths: Attach small fabric pumpkins to an autumn wreath for a unique front door decoration.
- Gift Toppers: Use a miniature fabric pumpkin as a charming and reusable gift topper for fall birthdays or hostess gifts.
The possibilities are truly endless! Let the changing weather inspire you to get creative with your fall crafts and transform your home into a sanctuary of autumnal beauty.
Caring for Your Fabric Pumpkins
One of the best features of fabric pumpkins is how easy they are to care for. To ensure they remain beautiful season after season:
- Storage: When the season ends, gently pack your pumpkins in a breathable container or box. Store them in a dry, cool place away from direct sunlight to prevent fading.
- Cleaning: If your pumpkins get dusty, a soft brush or a lint roller can typically clean them. For small spots or spills, spot clean very carefully with a damp cloth and mild soap, then allow to air dry completely. Avoid submerging them in water or putting them in a washing machine, as this can damage the shape and materials.
Start Your Fabric Pumpkin Patch Today!
Making fabric pumpkins is a delightful and rewarding craft that brings lasting beauty and warmth to your home throughout the autumn season. From selecting the perfect fabric to adding those final, personal touches, each step offers an opportunity for creative expression. Gather your materials, follow these simple steps, and prepare to fill your home with a charming collection of handmade pumpkins that will be cherished for years to come. Happy crafting!