
Crafting Comfort: Your Ultimate Guide to Making a Beautiful Chevron Quilt
There’s a unique magic in a handmade gift, especially when it’s crafted with love and intent. It’s a tangible expression of care, a comforting embrace woven into fabric and thread. Recently, this profound sentiment resonated deeply with me when a dear friend, an unwavering companion for eighteen years, received a life-altering cancer diagnosis. In that moment, the desire to offer support and solace solidified into a single, heartfelt project: a handmade chevron quilt.
This quilt became more than just a craft; it was a journey of dedication. From selecting the first fabric to the final stitch of the binding, I immersed myself in every step. It presented a thrilling opportunity to experiment with machine quilting using a free-motion foot – an exhilarating challenge that tested my muscles and patience, yet yielded immensely satisfying results. Completing the binding for the first time was another milestone, leaving me incredibly proud of the finished piece. This experience underscored a fundamental truth in quilting: once you grasp the basic construction principles, the possibilities for adapting and personalizing designs are endless.
The Enduring Power of Handmade Gifts
In a world often dominated by mass-produced items, a handmade gift stands out as a beacon of genuine affection and thoughtfulness. A quilt, in particular, embodies warmth, comfort, and a sense of security. It’s not merely a blanket; it’s a testament to the hours of careful labor, the precision of each cut, and the love sewn into every seam. For someone facing a challenging time, a quilt can be a tangible source of comfort, a reminder that they are cherished and supported. The act of creating such a gift is equally rewarding, forging a deeper connection to the recipient and imbuing the item with irreplaceable sentimental value.
Understanding the Allure of the Chevron Pattern
The chevron pattern, characterized by its distinctive V-shape or zig-zag design, has enjoyed immense popularity in various forms of design and fashion for centuries. In quilting, its dynamic lines and geometric appeal make it a visually striking choice that can be both modern and timeless. Chevrons offer incredible versatility; they can be bold and graphic, or subtle and elegant, depending on your fabric choices. Whether you prefer a playful zig-zag or a sophisticated angular design, mastering the chevron technique opens up a world of creative possibilities for stunning quilts, throws, and decorative pieces.
Gathering Your Essential Supplies for a Chevron Quilt
Before diving into the construction of your beautiful chevron quilt, it’s crucial to gather all the necessary materials and tools. Proper preparation ensures a smooth and enjoyable quilting experience, minimizing interruptions and allowing your creativity to flow freely.
Fabric Selection: The Heart of Your Quilt
- Choosing Your Fabrics: The chevron design thrives on contrast and complementary colors. You’ll need several fabrics to create your stripes. You can opt for a small selection of fabrics that repeat throughout the pattern, or choose a diverse array of eleven or more distinct fabrics for a more eclectic look.
- Quantity: For each chevron stripe, you’ll typically need either fat quarters (approximately 18×22 inches) or quarter-yard cuts (9 inches by the width of the fabric, usually 42-44 inches). If choosing quarter-yard cuts, always double-check that you have a full 9 inches in width to ensure consistent strip sizes.
- Theme and Palette: Consider the recipient’s preferences or the aesthetic of the space where the quilt will reside. Do they love vibrant colors, soothing pastels, or perhaps a specific theme like florals or geometrics? Select fabrics that inspire you and tell a story.
- Pre-washing: Many quilters recommend pre-washing and drying your fabrics before cutting. This helps prevent future shrinkage, color bleeding, and removes any manufacturing chemicals, ensuring your quilt maintains its beauty for years to come.
Essential Quilting Tools: Your Workshop Companion
- Sewing Machine: A reliable sewing machine is paramount. For quilting, features like a quarter-inch seam foot are incredibly helpful. If you plan to machine quilt, a walking foot (for straight lines) and a free-motion quilting foot (for intricate designs) are invaluable additions.
- Rotary Cutter, Mat, and Rulers: These tools are fundamental for precise, efficient fabric cutting. A large self-healing cutting mat (e.g., 24×36 inches) and a variety of acrylic rulers (e.g., 6×24 inches, 12.5×12.5 inches) will be your best friends. Always exercise caution when using a rotary cutter.
- Quality Thread: Invest in good quality cotton thread that complements your fabrics. A neutral color like white or light grey is often a good choice for piecing, while quilting thread can be chosen to blend or contrast with your quilt top.
- Pins or Fabric Clips: Essential for holding fabric pieces together before sewing, ensuring accurate seams.
- Iron and Ironing Board: Proper pressing at each stage is crucial for flat seams and accurate block construction.
- Quilt Batting: This is the middle layer of your quilt, providing warmth and dimension. Batting comes in various materials (cotton, polyester, wool, blends) and lofts (thickness). Choose one that suits your desired warmth, drape, and quilting style.
- Backing Fabric: A single piece of fabric or pieced together sections for the back of your quilt. Ensure it’s slightly larger than your quilt top to allow for shrinkage during quilting.
- Fabric Marker or Chalk: Useful for marking quilting lines or cutting guides.
Step-by-Step: Constructing Your Chevron Quilt
With your supplies ready, it’s time to embark on the exciting process of bringing your chevron quilt to life. Precision and patience are your greatest allies here.
1. Fabric Arrangement and Planning
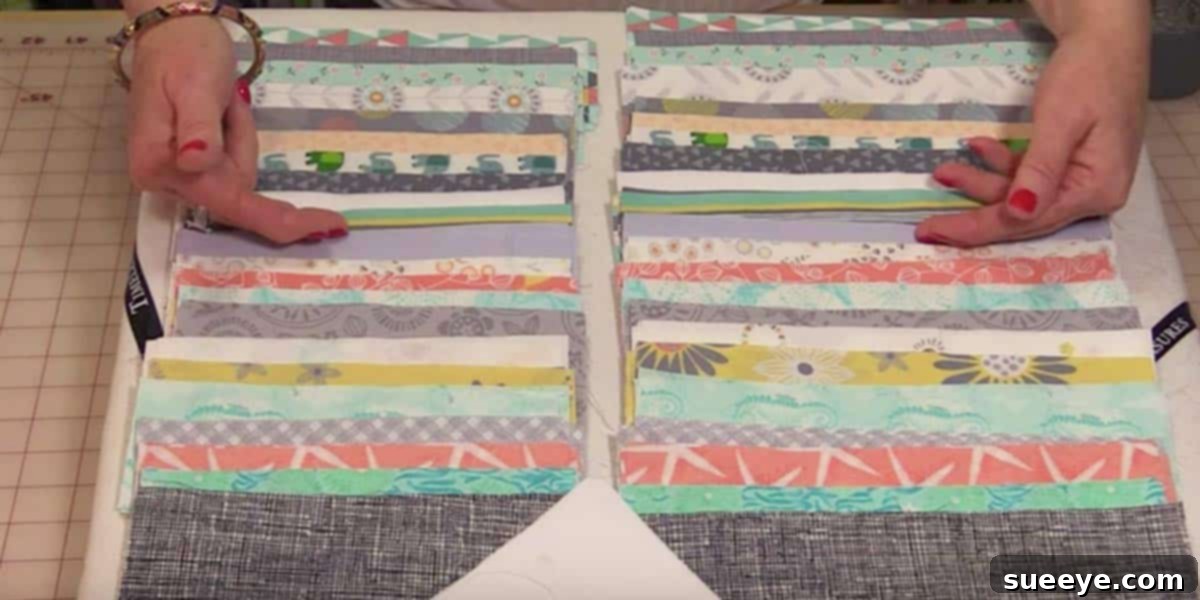
Before making any cuts, lay out all your chosen fabrics in the precise order you envision your chevrons appearing on the quilt. A helpful tip is to separate similar colors so they don’t directly touch, creating a more dynamic visual flow. This planning stage is critical. Once you’re satisfied with the arrangement, take a clear picture of your fabrics laid out in order. This visual reference will be an absolute lifesaver, especially if you need to take breaks or re-arrange. Commit to keeping your fabrics in this order for every subsequent step to maintain your design integrity.
2. Precision Cutting for Chevron Stripes
The key to crisp chevrons lies in accurate cutting. While there are various methods, a common approach for beginners involves cutting rectangular strips and then subdividing them into angled pieces. For example, cut your chosen fabrics into strips of a consistent width (e.g., 4.5 inches or 6.5 inches). Then, using a specialized chevron ruler or a regular ruler and a 45-degree angle marking, cut these strips into parallelograms or angled segments. Ensure all your angled cuts are consistent for a uniform chevron pattern. Remove any selvage edges before cutting your strips.
3. Piecing Your Chevron Blocks
Take two angled fabric pieces that will form the “V” of your chevron. Place them right sides together, aligning the raw edges precisely. Sew them together using a consistent ¼-inch seam allowance. Press your seams open or to one side, depending on your preference and how the seams will interact with future pieces. Continue piecing these angled segments to form a complete chevron block. Repeat this process for all your fabric combinations, carefully following your photographed layout.
4. Assembling the Quilt Top Rows
Once you have a collection of individual chevron blocks, it’s time to assemble them into rows. Lay out your blocks, again referencing your planning photo, ensuring that the chevron points align correctly. Pin the blocks right sides together, matching seams meticulously to create continuous, straight lines. Sew the blocks into rows. After each row is sewn, press the seams. Alternating the direction of your pressed seams in adjacent rows can help them nest together neatly when you join the rows.
5. Joining Rows to Form the Quilt Top
With your rows complete, it’s time to assemble the full quilt top. Place two rows right sides together, aligning all the seams and raw edges. Pin generously, especially where the chevron points meet, to ensure accuracy. Sew the rows together with a consistent ¼-inch seam. Continue adding rows until your entire quilt top is complete. Press the final quilt top thoroughly, making sure all seams are flat and smooth.
6. The Quilt Sandwich: Layering and Basting
Now, you’ll create the “quilt sandwich.” Lay your backing fabric face down on a clean, flat surface, securing it with tape to prevent shifting. Next, place your batting smoothly on top of the backing. Finally, center your finished quilt top face up on the batting. The goal is to have all three layers perfectly smooth and free of wrinkles. Baste the layers together using your preferred method: safety pins (spaced every 4-6 inches), basting spray, or long hand-stitches. Basting prevents the layers from shifting during the quilting process.
7. Quilting: Stitching the Layers Together
Quilting is the process of stitching through all three layers (quilt top, batting, and backing) to secure them and add texture. This is where your personal touch truly shines. For beginners, straight-line quilting using a walking foot is an excellent starting point, following the lines of your chevrons or creating a simple grid. If you’re feeling adventurous, as I did, try free-motion quilting with a free-motion foot. This allows for fluid, organic designs and adds wonderful dimension. Practice on scrap fabric first to get a feel for controlling the machine and fabric simultaneously. Remember, the quilting doesn’t have to be perfect; it’s about adding your unique creative flair.
8. The Finishing Touch: Binding Your Quilt
The binding provides a neat, durable edge to your quilt and is often considered the final flourish. Start by trimming any excess batting and backing fabric, squaring up your quilt. Create binding strips (usually 2.5 inches wide) from coordinating fabric. You can cut these strips on the straight grain or on the bias for more flexibility around curves (though for a rectangular quilt, straight-grain is typically fine). Sew the strips together end-to-end to form one long strip. Fold the strip in half lengthwise and press.
Attach the binding to the front of the quilt, aligning the raw edge of the binding with the raw edge of the quilt, and sew with a ¼-inch seam, mitering the corners for a professional finish. Once sewn to the front, flip the binding over to the back of the quilt, fold it neatly, and hand-stitch or machine-stitch it in place. The binding step can be incredibly satisfying, especially when you see the crisp, clean edges framing your hard work.
Tips for Your Quilting Journey and Personalization
- Patience is a Virtue: Quilting is a marathon, not a sprint. Take your time with each step, especially with cutting and pressing. Rushing often leads to mistakes that are more time-consuming to fix.
- Practice Makes Perfect: Don’t be afraid to experiment on scrap fabric before committing to your main project. This is especially true for free-motion quilting.
- Embrace Imperfections: Handmade items inherently carry unique characteristics. Don’t let minor imperfections deter you; they add to the charm and story of your quilt.
- Personalize Your Design: While following a pattern is great, feel free to modify your chevron design. Experiment with different fabric combinations, varying strip widths, or incorporating solid blocks between chevron rows.
- Consider the Recipient: If making a gift, think about the person’s favorite colors, hobbies, or home decor to make the quilt truly special for them.
- Add a Label: Consider adding a small fabric label to the back of your quilt, detailing who made it, for whom, and the date. This creates a lasting keepsake.
- Care Instructions: Provide simple care instructions (e.g., machine wash cold on a gentle cycle, tumble dry low) to ensure your quilt remains beautiful for years to come.
Conclusion: A Legacy of Love, Stitched with Care
Creating a chevron quilt is a deeply rewarding experience, transforming simple pieces of fabric into a masterpiece of comfort and artistic expression. Whether you’re making it as a heartfelt gift for a friend in need, as a cozy addition to your own home, or simply for the joy of creation, the journey from fabric selection to the final stitch is an act of love. Each chevron, each seam, and each carefully chosen fabric tells a story – a story of dedication, creativity, and connection.
I hope this comprehensive guide inspires you to embark on your own quilting adventure. The satisfaction of holding a finished quilt, knowing you’ve crafted something so beautiful and meaningful with your own hands, is truly unparalleled. Embrace the process, cherish the learning, and let your creativity flow. Happy quilting!