
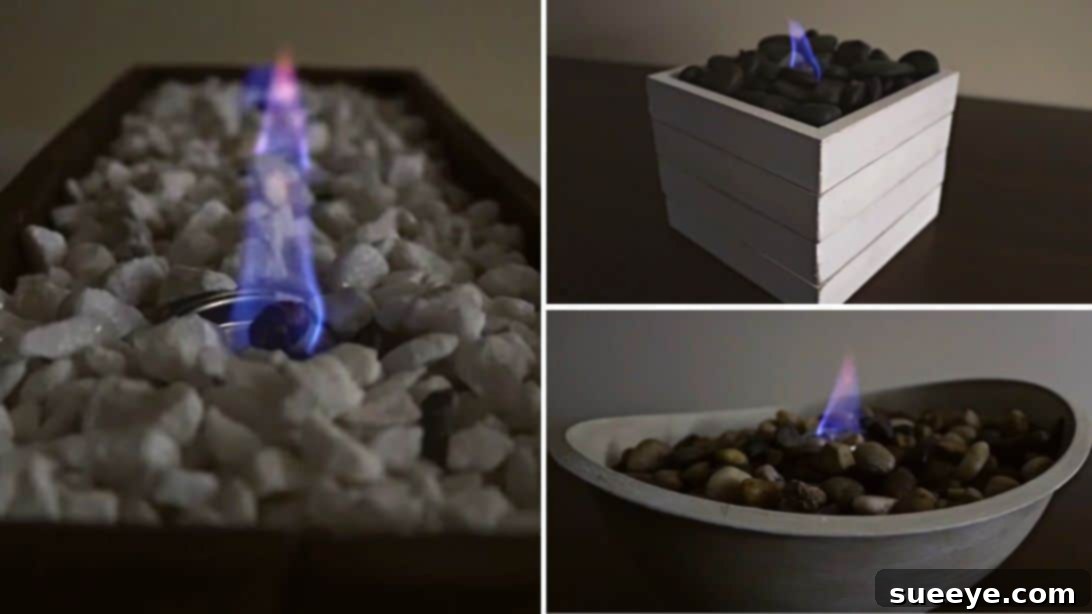
Create Your Own Cozy Ambiance: 3 Easy DIY Tabletop Fire Pits from Dollar Tree
As the chill of winter approaches, there’s nothing quite like the warm, inviting glow of a fire to create a cozy atmosphere. While a full-sized fireplace might not be an option for everyone, a tabletop fire pit offers a charming and practical alternative. These miniature fire features not only provide a touch of whimsical decor but also infuse your home with a delightful sense of warmth and comfort. Inspired by the brilliant ideas from The Crafty Couple on YouTube, we’ve put together a comprehensive guide to help you craft your very own tabletop fire pits using inexpensive supplies, primarily from your local Dollar Tree store. Get ready to transform your living spaces with these enchanting and easy-to-make DIY projects!
Why DIY Your Own Tabletop Fire Pit?
Creating your own tabletop fire pit offers a multitude of benefits, making it an incredibly popular and satisfying DIY project:
- Affordability: With most materials sourced from Dollar Tree, these projects are incredibly budget-friendly, often costing less than $10 per unit. This is a stark contrast to expensive retail versions.
- Customization: Unlike mass-produced items, your DIY fire pit can be personalized to perfectly match your home decor style, whether it’s rustic, modern, minimalist, or eclectic.
- Ease of Creation: These projects require minimal crafting experience and only basic tools, making them accessible for beginners and seasoned DIY enthusiasts alike.
- Instant Ambiance: The flickering flame instantly elevates the mood of any room, creating a soothing and romantic atmosphere perfect for relaxing evenings, entertaining guests, or adding a festive touch during holidays.
- Versatility: Suitable for indoor use (with proper ventilation and safety measures) or for enhancing outdoor patio and deck spaces, these portable fire pits can be moved wherever you desire a touch of warmth and light.
Essential Materials You’ll Need
Before diving into the crafting process, gather all your supplies. Most of these items can be found at Dollar Tree, making this project incredibly economical. For larger quantities or specific finishes, you might visit a craft store or hardware store.
- Tumbling Tower Blocks: These are the classic wooden blocks often found in dollar stores, similar to Jenga blocks. They are the primary building material for one of our designs.
- Wood Stain (Dark Walnut Recommended): To give your wooden blocks a rich, aged look. Dark walnut is suggested for a classic aesthetic, but feel free to choose any stain color that complements your decor.
- White Paint (Acrylic or Chalk Paint): Ideal for painting plastic bowls or other surfaces. Chalk paint offers a matte, distressed look, while acrylic is versatile.
- Paintbrush: A good quality paintbrush is essential for smooth application of paint and stain.
- Clean Cloth or Rag: For wiping off excess stain, distressing paint, or general cleanup.
- Large Stir Sticks (or Craft Sticks): Used for creating a stable base for the first fire pit design. Look for wider, sturdier options if possible.
- Pen or Pencil: For marking measurements and cut lines.
- Saw or Craft Knife: To accurately cut wood stir sticks. A utility knife or a small hand saw will work.
- Fuel Canisters (Tabletop Gel Fuel): These are the heart of your fire pit, providing the flame. Ensure they are designed for indoor tabletop use and read all safety instructions.
- Dollar Tree Rocks (Pebbles or Decorative Stones): Used to fill and stabilize the fire pits, adding to their aesthetic appeal. White rocks are popular for a clean look, but any decorative stones will work.
- Hot Glue Gun and Glue Sticks: Your primary adhesive for securely assembling the components. Ensure you have plenty of glue sticks.
- Plastic Bowl or Container: For the second fire pit design. Choose a heat-resistant plastic bowl if possible, or ensure it’s sufficiently insulated from the fuel canister’s heat.
- Dollar Tree Signs (Picture Frames): These inexpensive frames are cleverly repurposed for the third fire pit design. Look for ones with removable backings.
General Safety Guidelines for Tabletop Fire Pits
Working with any open flame requires careful attention to safety. Please read and adhere to these guidelines to ensure a safe and enjoyable experience with your DIY tabletop fire pits:
- Ventilation is Key: Always use your tabletop fire pit in a well-ventilated area. If indoors, ensure a window is slightly open to allow for fresh air circulation.
- Supervision: Never leave a burning fire pit unattended. Keep an eye on the flame, especially when children or pets are present.
- Stable Surface: Place your fire pit on a flat, stable, heat-resistant surface, away from any edges where it could be knocked over. Avoid placing it on flammable materials like tablecloths or paper.
- Clearance from Flammables: Maintain a safe distance from curtains, paper, wooden objects, and any other combustible materials.
- Use Approved Fuel: Only use gel fuel specifically designed for tabletop fire pits or chafing dishes. Never use liquid fuels, alcohol, or other unauthorized combustibles.
- Keep Water/Extinguisher Nearby: Have a small bucket of water or a fire extinguisher accessible in case of an emergency.
- Allow to Cool: Before moving, refilling, or cleaning your fire pit, ensure the fuel canister and surrounding materials have completely cooled down.
- Read Fuel Canister Instructions: Always follow the specific safety and usage instructions provided by the manufacturer of your gel fuel.
- Adult Use Only: These fire pits are not toys and should only be operated by adults.
Directions: Crafting Your DIY Tabletop Fire Pits
Let’s get started on building these charming fire pits! Each design offers a unique aesthetic and construction method.
Fire Pit #1: The Rustic Wood Block Design
This design utilizes tumbling tower blocks to create a robust, rustic-looking tray for your flames, perfect for a farmhouse or cozy cabin aesthetic.
- Prepare the Wood Blocks: Begin by staining all your tumbling tower blocks with the dark walnut wood stain. Apply an even coat, ensuring all sides are covered. Wipe off any excess stain with a clean rag. Allow them to dry completely according to the stain manufacturer’s instructions, which may take several hours.
- Construct the Base Frame: While the blocks are drying, lay out four large stir sticks side-by-side. Arrange approximately eight stained blocks along the sides, mimicking the intended dimensions of your fire pit. Place one block at each end and pivot it to determine the length needed for the stir sticks. Mark where the stir sticks end, then carefully cut off the excess ends using a saw or craft knife.
- Assemble the Base Brace: Hot glue the cutout pieces of the stir sticks underneath the base formed by the four main stir sticks. These pieces will serve as critical braces, providing stability and elevating the main structure slightly.
- Build the First Layer: Flip the stir stick base over so the braces are underneath. Begin adhering the stained blocks along the sides of this base using hot glue. Ensure the first row is securely attached and forms a sturdy perimeter.
- Add Subsequent Layers with Offset Pattern: Continue building the layers of blocks. For the subsequent rows, make sure to offset them slightly (like bricklaying) to create an attractive, interlocking pattern. This not only enhances the visual appeal but also adds structural integrity.
- Finish the Ends: As you build up the layers, you’ll notice blocks exceeding the length at the ends due to the offset pattern. Mark these excess portions, cut them off cleanly, and adhere the trimmed blocks with hot glue. Continue this process until your tray reaches approximately four rows high, or to your desired height.
- Stain the Base Edges: Once the main structure is built and all glue has dried, apply stain along the visible sides and edges of the stir stick base to match the blocks, ensuring a cohesive look.
- Insert Fuel and Rocks: Carefully place three fuel canisters inside the tray, spacing them evenly for balanced heat and light distribution. Fill the remaining spaces inside the tray with your white decorative rocks until all visible gaps are covered and the canisters are securely nestled.
- Ignite and Enjoy: Light the fuel canisters following their safety instructions, and enjoy the warm, rustic glow of your first DIY tabletop fire pit!
Fire Pit #2: The Elegant Painted Bowl
This design is wonderfully simple and results in a chic, modern fire pit using a repurposed plastic bowl, perfect for a minimalist or contemporary home.
- Prepare the Bowl: Thoroughly clean and dry your plastic bowl. If desired, you can lightly sand the surface to help the paint adhere better.
- Apply White Paint: Coat the entire bowl with a thin, even layer of white paint. Allow this first coat to dry completely. For a smooth, durable finish, apply two more coats, ensuring each layer dries fully in between applications. This multi-coat process prevents streaks and ensures even coverage.
- Add Depth with Stain (Optional): Once the white paint is completely dry, use a clean rag or cloth to lightly apply a small amount of wood stain (or a darker paint color thinned with water) over the white surface. Immediately wipe off most of the stain, leaving just enough to subtly antique or distress the bowl, giving it character and depth. This technique is often called “dry brushing” or “ragging.” Let it dry completely.
- Stabilize with Rocks: Fill the bottom of the bowl with a layer of decorative rocks. This serves two purposes: it helps flatten the base if your bowl is rounded, and it adds weight for stability.
- Insert Fuel and More Rocks: Place a single fuel canister securely in the center of the bowl, resting on the initial layer of rocks. Continue to fill around the canister with more decorative rocks until it is nicely covered and stable.
- Position and Light: Place your elegant bowl fire pit anywhere you like, ensuring it’s on a stable, heat-resistant surface. Light the fuel and enjoy the clean, modern glow.
Fire Pit #3: The Chic Frame-Style Fire Pit
Repurpose Dollar Tree picture frames to create a sleek, elevated fire pit that makes a stylish statement on any table.
- Prepare the Frames: From each Dollar Tree sign (typically a small picture frame or decorative plaque), remove any hanging hardware or attachments from the back. These often have small loops or stands that need to be detached.
- Create the Base: Take two of the sign frames. Stack them together with their decorative “right sides” facing upwards, ensuring they are perfectly aligned. Apply hot glue generously along the edges where they meet and firmly press them together. This double-layered frame will form a sturdy base for your fire pit.
- Prepare the Upper Frames: For the two remaining sign frames, completely remove the backing, matting, and any glass or plastic inserts, leaving only the bare frames themselves.
- Assemble the Upper Structure: Carefully stack these two deconstructed frames on top of the base you just created. Use hot glue to secure them firmly in place. This will create a box-like structure with an open top, ready to hold your fuel and rocks.
- Insert Fuel and Rocks: Place a fuel canister inside the assembled frame structure. Fill the inside surrounding the canister with your chosen decorative rocks until the canister is securely in place and the frame is aesthetically pleasing.
- Light it Up: Position your chic frame-style fire pit on a safe surface, ignite the fuel, and admire its contemporary charm.
Customization and Decorating Ideas
These DIY tabletop fire pits are fantastic canvases for your creativity. Don’t hesitate to experiment with different finishes and embellishments to make them uniquely yours!
- Paint Colors & Finishes: Instead of white or stained wood, consider painting your fire pit a bold color, a metallic shade (gold, silver, copper), or even a distressed look. Stencils can add intricate patterns.
- Alternative Fillers: While rocks are common, clear glass beads, small river stones, or even decorative ceramic pieces can be used to fill the space around the fuel canister. Just ensure they are non-combustible.
- Seasonal Touches: During holidays, incorporate small, non-flammable seasonal embellishments (e.g., miniature pinecones for winter, small faux flowers for spring, only if kept far from the flame).
- Base Accents: Add a small decorative tray or a heat-resistant coaster underneath your fire pit for extra protection and style.
- Varying Heights: Create a cluster of fire pits of different heights for a dynamic visual display on a larger table.
Maintenance and Care
To ensure your DIY tabletop fire pits remain beautiful and functional, a little maintenance goes a long way:
- Cleaning: Once cooled, wipe down the exterior surfaces with a damp cloth to remove dust or soot. For stained wood, use a furniture polish suitable for stained finishes.
- Refueling: When a fuel canister is empty, allow it to cool completely before carefully removing it and replacing it with a new one.
- Storage: When not in use, store your fire pits in a dry, safe place away from direct sunlight or extreme temperatures to preserve their materials.
Ignite Your Creativity and Cozy Up Your Home!
These three DIY Dollar Tree tabletop fire pits offer an incredible way to infuse your home with warmth, ambiance, and personalized style without breaking the bank. Whether you prefer the rustic charm of wood blocks, the modern elegance of a painted bowl, or the chic appeal of framed designs, there’s a project here for every taste. Grab your supplies, follow these simple steps, and prepare to bask in the cozy glow of your own handmade creation. Remember, safety first, and happy crafting!
*All image credit for these inspiring DIY projects belongs to The Crafty Couple via YouTube. Be sure to visit and subscribe to their channel for more fantastic crafting ideas!