
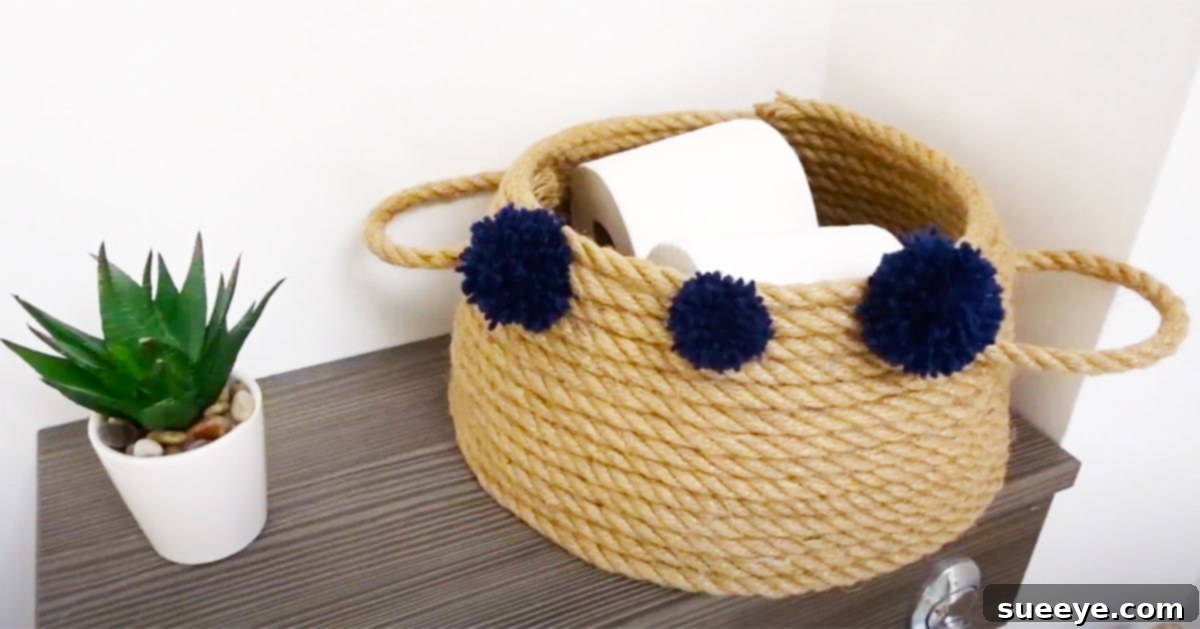
In the realm of home decor, few items strike the perfect balance between rustic charm and practical utility quite like the humble rope basket. These versatile organizers have surged in popularity, gracing the pages of interior design magazines and becoming coveted pieces in stylish homes. However, their trendy status often comes with a hefty price tag, making them an aspirational purchase for many. What if you could capture that coveted bohemian, natural aesthetic and practical functionality without breaking the bank? The answer lies in the rewarding world of DIY crafting. Creating your own jute rope basket is not only incredibly cost-effective but also offers the immense satisfaction of a handmade item perfectly tailored to your space.
Inspired by ingenious creators like Family Home Project, who masterfully simplify the DIY process, crafting your own rope basket has never been more accessible. This guide will walk you through everything you need to know, from gathering the right supplies to adding personalized decorative touches. You’ll discover how easy it is to transform simple jute rope into a sturdy, beautiful storage solution that complements any decor style, particularly those leaning towards natural, farmhouse, or bohemian vibes. Say goodbye to overpriced store-bought alternatives and hello to a custom-made treasure.
Why Craft Your Own Jute Rope Basket?
The allure of DIY projects, especially for home decor, extends far beyond mere cost savings. While significantly cheaper than purchasing pre-made baskets, creating your own jute rope basket offers a myriad of additional benefits:
- Unbeatable Value: Rope baskets can be surprisingly expensive in retail stores, with prices often reflecting their popularity and the perceived craftsmanship. By making your own, you drastically cut down on costs, using readily available and affordable materials.
- Customization at Your Fingertips: This is perhaps the greatest advantage. You have complete control over the size, shape, depth, and even the weave tightness of your basket. Need a shallow basket for keys by the door? A tall one for laundry? A wide one for blankets? The possibilities are endless. You can tailor it to fit specific nooks, shelves, or storage needs perfectly.
- Personalized Aesthetic: Jute rope inherently brings a warm, natural, and earthy tone to any room. It seamlessly blends with various interior design styles, from rustic farmhouse to minimalist modern or vibrant bohemian. The neutral palette of jute serves as an excellent canvas for further personalization with paints, dyes, or embellishments.
- Sustainable and Eco-Friendly: Jute is a natural, biodegradable fiber, making your DIY project an environmentally conscious choice. By crafting durable items that last, you reduce waste and contribute to a more sustainable lifestyle.
- A Unique Gift Idea: Handmade gifts carry a special sentiment. A custom jute rope basket makes a thoughtful and practical present for housewarmings, baby showers, weddings, or any occasion. Fill it with related goodies, and you have an instant, memorable gift.
- Therapeutic and Rewarding: The process of coiling and gluing can be incredibly meditative and relaxing. There’s immense satisfaction in seeing a simple spool of rope transform into a functional and beautiful piece of art crafted by your own hands.
Gathering Your Essential Supplies
One of the best aspects of this DIY project is its minimal supply list. You likely have some of these items on hand already, making it even more accessible. Here’s what you’ll need to create your beautiful jute rope basket:
- Jute Rope: This is the star of the show! Jute is a strong, natural fiber known for its earthy texture and durability. It’s affordable and widely available at craft stores, hardware stores, or online. The thickness of your rope will affect the final look and sturdiness of your basket. Thicker rope creates a chunkier, more substantial basket, while thinner rope allows for finer details and a slightly softer look. Aim for a medium thickness (around 6-10mm) for a good balance of ease of use and structural integrity. You’ll need several rolls depending on the desired size of your basket – it’s always better to have a little extra than to run out midway!
- Hot Glue Gun: A reliable hot glue gun is crucial for securing the rope coils together. Make sure it heats up efficiently and has a comfortable grip. Mini glue guns work well for smaller projects, but a full-size gun can handle larger baskets more efficiently.
- Glue Sticks: Stock up! You’ll use a lot of glue sticks. Purchase a quality brand to ensure strong adhesion and minimize stringing. Clear glue sticks are typically preferred.
- Sharp Scissors: Essential for cleanly cutting the jute rope. A good pair of craft scissors will make the process much smoother and prevent frayed ends.
- Protective Mat or Work Surface: Hot glue can get messy. Protect your table or workspace with a silicone mat, a piece of cardboard, parchment paper, or an old newspaper. This will prevent glue from sticking to your surface and make cleanup easier.
- Optional but Recommended:
- Thimble: A thimble can protect your fingers from the heat of the glue gun and prevent accidental burns, especially when pressing down hot glue.
- Binder Clips or Clothesline Clips: These can be very helpful for temporarily holding sections of rope together as the glue dries, especially when starting the walls of the basket.
- Measuring Tape or Ruler: Useful for planning your basket’s dimensions and ensuring even height.
- Pencil/Marker: For marking the desired base diameter on your mat or paper if you’re aiming for a precise size.
- Newspaper or Paper Towels: To quickly wipe away any excess glue.
Step-by-Step Guide to Crafting Your Jute Rope Basket
Now that you have all your supplies, let’s dive into the creative process! Remember, patience and consistency are key to a beautifully finished basket.
1. Preparing Your Workspace
Lay out your protective mat or covering on a flat, stable surface. Plug in your hot glue gun and allow it to heat up completely. Have your jute rope unspooled and easily accessible. A well-organized workspace makes the crafting process much more enjoyable.
2. Creating the Base of Your Basket
The base is the foundation of your basket, so it’s important to make it sturdy and flat.
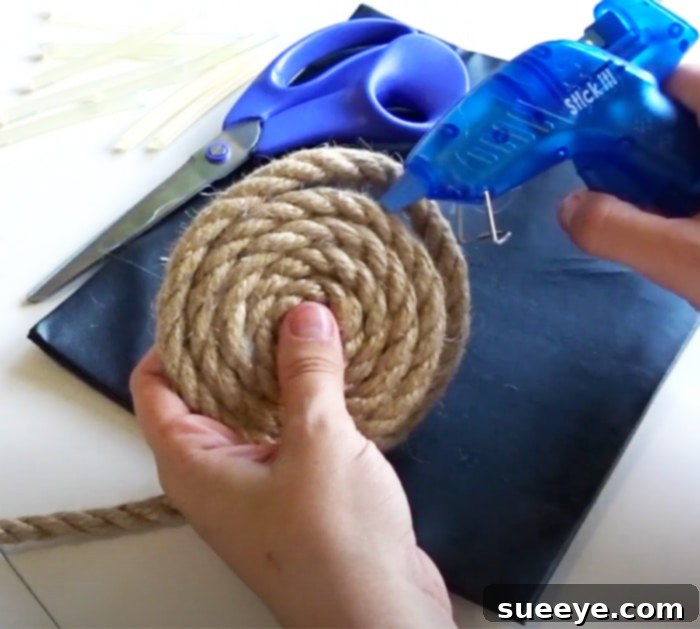
- Start the Coil: Take the end of your jute rope and apply a small dot of hot glue to it. Carefully begin to coil the rope tightly around itself, forming a small, flat spiral. Ensure this initial coil is very tight and secure, as it’s the absolute center of your basket.
- Expand the Base: Continue to coil the rope in a spiral, applying a thin line of hot glue along the edge of the previous coil before pressing the new rope firmly against it. Work in small sections, applying glue and pressing, then repeating. This ensures maximum adhesion and prevents the rope from unraveling.
- Maintain Flatness: As you build the base, periodically press it down onto your work surface to ensure it remains perfectly flat. A wobbly base will lead to a lopsided basket. Continue this process until your base reaches the desired diameter. This could be anywhere from 6 inches for a small utility basket to 12-18 inches or more for a large storage basket.
3. Building the Walls of Your Basket
Once your base is complete, it’s time to transition to building the sides of your basket. This is where your flat coil starts to stack upwards.
- Transitioning Upwards: Instead of gluing the new coil directly beside the last coil of the base, you’ll now start gluing it slightly on top of the previous layer. This subtle shift in placement will create the upward curve of your basket wall. Apply glue to the top edge of the outermost coil of your base and press the next rope coil directly on top.
- Stacking and Gluing: Continue to stack and glue the rope coils on top of one another, working your way around the circumference of the basket. Ensure you apply glue generously enough for a strong hold but not so much that it oozes out excessively. Press each new layer firmly against the one below it.
- Maintaining Shape and Height: As you build, continuously check the shape and height of your basket. Try to keep the walls as straight and even as possible. If you want a more tapered basket, you can slightly angle the new coils inward; for a flared basket, angle them slightly outward. However, for beginners, maintaining a straight wall is often easiest. Continue until your basket reaches your desired height.
4. Finishing the Rim
When you reach your desired height, it’s time to create a clean, sturdy rim for your basket.
- Securing the End: Once you’ve completed the final coil, cut the end of the jute rope cleanly. Apply a generous amount of hot glue to the very end of the rope and press it firmly against the previous coil, tucking it in neatly to create a seamless finish. Hold it in place for a few moments until the glue sets.
- Reinforcing (Optional): For added durability, you can apply an extra bead of glue along the inside of the top rim or even wrap a thin piece of string or wire around the top layer before gluing it down.
Adding Your Personal Touch: Handles and Decorations
This is where your basket truly becomes unique! The original creators at Family Home Project also demonstrate how to add handles, which are crucial for functionality and aesthetics.
Creating Handles:
There are several ways to add handles to your jute rope basket:
- Integrated Rope Handles: This is the most seamless method. Before finishing the rim, leave a loop of rope unglued on two opposing sides for your handles. Once the loops are formed, continue gluing the rope above them to secure the handle base, then finish the rim. You can then wrap the loop with a thinner rope for extra comfort and aesthetics.
- Separate Rope Loops: Cut two equal lengths of jute rope. Form each into a loop and securely hot glue the ends to the inside of the basket’s rim, on opposing sides. You can reinforce these with extra glue or by wrapping them with thinner rope.
- Fabric or Leather Handles: For a different look, you can attach pre-made fabric or faux leather handles. Use a strong fabric adhesive or even a needle and sturdy thread to sew them securely to the basket’s rim.
Decorating Your Basket:
Beyond the handles, the possibilities for decorating your jute rope basket are endless. This is your chance to infuse your personality and match your home’s aesthetic.
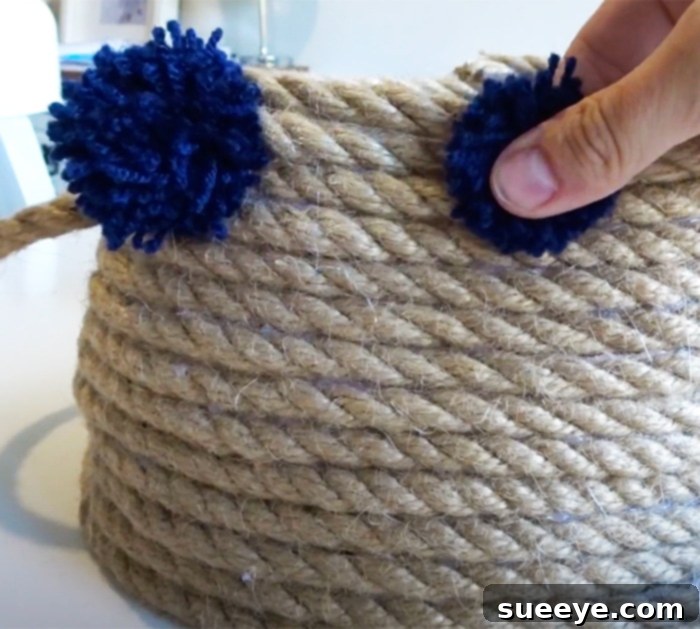
- Pom Poms: As suggested, colorful pom-poms hot-glued around the rim or in clusters can add a playful and vibrant touch.
- Tassels: Create or purchase yarn tassels and tie or glue them to the handles or along the rim for a bohemian flair.
- Paint: Use acrylic paint to create patterns, stripes, or dip-dye effects on the jute rope. Fabric paint works well for durability.
- Beads: Thread large wooden beads onto thin rope and wrap them around the basket, or glue individual beads onto the surface.
- Fabric Accents: Hot glue fabric strips, ribbon, or lace around the top edge or weave them through the coils.
- Labels: Attach small chalkboard labels, wooden tags, or fabric labels for organizational purposes.
- Natural Elements: Incorporate dried flowers, small wooden beads, or seashells for an even more organic feel.
Creative Ways to Use Your Jute Rope Baskets
The beauty of a handmade jute rope basket lies in its incredible versatility. Once completed, you’ll find countless uses for it throughout your home, helping you keep things organized while adding a touch of natural elegance. Here are just a few ideas:
- Bathroom Organization: Perfect for storing toilet rolls, hand towels, beauty products, or even baby wipes in a nursery. The natural material adds a spa-like serenity.
- Living Room Declutter: Use larger baskets to neatly tuck away throw blankets, magazines, remote controls, or children’s toys. They blend beautifully with any decor and hide clutter stylishly.
- Bedroom Solutions: Ideal for organizing scarves, belts, small accessories, or even as a chic laundry hamper for delicate items. A small basket on your nightstand can hold books, reading glasses, or hand cream.
- Nursery Essentials: Keep diapers, lotions, burp cloths, and small toys organized and easily accessible in a baby’s room. They’re soft, natural, and safe for little ones.
- Kitchen Storage: Great for holding fruits, vegetables (like onions or potatoes in a pantry), dish towels, or small kitchen utensils that don’t fit in drawers.
- Entryway Catch-All: Place a small basket by the door for keys, mail, sunglasses, or wallets, keeping your entryway tidy and functional.
- Office and Craft Supplies: Organize pens, notepads, crafting tools, yarn, or other supplies, bringing a touch of warmth to your workspace.
- Plant Holders: While not directly waterproof, you can place a potted plant (with a drip tray) inside a jute basket to elevate its look and add texture to your plant corner.
- Thoughtful Gift Packaging: Instead of a gift bag, present your carefully chosen items inside a handmade jute basket – it’s two gifts in one!
Tips for Success and Troubleshooting
- Patience is a Virtue: Don’t rush the process. Take your time with each coil, ensuring the glue sets properly and the rope is firmly pressed into place. Consistency yields the best results.
- Glue Gun Safety: Always be mindful of the hot nozzle and melted glue. If you’re prone to burns, wear a thimble or even thin gloves. Keep children and pets away from the hot glue gun.
- Managing Glue Strings: Hot glue guns are notorious for leaving behind fine, wispy strings. You can easily remove these once the glue has cooled by gently pulling them off or using a hairdryer on a low setting to melt them away (be careful not to overheat the jute).
- Check for Evenness: Periodically step back and look at your basket from different angles to ensure the walls are straight and the base is flat. It’s easier to correct minor wobbles early on.
- Don’t Be Afraid to Experiment: Once you’ve mastered the basic technique, try different rope thicknesses, explore various shapes (oval, square, rectangular), or incorporate other materials like fabric scraps or colored twine for unique designs.
- Reinforce if Needed: If you plan to use your basket for heavy items, consider adding extra glue to crucial seams or even incorporating a thin piece of cardboard or plastic into the base for added rigidity.
Caring for Your Jute Rope Basket
Jute is a durable material, but a little care will ensure your handmade basket lasts for years to come:
- Spot Clean Only: Jute is not meant to be submerged in water. For spills or dirt, gently spot clean with a damp cloth and mild soap. Blot the area and allow it to air dry completely.
- Avoid Excessive Moisture: Keep your jute basket away from prolonged exposure to high humidity or wet environments, as this can lead to mold or mildew.
- Maintain Shape: If your basket starts to lose its shape, you can gently reshape it by hand. For stubborn areas, a light mist of water can make the jute more pliable, but ensure it dries thoroughly afterward.
- Vacuum Regularly: Use a brush attachment on your vacuum cleaner to remove dust and debris from the rope fibers.
Overall, crafting your own jute rope basket is a wonderfully rewarding and practical DIY project. It’s a testament to the fact that beautiful, functional home decor doesn’t always have to come with a hefty price tag. From saving money to enjoying the satisfaction of creating something with your own hands, this project offers numerous benefits. The sturdy nature of jute ensures your basket will be a long-lasting addition to your home, perfect for organizing blankets, plants, toiletries, or making a thoughtful personalized gift. So, gather your supplies, find your inspiration, and embark on the journey of creating your very own, uniquely styled rope basket!