
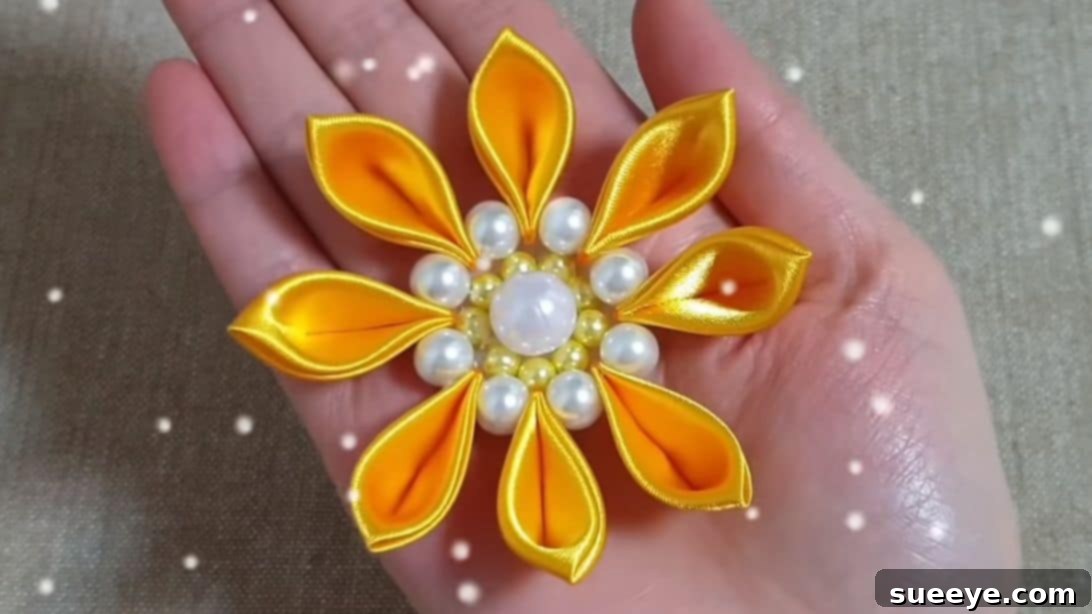
Are you searching for a delightful and surprisingly simple craft project that yields stunning results? Look no further! This comprehensive tutorial will guide you through the process of creating exquisite flowers using satin ribbons and a handful of common crafting supplies. Inspired by the brilliant techniques shared by Merry Craft, this DIY ribbon flower project is perfect for beginners and seasoned crafters alike. Imagine transforming ordinary ribbons into beautiful embellishments for your bags, dresses, hats, or even unique gifts. The versatility of these handmade flowers is endless, allowing you to experiment with various ribbon colors, bead styles, and sizes to match any aesthetic. Get ready to dive into the full instructions for crafting your very own beautiful ribbon blossoms, adding a touch of personalized elegance to almost anything!
Why Craft Ribbon Flowers? Endless Charm and Versatility
Handmade ribbon flowers offer a unique blend of charm, personalization, and practicality that makes them a favorite among crafters. They are not just pretty decorations; they are expressions of creativity and care. Here’s why you’ll love making them:
- Unleash Your Creativity: With an array of ribbon colors, textures, and bead options, each flower you create can be a unique piece of art.
- Cost-Effective Decor: Ribbons and beads are generally inexpensive, making this a budget-friendly way to add elegance to your projects without breaking the bank.
- Perfect for All Skill Levels: While the results look intricate, the actual steps are straightforward and easy to master, even for those new to crafting.
- Personalized Gifts: Attach a handmade ribbon flower to a gift package, a bookmark, or a hair clip to create a thoughtful and personalized present.
- Sustainable Crafting: Repurpose leftover ribbons or fabric scraps, contributing to more sustainable crafting habits.
- Therapeutic Hobby: Engaging in repetitive, mindful tasks like cutting, folding, and stitching can be incredibly relaxing and stress-reducing.
Essential Materials for Your Ribbon Flower Project
Before you begin, ensure you have all your materials laid out in an organized manner. Having everything within reach will make the crafting process smoother and more enjoyable. The beauty of this project lies in its simplicity and the accessibility of its components.
- Satin Ribbon: Choose a high-quality satin ribbon for a luxurious finish. Double-faced satin provides a consistent sheen on both sides, which is ideal for petals where both sides might be visible. A width of approximately 1.5 to 2 inches (3.8 – 5 cm) is recommended for petals of this size, ensuring a good structure. Consider vibrant colors or soft pastels to match your project.
- Ruler or Measuring Tape: Precision is key when cutting petals. A reliable ruler or measuring tape will ensure all your petals are uniform in size, contributing to a perfectly symmetrical flower.
- Sharp Pair of Scissors: A good pair of fabric scissors is essential for clean cuts, preventing fraying before you even start heat-sealing. Dull scissors can lead to jagged edges, making the sealing process more difficult.
- Lighter: This is used to heat-seal the edges of your ribbon, preventing them from fraying over time. (Note: Please exercise extreme caution when using a lighter. Always work in a well-ventilated area, away from flammable materials, and keep a glass of water nearby for emergencies. Adult supervision is highly recommended for younger crafters.)
- 8 Pieces of White Beads or Pearls: These beads will be strung between your petals, adding a delicate border and helping to form the flower’s circular shape. Pearls or white beads offer a classic, elegant touch.
- 9 Pieces of Small Beads: These smaller beads will be used to create a decorative inner ring around the flower’s center. Choose beads that complement your ribbon color and the larger central bead.
- 1 Big Bead: This will serve as the focal point of your flower’s center, adding a prominent and often contrasting or sparkling element. Select a bead that stands out and completes the design.
- Strong Thread and Needle: A durable polyester or quilting thread is recommended, as it needs to withstand pulling when assembling the petals. A sharp needle with an eye large enough for your chosen thread is necessary for smooth stitching.
- White Satin Ribbon (for backing): A small piece of white satin ribbon, preferably the same type as your petals, will be cut into a circle to provide a neat backing for your flower, hiding stitches and offering a stable base for attachment.
- Hot Glue Gun and Glue Sticks: A hot glue gun is perfect for quickly and securely attaching the backing and the beads. Ensure your glue gun is clean and ready to use.
- Tweezer: This tool is invaluable for holding small ribbon pieces while heat-sealing, protecting your fingers from the flame and allowing for precise manipulation.
Step-by-Step Guide to Crafting Your Ribbon Flower
Now that you have all your materials ready, let’s begin the exciting process of bringing your ribbon flower to life. Follow these detailed instructions carefully for the best results.
Step 1: Crafting the Petals with Precision
The foundation of your beautiful ribbon flower lies in meticulously crafted petals. Each petal contributes to the overall symmetry and appeal of the final piece, so consistency is key. Begin by measuring approximately 2 inches (5 cm) of your satin ribbon. Using your sharp scissors, make a clean cut. Immediately after cutting, use your lighter to carefully seal both cut edges of this ribbon segment. Gently pass the flame along the edge, just enough for the synthetic fibers to melt slightly and fuse together, preventing any fraying. Avoid holding the flame too close or for too long, as this can discolor or burn the ribbon.
Next, take the sealed ribbon segment and fold it in half diagonally, bringing one corner across to meet the opposite edge. This creates a triangular shape. Now, fold this triangle in half again, and then once more. This series of folds will give your petal its distinctive pointed shape and volume. With the ribbon still folded, carefully cut a small tip from the folded, pointed end. This cut will define the apex of your petal. Use your tweezers to firmly hold this newly cut tip, and lightly heat the edge with your lighter to seal it. This step is crucial for maintaining the petal’s shape and preventing unraveling. Finally, cut a small, narrow part from the bottom edge of the folded ribbon. Again, hold this bottom edge with your tweezers and lightly heat it to stick the layers of ribbon together. This fuses the base of the petal, creating a sturdy foundation for assembly. Congratulations, you’ve just made one petal! Repeat this exact process seven more times to create a total of eight identical petals, ensuring each one is as uniform as possible.
Step 2: Assembling the Flower Base with Beads
With all eight petals ready, it’s time to bring your flower to life by stringing them together. Thread your needle with a strong, durable thread, leaving a generous tail for tying knots later. Begin by running the needle through the very tip of the bottom-most folded edge of one petal. Ensure the thread goes through securely without tearing the ribbon. After threading the first petal, slide one of your white beads onto the thread, positioning it snugly against the petal. Continue this alternating pattern: thread a petal, then add a white bead. Repeat this sequence until all eight petals and eight white beads are strung onto your thread. The last item on your thread should be the eighth white bead.
To form the circular shape of your flower, carefully pass your needle back through the very first petal you threaded. Pull the thread gently but firmly, bringing the last bead into contact with the first petal, effectively closing the circle. This action will gather the petals and beads into a beautiful rosette form. Adjust the tension until the flower has a pleasing, evenly spaced appearance. Once satisfied with the shape, tie a secure double knot to lock the circle in place. Make sure the knot is tight enough to hold the flower’s form but not so tight that it puckers the petals excessively. Finally, trim any excess thread close to the knot for a neat finish.
Step 3: Creating a Secure and Neat Backing
A well-finished back not only hides the threads and knots but also provides a stable base for attaching your flower to other items. Take your white satin ribbon and cut a perfect circle with a diameter of approximately 1.18 inches (3 cm). You can use a coin or a small template to help you cut a clean circle. This circle will serve as the backing for your flower. Apply a thin, even line of hot glue around the very edge of this ribbon circle. Working quickly before the glue sets, carefully position and press the glued side of the circle onto the back of your assembled flower, specifically covering the area where the petals converge and the beads are secured. Ensure it adheres smoothly and securely, creating a neat and finished appearance that conceals all the stitching and raw edges.
Step 4: Adding the Central Embellishments
The final touches truly make your ribbon flower shine! With the backing in place, it’s time to add the decorative beads to the center. Begin by applying small dots of hot glue in a circular pattern just inside the beaded ring of your flower’s front. Carefully place your nine small beads onto these glue dots, arranging them neatly in a circle. Ensure they are evenly spaced and firmly attached. These smaller beads will create a lovely textured ring that draws the eye inward. Once these are secured, apply a slightly larger dot of hot glue directly in the very center of the flower. Take your single big bead and carefully press it onto this glue dot, centering it perfectly. This large bead will become the striking focal point, completing the elegant design of your handmade ribbon flower. Allow all the glue to dry completely before handling or using your flower.
Tips for a Flawless Ribbon Flower
Achieving a professional-looking ribbon flower is easier with a few expert tips:
- Practice Heat Sealing: If you’re new to using a lighter for ribbon, practice on a scrap piece first. Get a feel for how quickly the ribbon melts and how much heat is needed to seal without burning or discoloring.
- Consistency is Key: Ensure all your petals are cut and folded to the exact same dimensions. This uniformity is crucial for a balanced and symmetrical flower.
- Don’t Over-Glue: When using hot glue, a little goes a long way. Too much glue can seep out, creating a messy appearance or hardening unevenly.
- Use Quality Materials: High-quality satin ribbon drapes better and has a more luxurious sheen. Similarly, good quality beads will enhance the overall aesthetic.
- Secure Knots: When assembling the flower, ensure your knots are very secure. A loose knot can cause the flower to unravel over time.
- Work on a Clean Surface: A clean, flat work surface helps keep your ribbon and beads free from dust and debris.
Creative Ways to Use Your Handmade Ribbon Flowers
Once you’ve crafted your beautiful ribbon flowers, the possibilities for their use are virtually limitless. These versatile embellishments can add a personalized and elegant touch to a wide array of items:
- Fashion Accessories:
- Hair Adornments: Glue a flower to a plain hair clip, bobby pin, or headband for a custom hair accessory.
- Brooches: Attach a pin back to the flower to create a unique brooch for jackets, scarves, or blouses.
- Shoe Clips: Fasten small flowers to shoe clips to instantly transform a pair of plain shoes.
- Bag & Hat Decor: Sew or glue them onto handbags, clutches, or hats for a stylish upgrade.
- Home Decor:
- Vase Embellishments: Arrange several flowers and beads around the neck of a vase for an instant centerpiece.
- Curtain Tie-Backs: Create decorative tie-backs for your curtains.
- Picture Frame Accents: Adorn plain picture frames with flowers for a shabby chic or elegant look.
- Garlands & Wreaths: String multiple flowers together to create a charming garland, or attach them to a wreath base.
- Special Occasions & Gifts:
- Gift Wrapping: Replace traditional bows with a handmade ribbon flower for a truly special present.
- Wedding Favors & Decor: Use them as part of wedding favors, centerpieces, or even as small accents on bridal bouquets or boutonnieres.
- Greeting Cards: Glue a small ribbon flower onto a handmade greeting card for an extra dimension and personalized touch.
- Party Decorations: Incorporate them into party banners, table decorations, or place settings.
- Apparel Embellishments:
- Dresses & Blouses: Stitch them onto a dress sash, collar, or cuff for a unique accent.
- Jackets & Sweaters: Add a touch of flair to plain outerwear.
Beyond the Basics: Exploring Ribbon Flower Variations
Once you’ve mastered the basic ribbon flower, don’t hesitate to experiment and make it truly your own. The world of ribbon crafting is vast, and small changes can lead to completely different looks:
- Experiment with Ribbon Types:
- Grosgrain Ribbon: Offers a more structured, matte finish.
- Organza Ribbon: Creates delicate, translucent petals with a lighter, airy feel.
- Wired Ribbon: Allows you to shape and pose petals more dramatically.
- Velvet Ribbon: Adds a luxurious texture, perfect for colder seasons or elegant projects.
- Vary Petal Sizes and Shapes:
- Larger Petals: Use wider ribbon and adjust your initial cut length for bigger, bolder flowers.
- Smaller Petals: Narrower ribbon and shorter lengths create delicate, dainty blooms.
- Rounded Edges: Instead of cutting a sharp tip, try rounding the edges for a softer, more traditional flower shape.
- Creative Center Embellishments:
- Buttons: A vintage or decorative button can make an excellent focal point.
- Rhinestones & Jewels: Add sparkle and glamour with adhesive rhinestones or small flat-backed jewels.
- Charms: Small metal charms can give your flower a unique theme (e.g., an initial, an animal, a tiny key).
- Fabric Covered Buttons: Create your own custom fabric buttons to match or contrast with your ribbon.
- Layering Techniques:
- Multi-Layered Flowers: Create two or more flowers of different sizes and stack them, securing them at the center, for a fuller, more dimensional bloom.
- Mixed Materials: Combine satin petals with a layer of organza petals for added texture and visual interest.
- Color Play:
- Ombre Effect: Use ribbons in graduating shades of the same color for a sophisticated ombre flower.
- Contrasting Colors: Mix and match contrasting colors for a bold and vibrant statement piece.
- Monochromatic Schemes: Use different shades of one color for an elegant, understated look.
For another similar ribbon flower video tutorial, you can explore creations by Creative Creations on YouTube. While the original article did not provide a specific link for Creative Creations, you can search for “ribbon flower tutorial Creative Creations” to find relevant videos.
Conclusion: Your Journey into Ribbon Flower Crafting
And there you have it – a comprehensive guide to crafting beautiful ribbon flowers! What initially seemed like a complex embellishment is, in fact, an accessible and enjoyable project, perfect for adding a personal touch to almost anything. From the simple act of cutting and folding ribbon to the satisfying moment of seeing your petals assemble into a vibrant bloom, each step is designed to be both rewarding and meditative. We encourage you to embrace the joy of creation, whether you’re making these flowers for a special occasion, to adorn your everyday items, or simply to unwind with a calming craft.
Remember the inspiration from Merry Craft that sparked this delightful journey, and let it ignite your own creative spirit. Don’t be afraid to experiment with different ribbon textures, bead combinations, and colors to truly make each flower your own unique masterpiece. Your handmade ribbon flowers are more than just decorations; they are small works of art, imbued with your personal touch and creativity. Happy crafting, and may your projects bloom with beauty!