
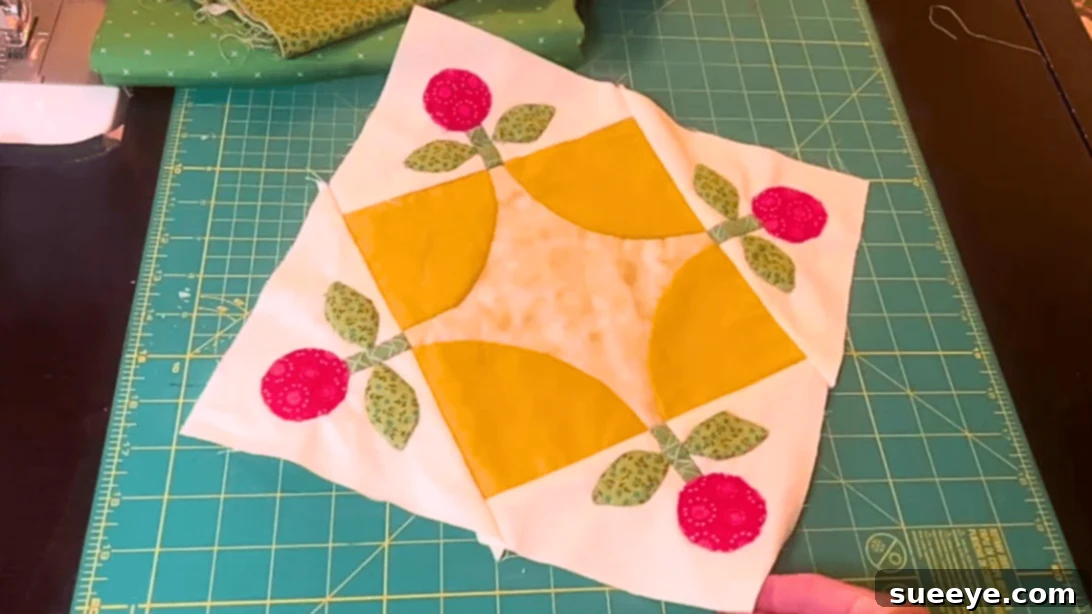
Embark on a delightful quilting journey with the “Pretty Posies Quilt Block,” a design that captures the essence of a blooming garden in fabric form. This particular quilt block stands out as one of the most enchanting projects I’ve encountered, quickly becoming a personal favorite. Its allure lies in the intricate details, the harmonious blend of colors, and the impeccable precision with which each piece comes together. The result is a stunning floral motif that adds a touch of charm and elegance to any quilting project.
The beauty of the Pretty Posies Quilt Block is not just in its final appearance but also in the rewarding process of creation. It’s a design so captivating that you’ll likely find yourself eager to explore countless variations, experimenting with different color palettes and fabric textures to create your own unique garden of posies. Imagine a quilt adorned with these vibrant blocks, each one a testament to your creativity and skill.
RELATED: Easy “Flower with a Stem” Quilt Block Tutorial
For those new to the world of quilting, or if you’re a seasoned crafter looking for a refreshing project, rest assured that the Pretty Posies Quilt Block is incredibly accessible. There’s no need to feel intimidated by its intricate appearance. This comprehensive guide, inspired by a fantastic video tutorial from my sewing room on YouTube, is designed to be beginner-friendly. We’ll walk you through each step with clear, concise instructions, ensuring that you can confidently create this beautiful quilt block perfectly, even if it’s your very first attempt. Let’s gather our supplies and transform fabric into a floral masterpiece!
Why the Pretty Posies Quilt Block is a Must-Make
Beyond its aesthetic appeal, the Pretty Posies Quilt Block offers a deeply satisfying creative experience. Quilting is more than just sewing fabric; it’s an art form that allows you to express your personality and bring warmth into your home. This particular block combines fundamental quilting techniques with an elegant design, making it a fantastic learning opportunity for beginners and a delightful project for experienced quilters.
- Stunning Visual Impact: The combination of gathered fabric petals, crisp leaves, and a neat stem creates a lifelike floral effect that instantly draws the eye.
- Versatile Design: This block can be a standalone piece for a mug rug or placemat, or combined with multiple blocks to form larger projects like throws, bedspreads, wall hangings, or even decorative pillow covers.
- Skill-Building Project: You’ll practice essential quilting skills such as precise cutting, stitching curves, managing seam allowances, and pressing for a professional finish.
- Customization Galore: The design truly shines with different fabric choices. Explore vibrant prints for a cheerful garden, muted tones for a vintage feel, or seasonal colors for holiday-themed decor.
- Handmade Gift Potential: A quilt or item featuring these posies makes for a heartfelt, personalized gift that will be cherished for years to come.
Essential Materials for Your Pretty Posies Quilt Block
Gathering your materials is the first exciting step in any quilting project. For the Pretty Posies Quilt Block, a careful selection of fabrics will bring your floral vision to life. Precision in cutting and quality in materials will significantly contribute to the beauty and longevity of your finished block.
- Red print fabric: This will be the main fabric for your flower petals. Choose a print that complements your overall design – a subtle floral, a delicate polka dot, or a solid vibrant red all work beautifully.
- Yellow print fabric: Used for the flower’s center, a bright yellow or a contrasting print will make your posy pop.
- Dark green print fabric, for the stem: A rich, deep green will provide a strong foundation for your flower, mimicking a natural stem.
- Light green print fabric, for the leaves: A lighter, perhaps softer green for the leaves will create visual interest and add depth to your botanical design.
- Low-volume print fabric, for the center: This fabric typically has a subtle pattern, acting as a background or transitional element without overwhelming the main motifs.
- Background fabric: This is the fabric that surrounds your main flower design, making it stand out. Choose a neutral or complementary color that highlights your posies.
- Interfacing fabric: A lightweight fusible interfacing provides stability for your leaves, helping them hold their shape beautifully.
- Marking pen, pencil, or chalk: Essential for transferring template lines onto your fabric accurately.
- Ruler: A clear quilting ruler with measurement lines will ensure precise cutting and marking.
- Scissors or rotary cutter and a cutting mat: A rotary cutter offers quick, accurate cuts, especially when used with a self-healing cutting mat. Scissors are perfect for intricate cuts.
- Fabric pins: To hold fabric pieces together securely before stitching.
- Needle and thread: All-purpose sewing thread in a color that blends with your fabrics, along with a hand-sewing needle for gathering.
- Iron, for pressing: Crucial for setting seams, flattening fabric, and achieving a crisp, professional finish throughout the construction process.
- Sewing machine: A reliable sewing machine is essential for stitching your quilt block together efficiently and precisely.
- Template (Click here to download the template): This crucial pattern piece provides the exact shapes and sizes needed for your posy elements. Make sure to print it at 100% scale.
How to Craft Your Pretty Posies Quilt Block: A Step-by-Step Guide
Step 1: Preparing Your Fabric & Creating the Petal Base
Begin by downloading and printing your Pretty Posies quilt block template. Ensure it prints at 100% scale for accurate sizing. Carefully cut out all the individual template pieces. Next, using these templates, cut out your fabric pieces. Remember to add a ¼-inch seam allowance around each piece, unless the template specifically indicates otherwise, as this will be crucial for assembling your block. Take a moment to fold the edges of your fabric over the curved template pieces, gently pressing them with a warm iron to create crisp, defined petal shapes. This pressing step is vital for achieving neatly curved edges. Repeat this process to create a total of four quarter-circle pieces, which will form the outer petals of your posy. Set these aside. Then, take your white squares, stack them neatly, and carefully cut them in half diagonally from corner to corner. These will create the background triangles for your flower’s center.
Step 2: Assembling the Flower Center & Crafting the Stems
Now, let’s begin to build the flower’s central structure. Take one of your prepared quarter-circle petal pieces and position it precisely on top of the corners of your chosen center square. Repeat for all four corners. Next, arrange the background triangles you cut earlier around all four sides of this central block, creating a larger square shape with the emerging flower in the middle. Carefully align all raw edges.
For the stems, take a strip of your dark green print fabric. Fold this strip lengthwise into thirds, ensuring the raw edges are neatly tucked inside. Press this fold flat to create a crisp, narrow strip. Stitch along the open edge to secure the fold, creating a neat, finished stem piece. Cut this longer stem piece into four shorter, equal-length stems. These will be placed strategically in the center of the background triangles, pointing towards the flower, to give the illusion of a full stem.
Step 3: Forming the Flower & Preparing the Leaves
Let’s bring the main flower to life. Using the circular template, carefully trace the circle onto the wrong side of your red print fabric. Once traced, use a hand-sewing needle and thread to stitch a running stitch closely around the traced circle. Leave long thread tails at both the beginning and end of your stitch. Gently pull these thread tails to gather the fabric inwards, creating a beautiful puckered flower head. Pull tightly enough to form a compact, full flower shape, then secure the gathering with a firm knot. Press this gathered fabric nicely to set the shape and flatten the edges. Repeat this process to create all the red flower circles needed for your block.
For the leaves, trace the leaf template onto the fusible interfacing. Cut out the interfacing leaves, adding a slight seam allowance around the traced line. Place each interfacing leaf, adhesive side down, onto the wrong side of your light green print fabric. Fuse them according to the interfacing manufacturer’s instructions, ensuring a secure bond.
Step 4: Final Assembly & Finishing Touches
With the interfacing fused, stitch around the traced line on each green fabric-interfacing leaf piece. After stitching, carefully cut out each leaf, leaving a small seam allowance (about 1/8 inch) beyond your stitch line. To help the curves turn smoothly, make small notches or clips along the curved edges within the seam allowance, being careful not to cut through your stitching. Additionally, cut a small hole in the center of the wrong side of each leaf – this will serve as an opening to turn the leaf right side out. Carefully turn each leaf right side out, using a point turner or a dull pencil to gently push out the edges and corners for a crisp, defined shape. Press the leaves flat.
Now, it’s time for the final assembly. Strategically place the prepared leaves on the sides of each stem, ensuring they appear to grow naturally from the stem. Pin them in place. Begin stitching all your components together. Start by sewing the central units of your flower, carefully attaching the gathered red flower to its yellow center and the quarter-circle petals. Then, proceed to attach the corner units, which include your background triangles and the stem-and-leaf elements, to the central flower unit. As you sew, remember the golden rule of quilting: press your seams after each significant step. Pressing helps flatten the fabric, align your pieces accurately, and gives your quilt block a polished, professional finish. Work methodically, piece by piece, until your Pretty Posies Quilt Block is complete, a beautiful testament to your efforts!
*All image credit belongs to my sewing room via YouTube. Follow and subscribe to her channel for more inspiring quilting and sewing tutorials!
Tips for Quilting Success with Your Pretty Posies Block
Achieving a beautifully finished quilt block is all about attention to detail and patience. Here are some pro tips to help you succeed with your Pretty Posies:
- Accurate Cutting is Key: In quilting, precision is paramount. Use a sharp rotary cutter and a reliable ruler to ensure all your fabric pieces are cut to exact measurements. Even a slight discrepancy can throw off your entire block.
- Consistent Seam Allowance: Maintain a consistent ¼-inch seam allowance throughout your project. A quarter-inch foot on your sewing machine can be incredibly helpful for this.
- Press, Don’t Iron: When quilting, we “press” seams, which means lifting and placing the iron down, rather than sliding it. This prevents stretching and distortion of your fabric. Press seams open or to one side, whichever results in less bulk.
- Test Your Stitches: Before sewing your actual project, always test your stitch length and tension on scrap fabric. This ensures your machine is set correctly for your chosen fabric.
- Pin Generously: Don’t be shy with pins! Use them to align fabric pieces carefully, especially when joining curves or multiple seams, to prevent shifting.
- Take Your Time: Quilting is a journey, not a race. Enjoy the process, take breaks, and don’t rush. Your patience will be reflected in the quality of your finished block.
Fabric Choices and Color Play for Your Posies
One of the most exciting aspects of the Pretty Posies Quilt Block is the endless potential for fabric and color experimentation. Your fabric choices can completely transform the mood and style of your finished piece.
- Seasonal Themes: Opt for reds and deep greens for a festive Christmas feel, pastels for a spring garden, or warm oranges and browns for an autumnal look.
- Modern vs. Traditional: Use bright, solid colors or graphic prints for a contemporary aesthetic, or traditional florals and calicos for a classic, vintage charm.
- Value and Contrast: Think about the ‘value’ of your fabrics – how light or dark they are. Using fabrics with good contrast will make your posies pop. The low-volume print for the center and a well-chosen background fabric will allow your main flower to be the star.
- Scrappy Delight: This block is perfect for using up smaller fabric scraps! Mix and match different reds, yellows, and greens for a truly unique and eclectic garden.
- Fabric Type: While cotton is standard for quilting, you can experiment with different cotton types, such as batiks for a subtle sheen or flannels for a cozy touch, keeping in mind their different handling properties.
Beyond the Block: Creative Project Ideas
Once you’ve mastered the Pretty Posies Quilt Block, the possibilities for incorporating it into larger projects are boundless. Here are a few ideas to spark your creativity:
- Full Quilt: Combine multiple blocks, perhaps alternating with solid background blocks, to create a stunning full-sized quilt for a bed or sofa.
- Cushion Cover: One or two blocks can make a beautiful focal point for a decorative cushion cover, adding a handmade touch to your living space.
- Placemats or Table Runner: A series of blocks sewn together can create an elegant table runner or individual placemats for your dining area.
- Wall Hanging: Frame a single block or a small grouping of blocks to create a charming piece of textile art for your wall.
- Tote Bag Panel: Embellish a simple canvas tote bag with a Pretty Posies block for a personalized accessory that showcases your quilting skills.
- Mug Rug: A single block, quilted and bound, makes a lovely mug rug – a small coaster that adds cheer to your coffee break.
Caring for Your Handmade Quilt Block or Project
Proper care will ensure your Pretty Posies quilt block or any project made from it lasts for generations.
- Pre-wash Fabrics: To prevent color bleeding and shrinkage in your finished project, consider pre-washing all your fabrics before cutting.
- Gentle Washing: When washing your finished quilted item, use a gentle cycle with cold water and a mild detergent. Avoid harsh chemicals or bleach.
- Air Drying Recommended: Tumble dry on a low setting or, ideally, lay flat to air dry. This minimizes stress on the stitches and prevents potential shrinking or distortion.
- Storage: Store quilted items folded flat in a breathable cotton pillowcase or specialized quilt bag to protect them from dust and light. Avoid storing in plastic containers for long periods, as this can trap moisture.