
DIY Pine Needle Basket Weaving: Crafting Natural Baskets from the Forest Floor
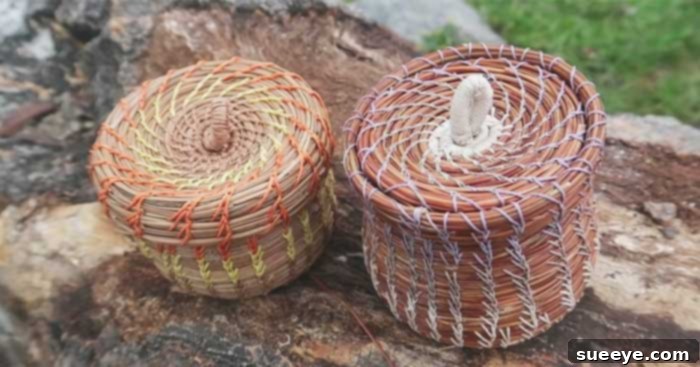
Embark on a captivating journey into the world of natural craftsmanship with this comprehensive guide to pine needle basket weaving. This timeless art form connects you directly with nature, transforming simple fallen pine needles into stunning, functional baskets. Whether you’re seeking a meditative hobby, an eco-friendly way to decorate your home, or a unique gift idea, pine needle basketry offers a rewarding creative outlet. Inspired by the clear and engaging tutorials from Wild She Goes, this guide will walk you through every step, ensuring your projects turn out beautifully each time.
Why Choose Pine Needle Basket Weaving? The Benefits of a Natural Craft
Pine needle basket weaving is more than just a craft; it’s an experience that offers numerous benefits:
- Sustainable and Eco-Friendly: You’re utilizing readily available, natural materials found right beneath your feet, turning forest floor waste into treasure. This practice promotes sustainability and a deeper connection to the natural world.
- Relaxing and Meditative: The repetitive motion of coiling and stitching pine needles can be incredibly calming and meditative. It’s an excellent way to unwind, reduce stress, and practice mindfulness.
- Unique and Rustic Decor: Each handmade pine needle basket possesses a unique charm, bringing a touch of rustic elegance and natural beauty to any home. They make perfect storage solutions, decorative pieces, or plant holders.
- Accessible Materials: Pine needles are abundant in many regions, making this an affordable craft to pick up. The few additional tools required are typically inexpensive and reusable.
- Personalized Gifts: A hand-woven pine needle basket makes a thoughtful and truly unique gift, imbued with the personal touch and effort of its creator.
Gathering Your Toolkit: Essential Materials for Pine Needle Basketry
Before you begin the exciting process of weaving, gather all your necessary materials. Having everything at hand ensures a smooth and enjoyable crafting experience.
- Pine Needles: The star of our project! Look for long, flexible needles, ideally from species like Longleaf, Ponderosa, or White Pine. The length makes them easier to work with, allowing for fewer joins.
- Waxed Polyester Thread: This is crucial for durability and ease of weaving. The wax coating helps the thread glide through the pine needles, prevents tangling, and adds strength and moisture resistance to your finished basket. Choose a color that complements the natural tones of the pine needles or provides a striking contrast.
- Water (Boiling): Used to soften and increase the flexibility of the pine needles, making them pliable and less prone to breaking during the weaving process.
- Towel (Damp): Essential for keeping your prepared pine needles moist and workable throughout your crafting session. A slightly damp towel prevents them from drying out and becoming brittle again.
- Sharp Scissors: For trimming pine needles, cutting thread, and shaping the edges of your basket. A good pair of sharp scissors makes clean cuts, which are important for a neat finish.
- Pliers (Small, Needle-Nose Recommended): These will be invaluable for gripping and pulling your sewing needle through tight coils, especially as your basket becomes thicker and denser.
- Large-Eye Sewing Needles: You’ll need sturdy needles with eyes large enough to accommodate your waxed polyester thread. Curved tapestry needles or blunt-tipped darning needles are often preferred as they can pass between coils without splitting the pine needles.
- Plastic Straw or Coiling Gauge: This simple tool acts as a guide to help you create consistently sized coils, ensuring an even thickness throughout your basket. A standard drinking straw works well, or you can craft a simple gauge from a piece of cardboard.
Before You Begin: Essential Tips for Success in Pine Needle Weaving
To ensure a satisfying and successful weaving experience, consider these preparatory tips:
- Pine Needle Selection is Key: Not all pine needles are created equal for basket weaving. Seek out needles that are relatively long, uniform in thickness, and free from significant blemishes or decay. Longer needles mean fewer joins, resulting in a smoother, stronger basket.
- Patience is a Virtue: Pine needle weaving is a slow, deliberate craft. Rushing can lead to uneven stitches or a less refined finish. Embrace the process and enjoy the journey of creation.
- Maintain Moisture: Keeping your pine needles consistently damp is paramount. Dry needles are brittle and will snap. Always have your damp towel nearby and re-moisten your needles as needed.
- Practice Makes Perfect: Don’t be discouraged if your first basket isn’t flawless. Each basket you create will refine your technique and understanding of the material.
Step-by-Step Guide to Weaving a Beautiful Pine Needle Basket
Step One: The Art of Pine Needle Harvesting and Preparation
The foundation of a great pine needle basket begins with careful collection and selection. Start by venturing out to gather your pine needles. The quality of your needles directly impacts the final appearance and durability of your basket. Focus on collecting needles that have recently fallen from the tree and are lying on the ground. Aim for needles that are mostly dry but still have a vibrant color and are not brittle or crumbling.
Avoid needles that are deeply buried in the forest litter, as these are often decaying and will be too weak or discolored to weave with. Instead, look for those closer to the surface. It’s important to collect a generous amount – far more than you think you’ll need – to ensure you have a consistent supply throughout your project and to allow for sorting and discarding imperfect needles. Once collected, clean any dirt or debris from your pine needles.
Step Two: Softening Your Pine Needles for Pliable Perfection
Once you have a good stash of clean pine needles, it’s time to prepare them for weaving by making them pliable. This step is crucial for achieving a smooth, bendable coil that won’t break during the stitching process. Carefully boil a pot of water. Once the water reaches a rolling boil, remove it from the heat and pour it over your collected pine needles in a heat-safe container, ensuring they are fully submerged. Allow the needles to soak for several hours, or even overnight, until they become soft, elastic, and easy to bend without snapping.
After soaking, drain the water. You should now have damp, flexible pine needles that are ideal for weaving. To maintain their pliability while you work, gently wrap a handful of these softened needles in a clean, damp towel. This will prevent them from drying out and becoming brittle again as you weave.
Step Three: Laying the Foundation: Starting Your Coil
This step initiates the coiling process, which is the core technique of pine needle basket weaving. Begin by taking a small, manageable bundle of softened pine needles – enough to comfortably fit into your plastic straw or coiling gauge. The straw acts as a temporary guide, helping you to create a uniform and consistent diameter for your initial coil. Insert the ends of your pine needles into one end of the plastic straw, feeding them through so they emerge from the other side. The needles should fit snugly but still allow the straw to slide easily along the bundle as you work.
Once you have your initial bundle in the straw, take your waxed polyester thread and securely wrap it around the very beginning of the pine needle bundle, just past the end of the straw. This initial wrapping helps to secure the pine needles together and forms the starting point of your coil. This will be the absolute center of your basket’s base.
Image by. Wild She Goes via YouTube video.
Step Four: Crafting the Central Base: The Beginning of Your Basket
With your initial pine needle bundle secured, it’s time to form the very center of your basket. Carefully bend the wrapped end of your pine needle bundle into a tight, small circle. This will form the core of your basket’s base. Now, thread your sewing needle with a generous length of waxed polyester thread (typically an arm’s length or more, to avoid frequent re-threading).
Begin stitching this small coil together. Pass the needle with your thread through the very center of the coil you just made, pulling the thread taut. You are essentially sewing the first turn of the coil onto itself. Continue to wrap the pine needle bundle around this central point, gradually increasing the size of your circle. As you wrap, use your needle to stitch through the previous turn of the coil, securing the new coil in place. This creates a strong, flat, and circular base. For particularly tight stitches or when the needles are dense, you might find it necessary to use your pliers to firmly grip the needle and pull it through the coil on the other side, ensuring a tight and consistent stitch.
Step Five: Expanding the Base: Building Your Basket’s Floor
Once you have established a solid, tight central coil, you will continue the coiling and stitching process to expand the base of your basket. Keep adding fresh pine needles to your working bundle as needed, ensuring the coil maintains a consistent thickness. As you coil the pine needles in an outward spiral, use your threaded needle to stitch the new coil to the previous one. A good rule of thumb is to create a stitch approximately every 3mm (or about 1/8 inch).
The key here is consistency: maintain even tension on your thread and uniform stitch spacing. This will ensure your basket’s base is flat, sturdy, and visually appealing. Continue this process, building the circular base to your desired diameter. Periodically check that your base remains flat and does not begin to curve upwards or downwards prematurely. If it starts to curve, adjust your stitch tension or how you’re placing the new coil.
Step Six: Raising the Walls: Shaping Your Basket
Once your basket’s base has reached the desired diameter, it’s time to transition from a flat surface to vertical walls. To achieve this, instead of laying the new coil flat against the previous one, you will begin stacking it slightly on top of the previous coil. Each new coil will sit slightly higher than the last, gradually building the height of your basket.
The angle at which you stack your coils will determine the shape of your basket’s walls. Stacking directly on top creates straight, vertical walls. Slightly insetting the new coil will create walls that taper inwards, while slightly offsetting it outwards will create a flaring shape. Experiment with this technique to achieve the desired form. Maintain your consistent 3mm stitch spacing as you work your way up. Remember to keep adding pine needles to your working bundle and to keep your entire project moist with the damp towel to prevent cracking or breaking.
Image by. Wild She Goes via YouTube video.
Step Seven: Finishing Touches and Optional Lid Construction
Once you have reached your desired basket height, it’s time to finish the rim. To create a neat and secure top edge, gradually taper the thickness of your pine needle bundle over the last few inches of coiling. This means you’ll slowly stop adding new pine needles to the bundle, making the coil thinner towards the end. Continue stitching until the coil becomes very thin, then carefully tuck the final end into the previous coil and secure it with a few extra stitches. You can make a series of tight, decorative stitches around the final coil for an extra polished look, or use a whipstitch technique to bind the final coil to the one below it.
If you wish to create a lid for your basket, the process is essentially a smaller version of weaving the basket’s base. You’ll start with a central coil and expand it to the diameter of your basket’s opening. For intricate details on lid construction, including how to create a knob or handle and ensure a perfect fit, we highly recommend watching the detailed video tutorial from Wild She Goes. Their visual instructions provide invaluable guidance for these advanced steps.
Troubleshooting Common Pine Needle Basketry Issues
Even experienced weavers encounter challenges. Here are some common issues and how to address them:
- Uneven Coil Thickness: Ensure you are consistently adding new pine needles to your bundle as you work. Use your coiling gauge (straw) to maintain a uniform diameter.
- Pine Needles Breaking: This almost always indicates they are too dry. Re-moisten your pine needles by spraying them with water or re-wrapping them in your damp towel.
- Loose Stitches: Pull your thread taut after each stitch. Loose stitches will result in a flimsy basket. Pliers can help ensure tightness.
- Basket Shape Distorting: Regularly check your basket’s shape as you weave. If the base is curving, adjust your stitch placement to lay the coils flatter. If walls are uneven, adjust the angle at which you stack your new coils.
- Thread Tangling: Use shorter lengths of thread to minimize tangles. The waxed nature of the thread already helps, but shorter segments are easier to manage.
Caring for Your Hand-Woven Pine Needle Basket
Your finished pine needle basket is a piece of natural art. To ensure its longevity:
- Cleaning: Gently wipe with a dry or slightly damp cloth to remove dust. Avoid submerging in water or using harsh cleaners.
- Storage: Store in a dry environment away from direct sunlight, which can fade the natural colors of the pine needles over time.
- Durability: While sturdy, pine needle baskets are best suited for holding dry items. Avoid placing heavy or wet objects inside unless specifically designed for that purpose.
Beyond the Basics: Exploring Creative Variations
Once you’ve mastered the fundamental techniques, don’t hesitate to experiment and make the craft your own:
- Different Shapes: Try weaving oval, square, or even free-form baskets. The coiling method is highly adaptable.
- Adding Embellishments: Incorporate beads, small stones, feathers, or other natural elements into your weaving for added visual interest.
- Varying Threads: Experiment with different thread colors to create patterns or contrasts. You can also use other natural fibers like raffia or thin twine for a different texture.
- Pine Needle Types: If available, try weaving with needles from different pine species. They can vary in length, thickness, and color, offering unique aesthetic possibilities.
Embark on Your Pine Needle Basketry Journey Today!
Pine needle basket weaving is a beautiful and sustainable craft that allows you to transform simple, natural materials into stunning works of art. It’s a journey of patience, creativity, and connection with the natural world. With this detailed guide and the inspiring tutorial from Wild She Goes, you have all the tools and knowledge to start weaving your very own unique, handmade pine needle baskets. Dive in, enjoy the meditative process, and delight in the rustic beauty of your creations!