
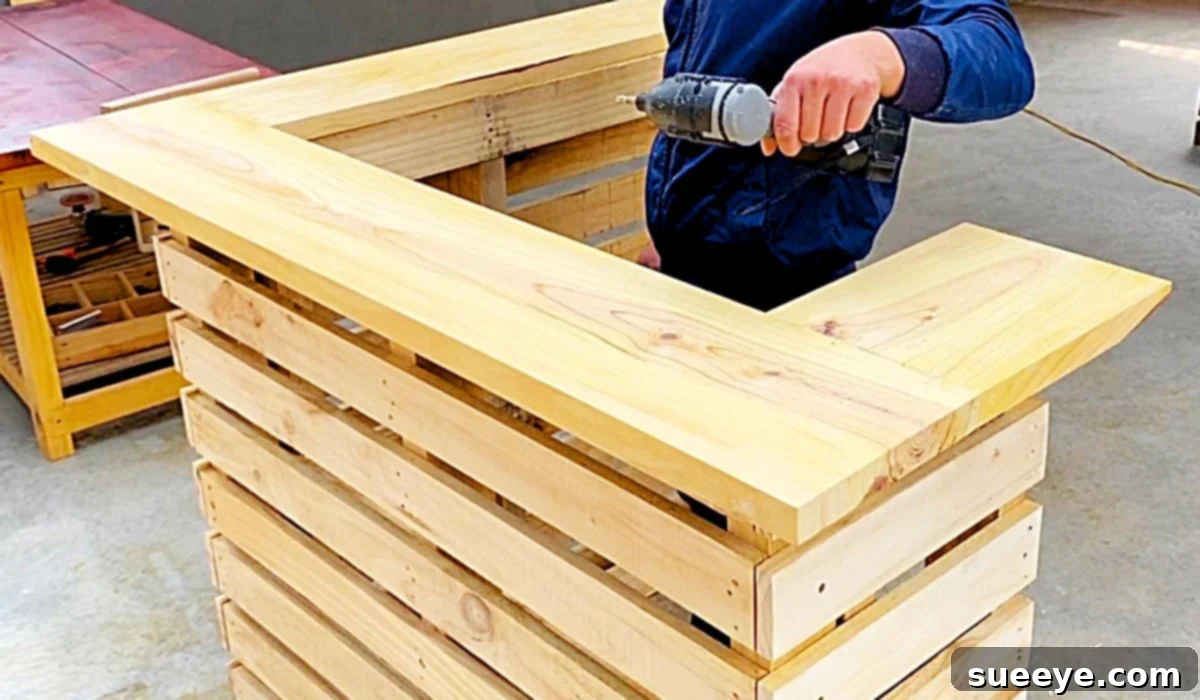
Transforming your outdoor living space into a vibrant entertainment zone doesn’t have to break the bank. A DIY pallet bar offers an incredibly cost-effective, sustainable, and charming solution for enhancing your patio, deck, or backyard. This guide will walk you through the journey of creating your very own rustic outdoor bar, providing a dedicated spot for mixing drinks, serving snacks, and gathering with friends and family. Inspired by the fantastic video tutorial by Woodworking Skill on YouTube, this project is not only satisfying but also adds significant functionality and character to any outdoor area. Imagine having a stylish, pub-like setting right in your backyard, perfect for summer barbecues, evening cocktails, or simply enjoying the fresh air. Separating your beverage station from the dining table creates an inviting new hangout space that guests will surely appreciate.
Rustic DIY Pallet Bar: Your Ultimate Outdoor Entertainment Hub
The allure of a homemade pallet bar lies in its unique blend of rustic charm, environmental friendliness, and practical utility. Upcycling discarded wooden pallets into functional furniture pieces is a trend that continues to grow, and for good reason. It allows you to create bespoke items with a minimal budget, contributing positively to waste reduction. This project is particularly appealing to those who enjoy a hands-on approach and wish to infuse their personal style into their home decor. From selecting the right pallets to applying the final coat of stain, every step of building your DIY pallet bar is an opportunity to craft something truly special. Let’s delve into why a pallet bar is an excellent addition to your outdoor space and how you can bring this vision to life.
Why Build a DIY Pallet Bar: Benefits and Appeal
Embarking on a DIY pallet bar project offers a multitude of advantages that extend beyond just having a place to mix drinks. Here’s why it’s a brilliant idea for your outdoor living area:
- Cost-Effective Outdoor Entertaining: One of the primary benefits is the low cost. Pallets are often free or very inexpensive, significantly reducing the material expenses compared to buying a pre-made bar. This allows you to allocate more of your budget to beverages and snacks for your gatherings!
- Eco-Friendly Upcycling: By repurposing pallets, you’re actively participating in sustainable practices. You divert usable wood from landfills, giving it a new life as beautiful, functional furniture. This makes your project not just a practical endeavor but also an environmentally conscious one.
- Customizable Design and Finish: Unlike off-the-shelf options, a DIY pallet bar provides complete creative freedom. You can design it to fit your specific space and needs, choosing its dimensions, configuration, and even adding unique features. The finishing touches – paint, stain, or a natural look – can be tailored to perfectly match your existing outdoor decor.
- Adds Value and Functionality to Outdoor Space: A dedicated bar area instantly elevates the usability and aesthetic appeal of your patio or backyard. It becomes a natural focal point for social interactions, keeping drinks and refreshments organized and easily accessible.
- Relatively Simple Project for Beginners: While woodworking projects can seem daunting, a pallet bar is surprisingly achievable for those with basic DIY skills. The construction often involves straightforward cuts and assembly, making it a rewarding project even for novice builders.
- Creates a Social Hub: A bar naturally draws people in. It provides a casual, inviting spot for guests to mingle, chat, and enjoy themselves, transforming your outdoor space into the ultimate social gathering spot.
Planning Your DIY Pallet Bar
Before you begin cutting and assembling, a little planning goes a long way. Consider these aspects to ensure your pallet bar meets your expectations:
- Space Considerations: Measure the area where you intend to place your bar. This will help determine the appropriate size and shape. Will it be against a wall, in a corner, or a freestanding unit?
- Desired Size and Shape: Do you envision a compact bar for intimate gatherings or a larger one to accommodate more guests? Pallets typically come in standard sizes, but they can be easily cut and combined to achieve various dimensions and designs.
- Functionality: Think about how you’ll use the bar. Do you need shelves for bottles and glasses, a countertop for serving, or perhaps a small cooler insert? Incorporating these features into your design from the outset will simplify construction.
- Drawing a Simple Sketch: A rough drawing or sketch of your intended bar, including approximate measurements, can be incredibly helpful. It allows you to visualize the finished product and identify any potential design challenges before you start building.
Materials and Tools For Your DIY Pallet Bar Project:
Gathering the right materials and tools is crucial for a smooth and successful build. Here’s an expanded list to ensure you’re well-equipped:
Essential Materials:
- 3-5 Pallets: The core of your project. Look for “HT” (Heat Treated) stamped pallets, which are safer as they haven’t been treated with harmful chemicals (avoid “MB” – Methyl Bromide treated pallets). Ensure they are clean, free of significant damage, and relatively consistent in size. The exact number depends on your desired bar size and design.
- Exterior-Grade Screws: Choose screws specifically designed for outdoor use (e.g., galvanized or stainless steel) to prevent rust and ensure structural integrity in varying weather conditions. Various lengths might be needed for different parts of the assembly.
- Wood Glue: A good quality, exterior-grade wood glue can add extra strength to your joints when used in conjunction with screws.
- Sandpaper/Sanding Discs: Essential for smoothing rough surfaces and preparing the wood for finishing. You’ll need a range of grits, from coarse (80-100) for initial shaping to fine (180-220) for a smooth finish.
- Wood Stain or Exterior Paint: To protect the wood from the elements and enhance its appearance. Choose a product suitable for outdoor use.
- Exterior Wood Sealer/Varnish: An additional layer of protection, especially for the bar top, to guard against moisture, spills, and UV damage.
Required Tools:
- A Drill/Driver: For pre-drilling pilot holes (to prevent splitting) and driving screws. An impact driver can be particularly helpful for driving long screws.
- A Saw:
- Circular Saw: Excellent for making long, straight cuts quickly and efficiently.
- Jigsaw: Useful for more intricate cuts or curves, if your design requires them.
- Hand Saw: A basic option for smaller cuts or if power tools aren’t available.
- A Sander: An orbital sander is highly recommended for achieving smooth surfaces efficiently. Manual sanding blocks can also be used for smaller areas.
- Pry Bar / Cat’s Paw: If you need to disassemble pallets, these tools are invaluable for carefully separating planks without causing excessive damage.
- Clamps: To hold pieces securely in place while gluing and screwing, ensuring precise assembly.
- Measuring Tape, Pencil, and Carpenter’s Square: For accurate measurements and marking cuts.
- Safety Gear: Always wear safety glasses to protect your eyes, work gloves to prevent splinters, and a dust mask when sanding or cutting to avoid inhaling wood particles.
Directions: Step-by-Step Guide to Building Your Pallet Bar
Creating your DIY pallet bar is a rewarding process that involves a few key stages. While specific cutting and assembly details are best gleaned from a visual guide like the Woodworking Skill tutorial on YouTube, here’s a generalized step-by-step approach to give you a clear roadmap:
Step 1: Pallet Selection and Preparation
Begin by carefully inspecting your chosen pallets. Ensure they are sturdy and free from severe damage, rot, or excessive insect infestation. Clean them thoroughly with a stiff brush and soapy water to remove dirt, debris, and any lingering odors. Allow them to dry completely. Depending on your design, you may need to disassemble some pallets into individual planks using a pry bar and hammer. This process requires patience to avoid splitting the wood, but it gives you more versatile material to work with.
Step 2: Cutting and Shaping the Components
Referencing your design sketch and potentially a video tutorial (like the one by Woodworking Skill), mark all your cuts precisely. You’ll typically need pieces for the main frame (vertical supports and horizontal braces), the bar top, and any internal shelving. Use your circular saw or jigsaw to make clean cuts. Accuracy here will ensure a stable and professional-looking bar. For the bar top, you might opt to join several pallet planks together or use a solid piece of salvaged wood if available, creating a smoother, more durable surface.
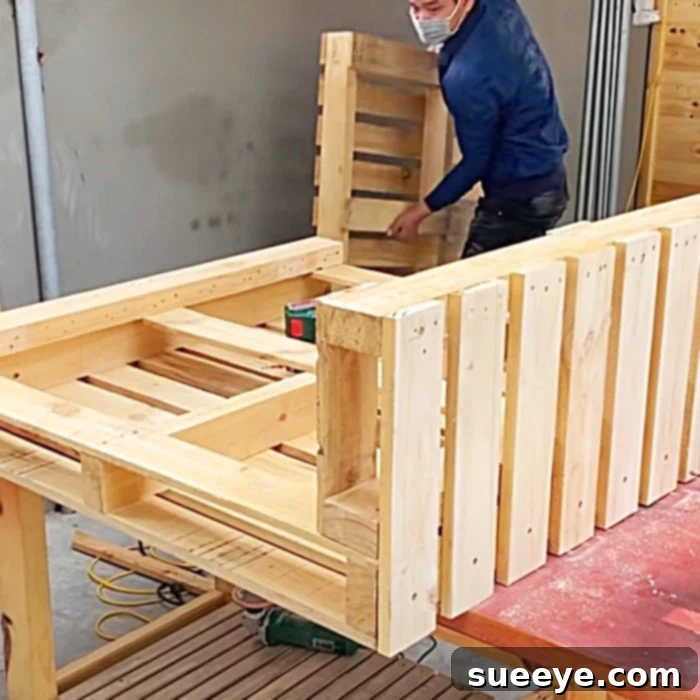
Step 3: Assembly and Reinforcement
Once all your pieces are cut, it’s time for assembly. Start by building the main frame of your bar. Use clamps to hold pieces together as you pre-drill pilot holes and then secure them with exterior-grade screws. Apply wood glue to all mating surfaces before screwing them together for maximum strength and durability. Pay close attention to making sure all joints are square and secure. Add any internal shelving or supports as per your design, ensuring they are level and capable of holding weight.
Step 4: Sanding for Smoothness and Safety
This is a critical step, especially for a piece of furniture that will be frequently touched. Rough pallet wood can be prone to splinters. Use your orbital sander, starting with a coarser grit (e.g., 80-100) to smooth out rough spots, remove old paint or grime, and shape edges. Gradually move to finer grits (e.g., 150-220) to achieve a smooth, splinter-free finish on all surfaces, particularly the bar top and any edges guests might lean against. Take your time with this step, as a well-sanded surface is key to both aesthetics and safety.
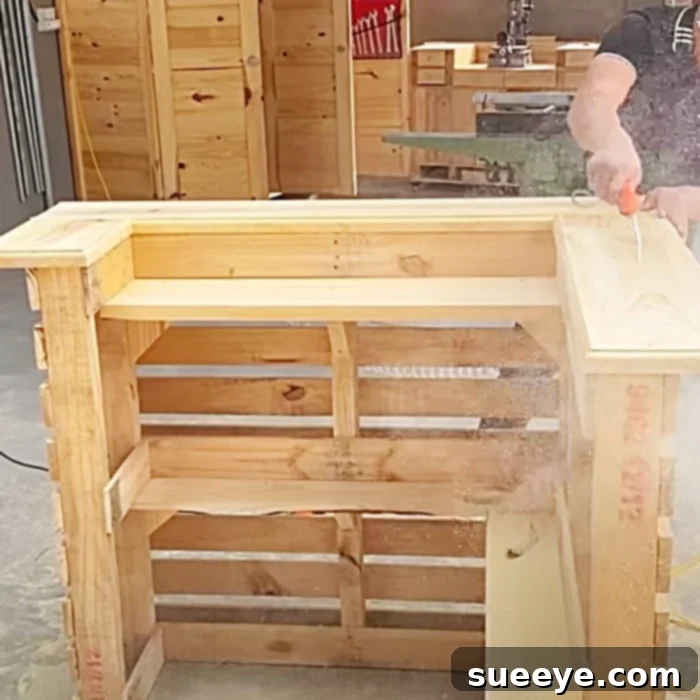
Step 5: Finishing and Protection
With the structure complete and thoroughly sanded, it’s time to apply the finishing touches. You have several options:
- Paint: Choose an exterior-grade paint for a pop of color or to match your existing outdoor decor. Two coats are usually recommended for durability.
- Stain: A wood stain will enhance the natural grain of the wood, giving it a rich, rustic appearance. Various shades are available, from light oak to dark walnut.
- Natural/Raw: If you love the raw, weathered look of pallets, you can simply apply several coats of a clear, exterior-grade sealer or spar varnish to protect the wood from moisture and UV rays, preventing it from deteriorating quickly.
Regardless of your choice, ensure the finish is suitable for outdoor use to withstand the elements. Apply multiple thin coats according to product instructions, allowing adequate drying time between each. This final step not only beautifies your bar but also significantly extends its lifespan.
Customization Ideas for Your Unique Pallet Bar
The beauty of a DIY project is the ability to personalize it. Here are some ideas to make your pallet bar truly unique:
- Bar Top Materials: While pallet wood is classic, consider a contrasting bar top. Options include reclaimed timber, outdoor tiles, a polished concrete slab, or even a sheet of galvanized metal for an industrial look.
- Shelving and Storage Solutions: Add custom shelves for glassware, hooks for bottle openers and towels, or even a built-in wine rack.
- Lighting: Integrate LED strip lights under the bar top or along the frame for ambient evening illumination, creating a cozy and inviting atmosphere.
- Mobility: Attach heavy-duty locking casters to the base if you want the flexibility to move your bar around your outdoor space.
- Integrated Cooler: Cut out a section of the bar top and drop in a small cooler or a galvanized tub to keep drinks chilled and easily accessible.
- Personalized Touches: Stencil your family name, a favorite quote, or a custom design onto the bar. Add a chalkboard panel for daily specials or messages.
Maintenance Tips for Longevity
To ensure your DIY pallet bar remains a beloved feature of your outdoor space for years to come, follow these simple maintenance tips:
- Regular Cleaning: Wipe down surfaces regularly to remove dust, dirt, and spills. For tougher grime, use a mild soap solution and a soft brush.
- Re-sealing/Re-staining: Depending on your local climate and how much exposure your bar gets, plan to re-apply a protective sealer or stain every 1-2 years. This will refresh its appearance and continue to shield the wood from moisture and UV damage.
- Winter Storage: If possible, move your pallet bar to a sheltered area (e.g., a garage, shed, or under a waterproof cover) during the harsh winter months. This will significantly extend its life.
- Address Damage Promptly: Inspect your bar periodically for any signs of wear, loose screws, or splintering. Address minor issues quickly to prevent them from worsening.
This is a truly wonderful project that promises not just a piece of furniture, but a new hub for joy and camaraderie in your outdoor living area. The satisfaction of crafting something with your own hands, especially a functional and stylish piece like this DIY pallet bar, is immense. It’s an investment in countless happy memories and delightful moments shared with loved ones. So, gather your materials, watch the excellent tutorial by Woodworking Skill on YouTube, and get ready to build the outdoor bar of your dreams!