
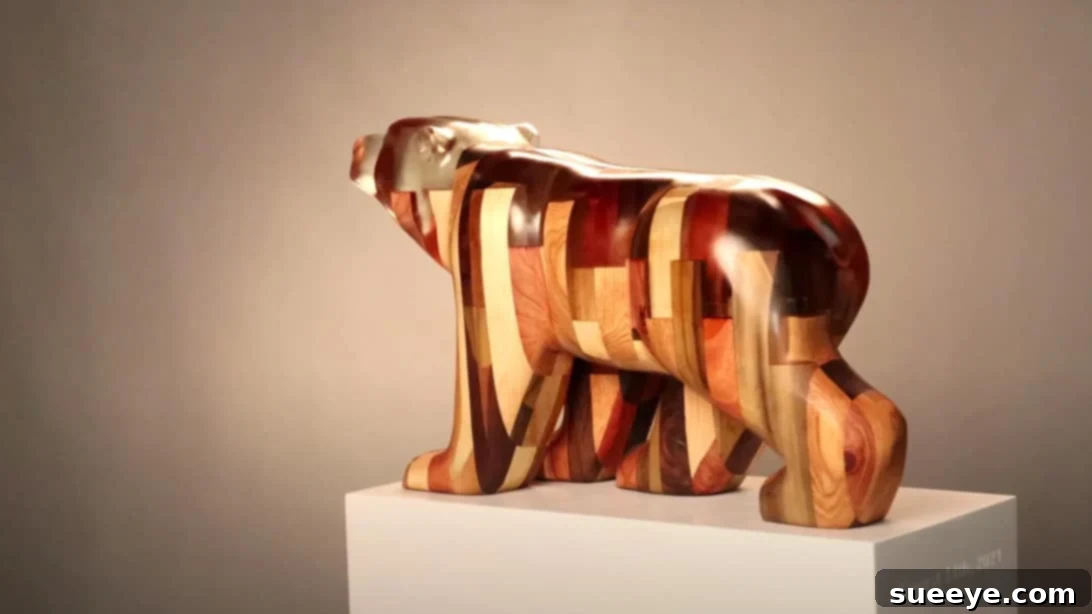
Embarking on a creative journey, especially one that challenges your existing skills, can be incredibly rewarding. Whether you consider yourself an experienced artisan or a curious beginner, tackling a mixed-media project offers a unique opportunity to expand your artistic horizons. This comprehensive guide will walk you through the fascinating process of crafting a magnificent bear sculpture from a blend of epoxy resin and various woods, inspired by the intricate techniques showcased in BM Sculpture’s illuminating YouTube tutorial. This project isn’t just about creating a beautiful object; it’s about pushing your boundaries in woodwork and resin artistry, culminating in a stunning piece worthy of display in your home or even a gallery.
Mastering the Art of Epoxy Resin and Wood Bear Sculpture
The fusion of natural wood and versatile epoxy resin opens up a world of creative possibilities. This particular project, a captivating bear sculpture, combines the organic beauty of diverse wood grains with the pristine clarity and structural integrity of deep-pour epoxy. By following these detailed steps, you’ll not only learn advanced woodworking and resin casting techniques but also gain the satisfaction of bringing a complex artistic vision to life. Prepare to challenge your precision, patience, and artistic eye as you transform raw materials into a breathtaking work of art.
Essential Materials and Tools for Your Sculpture
Before diving into the creation process, gathering all the necessary materials and ensuring your workspace is equipped with the right tools is crucial. Each item plays a vital role in achieving a professional and durable finish for your epoxy and wood bear sculpture.
Materials List:
- Assorted Hardwoods: White oak, walnut, mahogany, poplar, redwood, pine, or similar woods chosen for their grain, color, and workability.
- Odies Oil (or similar wood finish): For protecting and enhancing the natural beauty of the wood and epoxy.
- High-Quality Epoxy Resin (e.g., Mas Deeppour X): Specifically formulated for deep pours, ensuring clarity and minimal bubbles.
- Melamine Sheets: To construct a sturdy, non-stick mold for your resin pour.
- Silicone Sealant: For creating watertight seals within your melamine mold.
- Wood Glue: Strong, waterproof wood glue for initial wood laminations.
- Penetrating Epoxy Sealer: To seal the wood prior to the deep pour, preventing air release.
Tools Required:
- Jointer: For flattening and squaring wood edges.
- Planer: For achieving uniform thickness and smooth surfaces on your wood pieces.
- Table Saw or Miter Saw: For precise cutting of wood to desired lengths and widths.
- Clamps: Essential for securing wood during glue-ups and holding mold components.
- Chainsaw: For the initial rough carving and shaping of the bear form.
- Die Grinder (with various bits): For detailed shaping, refining contours, and defining features.
- Assorted Carving Tools: Chisels, gouges, and hand files for fine-tuning details.
- Sanding Tools: Orbital sander, sanding blocks, and a wide range of sandpaper grits (from 60 to 1000 grit, wet/dry).
- Buffing Tools: Buffing pads and compounds for achieving a high-gloss finish.
- Measuring Tapes and Rulers: For accurate dimensions.
- Mixing Containers and Stir Sticks: For epoxy resin.
- Personal Protective Equipment (PPE): Safety glasses, gloves, respirator, and hearing protection are absolutely critical when working with power tools, wood dust, and epoxy resin.
Step-by-Step Guide to Crafting Your Bear Sculpture
This detailed guide will take you through each phase of creating your epoxy and wood bear sculpture, from preparing the raw wood to the final polished finish.
Phase 1: Wood Preparation and Lamination
1. Selecting and Milling Your Wood: Begin by carefully selecting several types of wood. White oak offers strength and a beautiful grain, walnut provides rich, dark tones, mahogany adds reddish hues, while poplar, redwood, and pine can introduce lighter contrasts and varied textures. The diversity of these woods will create a stunning visual effect within the transparent epoxy. Once selected, mill these woods using a table saw to create planks of manageable size.
2. Precision Jointing: Utilize a jointer to achieve perfectly flat and square edges on your wood planks. This precision is paramount for strong, gap-free glue lines. Cut the jointed planks to exact dimensions, aiming for consistent widths and thicknesses. The goal is to create numerous slats that will form the core structure of your sculpture.
3. Crafting Individual Glue-Ups: Line up nine of the prepared wood slats, varying their lengths to create an intentional random pattern. This randomness is key to the organic, layered look of the finished piece. Individually glue these nine slats together, ensuring even glue distribution and firm clamping. Allow ample time for the glue to cure completely. Repeat this process approximately 20 times to create a significant number of these laminated wood blocks. The more varied your initial glue-ups, the richer the final pattern will be.
4. Smoothing and Leveling with a Planer: Once all the individual glue-ups have cured, use a planer to smooth and level all surfaces. This ensures consistent thickness across your laminated blocks and prepares them for the next stage. A perfectly flat surface is crucial for a successful final glue-up and resin pour.
5. Designing the Sculpture’s Layout: Now, arrange your smoothed laminated wood blocks. This is where your artistic vision truly comes into play. Experiment with the orientation and placement of each piece, rotating and shifting them to create an aesthetically pleasing, random pattern. Consider how the different wood types and grain directions will interact to form a captivating visual tapestry within the eventual epoxy. This thoughtful arrangement is fundamental to the sculpture’s final appearance.
Phase 2: Epoxy Preparation and Pouring
6. The Final Wood Glue-Up with Epoxy Sealing: For the ultimate structural integrity, use epoxy resin for the final glue-up of your arranged wood pieces. Before applying the main epoxy, brush two generous coats of a penetrating epoxy sealer onto all surfaces of your wood layout. This critical step seals the wood, preventing air trapped within the wood fibers from escaping and creating unwanted bubbles during the deep pour. Allow each coat to cure according to the manufacturer’s instructions.
7. Constructing the Melamine Mold: Build a sturdy mold using melamine sheets. Melamine is ideal because epoxy resin will not adhere to its surface, making demolding significantly easier. Crucially, apply silicone sealant along all interior seams and exterior joints of the mold. This ensures a completely watertight seal, preventing any epoxy leakage during the deep pour. Place your sealed wood layout carefully inside this prepared mold.
8. The Deep Pour Process with Mas Deeppour X: Prepare your epoxy resin (e.g., Mas Deeppour X) according to the manufacturer’s instructions, ensuring accurate mixing ratios. Pour the epoxy into the mold in controlled layers. This multi-layer approach helps manage exothermic reactions (heat generated by curing epoxy) and minimizes bubble formation. For the first pour, cover the bottom of your wood layout. Once this initial layer has partially set but is still tacky, you can proceed with further layers.
9. Strategic Tilting and Displacement: To create dynamic visual interest and depth, tilt your entire mold by resting it on 2x4s or similar supports. This allows you to pour more epoxy on one side than the other, creating varying depths within the resin. To further displace epoxy and achieve specific contours, strategically place a heavy object, such as a 4×4 bag (or a sandbag wrapped in plastic to prevent sticking), on the front side of your sculpture within the mold. This technique helps guide the epoxy flow and creates a three-dimensional effect even before carving begins. Allow the epoxy to fully cure, which can take several days depending on the product and ambient conditions.
Phase 3: Carving and Shaping the Bear
10. Demolding and Initial Carving: Once the epoxy is completely cured, carefully remove the mold and the displacement bag. You will now have a solid block of wood and epoxy. Outline the bear design directly onto the exterior of this block. Using a chainsaw, begin the rough carving process. Work slowly and methodically, removing small chunks at a time. This prevents cutting too deeply or making irreversible mistakes. The chainsaw is for establishing the overall silhouette and large forms of the bear.
11. Refining the Sculpture’s Form: After the initial chainsaw work, use smaller carving tools and a die grinder to thin out and refine the sculpture’s shape. Focus on bringing out the natural contours and musculature of a bear. The die grinder is particularly effective for shaping intricate areas like the jawline, defining the eyes, and articulating the body parts such as the arms, legs, and paws. This phase requires a keen eye for detail and continuous assessment of the form from all angles. Gradually transition from aggressive shaping bits to finer ones as you move towards more detailed areas.
Phase 4: Sanding, Polishing, and Finishing
12. Extensive Sanding for Clarity: This is perhaps the most labor-intensive but crucial phase for revealing the beauty of your sculpture. Begin sanding with a coarse 60-grit sandpaper to remove tool marks and further refine the shape. Progress through successively finer grits: 80, 120, 180, 220, 320, and 400. Ensure all scratches from the previous grit are removed before moving to the next. Once you reach 400-grit, transition to wet sanding. Wet sanding with 400, 600, 800, and finally 1000-grit sandpaper will eliminate microscopic scratches and bring out the stunning clarity and shine of the epoxy resin and the smooth finish of the wood.
13. Applying the Final Finish: After meticulous sanding and ensuring the surface is clean and dry, it’s time to apply the finish. Products like Odies Oil are excellent for both wood and epoxy, providing protection and enhancing their natural luster. Apply a thin, even coat over the entire surface of your bear sculpture, following the manufacturer’s instructions. Allow it to penetrate and set for the recommended time.
14. Buffing for a Brilliant Shine: Once the finish has cured, use a buffing tool with a clean buffing pad to gently buff the entire surface. This final step will bring out a deep, rich sheen and leave your bear sculpture with a professional, museum-quality luster. The contrast between the varied wood grains and the crystal-clear epoxy will be truly captivating.
Tips for Success and Safety Considerations
Achieving Flawless Results:
- Patience is Key: Rushing any step, especially curing times for glue and epoxy, can compromise the integrity and finish of your sculpture.
- Workspace Environment: Work in a dust-free environment for epoxy pours to prevent inclusions. Maintain a consistent room temperature as recommended by your epoxy manufacturer for optimal curing.
- Test Pieces: If you’re new to deep-pour epoxy or specific woods, consider making small test pieces to understand how the materials behave and interact.
- Cleanliness: Keep all tools and surfaces meticulously clean to avoid contamination in your epoxy or finish.
- Embrace Imperfection: While precision is important, remember that mixed-media art often embraces the natural variations of wood and the unique flow of resin. Small imperfections can add character.
Safety First:
- Personal Protective Equipment (PPE): Always wear safety glasses, hearing protection, gloves, and a respirator, especially when working with power tools, fine wood dust, and epoxy fumes. Epoxy resin can cause skin irritation and respiratory issues.
- Ventilation: Ensure your workspace is well-ventilated when working with epoxy resin and during sanding, as wood dust and resin particles can be hazardous.
- Tool Safety: Familiarize yourself with all power tools before use. Always operate chainsaws and grinders with extreme caution, keeping bystanders at a safe distance. Never force a tool.
- Proper Storage: Store all chemicals (epoxy, oil finishes) in their original containers, away from heat sources and out of reach of children and pets.
Conclusion: A Masterpiece Born of Skill and Vision
Creating an epoxy resin and wood bear sculpture is a deeply rewarding artistic endeavor that marries the ancient craft of woodworking with modern resin art techniques. From the initial milling of diverse hardwoods to the meticulous deep-pour process and the intricate carving, each step demands precision, patience, and a touch of artistic flair. The journey culminates in a unique masterpiece that showcases the rich textures of natural wood suspended within the crystalline clarity of epoxy, forming a striking representation of a bear.
This project is more than just a craft; it’s an opportunity for personal growth, challenging you to master new skills and refine existing ones. The finished sculpture stands as a testament to your dedication and creativity, a captivating focal point in any setting. Whether it graces your living room, office, or is gifted to a loved one, this bear sculpture will undoubtedly spark conversation and admiration, reflecting the intricate beauty achieved through the harmonious blend of wood and resin. Embrace the challenge, enjoy the process, and take pride in the extraordinary art you create.