
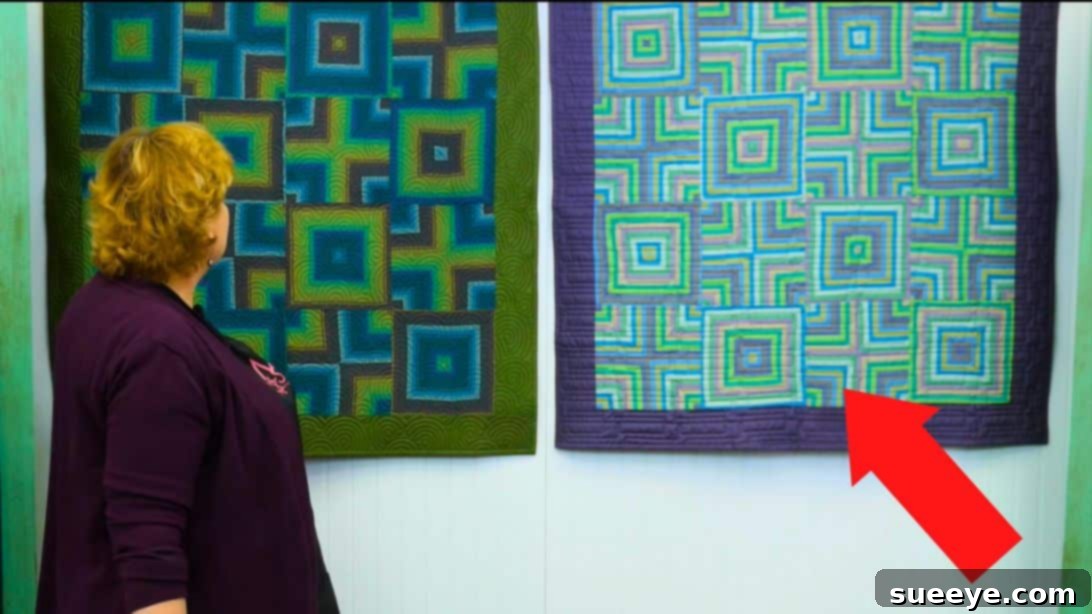
Embark on an exciting quilting journey with the mesmerizing Quartered Stripes Quilt! Have you ever imagined transforming simple striped fabrics into intricate, captivating patterns that create an optical illusion? Thanks to the ingenious techniques popularized by Missouri Star, this stunning effect is not only achievable but also incredibly fun to make. From a distance, these quilts appear to shimmer and shift, drawing the eye with their dynamic interplay of lines and shapes. This comprehensive tutorial will guide you through crafting beautiful blocks composed of quarter square triangles, which are then skillfully arranged to form striking square and cross designs.
The secret to this quilt’s distinctive charm lies in precise fabric preparation, particularly how you cut and align your striped materials. While this might sound daunting, especially for those new to quilting, rest assured that the subsequent steps are wonderfully straightforward and rewarding. This project is ideally suited for beginners, offering a fantastic introduction to fundamental quilting techniques while yielding a truly impressive finished piece. Get ready to dive into the world of creative fabric manipulation. Read on for detailed instructions or watch the inspiring video tutorial below to master the art of the Quartered Stripes Quilt. Happy sewing and prepare to be amazed by your own craftsmanship!
Essential Materials for Your Quartered Stripes Quilt:
Gathering your materials is the first exciting step towards creating your beautiful quilt. Choosing quality fabrics will ensure your project is not only a joy to make but also lasts for years to come.
- 1 and 1/4 yards of Striped Fabric: This is the star of our show! Select a striped fabric with clear, distinct lines that will enhance the illusion. The contrast in the stripes will make your patterns pop.
- 3/4 yards of Border Fabric (includes binding): Pick a coordinating solid or subtle print for your borders and binding. This fabric will frame your design beautifully and provide a polished finish.
- 1 and 1/2 yards of Backing Fabric: Choose a comfortable and durable fabric for the back of your quilt. This can be a fun opportunity to add another layer of personality to your project.
Step-by-Step Instructions: Crafting Your Quartered Stripes Quilt
Precision is key when working with stripes, but don’t let that intimidate you. Follow these detailed steps carefully, and you’ll be well on your way to a stunning quilt.
Step 1: Preparing Your Striped Fabric for Precision Cutting
The foundation of a visually stunning quartered stripes quilt begins with meticulous fabric preparation. Unfold your beautiful striped fabric entirely. Now, here’s the crucial part: fold the fabric in the opposite direction from its original fold, ensuring that the selvages (the factory-finished edges) are perfectly aligned along one side. Take your time to match up every single stripe from one edge to the other. You might even want to use pins to hold the stripes in place for extra security. Once you’ve achieved this precise alignment, fold the fabric one more time, again making sure all layers are perfectly stacked and the stripes continue to line up without any shifting. This multi-layered, precisely aligned stack will allow you to cut multiple pieces simultaneously while maintaining the integrity of the striped pattern across all layers.
With your fabric neatly folded and perfectly aligned, it’s time to trim. Carefully trim off the selvages using a rotary cutter and a ruler to create a clean, straight edge. From this newly squared-up edge, begin cutting your fabric into 10-inch segments. Continue this process along the entire length of your folded fabric. The goal is to produce several uniform 10-inch strips, each comprising multiple layers of perfectly aligned striped fabric. This careful preparation is paramount for ensuring that when you later assemble your quilt blocks, the striped patterns will create the desired optical effect flawlessly.
Step 2: Creating Quarter Square Triangle Units
Now that you have your perfectly cut 10-inch striped segments, let’s transform them into the building blocks of our illusion. Take one of your 10-inch segments – which, remember, is actually multiple layers of striped fabric. Carefully turn it so that you can access all sides. First, trim off any remaining folded edges to open up the tube of fabric, creating a single, multi-layered 10-inch square. Then, using your rotary cutter and a long ruler, cut this 10-inch square in half diagonally from one corner to the opposite corner. This will give you two large triangles. Immediately after, cut each of these two large triangles in half again diagonally, perpendicular to your first cut. You will now have four smaller triangles from each 10-inch square.
Repeat this diagonal cutting process for all of your 10-inch segments. Once cut, you will have multiple stacks of triangles. To keep these stacks organized and prevent the layers from shifting – which is especially important with striped fabric – place a pin through each stack of four triangles. This simple step ensures that the precise alignment you worked so hard for in Step 1 remains intact. These units are the foundation for your quarter square triangles, and maintaining their layered, aligned state is crucial for the striking visual effect of your finished blocks.
Step 3: Assembling Blocks with Square and Cross Patterns
With your precisely cut and pinned stacks of triangles, it’s time to bring your blocks to life. Take one of these stacks of four triangles. Carefully arrange the four triangles to form a square. The magic here is in the orientation: experiment with how you turn each triangle until you see a distinct pattern emerge. You will notice that if you arrange them one way, the stripes will form a square in the center, and if you arrange them another way, they will form a cross pattern. For this quilt, we will create both variations to achieve the alternating design.
Once you’ve decided on your desired pattern (either square or cross), lay two adjacent triangles right sides together, ensuring their edges align perfectly. Using a sewing machine, sew them together with a consistent quarter-inch seam allowance. This precise seam allowance is fundamental in quilting for achieving accurate block sizes. Once sewn, carefully press the seam open. Pressing seams open helps to reduce bulk and creates flatter, more accurate blocks. Now, take the remaining two triangles and repeat the process to create a second half-block. Finally, sew these two half-blocks together, again with a quarter-inch seam, and press the final seam open.
Repeat this assembly process with the remaining stacks of triangles. From each original 10-inch square, you will be able to create one complete block. Continue until you have a sufficient number of blocks. For a quilt of this specific design, you will need a total of 16 blocks to create a layout of 4 rows with 4 blocks in each row. As you assemble, aim to create an equal number of “square pattern” blocks and “cross pattern” blocks. The beauty of this quilt lies in the alternating arrangement of these two distinct block types. When you begin to lay out your quilt top, carefully alternate the cross and square patterns in a checkerboard fashion. This creates the captivating visual flow and optical illusion that makes the Quartered Stripes Quilt so unique and appealing.
Step 4: Assembling Your Quilt Top
Once you have all 16 of your perfectly pressed blocks, it’s time to bring them together to form the quilt top. Lay out your blocks on a flat surface, such as the floor or a large design wall, to finalize your arrangement. Ensure you have the alternating square and cross patterns that create the desired visual effect. Once you are satisfied with your layout, begin sewing the blocks together into rows. Take the first two blocks of your first row, place them right sides together, and sew them with a quarter-inch seam. Continue adding blocks to complete the entire row. Repeat this process for all four rows.
After each row is sewn, press your seams. For rows, it’s often helpful to press the seams of adjacent rows in opposite directions (e.g., press seams to the left for row 1, to the right for row 2, and so on). This technique, known as “nesting seams,” helps the seams interlock when you join the rows, creating perfectly matched points and reducing bulk at the intersections. Once all rows are completed and pressed, join the rows together, again using a precise quarter-inch seam allowance. Take your time to align the intersections where your blocks meet, pinning generously to keep everything in place. Press these final row seams open or to one side, depending on what creates the flattest quilt top.
Step 5: Adding Borders and Finalizing the Quilt Top
Borders frame your quilt and give it a finished, polished look while also providing an opportunity to increase its size. Measure the length and width of your assembled quilt top to determine the dimensions for your border fabric. Cut your border fabric strips to the appropriate width and length. Typically, you’ll add side borders first, followed by top and bottom borders. Sew the side borders onto the quilt top, ensuring they are evenly distributed. Press the seams towards the border fabric.
Next, measure the length of your quilt top with the side borders attached, and cut your top and bottom border pieces accordingly. Sew these borders in place and press the seams. This completes your quilt top! Take a moment to admire your work. The vibrant stripes and clever arrangement of quarter square triangles should now create a dynamic and eye-catching design.
Step 6: Quilting and Finishing
With your quilt top complete, the next crucial steps involve layering, quilting, and binding to turn it into a functional and beautiful quilt. This process includes three layers: the quilt top, a layer of batting (for warmth and dimension), and the backing fabric you selected earlier.
- Basting: Lay your backing fabric wrong side up on a clean, flat surface, securing it with painter’s tape or pins. Place the batting evenly over the backing, smoothing out any wrinkles. Finally, center your quilt top right side up on top of the batting. Secure all three layers together using basting pins, spray basting, or hand basting stitches. Ensure there are no puckers or wrinkles.
- Quilting: This is where you stitch through all three layers to hold them together and add texture. For beginners, simple straight-line quilting, stitch-in-the-ditch (quilting along the seam lines), or a simple meandering pattern are excellent choices. You can use your domestic sewing machine or opt for a long-arm quilter if available. The quilting design can greatly enhance the visual appeal of your striped patterns.
- Trimming and Squaring: Once quilting is complete, trim off any excess batting and backing fabric, squaring up your quilt edges to ensure they are perfectly straight and even.
- Binding: The final touch! Cut your border/binding fabric into 2.5-inch wide strips. Join these strips end-to-end to create one continuous binding strip long enough to go around the entire perimeter of your quilt, plus a few extra inches. Fold the binding strip in half lengthwise and press. Attach the raw edge of the binding to the raw edge of your quilt, either by machine or hand, mitering the corners for a neat finish. Then, flip the binding over to the back of the quilt and hand-stitch or machine-stitch it down to secure it, enclosing all raw edges.
Expert Tips for a Flawless Quartered Stripes Quilt
To ensure your quartered stripes quilt turns out as stunning as you envision, keep these valuable tips in mind, especially if you’re a beginner:
- Precision is Paramount: With striped fabrics, even a slight misalignment can be noticeable. Take extra time during cutting to ensure your stripes are perfectly stacked and your cuts are precise. Use a sharp rotary cutter blade and a non-slip ruler.
- Pressing Matters: Proper pressing throughout the process is critical for flat, accurate blocks. Always press after each seam, either open or to one side consistently, to avoid bulk and distortion.
- Consistent Seam Allowance: A quarter-inch seam allowance is standard in quilting. Practice maintaining a consistent seam allowance to ensure your blocks fit together perfectly. A quarter-inch foot for your sewing machine can be a great investment.
- Chain Piecing: To save time and thread, use chain piecing when sewing together multiple sets of triangles or blocks. This involves feeding units through your machine one after another without lifting the presser foot or cutting threads between them.
- Squaring Up Blocks: After assembling each block, it’s a good practice to square it up to a uniform size using a square ruler. This step ensures all your blocks are exactly the same size, making it much easier to assemble the quilt top without waves or puckers.
- Fabric Choices: While this tutorial focuses on a single striped fabric, consider experimenting with different striped fabrics or contrasting solids for an even more dynamic effect on future projects. The width and repeat of your stripes can also dramatically alter the final look.
- Watch the Video: Sometimes seeing a technique demonstrated makes all the difference. The Missouri Star tutorial linked above is an excellent visual aid that complements these written instructions perfectly.
Why You’ll Love Making This Quartered Stripes Quilt
This Quartered Stripes Quilt isn’t just another project; it’s an opportunity to create something truly magical. The optical illusion it creates is a constant source of wonder, drawing compliments and curiosity from everyone who sees it. For beginners, it’s a perfect learning ground, teaching essential skills like precise cutting, consistent seam allowances, and careful pressing, all while building confidence. Experienced quilters will appreciate the clever simplicity of the design and the satisfying precision required. The process is meditative, and the result is a unique, personalized heirloom that brings warmth and style to any home. Enjoy the journey of bringing these stripes to life!