
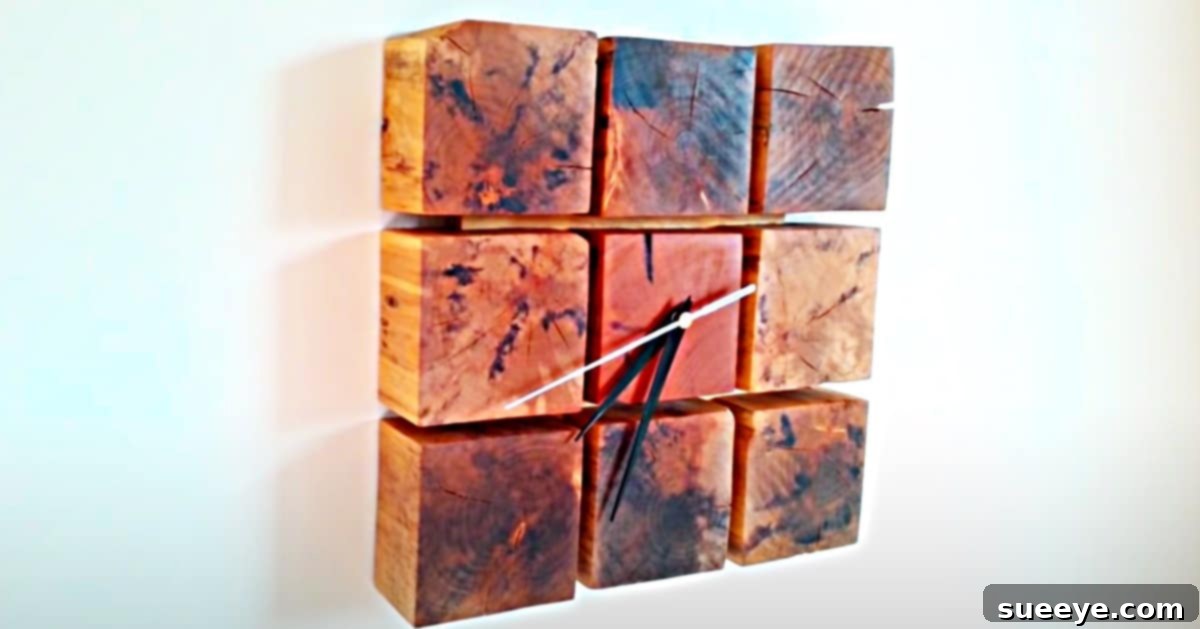
How To Make A Stunning Pallet Wood Block Clock
The allure of repurposing old materials into something beautiful and functional is incredibly rewarding, and few projects embody this spirit as perfectly as a DIY pallet wood block clock. When I first stumbled upon a tutorial for this particular craft, the idea instantly captivated me. The thought of transforming discarded wooden pallets into a charming, rustic timepiece for my home was simply too exciting to resist. It wasn’t just the creative challenge; it was the promise of a unique decor piece, born from sustainability and personal effort.
My enthusiasm was further fueled by the fortunate discovery of a stack of old pallets behind my office building. They were practically calling my name, presenting the perfect opportunity to embark on this eco-friendly adventure. With the raw material secured, all that remained was gathering a few essential items. While I had most of the tools and supplies on hand, the critical component – the clock mechanism – still needed to be acquired. A quick call to Michael’s Craft Store confirmed they had exactly what I needed: a small, battery-operated clock movement. The experience was made even sweeter by a fantastic 60% off coupon from the Michael’s app, demonstrating how accessible and budget-friendly DIY can truly be. Craft store discounts are wonderfully straightforward; a simple scan of your phone at checkout and the savings are magically applied.
Why Choose a Pallet Wood Block Clock?
Creating a clock from pallet wood blocks offers numerous advantages beyond just a beautiful end product:
- Sustainability: You’re giving new life to discarded wood, reducing waste and your environmental footprint.
- Unique Aesthetic: Each pallet has its own character, meaning every clock will have a distinct, rustic charm that store-bought items simply can’t replicate.
- Cost-Effective: Pallets are often free or very inexpensive, making this a budget-friendly way to add personality to your home.
- Personalized Decor: The ability to customize the stain, finish, and arrangement of the blocks allows for a truly personalized piece that reflects your style.
- Sense of Accomplishment: There’s immense satisfaction in creating something useful and attractive with your own hands.
Sourcing and Preparing Your Pallet Wood
The journey to your beautiful clock begins with selecting the right pallets. Not all pallets are created equal, and safety is paramount. Look for pallets stamped with “HT” which stands for Heat Treated, indicating they haven’t been treated with harmful chemicals. Avoid “MB” (Methyl Bromide) treated pallets. Once you’ve found suitable pallets, the next steps are crucial:
- Cleaning: Pallets can be dirty! Give them a thorough scrubbing with soap and water, then let them dry completely in the sun.
- Disassembly: Carefully dismantle the pallet using a pry bar, hammer, or even a reciprocating saw to separate the deck boards from the stringers. Be mindful of nails and potential splinters.
- Cutting Blocks: Once you have individual boards, cut them into uniform blocks of your desired size. The beauty of this project lies in creating a mosaic, so don’t be afraid to experiment with block dimensions. A miter saw or table saw will ensure precise cuts.
- Sanding: This is perhaps the most important step for a professional finish. Start with a coarser grit sandpaper (e.g., 80-100 grit) to remove rough spots and imperfections, then progress to finer grits (e.g., 150-220 grit) for a smooth, touchable surface. A random orbital sander can make this process much faster and more effective.
Essential Materials and Tools for Your Pallet Wood Block Clock
Before diving into the assembly, ensure you have all the necessary components ready. Having everything organized will make the crafting process smoother and more enjoyable.
Materials:
- Wood Blocks (from a pallet): Carefully selected, cut, and sanded pieces of reclaimed pallet wood. Ensure you have enough for your desired clock size and design.
- Small Clock Mechanism (with hands): A battery-operated quartz movement is ideal for DIY clocks. Ensure the shaft length is appropriate for the thickness of your wood block.
- Wood Glue (e.g., Gorilla Wood Glue, Elmer’s Wood Glue Max): A strong, durable wood adhesive is essential for securely joining your blocks.
- Wood Stain (e.g., Minwax, Varathane): Choose a shade that complements your home decor. Stains not only add color but also enhance the natural wood grain.
- Polyurethane or Clear Coat: This protective finish will seal the wood, providing durability and a beautiful luster. It can be oil-based or water-based, depending on your preference.
- Optional: Wood filler: If you have any significant gaps or imperfections you wish to fill.
- Optional: Clock numbers or markers: These can be painted, stenciled, or small metal/wood pieces.
- Optional: Hanging Hardware: A D-ring hanger or a keyhole slot router bit for easy wall mounting.
Tools:
- Drill: Essential for creating the hole for the clock mechanism and pre-drilling screw holes. Various drill bit sizes will be needed.
- Screws: Wood screws (e.g., 1-1.5 inches) for attaching the blocks to a backer board, providing extra stability.
- Sander (Orbital or Block Sander): For achieving a smooth finish on your wood blocks.
- Clamps (Bar Clamps or Pipe Clamps): Crucial for holding glued wood blocks together firmly while the adhesive dries.
- Safety Glasses and Gloves: Always wear appropriate personal protective equipment when working with wood and tools.
- Measuring Tape and Pencil: For accurate measurements and markings.
- Saw (Miter Saw, Table Saw, or Hand Saw): For cutting pallet boards into desired block sizes.
- Rags or Brushes: For applying stain and polyurethane.
Step-by-Step Directions: Crafting Your Pallet Wood Block Clock
This video tutorial by Well Done Tips on YouTube provides an excellent visual guide, but here’s a detailed breakdown to ensure your project is a resounding success:
Step 1: Design and Layout Your Blocks
Before gluing, arrange your sanded wood blocks on a flat surface to visualize your clock’s design. Experiment with different patterns, orientations, and the overall shape. Decide on the center block where the clock mechanism will be housed. This planning stage is crucial for ensuring a cohesive and appealing final product.
Step 2: Prepare the Clock Mechanism Hole
Identify the central block for your clock mechanism. Using your drill, create a hole large enough for the clock mechanism’s shaft to pass through. If your mechanism requires a recessed area for a flush fit, use a larger drill bit or a router to create a shallow pocket on the back of the block. Test fit the mechanism to ensure it sits correctly.
Step 3: Glue and Clamp the Blocks
Apply a generous, even layer of wood glue to the edges of your blocks. Carefully join them according to your chosen design, ensuring they are flush and tightly pressed against each other. Use clamps to hold the entire assembly firmly together. Wipe away any excess glue that squeezes out with a damp cloth. Allow the glue to dry completely according to the manufacturer’s instructions, usually several hours or overnight. This is vital for the structural integrity of your clock.
Step 4: Secure with a Mounting Board
While the glue provides initial adhesion, adding a thin piece of plywood or another pallet board as a “mounting board” to the back of your block assembly will greatly enhance stability and durability. Once the glue has dried, flip your block assembly over. Place the mounting board on the back, ensuring it covers the entire glued area. Pre-drill pilot holes to prevent splitting, then use screws to securely attach the blocks to this backer board. This step prevents the blocks from separating over time, especially with environmental changes.
Step 5: Stain and Finish Your Masterpiece
Now comes the artistic part. Apply your chosen wood stain evenly to all surfaces of the assembled blocks using a brush or rag. Work in small sections, wiping off excess stain after a few minutes to achieve your desired depth of color. Let the stain dry completely. For enhanced protection and a beautiful sheen, apply one or two coats of polyurethane or a clear topcoat. A coat of polyurethane will truly bring out the luster and richness of the wooden blocks, while also protecting them from moisture and wear. Lightly sand between coats with a very fine-grit sandpaper (e.g., 320 grit) for an exceptionally smooth finish.
Step 6: Install the Clock Mechanism and Hands
Once your finish is completely dry, insert the clock mechanism into the prepared hole from the back of your clock. Secure it with the washer and nut provided with the mechanism. Then, carefully attach the clock hands to the shaft in the correct order (hour, minute, second). Be gentle, as the hands can be delicate. Install a battery and set the time to test your new clock.
Step 7: Add Final Touches and Hanging Hardware
Consider adding numbers or hour markers to your clock face for easier readability, or embrace a minimalist look without them. These can be stenciled, painted, or glued-on elements. Finally, attach appropriate hanging hardware to the back of your clock. A D-ring hanger or a picture wire setup works well, ensuring your creation can be proudly displayed on your wall.
Customization Ideas to Make it Truly Yours
The beauty of a DIY project is the endless possibilities for customization:
- Color Palette: Instead of just stain, consider painting some blocks in contrasting colors, or even creating an ombre effect.
- Number Styles: Use stencils for Roman numerals, modern fonts, or hand-paint abstract markers. Small metal or wooden numbers can also be glued on.
- Block Arrangement: Play with different block sizes and orientations to create a more dynamic and abstract design.
- Distressed Look: Further distress the wood before staining for an even more antique or rustic feel.
- Mixed Materials: Incorporate small metal accents, bottle caps, or even pebbles into your design for added texture.
Safety First: Important Precautions
Working with wood and tools requires attention to safety:
- Always wear safety glasses to protect your eyes from sawdust and flying debris.
- Wear gloves to prevent splinters, especially when handling rough pallet wood.
- Use ear protection when operating loud power tools like saws and sanders.
- Ensure your workspace is well-ventilated, especially when working with stains and polyurethanes, which emit fumes.
- Keep your workspace clean and tidy to prevent trip hazards.
- Familiarize yourself with your tools and always follow manufacturer safety guidelines.
I absolutely adore this wooden pallet block clock, and I simply cannot wait to create one for my own home. I’ve already picked out the perfect spot for it: a prominent wall in my husband’s study, where its unique charm and handmade character will be a wonderful conversation starter. This project is more than just making a clock; it’s about infusing your living space with personality, sustainability, and the undeniable satisfaction of crafting something truly special with your own hands. Give it a try – you’ll be amazed at what you can create!