
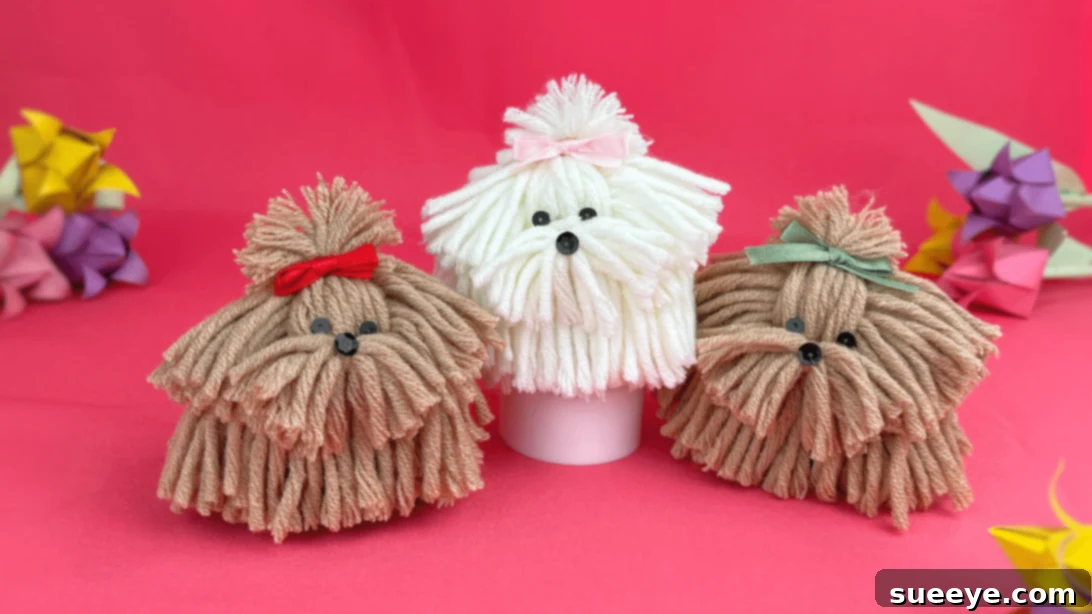
Do you have a stash of leftover yarn from previous projects, perhaps just waiting for its next creative adventure? Look no further! This delightful DIY tutorial will guide you through transforming those colorful remnants into the most adorable yarn dogs you’ve ever seen. As a passionate dog lover and crafting enthusiast, I can confidently say this project is an absolute favorite. It’s not just a craft; it’s a journey into creating charming, fluffy companions that bring warmth and personality to any space.
The world of yarn crafts is truly boundless, offering endless possibilities for creative expression. From intricate flower pom-poms that bloom with vibrant colors to elegant macrame wall hangings, festive garlands, stylish tassels, captivating string art, cozy rugs, comforting blankets, fashionable hats, sweaters, or socks – yarn is an incredibly versatile medium. But perhaps one of the most heartwarming creations you can fashion with yarn are these irresistibly cute yarn animals. Seriously, just take a moment to admire these little yarn pups. Their charm is undeniable! While making them, I found myself constantly exclaiming, “So cute!” Want to experience the same joy and create your own fluffy friends? Join the fun and follow our easy, step-by-step guide below, complete with a video tutorial on how to make a yarn dog.
RELATED: DIY Dog Wash Station
Why You’ll Love Crafting These Cute Yarn Puppies
This easy dog yarn craft is a fantastic activity suitable for both children and adults. Its simplicity makes it accessible for beginners, while the potential for customization allows seasoned crafters to truly make it their own. The process is incredibly enjoyable, offering a relaxing and rewarding creative outlet. Imagine tailoring your yarn dog to perfectly match your own beloved canine companion! You can experiment with different yarn colors to mimic various dog breeds, add a delicate floral bow for a touch of elegance, use a heart-shaped nose for extra cuteness, or even attach a miniature name tag to personalize your creation further. Let your imagination soar and infuse each yarn pup with its own unique personality!
These handmade yarn dogs are more than just crafts; they are versatile creations perfect for a variety of uses. They make charming decorative accents for shelves, desks, nurseries, or playrooms, adding a touch of whimsy and warmth to any decor. Beyond home decoration, a handmade yarn dog makes for a truly sweet and thoughtful gift. Whether it’s for a dog lover’s birthday, a housewarming present, or just a token of affection, a handcrafted item carries a special sentiment that store-bought gifts often lack. It’s a tangible expression of care and creativity, sure to bring a smile to anyone’s face. Plus, engaging in crafts like this can be a wonderful way to de-stress, improve fine motor skills, and foster a sense of accomplishment.
Essential Materials for Your DIY Yarn Dog Project
Gathering your supplies is the first exciting step in bringing your adorable yarn dog to life. Most of these items are common craft supplies, making this a budget-friendly project, especially if you’re utilizing leftover yarn. Here’s what you’ll need:
- Yarn: This is the star of our project! Choose your favorite colors and textures. Acrylic yarn is usually easy to work with and widely available. Consider different shades for varied dog breeds or a single color for a uniform look.
- Scissors: A sharp pair of scissors is crucial for clean cuts, both when preparing the yarn bundles and when trimming your finished pup to shape.
- Beads or Sequins: These will serve as the eyes and nose of your yarn dog, giving it character. Small black beads are classic for eyes, while larger ones or a sequin can form the nose. Get creative with different colors and shapes!
- Hot Glue Gun: Essential for securely attaching the various yarn components and embellishments. Ensure your hot glue gun is in good working order and always practice safety when handling it.
- Glue Sticks: You’ll need these to feed into your hot glue gun. Make sure to have a few extra on hand so you don’t run out mid-project.
- Ribbon: Optional, but perfect for adding a cute bow or collar to your finished yarn dog, enhancing its charm and personality.
- Elastic Band: A small elastic band will be used to create the dog’s muzzle, gathering specific yarn strands into shape.
- Cork: This acts as the sturdy base for your yarn dog’s body, providing structure and support. A wine cork or similar cylindrical cork will work perfectly.
- Skewer (optional): A wooden skewer can be very helpful for fluffing out yarn strands or gently pushing glue into tight spots, though it’s not strictly necessary.
How to Make Dog Yarn: A Step-by-Step Guide
Follow these detailed instructions to craft your very own charming yarn dog. Take your time with each step, and don’t be afraid to add your personal touch!
Step 1: Creating the Body Yarn Bundles
To begin forming the main structure of your yarn dog’s body, take your yarn and wrap it around three of your fingers approximately 10 times. Ensure the wraps are snug but not overly tight to avoid discomfort and make removal easier. Once you have your 10 loops, carefully cut the excess yarn, leaving a tail long enough to tie.
Step 2: Securing the Body Loops
Carefully slide the looped yarn off your fingers. Take a separate small piece of yarn (about 4-5 inches long) and insert it through the center of these loops. Bring the ends of this small piece together at the top of the bundle and tie them securely into a double knot. This knot will hold all the loops together, creating a pom-pom-like structure.
Step 3: Cutting the Loops
With one hand, firmly hold the tied part of the yarn bundle. With your other hand, take your scissors and cut through all the loops on the opposite end. This will transform your looped bundle into a collection of individual yarn strands.
Step 4: Trimming and Preparing Body Pieces
Now, gently trim the long, uneven strands of yarn to create a more uniform length. The goal is to make a fluffy, consistent bundle. You will need to create a total of 9 such pieces for the main body of your yarn dog. Once all 9 are made and trimmed, set them aside for assembly.
Step 5: Preparing the Head Yarn Bundle
For the head, we need a larger, denser bundle. Take your yarn and wrap it around four of your fingers approximately 95 times. This higher number of wraps will create a much fuller pom-pom, perfect for the dog’s head. After wrapping, cut the excess yarn, and very carefully slide the large bundle off your fingers, trying to keep its shape intact.
Step 6: Securing the Head Loops
Similar to Step 2, take a small piece of yarn and carefully insert it through the center of the large looped bundle. This step can be a bit trickier due to the volume of yarn, so take your time.
Step 7: Tying the Head Bundle
Tie the ends of the small yarn piece tightly into a double knot, securing all the loops together. This will form the core of your dog’s head pom-pom. Ensure the knot is very firm to prevent the yarn from unraveling.
Step 8: Cutting and Setting Aside the Head Piece
Hold the tied part of the large yarn bundle and cut through the loops on the opposite end, just as you did in Step 3. This will create the full, fluffy head. Give it a quick fluff and set it aside with the body pieces.
Step 9: Attaching Body Pieces to the Cork Base
Now, let’s assemble the body. Take 8 of the small yarn bundles you made in Step 4. Apply a small dot of hot glue to the middle part of each bundle’s tied section. Carefully glue each of these 8 pieces evenly around the top edge of your cork. Arrange them so they form a fluffy skirt around the cork, covering its sides.
Step 10: Attaching the Head
Once the body pieces are firmly attached, apply a generous amount of hot glue to the very top surface of the cork. Take the large head piece (from Step 8) and carefully center it on top of the glue, pressing down gently but firmly. Hold it in place for a moment to ensure a strong bond. It’s crucial for the head to be well-centered for a balanced look.
Step 11: Shaping the Muzzle
After the glue has dried and the head is secure, identify the front of your dog. Take a few strands of yarn from the front section of the head and a few from the corresponding back section. Gently gather these strands together and tie them securely with a small elastic band. This will start to define the muzzle area of your yarn dog, giving it a distinct snout.
Step 12: Adding Volume and Fluff
To give the tied strands around the muzzle area more volume and a softer appearance, you can use a skewer. Gently poke and pull at the yarn strands around the elastic band. This helps to separate them and create a fluffier, more natural-looking snout. If you don’t have a skewer, the blunt end of a small paintbrush or even your fingers can work.
Step 13: Concealing the Elastic
Take the last remaining yarn bundle (from Step 4, the ninth piece). Apply hot glue to its tied center. Carefully glue this piece over the elastic band on the muzzle. This serves to conceal the elastic, give the muzzle more volume, and create a seamless, fluffy transition. It helps integrate the snout into the overall head shape.
Step 14: Giving Your Dog a Haircut
This is where your yarn dog truly takes shape! Using your scissors, carefully trim the yarn on the sides and front of the dog. Refer to the provided photo below for guidance on shaping. You can create rounded ears by snipping and shaping, define the head, and give your dog a tidy, fluffy coat. This step allows for a lot of personalization – you can trim it to look like a specific breed or just give it a charming, generic puppy cut. Don’t be afraid to sculpt and refine until you’re happy with the silhouette.
Step 15: Adding the Finishing Touches
The final step is to bring your yarn dog to life with facial features and accessories. Using your hot glue gun, carefully attach two beads or sequins for the eyes and one for the nose. Position them thoughtfully to give your dog an expressive face. If you have a ribbon, tie it into a cute bow and glue it near the ear or neck for an extra touch of charm. You can also add other small embellishments like tiny bells, a personalized tag, or even small fabric ears. Step back and admire your adorable, handcrafted yarn dog!

Craft Tips for Perfect Yarn Puppies
- Gentle Wrapping: When wrapping yarn around your fingers, maintain a light and consistent tension. Avoid wrapping it too tightly, as this can strain your fingers and make it difficult to remove the yarn loops without distorting their shape. A relaxed wrap ensures a fluffier pom-pom.
- Precise Trimming: To achieve a clean, professional look for your yarn dog, use sharp scissors and aim for straight, even cuts when trimming the yarn strands. You can use a small comb to fluff out the yarn and identify any uneven pieces before a final trim. Don’t be afraid to take your time and sculpt the yarn to your desired shape.
- Hot Glue Safety: Always exercise caution when using a hot glue gun, especially if crafting with children. Ensure proper ventilation, and be mindful of the hot tip and dispensed glue. Adult supervision is recommended for younger crafters.
- Yarn Choice Matters: While any yarn can technically be used, acrylic or wool blends work best for these types of projects as they hold their shape well and provide a good amount of fluff. Different yarn weights (thicknesses) will result in different size and texture puppies, so experiment!
- Customization is Key: Don’t feel limited by the basic design. Consider adding pipe cleaner ears for a stiffer, more defined ear shape, or embroidering small details like eyebrows for added expression. You can even try mixing yarn colors within a single bundle for a multi-toned effect.
Frequently Asked Questions About Yarn Dogs
What kind of yarn is best for making yarn dogs?
Medium-weight acrylic yarn (also known as worsted weight or Aran weight) is generally recommended. It’s affordable, widely available, comes in many colors, and holds its shape well. Wool yarn can also be used for a slightly denser, natural feel, but may be more expensive. Avoid very thin or slippery yarns as they might be harder to work with and may not create as full a pom-pom.
Can children make these yarn dogs?
Absolutely! This is a fantastic craft for children, especially with adult supervision for the hot glue gun and scissor steps. The wrapping and trimming are great for developing fine motor skills. Younger children might need more assistance with the tying and gluing, while older children can follow most steps independently.
How long does it take to make one yarn dog?
The time required can vary based on your crafting experience and speed, but typically, one yarn dog can be completed within 30-60 minutes, not including drying time for the glue. Once you get the hang of making the yarn bundles, the process becomes quite quick.
How can I make different dog breeds?
The beauty of this craft lies in its versatility! You can create different breeds by varying the yarn colors (e.g., black and white for a Border Collie, tan for a Golden Retriever). More advanced customization involves the trimming step: longer yarn around the ears can mimic floppy ears, while shorter, rounder cuts can suggest terrier breeds. Experiment with bead placement for different eye expressions.
How do I ensure the beads (eyes/nose) are securely attached?
For small parts like beads, using a hot glue gun is very effective. Apply a small dot of glue directly to the yarn where you want the bead to go, then press the bead firmly into place. Hold it for a few seconds until the glue sets. For added security, especially if children will be playing with the yarn dog, you can use a strong fabric glue or even stitch the beads on before applying hot glue.
DIY Dog Yarn Video Tutorial | YouTube
For those who prefer a visual guide, our detailed video tutorial provides step-by-step instructions that bring this project to life. Watch closely as we demonstrate each technique, from wrapping the yarn to assembling your adorable puppy. It’s the perfect companion to our written instructions, ensuring you master every detail and create a truly perfect yarn dog!
We hope you enjoyed this journey into crafting these adorable yarn dogs. They’re more than just simple crafts; they’re tiny bundles of joy waiting to bring a smile to your face or a loved one’s. Don’t forget to share your amazing creations with us on social media! Happy crafting!