
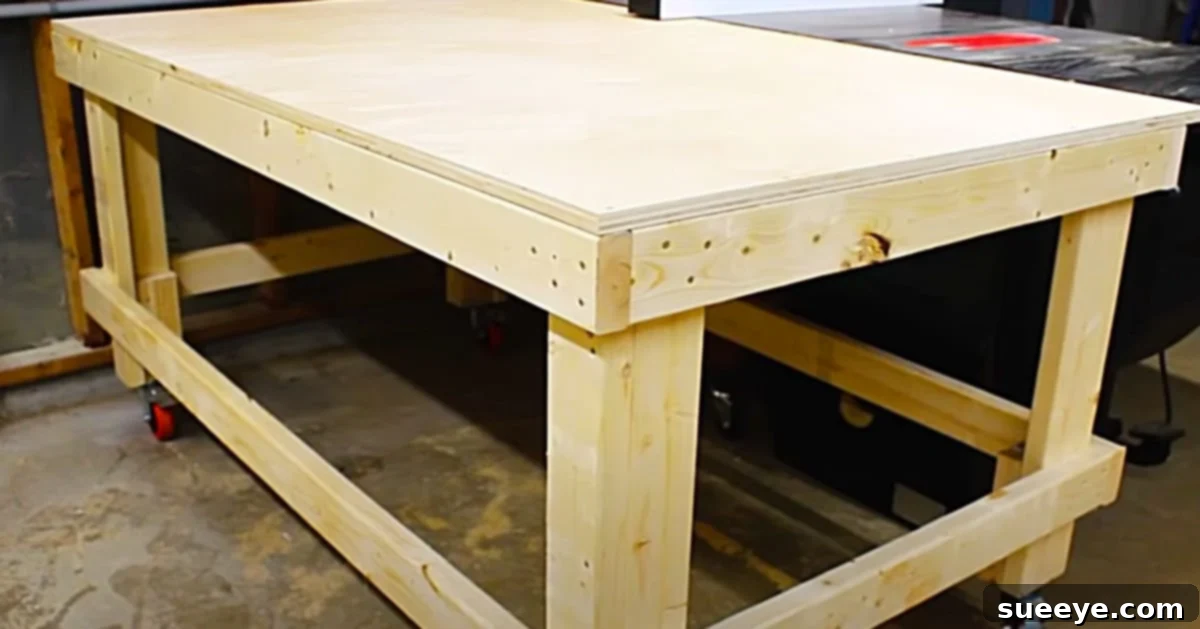
Build a Mobile 1-Hour Workbench: Your Ultimate DIY Garage & Crafting Solution
Are you tired of clutter in your workspace? Do you dream of a dedicated area for your DIY projects, crafts, or woodworking, but lack the space or the time for a complex build? Look no further! This comprehensive guide will introduce you to an ingenious solution: a sturdy, mobile workbench that can be assembled in approximately one hour. This incredibly practical project, inspired by the brilliant design from Robert J Keller, is a game-changer for anyone seeking efficiency and organization in their garage or workshop.
For too long, many of us have struggled with the common problem of shared workspaces. Crafting supplies often mix with power tools, leading to frustration, disarray, and sometimes even conflict. Imagine a world where your tools are always within reach, and your creative projects have a dedicated, portable home. This mobile workbench, equipped with smooth-rolling casters, offers precisely that flexibility. It allows you to effortlessly move your workspace wherever you need it – whether it’s out into the center of the garage for a big project, or neatly tucked away in a corner when your work is done. This method has proven to be an invaluable solution for keeping diverse projects separate and harmonious, transforming cluttered areas into highly functional zones.
The beauty of this workbench lies in its remarkable simplicity and speed of construction. Designed for quick assembly without compromising on stability or durability, it utilizes readily available materials and basic household tools. Whether you’re a seasoned woodworker looking for a quick shop addition or a complete beginner to DIY eager to tackle your first major project, you’ll find the process straightforward, incredibly rewarding, and surprisingly fast. Let’s dive into how you can bring this indispensable addition to your home workshop and reclaim your space.
Why a Mobile Workbench is a Must-Have for Every DIY Enthusiast
The advantages of having a mobile workbench extend far beyond simple convenience. It’s a fundamental upgrade to any home, garage, or dedicated craft space, offering a myriad of benefits that enhance productivity, organization, and enjoyment of your hobbies. Let’s explore the key reasons why this project is such a valuable investment of your time.
Unmatched Versatility and Portability
One of the most compelling features of this workbench is its inherent mobility. Mounted on sturdy caster wheels, it transforms from a static fixture into a dynamic workstation that adapts to your needs. Need to work on a project under better lighting near a window? Simply wheel it over. Have a large item that needs space on the floor? Easily roll the bench out of the way. This flexibility is particularly invaluable in multi-purpose spaces where the layout frequently changes or where dedicated, permanent floor space is at a premium. It means you can bring your workbench directly to the project, rather than struggling to bring cumbersome items to a fixed bench, saving time and effort.
Optimal Space Optimization for Any Garage or Room
For those with smaller garages, compact workshops, or shared living spaces, a mobile workbench is an absolute lifesaver. When not in use, it can be easily pushed into a corner, snugly against a wall, or even cleverly tucked underneath another workbench, cabinet, or shelf, freeing up valuable floor space. This intelligent use of space ensures that your garage remains functional for parking vehicles or other activities, without being permanently dominated by a large, immovable structure. It’s the ultimate solution for maximizing every square foot of your workspace.
Cost-Effective and Highly Accessible DIY Project
Building your own workbench is often significantly more cost-effective than purchasing a pre-manufactured one of comparable size, quality, and durability. This project specifically utilizes common lumber (2x4s) and plywood, materials that are budget-friendly and widely available at any local hardware store. Furthermore, the brilliant simplicity of Robert J Keller’s design means you won’t need specialized tools, obscure materials, or advanced woodworking skills. This makes it an incredibly accessible project for almost anyone, regardless of their prior DIY experience, allowing you to achieve a professional-looking result on a minimal budget.
A Harmonious Workspace Solution for Shared Environments
As mentioned in our introduction, shared workspaces can often lead to unnecessary friction over tools, tidiness, and personal space. A mobile workbench provides a clear and elegant solution for establishing personal boundaries. It offers a dedicated, movable spot for your crafting tools, gardening supplies, specific repair projects, or delicate electronics, ensuring they remain separate from others’ equipment. This clear distinction reduces clutter, minimizes the misplacement of tools, and fosters a more harmonious and respectful environment for everyone sharing the space, making joint use of the garage or workshop a pleasure rather than a point of contention.
Deconstructing the “1-Hour Workbench” Concept: Speed Meets Stability
The idea of building a robust and functional workbench in just an hour might sound overly ambitious, perhaps even too good to be true. However, it is entirely achievable thanks to a clever, streamlined, and highly efficient design. The secret lies in focusing on core functionality and employing efficient construction techniques that minimize complexity. This isn’t about rushing through the process; rather, it’s about maximizing simplicity and utilizing standard dimensions that virtually eliminate the need for complex cuts or intricate joinery. Robert J Keller’s brilliant design places a strong emphasis on speed, practicality, and structural integrity, making it the perfect project for those who want a fully functional workbench without committing to a multi-day construction endeavor.
While the actual assembly can indeed be completed in approximately 60 minutes, it’s important for realistic planning to account for preliminary preparatory steps. This includes gathering all your materials, ensuring your tools are charged and ready, and taking a few moments to thoroughly familiarize yourself with the detailed plans. Once these preliminary tasks are efficiently handled, the construction phase itself is remarkably swift. It primarily involves a few straightforward measurements, making a handful of precise cuts for the wooden components, and then assembling them securely with screws using a drill or impact driver. This project stands as a powerful testament to how intelligent design can deliver significant utility and robust functionality with an impressively minimal time investment.
Essential Materials You’ll Need for Your Quick Workbench Build
Before you begin the exciting journey of building your new workbench, gathering all the necessary materials and tools is an absolutely crucial step for a smooth, efficient, and frustration-free build. Opting for quality materials will ensure your workbench is not only sturdy upon completion but also durable enough to withstand years of heavy use and challenging projects. Here’s a detailed look at everything you’ll need to have on hand:
- Plywood: A sturdy sheet of plywood will serve as the primary workbench top. For optimal durability, resistance to warping, and ability to handle impact, a 3/4-inch thick sheet (19mm) is highly recommended. The exact dimensions will depend on your desired workbench size, but typically a half or quarter sheet (e.g., 4×4 feet or 2×4 feet) works exceptionally well for a compact, mobile bench. Choose a good quality grade (like sanded pine or birch) for a smoother, more resilient working surface that will be easier to clean and maintain.
- Wood 2x4s: These form the foundational frame of your workbench, providing exceptional strength, rigidity, and stability. You’ll need several lengths for the vertical legs, the long side support beams, and the shorter cross-braces that connect the frame. Standard pine or fir 2x4s are perfectly suitable, cost-effective, and widely available at any lumberyard or hardware store. It is vital to refer to the specific plans for exact length and quantity requirements, but generally, expect to need about eight to ten 8-foot (2.4-meter) 2x4s to complete the entire structure.
- 4 Caster Wheels: The very essence of mobility for this workbench! Choose heavy-duty casters, preferably those equipped with reliable locking mechanisms, to prevent your bench from rolling away inadvertently during use. Swivel casters offer maximum maneuverability, allowing the bench to turn in any direction. Crucially, ensure that the casters you select have a sufficient weight capacity to comfortably support both the workbench itself and any tools, materials, or project items you plan to place on it.
- A Saw: A circular saw is an ideal tool for making quick, straight, and efficient cuts through both the 2x4s and the plywood sheet. A miter saw (chop saw) can also be used for extremely precise angle cuts if desired, though for this simple design, accurate straight cuts are primarily what’s needed. Always prioritize personal safety when operating any power tools by wearing appropriate protective gear and following manufacturer instructions.
- A Hammer: While screws are the primary fasteners, a hammer can be incredibly useful for tapping components gently into their precise positions, or for driving nails if you opt for additional reinforcement alongside your screws.
- A Drill/Impact Driver: This tool is absolutely essential for pre-drilling pilot holes (to prevent wood splitting) and for driving screws quickly and efficiently. An impact driver is particularly effective and recommended for driving long wood screws into dense lumber with minimal effort. Ensure you have the correct bit sizes for your screws.
- Screws: High-quality wood screws are paramount for ensuring the structural integrity and long-term durability of your workbench. Use screws that are long enough to penetrate at least halfway into the connecting piece of wood (e.g., 2.5-inch or 3-inch screws are generally appropriate for joining 2x4s). Deck screws are also an excellent choice due to their superior strength, corrosion resistance, and ability to resist stripping during installation.
- Official Plans for the Project by Robert J Keller: While this guide provides a comprehensive overview and step-by-step instructions, following the detailed, original plans from Robert J Keller is highly recommended. These plans will provide exact measurements, diagrams, and specific assembly instructions that are your ultimate blueprint for guaranteed success.
Step-by-Step Directions to Build Your 1-Hour Mobile Workbench
Constructing this mobile workbench is surprisingly straightforward and incredibly rewarding. By meticulously following these steps, you’ll have a fully functional, robust, and mobile workstation ready for action in virtually no time. For a comprehensive visual guide that will complement these written instructions perfectly, be sure to watch the original and insightful video tutorial by Robert J Keller on Youtube, which walks you through each stage of the process with clear demonstrations.
Step 1: Prepare and Cut Your Wood Pieces
Begin by organizing your workspace and carefully laying out all your 2x4s and the plywood sheet. Using your saw, measure and meticulously cut all the pieces according to the precise dimensions specified in Robert J Keller’s plans. You’ll typically need four identical pieces for the vertical legs, two longer 2x4s for the top side supports, two more for the bottom side supports, and several shorter cross-braces for both the top and bottom frames. Accuracy in measuring and cutting is absolutely critical at this stage, as it directly impacts the squareness and ultimate sturdiness of your finished workbench.
Step 2: Assemble the Top and Bottom Frames
Next, you will assemble the two rectangular frames – one that will serve as the top perimeter and another for the base of the workbench. Lay out two of your long 2x4s parallel to each other. Then, position two of the shorter cross-braces between the ends of these long 2x4s, forming a perfect rectangle. Use your drill to pre-drill pilot holes at each joint to prevent the wood from splitting, then securely fasten the joints with your chosen wood screws. It is essential to ensure these frames are perfectly square before moving on, as this will dictate the overall stability and professional appearance of your entire bench. Repeat this exact process to create both the top and bottom frames.
Step 3: Attach the Vertical Legs
Once your top and bottom rectangular frames are securely assembled, it’s time to connect them with the vertical legs. Stand the four cut legs upright. Carefully position the top frame on top of these legs, meticulously aligning each corner. Secure the legs to the top frame using screws, driving them through the frame into the end grain of the legs for a robust connection. Then, with assistance if necessary, gently lift the entire assembly and attach the bottom frame to the lower portion of the legs, again using screws to create a strong, unified, and incredibly stable structure. This step forms the basic skeletal structure of your workbench.
Step 4: Install the Caster Wheels for Mobility
Now, carefully flip your workbench frame upside down. Position one caster wheel at each corner on the very bottom of the legs. Using a pencil, mark the locations for the screw holes. Pre-drill pilot holes to ensure easy and secure attachment, and then firmly attach each caster using appropriate screws. It’s important to make sure that the locking mechanism (if your casters are equipped with one) is easily accessible and functions correctly once installed. Once all four casters are securely in place, carefully flip the workbench back over onto its wheels. You’ll immediately appreciate its newfound mobility and ease of movement!
Step 5: Secure the Plywood Top
Finally, carefully place your cut plywood sheet on top of the assembled frame. Align it precisely so that it’s flush with all the outer edges of the 2×4 frame. Using your drill and screws, secure the plywood to the underlying frame. For optimal stability and to prevent warping, space your screws every 6-8 inches along the entire perimeter of the plywood top, and consider adding a few in the center area for extra rigidity. This final step completes your robust, stable, and ready-to-use working surface.
The top of the workbench, crafted from sturdy plywood and securely screwed into the 2×4 frame, provides an excellent, durable, and expansive surface perfectly suited for all your DIY projects.
Maximizing the Utility of Your New Mobile Workbench
Once your robust and versatile mobile workbench is built, its potential uses are virtually limitless. This isn’t just a simple table; it’s a dynamic hub for creativity and productivity. Here are some innovative ideas to help you get the absolute most out of your new, adaptable workspace, transforming how you approach your various projects:
- Dedicated Crafting Station: Keep all your art and crafting supplies organized and within easy reach. The workbench’s mobility allows you to effortlessly bring your projects into natural light by a window, or closer to your main storage without spreading materials across your entire house.
- Efficient Woodworking & Repair Hub: This bench is ideal for smaller woodworking projects, precise sanding, intricate assembly tasks, or general household repairs. You can easily clamp down your workpieces directly to the sturdy plywood top, providing a stable and secure foundation for your work.
- Outdoor Gardening Potting Bench: Roll it outdoors for convenient and mess-free potting of plants, mixing soil, transplanting seedlings, and organizing your gardening tools. It prevents bringing dirt indoors and makes seasonal gardening tasks much more enjoyable.
- Temporary Serving or Buffet Table: For backyard barbecues, family gatherings, or holiday parties, your mobile workbench can effortlessly double as a robust outdoor serving table, a prep station for food, or a buffet for drinks and snacks.
- Flexible Tool Assembly & Storage Area: Utilize the ample space beneath the workbench for adding additional shelving, creating cubbies, or mounting hooks to store frequently used tools, power tool cases, or project bins. This frees up your main workspace from clutter and keeps essential items close at hand.
Tips for Enhanced Workbench Functionality and Longevity
To further improve your mobile workbench and ensure it serves you exceptionally well for many years to come, consider implementing these additional tips. These enhancements can add to its functionality, durability, and overall user experience:
- Seal or Paint the Wood: Apply a high-quality wood sealant, polyurethane, or a durable paint to the plywood top and the 2×4 frame. This will provide crucial protection to the wood from moisture, accidental spills, stains, and general wear and tear, making the surfaces much easier to clean and maintain.
- Add Custom Storage Solutions: Beyond basic shelving, consider customizing the space beneath your bench with fitted drawers, pull-out trays, or magnetic strips for small tools. Attaching a pegboard to one end of the workbench can also maximize vertical storage for frequently used hand tools.
- Install a Workbench Vise: If you anticipate doing a lot of woodworking, metalworking, or any task requiring material to be held firmly, consider attaching a sturdy workbench vise to one corner of your bench. This will dramatically increase its versatility.
- Protect the Top Surface: For particularly messy projects (like painting, gluing, or sanding) or delicate tasks, place a sacrificial piece of hardboard, an old cutting mat, or a sheet of MDF on top of the plywood. This will protect your primary workbench surface from damage, making cleanup simpler.
- Consider an Electrical Outlet Strip: For even greater convenience, consider mounting a power strip with multiple outlets to the side or underside of your workbench. This provides easy access to power for your tools without needing long extension cords.
Embrace the Joy of an Organized and Efficient Workspace
This 1-hour mobile workbench isn’t just a simple piece of shop furniture; it’s an intelligent investment in your productivity, organization, and ultimately, your enjoyment of hobbies and DIY projects. It effectively eliminates the common friction often associated with starting new projects by providing a dedicated, accessible, and movable space that is always ready when inspiration strikes. The profound satisfaction of building something so immensely useful with your own hands, and then consistently reaping the tangible benefits of a well-organized and efficient workspace, is incredibly rewarding.
No more arguments over shared tools, no more frustrating searches for misplaced items, and no more sprawling projects taking over your entire garage or room – just a clean, functional, and adaptable space waiting patiently for your next big idea. Take the leap and transform your cluttered area into an efficient DIY haven. With Robert J Keller’s brilliant design and this comprehensive guide, you are now well on your way to enjoying the perfect mobile workbench. Happy building and happy creating!