
Mastering the Ziggy Pop Quilt: An Easy Guide to Half-Square Triangles for Beginners
Welcome to the captivating world of quilting! If you’re eager to embark on a new creative journey or seeking your next enjoyable fabric project, you’ve landed in the perfect spot. Today, we’re delving into one of the most fundamental yet infinitely versatile building blocks in quilting: the Half-Square Triangle, affectionately known as the HST. Often considered the backbone of many intricate and breathtaking designs, the HST is surprisingly straightforward to master. At its core, it simply involves two triangles meticulously sewn together to form a perfect square. But don’t let this apparent simplicity fool you; HSTs are the secret behind countless stunning quilt patterns, allowing for incredible geometric interplay, dynamic movement, and visual depth.
For aspiring quilters, gaining proficiency in creating precise Half-Square Triangles is an indispensable skill. The beauty of HSTs lies not only in their design potential but also in the efficiency with which they can be created. There are numerous clever methods available, ranging from producing 4 HSTs at a time, 8 at a time, 16 at a time, and for those tackling larger projects, even an impressive 32 Half-Square Triangles simultaneously. Each method offers distinct advantages, catering to different project scales and personal preferences, ensuring you can approach any quilt design with confidence and efficiency.
Why Half-Square Triangles Are a Quilter’s Essential Tool
Half-Square Triangles are far more than just two pieces of fabric joined; they are a gateway to boundless creative expression within the quilting realm. Their unique construction allows for the creation of sharp angles, crisp lines, and a sense of dynamic motion, making them indispensable for crafting both timeless traditional quilts and cutting-edge modern designs. By simply rotating HST units and strategically combining them with solid squares or other fabric elements, quilters can conjure a myriad of secondary patterns, fascinating optical illusions, and rich textural effects that truly bring a quilt to life.
The enduring popularity of HSTs among quilters of all skill levels can be attributed to several key factors:
- Unmatched Versatility: From creating charming chevron patterns and intricate star motifs to elegant pinwheels and complex tessellations, HSTs serve as the foundational element for an astonishing array of designs.
- Beginner-Friendly Foundation: The basic process of constructing an HST is straightforward, making it an excellent starting point for new quilters to develop crucial skills such as accurate cutting, precise piecing, and effective pressing techniques.
- Excellent for Scrap Busting: HSTs are perfect for utilizing smaller fabric pieces and beloved scraps that might otherwise go unused. They transform these cherished remnants into cohesive, visually engaging designs, reducing fabric waste and adding sentimental value.
- High-Impact Designs with Simple Construction: Even the most basic arrangement of Half-Square Triangles can produce a striking and sophisticated quilt, demonstrating that impactful design doesn’t always require overly complicated techniques.
RELATED QUILTING INSPIRATION: Ready to explore more possibilities with HSTs? Don’t miss this fantastic guide for an Easy HST Star Block Tutorial. It’s a perfect follow-up project to further hone your HST skills and expand your design repertoire!
Introducing the Ziggy Pop Quilt: A Modern and Playful Design
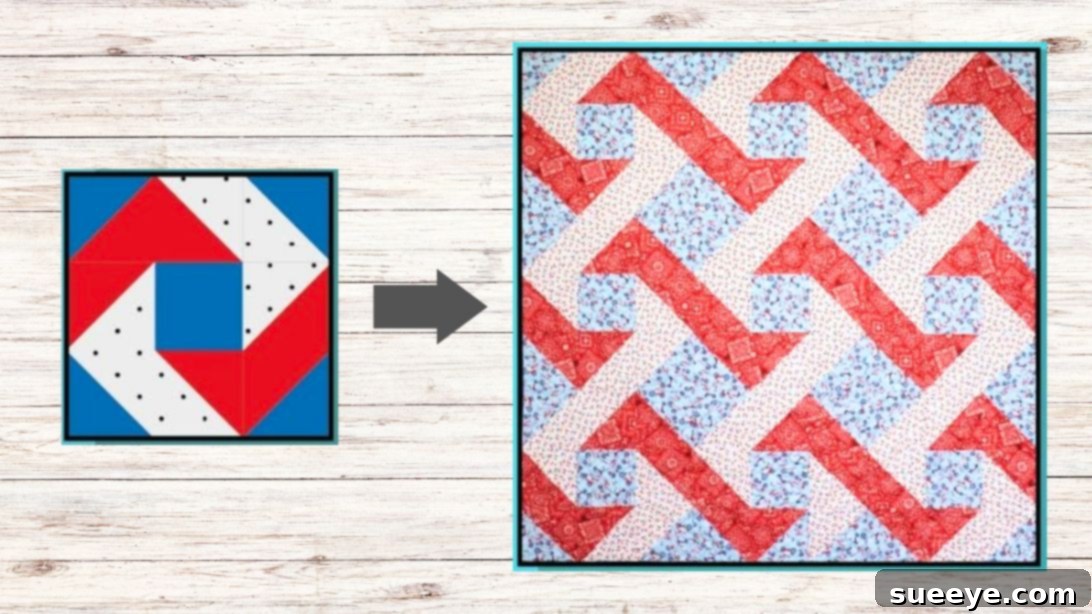
Today, we are thrilled to guide you through the creation of a truly captivating project: the “Ziggy Pop Quilt.” This wonderfully modern and playful design, masterfully showcased by Sew Yeah on YouTube, stands as a brilliant example of how innovative and dynamic you can be with simple Half-Square Triangles. What initially appears from a distance to be a complex, undulating pattern is, in fact, a remarkably clever arrangement of just eight HSTs and one plain square within each quilt block. The true magic of the Ziggy Pop Quilt lies in its dynamic visual effect; the individual HSTs seem to seamlessly blend into a larger, vibrant zig-zag motif that travels across the quilt top, creating an astonishing sense of movement, depth, and playful energy. It’s a powerful testament to the impact of thoughtful fabric placement and deliberate rotation.
This particular quilt pattern is perfectly suited for both novice quilters eager to build their skills and more experienced crafters looking for a quick, satisfying, and visually rewarding project. Its straightforward construction, combined with the impressive visual payoff, makes it an absolute joy to create. You’ll be amazed at how quickly the distinctive zig-zag pattern emerges as you meticulously assemble your blocks, transforming simple fabric pieces into a charming masterpiece of modern design. This quilt makes a fantastic throw for a sofa, a cozy addition to a child’s room, or a cherished handmade gift. Let’s gather our materials and embark on this exciting quilting adventure!
Essential Materials for Your Ziggy Pop Quilt Project
Before we immerse ourselves in the rewarding process of piecing together your beautiful quilt, it’s absolutely crucial to gather and organize all your materials. The fabric selection stage is often one of the most exciting, as your chosen colors and prints will set the entire mood and character of your finished project. For the Ziggy Pop Quilt, we will primarily utilize three distinct fabric tones—a medium, a light, and a dark—to create the striking contrast and definition that brings the signature zig-zag effect to life. Feel empowered to experiment with colors that truly resonate with your personal aesthetic, complement your home decor, or align with the preferences of the recipient if it’s a gift. For the best results in terms of handling and durability, high-quality 100% cotton quilting fabrics are highly recommended, as they are a dream to work with and maintain their beauty over time.
- Fabric 1 (Medium Tone): 1 1/4 yards. This fabric will play a pivotal role in several of your HST combinations and will also serve as your plain solid squares, providing a balanced visual anchor within each block.
- Fabric 2 (Light Tone): 1 1/8 yards. A lighter-toned fabric is indispensable for creating the necessary contrast and ensuring your zig-zags truly “pop” against the darker elements of the design.
- Fabric 3 (Dark Tone): 1 1/8 yards. The darkest fabric choice will provide essential depth and strong definition, dramatically enhancing the illusion of dynamic movement inherent in the quilt’s pattern.
- Border Fabric: 3 strips of 9.5″ x WOF (Width of Fabric). These carefully cut strips will form a cohesive and elegant border around your assembled quilt top, giving it a beautifully polished and framed finish.
- Backing Fabric: 3 1/2 yards. Select a comfortable, durable, and aesthetically pleasing fabric for the back of your quilt. It should ideally complement the colors and style of your quilt top, offering a pleasant tactile experience.
- Quilt Batting: Approximately 60″ x 70″ (a standard throw or twin size batting is usually sufficient, but always verify specific product dimensions). Batting is the crucial middle layer that provides warmth, a lovely loft, and stabilizes the quilt for the final quilting stitches.
- Standard Quilting & Sewing Supplies: Ensure you have a sharp rotary cutter, a large self-healing cutting mat, accurate quilting rulers (at least one large square and one long rectangular ruler), a reliable sewing machine, high-quality cotton thread (matching or neutral, depending on preference), plenty of sharp pins or wonder clips, a good iron, and an ironing board. A seam ripper is also a quilter’s essential, just in case!
Taking the time to prepare and meticulously organize all your materials before you even make the first cut or stitch will significantly streamline your entire process. This thoughtful preparation will eliminate interruptions, minimize stress, and ultimately make your quilting journey much more enjoyable and efficient. Now, with everything in place, let’s move on to the core of this project: creating those fabulous and foundational Half-Square Triangles!
Step-by-Step Guide: Crafting Your Ziggy Pop Quilt to Perfection
Achieving precision is absolutely paramount in quilting, and this holds especially true when you’re working with Half-Square Triangles. Dedicating your time and attention to detail during each step—particularly cutting and pressing—will culminate in a quilt that is beautifully aligned, lies perfectly flat, and boasts a truly professional appearance. Follow these detailed instructions meticulously to ensure your Ziggy Pop Quilt comes together flawlessly and becomes a source of immense pride.
Step 1: Achieving Accurate Fabric Cuts for a Solid Foundation
The foundation of any successful quilt lies in precise cutting. Employ a fresh, sharp blade in your rotary cutter, work on a good quality self-healing mat, and always use an accurate quilting ruler. These tools are indispensable for ensuring that all your squares are perfectly sized, a critical factor that will prevent frustration and alignment issues later in the piecing process. Precision at this stage is a huge time-saver in the long run.
- From Fabric 1 (Medium Tone):
- Cut 9 pieces of 6.5″ x 6.5″ squares. These will serve as the crucial plain solid squares that integrate into the center of your Ziggy Pop blocks.
- Cut 10 pieces of 10″ x 10″ squares. These larger squares are designated for specific Half-Square Triangle combinations, providing the necessary extra fabric for trimming.
- From Fabric 2 (Light Tone):
- Cut 14 pieces of 10″ x 10″ squares. These squares will be paired with other fabrics to form various HST units, contributing to the lighter elements of your design.
- From Fabric 3 (Dark Tone):
- Cut 14 pieces of 10″ x 10″ squares. These squares will be paired for HSTs as well, establishing the distinct dark contrasts that define the zig-zag pattern.
After completing your cuts, take a moment to carefully double-check each piece against your ruler. Having accurately sized squares from the outset will make the subsequent HST creation process significantly smoother, more enjoyable, and ultimately more successful.
Step 2: Mastering Half-Square Triangle (HST) Construction and Trimming
This is arguably the most exciting part of the process where your fabric truly begins to transform! We will be employing a highly popular and efficient method to create multiple HSTs from larger squares. This technique involves sewing around the perimeter of two squares before making strategic cuts, ensuring consistent sizing and optimizing your time.
Detailed Method for Creating 4 HSTs from Two Squares:
- Pairing Your Fabrics: Select two 10″ squares – one from each chosen fabric (for example, one from Fabric 2 and one from Fabric 3). Place them precisely right sides together, ensuring all edges align perfectly. Use pins generously around the perimeter to prevent any shifting of the layers while you sew.
- Marking for Sewing and Cutting: On the wrong side of the lighter fabric square (or whichever fabric you designate as the top), use a pencil or a fine fabric marker to draw a diagonal line from one corner to its opposite corner. For enhanced precision and to mark your cutting lines, you can draw a second diagonal line in the other direction, forming an ‘X’ across the square.
- Sewing the Perimeter: With your sewing machine, carefully sew all around the entire perimeter of the paired squares, maintaining a consistent and accurate 1/4″ seam allowance. Precision here is key to well-formed HSTs.
- Cutting Diagonally: Using your rotary cutter and a reliable quilting ruler, meticulously cut along the drawn diagonal lines. If you drew an ‘X’, cut along both lines. This action will yield four individual smaller triangles from your original paired squares.
- Pressing Open the Seams: Gently open each newly formed HST unit. Take it to your ironing board and carefully press the seam allowance open. Pressing seams open is highly recommended for HSTs as it helps to distribute bulk evenly and ensures your blocks lie remarkably flatter, which is crucial for achieving accurate piecing when assembling your quilt top.
- Trimming for Perfection: Each of these freshly made HSTs will be slightly oversized. It’s now time to trim them down to a precise 6.5″ x 6.5″ square. Align the diagonal seam of your HST with the 45-degree line on your quilting ruler. Carefully trim the excess fabric from all four sides. This trimming step is absolutely critical for achieving accuracy and will ensure that all your blocks fit together beautifully without stretching or puckering.
Now, let’s proceed to create the specific HST combinations required for your beautiful Ziggy Pop Quilt. Pay close attention to the fabric pairings for each set:
- Fabric 2 (Light) & Fabric 3 (Dark) HSTs: Select 9 pieces of 10″ squares from Fabric 2 and 9 pieces of 10″ squares from Fabric 3. Pair them up and, using the detailed method described above, create 4 HSTs from each pair. This will result in a total of 36 stunning Half-Square Triangles featuring a vibrant light and dark contrast.
- Fabric 1 (Medium) & Fabric 2 (Light) HSTs: Take 5 pieces of 10″ squares from Fabric 1 and 5 pieces of 10″ squares from Fabric 2. Pair them, and from each pair, create 4 HSTs. This will provide you with 18 Half-Square Triangles showcasing a harmonious blend of medium and light fabrics.
- Fabric 1 (Medium) & Fabric 3 (Dark) HSTs: Lastly, get 5 pieces of 10″ squares from Fabric 1 and 5 pieces of 10″ squares from Fabric 3. Pair these, and create 4 HSTs from each pair. This step will yield 18 Half-Square Triangles that combine the medium and dark fabrics, adding another layer of visual interest.
Upon completing this comprehensive step, you should have a grand total of 72 precisely trimmed 6.5″ x 6.5″ Half-Square Triangles. These are now perfectly prepared and ready to be meticulously assembled into the individual blocks of your quilt. Always remember, the extra time and care invested during the HST creation and trimming phases will dramatically impact the overall quality and stunning final appearance of your Ziggy Pop Quilt.
Step 3: Assembling Your Distinctive Ziggy Pop Quilt Blocks
This is the moment where the unique and captivating “ziggy pop” design truly begins to materialize! Each individual quilt block will be carefully constructed from eight of your freshly made HSTs and one of the plain 6.5″ Fabric 1 squares. The essential element to achieving this dynamic pattern lies in the precise arrangement and strategic rotation of the HSTs to generate that distinctive and flowing zig-zag illusion.
- Layout Your Block Grid: Refer closely to the provided photo below for the exact placement and orientation of your squares. Each completed block is a 3×3 grid, meaning it consists of three rows with three squares in each row. Pay critical attention to the orientation of each HST – the diagonal seam must be pointing in specific directions to create the continuous flow of the zig-zag. The plain 6.5″ square from Fabric 1 is typically positioned in the absolute center of the block.
- Matching Seams for Perfection: As you meticulously lay out your squares, ensure that the seams of any adjacent HSTs will align perfectly when sewn. Use pins generously at these crucial intersection points to prevent any slippage or shifting of fabric during the sewing process. Accuracy here is vital for achieving crisp points and clean, uninterrupted lines in your finished block.
- Sewing Your Rows Together: Stitch the squares within each row together using a consistent 1/4″ seam allowance. After sewing each row, take it to your ironing board. You can choose to press seams either open (which reduces bulk) or to one side (often pressed away from the darker fabric to minimize shadow, but open seams are generally preferred for flatter blocks and improved accuracy).
- Joining Your Rows to Form the Block: Once you have three completed rows for a block, carefully join them together to form your 18.5″ x 18.5″ quilt block. Again, prioritize aligning the seams at the intersections, pinning securely before you begin to sew. Press the final seams of the block, either open or consistently in one direction, ensuring a flat and tidy finish.
You will need to construct a total of 9 identical Ziggy Pop blocks for your quilt. As you complete each block, you’ll witness the captivating design truly come to life, building anticipation for the finished quilt. Once all 9 blocks are complete, arrange them on a large design wall or clear floor space in a 3×3 grid (comprising 3 rows with 3 blocks each). Take a step back and visually assess how the zig-zag pattern flows seamlessly and continuously across the larger quilt top. This is your final opportunity to make any minor adjustments to block placement or rotation before proceeding to the final assembly of the quilt top.
Step 4: Assembling the Quilt Top and Adding the Borders
With all 9 beautifully crafted Ziggy Pop blocks now complete, it’s time to bring them together to form the main body of your quilt. Carefully lay out your 9 blocks in the 3×3 grid you finalized in the previous step. Methodically sew the blocks together in rows, once again paying meticulous attention to seam alignment and pressing. After completing and pressing your three long rows, join these rows together to form the full center of your quilt. Press the final seams open for a flat finish.
Next, it’s time to add the borders, which will frame your artistic creation beautifully. Begin by accurately measuring the exact length and width of your assembled quilt center. This ensures your border strips will fit perfectly and lie flat without waving. Trim your 9.5″ WOF border strips to these precise lengths. First, attach the side borders to the quilt center, pressing the seams either open or towards the border fabric. Then, attach the top and bottom borders, pressing their seams similarly. Borders not only provide an elegant frame for your stunning design but also play a crucial role in stabilizing the quilt top, ensuring it remains square and even.
Step 5: The Grand Finale – Quilting and Finishing Your Project
You’re in the home stretch of bringing your vision to life! Once your quilt top is completely assembled and its borders are securely in place, the next essential steps involve creating the foundational “quilt sandwich” and adding the final, professional touches.
- Crafting the Quilt Sandwich: On a clean, large, and flat surface (like a floor or large table), meticulously lay out your backing fabric wrong side up, smoothing out every single wrinkle or crease. You might find it helpful to tape the edges down to prevent shifting. Next, carefully place your chosen batting centered on top of the backing, also ensuring it’s completely smooth. Finally, position your completed quilt top right side up on top of the batting, making sure it is perfectly centered and free of any folds or puckers.
- Basting for Stability: Securely fasten all three layers of your quilt sandwich together. There are several popular methods: you can use quilting safety pins (specifically designed for this purpose, spaced every few inches), a temporary basting spray, or long, hand-basting stitches. The purpose of basting is critical: it prevents the layers from shifting, wrinkling, or puckering during the actual quilting process.
- The Art of Quilting: This exciting stage is where you stitch through all three layers of your quilt (the top, the batting, and the backing) to hold them permanently together and add texture. You can choose to quilt by hand for a traditional, soft look, or by machine for speed and a crisp finish. For beginners, simple straight-line quilting (using your walking foot) or “stitch-in-the-ditch” (quilting precisely along the existing seam lines) can be incredibly effective, manageable, and forgiving. If you’re feeling adventurous, free-motion quilting offers endless creative possibilities for adding intricate designs.
- Trimming and Squaring Up: Once your quilting is complete, use your rotary cutter and a large quilting ruler to carefully trim away any excess batting and backing fabric. At the same time, square up the edges of your quilt, ensuring they are perfectly even, straight, and perpendicular at the corners. This step is vital for a professional-looking finish.
- Applying the Binding: The final, crowning step is to bind your quilt. This involves attaching specially prepared fabric strips around the entire perimeter of the quilt, neatly enclosing all the raw edges. Binding provides a durable, clean, and polished finish. There are numerous binding tutorials available for both machine binding (quicker) and hand binding (for that classic, heirloom look). Choose the method you prefer!
Congratulations! You have successfully designed, pieced, and quilted a truly stunning Ziggy Pop Quilt. Take a moment to deeply admire your incredible handiwork and reflect on the rewarding journey you’ve undertaken, transforming simple fabric squares into a dynamic, beautiful, and functional piece of textile art that will be cherished for years to come.
Essential Tips for Quilting Success, Especially for Beginners
Embarking on a quilting journey is an incredibly fulfilling and creative endeavor. To ensure your experience with the Ziggy Pop Quilt and all your future projects is as smooth, enjoyable, and successful as possible, keep these invaluable tips and best practices in mind:
- Invest in Quality Tools: A sharp rotary cutter, a robust self-healing cutting mat, and accurate acrylic rulers are not luxuries; they are fundamental necessities. Good tools reduce frustration, improve precision dramatically, and make quilting much more enjoyable.
- Press, Don’t Iron: This is a golden rule in quilting. When joining fabric pieces, always “press” (which means lifting your iron, placing it down, holding, then lifting again) rather than “iron” (which involves sliding the iron back and forth). Pressing prevents stretching, distortion, and warping of your fabric, ensuring your blocks remain perfectly square.
- Maintain a Consistent Seam Allowance: A precise 1/4-inch seam allowance is the cornerstone of accurate quilt piecing. Practice on scrap fabric until your seam is consistently spot-on. Investing in a specific 1/4-inch quilting foot for your sewing machine can be an absolute game-changer for consistency.
- Embrace Chain Piecing: For steps involving numerous identical units (like making many HSTs), consider using the chain piecing method. Sew one unit after another without lifting the presser foot or clipping the thread between them. This technique significantly saves time and thread, making your process more efficient.
- Always Square Up: Never skip the trimming or squaring up step for your HSTs and individual blocks. This critical stage ensures that every component is the exact desired size, allowing everything to fit together seamlessly without any unsightly puckers, waves, or stretched areas.
- Take Strategic Breaks: Quilting can be a meticulous and sometimes challenging craft. If you find yourself becoming frustrated, take a deliberate break. Step away from your machine, stretch, grab a drink, and return with a fresh perspective. Often, a short pause is all it takes to resolve a tricky problem.
- Embrace and Learn from Imperfection: It’s important to remember that your initial projects might not be absolutely flawless, and that is perfectly acceptable! Every stitch, every block, and every project is a valuable learning opportunity. The unique charm and character of handmade items often lie in their slight imperfections.
- Connect with the Quilting Community: Engage with other quilters, either through online forums, social media groups, or local guilds. Sharing tips, asking questions, and showcasing your progress can be incredibly motivating and provide a wonderful sense of camaraderie and support.
The Ziggy Pop Quilt is far more than just a sewing project; it’s an exceptional opportunity to build confidence in your quilting skills, experiment with vibrant colors, and create a truly cherished, functional item. The playful and modern nature of this pattern makes it a perfect addition to any home, whether it’s gracefully draped over a sofa, providing warmth as a cozy blanket, or given as a heartfelt, handmade gift that speaks volumes. We sincerely hope this comprehensive guide has thoroughly inspired you to pick up your rotary cutter and embark on your exciting quilting adventure!
Watch the Full Ziggy Pop Quilt Tutorial Video
For a complete and immersive visual walkthrough of every intricate step, including detailed demonstrations of precise fabric cutting, efficient HST construction, and seamless block assembly, we enthusiastically recommend watching the original tutorial by Sew Yeah on YouTube. Seeing these techniques applied in real-time can significantly enhance your understanding, boost your confidence, and ensure you tackle this project with ease and enjoyment. Happy quilting!