
Craft Your Own Scented Wax Sachets: The Ultimate DIY Guide to Beautiful Home Fragrance
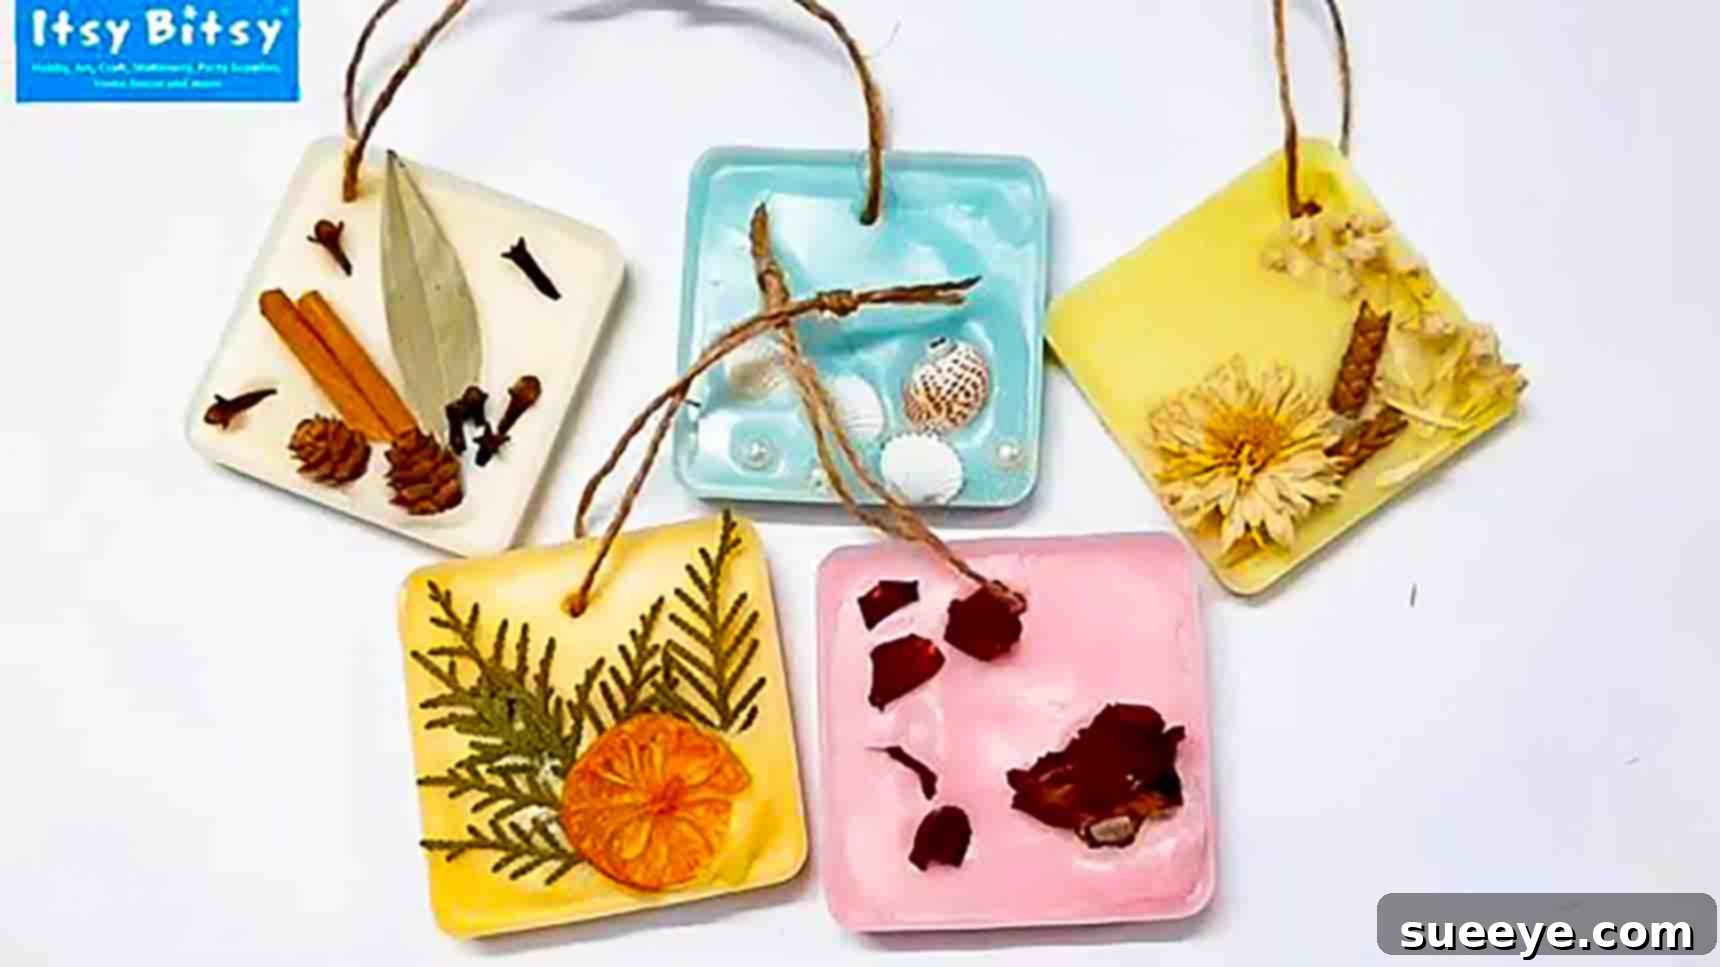
Transform your living space with a touch of elegance and a burst of delightful aroma! If you’re searching for a charming and effortless DIY project to elevate your home decor, look no further than these exquisite scented wax sachets. Inspired by creative insights from channels like Itsy Bitsy on Youtube, these delicate wax treasures are more than just pretty ornaments; they cleverly double as long-lasting air fresheners. Imagine walking into a room and being greeted by the subtle, inviting fragrance of your favorite essential oils. These dainty sachets infuse your surroundings with a continuous, gentle scent, making every corner of your home feel warm, inviting, and impeccably styled.
Crafting these sachets is an incredibly rewarding experience. They are remarkably simple and fun to make, allowing for endless personalization to match your unique taste and home aesthetic. Whether you prefer vibrant colors, natural earthy tones, or a blend of floral and woody scents, you have complete control over every detail. I recently made a variety of these sachets in different hues and scents, scattering them throughout my home. The result was astonishing – my space not only looked more stylish but also smelled absolutely divine! This guide will walk you through each step of the process, ensuring you can create your own beautiful and fragrant wax sachets with ease. Get ready to embark on a delightful crafting journey that will leave your home smelling wonderful and looking even better.
Why Make DIY Scented Wax Sachets? The Benefits of Homemade Fragrance
Beyond their undeniable charm, scented wax sachets offer a myriad of advantages that make them a popular choice for home crafters and decor enthusiasts alike:
- Personalized Aroma: Unlike store-bought air fresheners with limited scent options, DIY sachets allow you to choose any essential oil or fragrance blend you desire. Create custom scents that truly resonate with your mood and preferences.
- Elegant Home Decor: These sachets aren’t just functional; they are beautiful decorative elements. Adorned with dried botanicals, shells, or pearls, they add a touch of sophistication and handmade artistry to any room.
- Long-Lasting Fragrance: Wax sachets release scent gradually, providing a consistent and enduring aroma for weeks, sometimes even months, depending on the essential oil concentration and room conditions.
- Eco-Friendly Alternative: By choosing natural soy wax and essential oils, you can create a more environmentally conscious air freshener option compared to aerosol sprays or synthetic plug-ins.
- Thoughtful Handmade Gifts: Scented wax sachets make exquisite and personal gifts for friends, family, or colleagues. Package them beautifully, and you have a unique present for any occasion.
- Safe and Flame-Free: As they don’t require a flame, these sachets are a safe way to add fragrance to areas where candles might be a hazard, such as closets, drawers, or children’s rooms.
- Cost-Effective Craft: Once you have the basic materials, making a batch of sachets is far more economical than continually purchasing expensive commercial air fresheners.
What You’ll Need: Essential Materials for Your DIY Wax Sachets
Gathering the right materials is the first step to crafting perfect scented wax sachets. Each component plays a vital role in the final look and fragrance of your creations.
- Soy Wax: Opt for high-quality soy wax flakes, as they are natural, biodegradable, and provide a clean burn (or in this case, a clean scent release). Soy wax also has excellent scent retention properties and a creamy appearance, perfect for sachets. You can find it at most craft stores or online suppliers.
- Molds: Silicone molds are ideal for wax sachets due to their flexibility, which makes demolding incredibly easy. You can use standard candle molds, soap molds, or even silicone baking molds in various shapes like circles, ovals, hearts, or squares. Ensure they are heat-resistant.
- Candle Dyes: Liquid or block candle dyes are perfect for adding color to your sachets. Choose colors that complement your dried botanicals or your home decor. A little dye goes a long way, so start with small amounts and add more to achieve your desired shade.
- Essential Oils: This is where the magic happens! Select high-quality essential oils for the best scent throw and therapeutic benefits. Popular choices include lavender for relaxation, lemon or orange for invigoration, peppermint for clarity, or floral blends like rose and jasmine. Experiment with different scents or create custom blends for a truly unique aroma. Aim for 20-25 drops per sachet, or adjust based on your desired scent intensity.
- Dried Botanicals: These add beautiful visual appeal and a rustic, natural touch. Think dried flowers (rosebuds, lavender sprigs, small daisies), leaves (eucalyptus, fern), or even citrus slices. Ensure they are thoroughly dried to prevent mold.
- Shells, Pearls, or Beads: For an extra touch of elegance or coastal charm, incorporate small decorative elements. Seashells, tiny pearls, or glass beads can be gently pressed into the wax for a sophisticated finish.
- Jute Twine or Ribbon: This is essential for creating the hanging loop. Jute twine offers a rustic, natural look, while satin ribbons can add a more refined touch. Choose a material that complements the aesthetic of your sachet.
- Double Boiler: A double boiler is crucial for safely melting wax. It prevents direct heat from scorching the wax and ensures an even melt. If you don’t have one, you can create a makeshift double boiler using a heat-safe bowl placed over a pot of simmering water.
- Skewer or Poking Tool: You’ll need this to create the hole for your twine or ribbon. A wooden skewer, a thick needle, or a small drilling tool works well.
- Stirring Utensil: A dedicated stir stick or old spoon is useful for mixing the wax, dye, and essential oils.
- Protective Surface: Always work on a heat-resistant surface covered with parchment paper or newspaper to protect your workspace from wax spills.
Step-by-Step Guide: Crafting Your Beautiful Scented Wax Sachets
Follow these detailed instructions to create stunning and fragrant wax sachets that will brighten any space.
Preparation: Setting Up Your Workspace
Before you begin, ensure your workspace is clean, organized, and protected. Lay down newspaper or parchment paper on a flat, stable surface. Gather all your materials within easy reach. Prepare your molds by placing them on a tray or another flat surface; this makes them easy to move once filled with wax.
Step 1: Melting and Infusing Your Wax
To start, place your soy wax flakes into the top pot of a double boiler. Fill the bottom pot with a few inches of water, ensuring it doesn’t touch the bottom of the top pot. Bring the water to a gentle simmer over medium heat. As the water heats, the wax will slowly begin to melt. Stir the wax occasionally with your dedicated stirring utensil to ensure even melting and prevent hot spots. Patience is key here; a slow, even melt is preferable. Once the wax is fully melted and completely clear, remove it from the heat. Carefully add the wax dye of your choice. Begin with a small amount, mixing thoroughly, and gradually add more until you achieve your desired color intensity. Next, add approximately twenty to twenty-five drops of your favorite essential oil. If you prefer a stronger scent, you can add a few more drops, but avoid overdoing it as too much oil can affect the wax’s setting properties. Mix the essential oil thoroughly into the colored wax, ensuring it’s evenly distributed for a consistent fragrance.
Step 2: Pouring and Initial Cooling
With your infused wax ready, carefully pour it into your chosen molds. Aim for a thickness of approximately 1/4 inch (about 0.6 cm). This thickness is ideal for sachets, as it’s sturdy enough to hold its shape but thin enough to hang elegantly. Do not overfill the molds. Once poured, leave the molds undisturbed on your flat surface. The wax will begin to cool and solidify from the edges inward. Monitor the wax closely; you’ll notice the top layer starting to become cloudy and opaque. This “cloudy” stage is crucial, as it indicates the wax has partially set but is still soft enough to embed decorations and create a hole without cracking.
Step 3: Decorating and Creating the Hanging Hole
Once the top layer of the wax is cloudy but still pliable, it’s time for the creative part! Gently press your chosen dried flowers, leaves, shells, or pearls into the surface of the wax. Arrange them aesthetically, ensuring they are slightly submerged so they adhere well once the wax fully hardens. At this same cloudy stage, carefully take your skewer or poking tool and create a hole near the top edge of each wax sachet. Twist the skewer gently to ensure the hole is clean and wide enough for your twine or ribbon to pass through easily later. Be precise with the placement of your hole, ensuring it’s not too close to the edge to prevent tearing once hung. After decorating and making the hole, leave the sachets to cool down completely. This can take several hours, or even overnight, depending on the room temperature and the size of your sachets. The wax needs to be fully hardened throughout to prevent damage during demolding.
Step 4: Final Touches and Curing
Once the wax sachets are completely cool and hard to the touch, it’s time to demold them. Gently flex the silicone mold to release the wax. If you used a stiffer mold, you might need to carefully pry the edges. Once removed, inspect your sachets. If the hole you made earlier has closed up slightly or isn’t perfectly clear, use your skewer again to gently re-poke and clear out the opening. Next, cut a piece of jute twine or your chosen ribbon to your desired hanging length, typically around 8-12 inches (20-30 cm). Thread one end of the twine through the hole in the sachet, bring both ends together, and tie a secure knot at the top to form a loop. Ensure the knot is tight so the sachet hangs securely. Your beautiful and fragrant DIY scented wax air freshener sachet is now complete and ready to adorn your home or be gifted!
Pro Tips for Perfect Scented Wax Sachets
Elevate your wax sachet crafting with these expert tips:
- Temperature Control is Key: For the smoothest sachets and best scent throw, melt your wax to around 180-185°F (82-85°C) before adding essential oils, then let it cool slightly to 160-170°F (71-77°C) before pouring. Pouring at a slightly lower temperature can help prevent cracking and improve adhesion of botanicals.
- Don’t Rush the Cooling: Allow the sachets to cool and harden naturally at room temperature. Rushing the process (e.g., placing them in the fridge) can lead to uneven cooling, cracking, or “frosting” (a white crystalline layer) on the wax.
- Experiment with Scents: Don’t be afraid to blend essential oils! Try combining complementary scents like lemon and lavender, cedarwood and orange, or peppermint and eucalyptus for unique aromatic experiences.
- Secure Decorations Properly: When embedding botanicals or other decor, ensure they are pressed firmly enough to adhere but not so deep that they poke through the back of the sachet.
- Consider the “Curing” Time: While sachets can be used immediately, the scent often becomes richer and more well-rounded after a few days, allowing the essential oils to fully bind with the wax.
- Packaging for Gifts: If gifting, package your sachets in breathable bags (like organza or burlap) to allow the scent to subtly escape, or in a decorative box with tissue paper.
- Refreshing the Scent: If the scent begins to fade after a few weeks, you can gently scrape a tiny bit of wax from the back of the sachet, or even place a few fresh drops of essential oil onto the wax (test in an inconspicuous spot first).
Creative Variations and Customization Ideas
Unleash your creativity and personalize your wax sachets for every occasion and decor style:
- Seasonal Themes:
- Autumn: Use orange/brown dyes, cinnamon sticks, dried orange slices, star anise, and essential oils like cinnamon, clove, or pumpkin spice.
- Winter/Holidays: Red/green/white dyes, holly berries (artificial), pine needles, small pinecones, glitter, and scents like frankincense, myrrh, peppermint, or spruce.
- Spring: Pastel dyes, delicate dried spring flowers (pansies, violets), and fresh, light scents like lily of the valley, jasmine, or grapefruit.
- Summer: Bright dyes, small seashells, sand (sprinkled on while wax is wet), and tropical scents like coconut, lime, or plumeria.
- Monochromatic Elegance: Choose a single color palette for your wax and botanicals (e.g., all white wax with white dried flowers and pearls) for a minimalist, sophisticated look.
- Rustic Charm: Use natural beige or brown wax, jute twine, dried twigs, small acorns, and earthy essential oils like sandalwood or patchouli.
- Boho Chic: Incorporate feathers, colorful dried petals, intricate patterns pressed into the wax, and exotic essential oil blends.
- Layered Effects: Experiment with pouring thin layers of different colored wax for a unique striped or marbled effect, allowing each layer to partially set before adding the next.
Where to Use Your Scented Wax Sachets
The beauty of wax sachets lies in their versatility. Here are some ideal places to hang or place them to maximize their fragrant charm:
- Closets: Keep clothes smelling fresh and deter mustiness.
- Drawers: Infuse your linens, towels, and delicates with a subtle scent.
- Bathrooms: Provide a continuous, flameless air freshener.
- Laundry Rooms: Add a refreshing scent to a functional space.
- Guest Rooms: Offer a welcoming aroma for visitors.
- Car: Hang one from your rearview mirror for a pleasant journey (ensure it won’t melt in extreme heat).
- Behind Curtains: As warm air circulates, it will help disperse the scent.
- Gift Tags: Attach a small sachet to a gift for an extra special touch.
- Door Knobs: A subtle way to scent an entryway or hallway.
Frequently Asked Questions about DIY Wax Sachets
Here are answers to some common questions you might have about making and using your scented wax sachets:
- How long does the scent last in a wax sachet?
The longevity of the scent depends on several factors, including the quality and type of essential oils used, the concentration of the oil in the wax, and the environmental conditions (temperature, humidity, airflow). Generally, a well-made soy wax sachet can retain its primary scent for 3-6 weeks, with subtle notes lingering for even longer. Stronger essential oils like peppermint or citrus tend to dissipate faster than woody or floral notes. You can always refresh the scent as mentioned in our pro tips.
- Can I use other types of wax besides soy wax?
While soy wax is highly recommended for its natural properties, excellent scent throw, and ease of use, you can experiment with other waxes. Beeswax creates a harder sachet with a natural honey-like aroma, but it can be more challenging to work with and might mask essential oil scents. Paraffin wax is also an option, often producing a strong scent throw, but it’s a petroleum-based product and less eco-friendly than soy wax.
- What if my wax sachets melt in hot weather?
Wax sachets, especially those made with lower melt point soy wax, can soften or melt in direct sunlight or very high temperatures (e.g., in a hot car during summer). To prevent this, avoid hanging them in direct sunlit windows or extreme heat. If you live in a very warm climate, consider using a harder wax blend (like soy-beeswax blend) or a wax specifically designed for higher temperatures, or simply place them in cooler, shaded areas like drawers and closets.
- Are wax sachets safe for pets and children?
When made with natural soy wax and pure essential oils, they are generally safer than some synthetic air fresheners. However, certain essential oils can be toxic to pets (especially cats) or irritating to sensitive individuals. Always research pet-safe essential oils if you have animals in your home (e.g., lavender and cedarwood are often safer choices, but consult a vet if unsure). Keep sachets out of reach of young children and pets to prevent accidental ingestion or prolonged contact, as they are not toys.
Conclusion: Your Home, Beautifully Scented and Styled
Crafting DIY scented wax sachets is a delightful and rewarding project that allows you to infuse your home with personalized fragrances and charming decor. From selecting your favorite essential oils and dried botanicals to pouring and decorating each unique piece, every step of the process is an opportunity for creativity and self-expression. Not only will you create functional air fresheners, but also beautiful works of art that reflect your personal style.
Whether you’re looking to refresh a closet, add a welcoming touch to a guest room, or create thoughtful handmade gifts, these wax sachets are the perfect solution. So gather your materials, follow our comprehensive guide, and prepare to enjoy the enchanting aromas and elegant aesthetics of your very own handmade scented wax sachets. Happy crafting!