
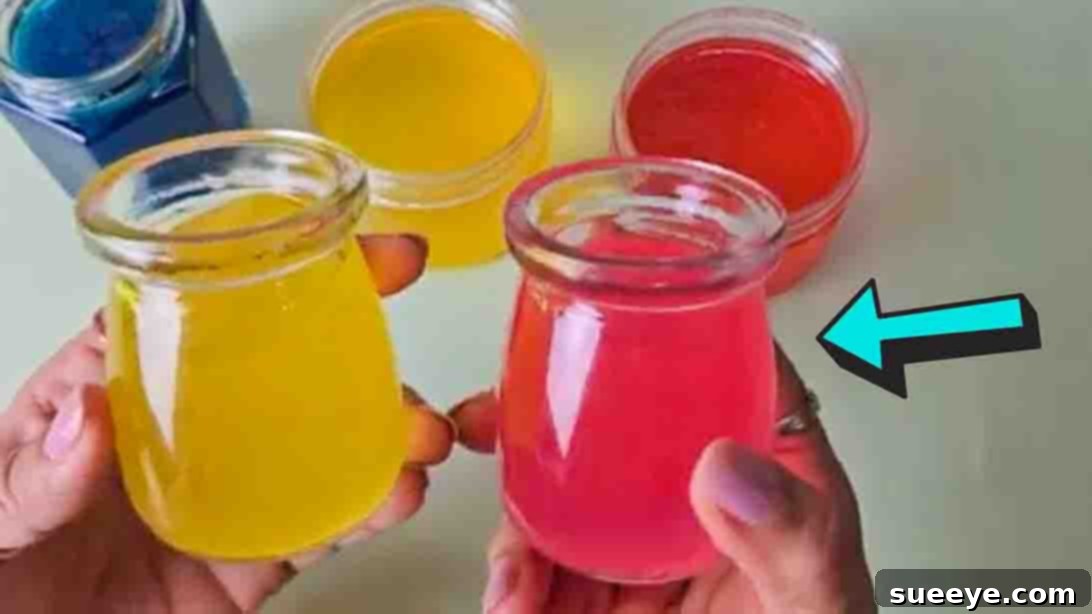
Achieving a pleasant and inviting aroma in your home often feels like a constant battle against lingering odors. Many commercial air fresheners promise freshness but deliver a concoction of synthetic chemicals, volatile organic compounds (VOCs), and artificial fragrances that can be harsh on sensitive noses and potentially harmful to indoor air quality. But what if there was a simpler, more natural, and incredibly satisfying way to infuse your living spaces with delightful scents? Imagine a solution that not only freshens the air effectively but also allows for unparalleled personalization and a creative outlet.
This comprehensive guide introduces you to the world of DIY air freshener gels, a homemade alternative that utilizes just a handful of simple, natural ingredients. Forget complicated formulations and expensive store-bought options; with this method, you gain complete control over the fragrances that define your home’s atmosphere. Whether you envision a serene, lavender-infused bedroom or a vibrant, citrus-scented kitchen, this project empowers you to craft a truly unique aromatic experience.
Not only is this DIY air freshener gel easy to make, but it also offers a fantastic opportunity for creativity and even a potential small business venture, perfect for local craft fairs or thoughtful handmade gifts. Let’s delve into the simple steps to create these beautiful, functional, and eco-friendly home fragrance gels. You can also refer to the original inspiration from DIY Personal Care & Household Products on YouTube for a visual guide.
RELATED: Easy Homemade Natural Air Freshener Tutorial
Why Choose DIY Gel Air Fresheners?
Opting for homemade air freshener gels offers a multitude of benefits over their commercial counterparts. It’s more than just a craft project; it’s a step towards a healthier, more personalized, and environmentally conscious home.
- Healthier Home Environment: Commercial air fresheners often contain phthalates, parabens, and other synthetic chemicals linked to respiratory issues, allergies, and hormonal disruptions. By making your own, you eliminate these questionable ingredients, opting for natural alternatives that are safer for your family and pets.
- Unmatched Customization: The beauty of DIY lies in the ability to tailor everything to your preference. From the choice of essential oils and their blends to the color and even embedded decorations, your air fresheners can perfectly match your mood, season, or home decor.
- Cost-Effective: The ingredients for these gels are incredibly affordable, especially when purchased in bulk. This makes DIY gel air fresheners a budget-friendly way to keep your home smelling fantastic without breaking the bank on expensive aerosols or plug-ins.
- Eco-Friendly: Reusable containers significantly reduce waste, and the natural ingredients are biodegradable. This commitment to sustainability makes your home smell good in more ways than one.
- Creative & Rewarding: There’s immense satisfaction in creating something beautiful and functional with your own hands. It’s a simple yet rewarding project that can spark creativity and enhance your living space.
Understanding Your Natural Ingredients
The simplicity of this recipe belies the powerful impact its natural ingredients have. Each component plays a vital role in creating a long-lasting, aromatic gel.
- Water: The primary base for our gel, providing the necessary medium for the gelatin to dissolve and set.
- Unflavored Gelatin: This is the gelling agent that transforms liquid into a firm, yet pliable, gel. Derived from animal collagen (or plant-based agar-agar for a vegan alternative), gelatin is a natural and effective way to hold the essential oils and release their scent slowly. Ensure it’s unflavored to avoid unwanted aromas.
- Essential Oils: The heart of your air freshener’s scent. Essential oils are concentrated plant extracts known for their potent aromas and therapeutic properties. This is where personalization truly shines.
- Calming Scents: Lavender, Chamomile, Sandalwood, Bergamot
- Energizing Scents: Lemon, Wild Orange, Peppermint, Grapefruit
- Purifying Scents: Tea Tree, Eucalyptus, Lemon, Rosemary
- Grounding Scents: Cedarwood, Frankincense, Patchouli
When selecting essential oils, opt for high-quality, pure oils from reputable brands. The quality of your oils directly impacts the longevity and effectiveness of your air freshener’s scent. Always consider safety, especially if you have pets or small children, as some oils can be irritating or toxic if ingested or applied undiluted.
- Liquid Dye: While optional, a few drops of liquid dye allow you to add a vibrant splash of color to your gels, making them visually appealing and able to complement your home decor. Food-grade liquid dyes are readily available and safe. For natural coloring, consider a tiny pinch of turmeric for yellow, spirulina powder for green, or beet powder for pink hues.
- Salt: A simple yet crucial ingredient, salt acts as a natural preservative. It helps to inhibit mold growth and extend the shelf life of your homemade gel air fresheners, ensuring they remain fresh and effective for longer.
Materials:
Gathering your materials before you begin ensures a smooth and enjoyable crafting experience. You’ll likely find most of these items already in your pantry or easily accessible at a local grocery or craft store.
- 2 cups of water (filtered or distilled water can sometimes extend shelf life)
- 4 tbsp unflavored gelatin (powdered form works best)
- 1 – 2 tsp essential oil (your favorite single oil or a custom blend)
- Liquid dye (food-grade liquid coloring is ideal, or natural alternatives)
- 1/2 tsp salt (standard table salt or fine sea salt)
- Heat-resistant measuring cup or saucepan
- Spoon or whisk for stirring
- Glass or plastic containers (small jars, ramekins, or decorative bowls work wonderfully)
- Thermometer (optional, but recommended for precision)
Directions: Crafting Your Natural Air Freshener Gel
Step 1: Preparing the Gelatin Base
Begin by carefully measuring two cups of water. Pour the water into a saucepan or a microwave-safe, heat-resistant measuring cup. Gently heat the water until it reaches approximately 158 degrees Fahrenheit (about 70 degrees Celsius). This temperature is crucial for effectively dissolving the gelatin without boiling it excessively. If you don’t have a thermometer, heat the water until it’s very hot but not yet simmering vigorously.
Once the water is at the desired temperature, gradually add 4 tablespoons of unflavored gelatin powder. Stir continuously and thoroughly with a spoon or whisk until the gelatin is completely dissolved. Ensure there are no lumps remaining, as this will affect the texture and clarity of your finished gel. This might take a few minutes of patient stirring. After the gelatin is fully dissolved, remove the mixture from the heat and set it aside to cool. It’s important to let it cool down to about 149 degrees Fahrenheit (approximately 65 degrees Celsius) before proceeding to the next step. Cooling slightly prevents the essential oils from evaporating too quickly when added, preserving their potency and fragrance.
While the gelatin mixture cools, prepare your chosen glass or plastic containers. These could be small mason jars, decorative ramekins, or any heat-safe container you wish to use. Evenly divide the gelatin mixture among your prepared jars. This ensures each air freshener gel has a consistent base.
Step 2: Infusing with Scent, Color, and Preservative
Now comes the exciting part: customizing your air freshener gels! To each jar containing the cooled gelatin base, add 1 to 2 teaspoons of your favorite essential oil or a carefully crafted essential oil blend. The exact amount can be adjusted based on the potency of your chosen oils and your desired fragrance strength. Start with less and add more if needed, as essential oils are highly concentrated.
Next, introduce a few drops of liquid dye to each jar. Add one drop at a time, stirring gently after each addition, until you achieve your desired color intensity. This allows for precise control over the aesthetic of your air fresheners. Remember to use different colors for different scents if you wish to distinguish them easily!
After adding the essential oils and dye, stir in 1/2 teaspoon of salt into each jar. The salt acts as a natural preservative, helping to prevent mold and extend the freshness of your gel. Stir all ingredients thoroughly in each jar to ensure the essential oils, dye, and salt are evenly distributed throughout the gelatin mixture.
Once everything is well mixed, set your jars aside in a cool, undisturbed place, away from direct sunlight. Allow them to sit for a minimum of 24 hours. During this time, the gelatin will firm up and fully set into a stable gel. Do not cover the jars tightly during setting, as a little air circulation can help the setting process. After they are fully set, your DIY home air freshener gels are ready to use! You can place them anywhere in your home—bathrooms, bedrooms, living areas, closets, or offices—to enjoy a continuous, fresh aroma 24/7.
Customization and Creative Ideas
The true joy of DIY air freshener gels lies in the endless possibilities for customization. Don’t be afraid to experiment and make them uniquely yours!
- Scent Blends: Move beyond single essential oils. Combine complementary scents for a more complex aroma. Try:
- Relaxing: Lavender & Cedarwood
- Uplifting: Lemon & Peppermint
- Warm & Cozy: Sweet Orange & Cinnamon (add a tiny pinch of ground cinnamon for visual appeal!)
- Fresh & Clean: Eucalyptus & Tea Tree
- Decorative Elements: Before the gel fully sets, you can embed small, non-porous items for a beautiful visual touch. Consider dried flower petals, small polished stones, colorful beads, or even a few coffee beans (which can also absorb odors). Ensure they are clean and won’t rot.
- Seasonal Themes: Create gels for holidays or seasons. Use festive colors and appropriate scents, like pine and cranberry for winter, or pumpkin spice for autumn.
- Gift Giving: Package your finished gels in attractive jars with custom labels and ribbons. They make thoughtful, handmade gifts for friends, family, or teachers.
- Different Molds: While jars are traditional, silicone molds (like those for ice cubes or chocolates) can be used to create unique shapes. Once set, these can be placed on small dishes.
Maintaining and Refreshing Your Gel Fresheners
Your homemade air freshener gels typically last between 2 to 4 weeks, depending on the ambient temperature and humidity. Over time, the scent may diminish as the essential oils evaporate. Here are some tips for maintenance:
- Refreshing the Scent: When the fragrance starts to fade, simply add a few more drops of your chosen essential oil directly onto the surface of the gel. The gel will absorb the new oil, revitalizing the scent.
- Optimal Placement: Place your gels in areas with good air circulation but away from direct heat or strong sunlight, which can cause the gel to melt or the essential oils to evaporate too quickly.
- When to Replace: If you notice the gel starting to shrink significantly, dry out, or if mold growth occurs despite the salt (rare, but possible in very humid environments), it’s time to replace it.
- Disposal: Since the main ingredients are natural, you can typically discard the used gel in your compost or regular trash. Rinse and reuse your containers!
Troubleshooting Common Issues
Even with simple recipes, sometimes things don’t go exactly as planned. Here are some solutions to common problems:
- Gel Not Setting: This usually happens if the water wasn’t hot enough to fully dissolve the gelatin, or if there wasn’t enough gelatin for the amount of water. Ensure thorough dissolving and correct ratios. Cooling in the refrigerator for a few hours can sometimes help a weakly set gel.
- Scent Too Weak: If the fragrance isn’t strong enough, you can add more essential oil (up to 3 tsp total per batch) or use essential oils known for their stronger aromas, such as peppermint, eucalyptus, or strong citrus oils. Adding the essential oils when the gelatin is too hot can also cause them to evaporate prematurely.
- Mold Growth: While rare due to the salt, mold can occur in very humid environments or if the ingredients weren’t completely fresh. Ensure your containers are clean, and you’ve added the correct amount of salt. If mold appears, discard the gel.
Embrace a Naturally Scented Home
Making your own DIY air freshener gels is a simple, enjoyable, and incredibly rewarding way to control the ambiance of your home. By choosing natural ingredients, you create a healthier living environment free from harsh chemicals and artificial fragrances. You unlock endless possibilities for customization, allowing you to craft scents and designs that truly reflect your personal style and preferences.
So, gather your ingredients, unleash your creativity, and embark on this delightful DIY journey. Enjoy the satisfaction of transforming simple materials into beautiful, functional, and aromatic accents for every corner of your home. Say goodbye to synthetic smells and embrace the fresh, natural essence of a truly personalized living space.