
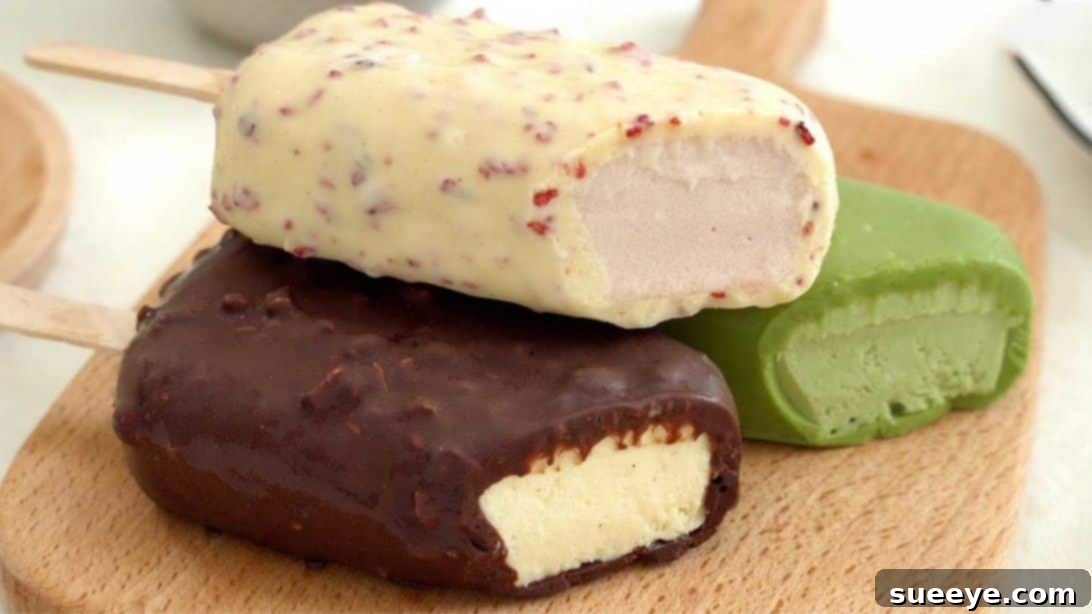
There’s nothing quite like a luscious, cold dessert to provide a delightful escape from the summer heat. Imagine biting into a rich, creamy ice cream bar enrobed in a perfectly crisp chocolate shell. Now, imagine crafting that very indulgence right in your own kitchen! Forget store-bought; we’re about to unveil the secrets to creating your very own gourmet copycat Magnum ice cream, inspired by the masterful creations of M. Patisserie on YouTube.
This comprehensive guide will walk you through making not one, but three distinct and equally tantalizing flavors: the timeless elegance of Vanilla Hazelnut Dark Chocolate, the exotic allure of Matcha White Chocolate, and the vibrant freshness of Raspberry White Chocolate. Each bar promises a luxurious experience, surprisingly simple to achieve at home. Get ready to impress your family and friends with these exquisite frozen treats that are bound to become everyone’s new favorite!
Ingredients for Gourmet Homemade Magnum Ice Cream
Crafting these sensational ice cream bars starts with high-quality ingredients, forming the rich custard base that gives Magnum its signature creaminess, and then transitioning to the decadent coatings. For the best results, opt for fresh eggs, full-fat milk, and premium chocolate.
Custard Sauce (The Foundation of Creaminess)
This velvety smooth custard is the heart of your homemade Magnum bars, providing a rich and stable base for all three flavors.
- 6 large egg yolks (for richness and thickness)
- 1¾ cups (415ml) whole milk (for a creamy texture)
- ¾ cup (150g) granulated sugar (for sweetness and texture)
Vanilla Hazelnut Dark Chocolate Ice Cream
A sophisticated classic, combining the depth of dark chocolate with aromatic vanilla and crunchy hazelnuts.
- 1/3 portion of the prepared Custard Sauce
- 1 tsp vanilla seeds or 1 tbsp vanilla extract (for authentic vanilla flavor)
- ½ cup (120ml) heavy whipping cream (whipped to soft peaks, for airiness)
- 2 cups (340g) good quality dark chocolate, chopped (for the coating)
- 2 tbsp (30ml) melted cocoa butter or neutral vegetable oil (for the signature snap)
- ½ cup (60g) chopped hazelnuts, toasted (for crunch and nutty flavor)
Matcha White Chocolate Ice Cream
An elegant and uniquely flavored bar, perfect for tea lovers, with the earthy notes of matcha complementing sweet white chocolate.
- 1/3 portion of the prepared Custard Sauce
- ½ tbsp (7.5g) culinary-grade matcha powder (for flavor and vibrant color in the ice cream)
- ½ cup (120ml) heavy whipping cream (whipped to soft peaks, for lightness)
- 2 cups (340g) good quality white chocolate, chopped (for the coating)
- 2 tbsp (30ml) melted cocoa butter or neutral vegetable oil (for the smooth, snapping coating)
- ½ tbsp (7.5g) additional matcha powder (for flavoring the white chocolate coating)
Raspberry White Chocolate Ice Cream
A delightful combination of sweet white chocolate and the tangy brightness of raspberries, creating a refreshing and visually appealing treat.
- 1/3 portion of the prepared Custard Sauce
- ¼ cup (60ml) raspberry puree (strained, for a smooth fruit flavor)
- ½ cup (120ml) heavy whipping cream (whipped to soft peaks, for delicate texture)
- 2 cups (340g) good quality white chocolate, chopped (for the coating)
- 2 tbsp (30ml) melted cocoa butter or neutral vegetable oil (to achieve a perfect chocolate shell)
- ¾ tbsp (5g) freeze-dried raspberry pieces, chopped (for intense fruit flavor and appealing texture in the coating)
*Note on Cocoa Butter: Cocoa butter is ideal for achieving that perfect, crisp “snap” typical of Magnum bars. However, if unavailable, a neutral-flavored vegetable oil (like coconut oil or sunflower oil) can be used as a substitute to thin the chocolate for a better dipping consistency, though the snap may be slightly less pronounced.
Directions: Crafting Your Copycat Magnum Ice Cream
Follow these steps carefully to ensure a perfect batch of creamy, delicious, and beautifully coated ice cream bars. Precision and patience are key!
Step 1: Preparing the Custard Base and Flavor Infusion
The foundation of these magnificent ice cream bars lies in a perfectly prepared crème anglaise, or custard sauce. This step ensures a rich, creamy texture without the need for an ice cream maker.
- Combine Ingredients: In a large, heat-proof mixing bowl, whisk together the egg yolks, milk, and sugar until the mixture is well combined and slightly frothy. This initial whisking helps to incorporate air and dissolve the sugar.
- Cook the Custard: Transfer the mixture into a heavy-bottomed saucepan or pot. Place it over medium to medium-high heat. The key here is continuous stirring with a spoon or spatula, ensuring the bottom doesn’t scorch. Stir until the custard thickens slightly and reaches a temperature of 82°C (180°F). This temperature is crucial for pasteurizing the eggs and achieving the correct consistency, known as “nappe” (it should coat the back of a spoon). Do not let it boil, as this can curdle the eggs.
- Cool Down: Immediately remove the saucepan from the heat. To stop the cooking process and cool the custard quickly, you can place the pot in an ice bath (a larger bowl filled with ice and a little water). Stir occasionally until the custard cools down significantly. This rapid cooling prevents overcooking and ensures a smooth texture.
- Chill Thoroughly: Once cooled, transfer the custard to a clean bowl, cover it with plastic wrap directly on the surface to prevent a skin from forming, and refrigerate for at least 2 hours, or ideally overnight. Chilling is vital for the custard to fully set and develop its rich flavor.
- Strain and Divide: After chilling, pour the custard through a fine-mesh sieve into another mixing bowl. This step removes any small lumps and ensures an incredibly smooth texture. Divide the strained custard equally into three separate bowls.
- Infuse Flavors:
- Vanilla Hazelnut: To one portion, add the vanilla seeds (or extract).
- Matcha: To the second portion, add the ½ tablespoon of culinary-grade matcha powder. Whisk thoroughly until completely dissolved and no lumps remain.
- Raspberry: To the third portion, gently fold in the raspberry puree.
- Whip Cream and Fold: In separate clean bowls, whip ½ cup of heavy whipping cream for each custard portion until soft peaks form. Gently fold one portion of whipped cream into each of the three flavored custard sauces. This lightens the mixture and adds air, contributing to the signature creamy mouthfeel of ice cream. Be careful not to deflate the whipped cream.
Step 2: Freezing the Ice Cream and Preparing the Chocolate Coatings
This stage involves transforming your creamy mixtures into solid ice cream bars and preparing the decadent chocolate shells that make Magnum so iconic.
- Mold and Freeze: Carefully pour each flavored ice cream mixture into individual popsicle molds. Insert popsicle sticks firmly into each mold. Ensure the sticks are centered for easy handling later. Cover the molds (if they come with covers) and place them in the freezer. Freeze for at least 8 hours, or preferably overnight, to ensure they are completely solid. A fully frozen bar will hold its shape better and allow the chocolate coating to set instantly.
- Prepare Chocolate Dipping Stations (Double Boiler Method): To achieve perfectly smooth, tempered chocolate coatings, use a double boiler method for each flavor. Place a heat-proof bowl over a saucepan of simmering water (ensure the bowl does not touch the water). The steam will gently melt the chocolate.
- Dark Chocolate Hazelnut Coating:
- In a double boiler, melt the 2 cups of dark chocolate.
- Once melted and smooth, remove from heat and stir in the 2 tablespoons of melted cocoa butter (or vegetable oil) until fully incorporated.
- Finally, stir in the chopped toasted hazelnuts. The nuts will adhere beautifully to the chocolate, adding texture and flavor. Keep this mixture warm enough to be liquid, but not hot, for dipping.
- Raspberry White Chocolate Coating:
- In a separate double boiler, melt the 2 cups of white chocolate.
- Once melted and smooth, remove from heat and stir in the 2 tablespoons of melted cocoa butter (or vegetable oil) until thoroughly combined.
- Gently fold in the chopped freeze-dried raspberry pieces. The freeze-dried fruit will infuse a burst of tangy raspberry flavor and beautiful specks of color.
- Matcha White Chocolate Coating:
- In a small separate bowl, whisk together the additional ½ tablespoon of matcha powder with 2 tablespoons of melted cocoa butter (or vegetable oil) until a smooth paste forms. This pre-mixing prevents lumps when adding to the chocolate.
- In a third double boiler, melt the 2 cups of white chocolate until smooth.
- Remove from heat and stir in the matcha-cocoa butter paste. Mix thoroughly until the coating is uniformly green and smooth. This creates a vibrant, earthy, and sweet coating.
- The Dipping Technique:
- Working quickly, unmold one frozen ice cream bar at a time. Hold it by the stick.
- Dip the entire ice cream bar into its corresponding chocolate coating mixture. Ensure a swift, single dip to achieve an even layer. The extreme cold of the ice cream will cause the chocolate to set almost instantly, creating that satisfying crack.
- Allow any excess chocolate to drip off for a few seconds. You can gently tap the stick against the edge of the bowl.
- Place the coated bar onto a baking sheet lined with parchment paper or a silicone mat. Repeat with the remaining ice cream bars, matching each bar to its flavored coating.
- For an extra crisp snap, or if the chocolate starts to soften, return the coated bars to the freezer for at least 15-30 minutes to fully set.
Tips for Success and Customization
- Quality Ingredients Matter: Using good quality chocolate, fresh eggs, and full-fat dairy will significantly impact the flavor and texture of your final product.
- Patience with Chilling: Do not rush the chilling times for the custard base or the frozen bars. Proper chilling is essential for stability and texture.
- Maintain Chocolate Temperature: Keep your chocolate coatings at a good dipping consistency. If they cool too much and thicken, gently rewarm them over the double boiler. If they are too hot, they won’t set quickly.
- Experiment with Flavors: Feel free to get creative! Other delicious additions to the ice cream base could include coffee extract, mint extract, caramel swirl, or even finely crushed cookies.
- Nut Alternatives: For the dark chocolate coating, instead of hazelnuts, consider toasted almonds, pecans, or even pistachios.
- Decorative Toppings: After dipping, before the chocolate fully sets, you can sprinkle additional toppings like sea salt flakes on the dark chocolate, more freeze-dried fruit, or even edible glitter for an extra touch of gourmet elegance.
- Storage: Store your homemade Magnum bars in an airtight container in the freezer. They will keep well for up to 2-3 weeks, though they are usually devoured much faster! Wrap individual bars in parchment paper before placing them in the container to prevent them from sticking together.
- Troubleshooting Lumpy Custard: If your custard accidentally curdles slightly, don’t despair! You can try blending it with an immersion blender or pouring it through a fine-mesh sieve to smooth it out. Prevention is key, so constant stirring and temperature monitoring are crucial.
*All image credit belongs to M. Patisserie via YouTube. Follow and subscribe to their channel for more inspiring culinary creations!
Homemade Copycat Magnum Ice Cream Recipe: Indulge in Gourmet Perfection
Creating your own copycat Magnum ice cream bars is more than just following a recipe; it’s an experience in crafting luxurious desserts tailored exactly to your taste. With this detailed guide, you have everything you need to transform simple ingredients into spectacular frozen masterpieces. From the creamy, rich custard base to the satisfying snap of the chocolate coating, each bite is a testament to the joy of homemade goodness.
Whether you opt for the classic dark chocolate and hazelnut, the unique matcha white chocolate, or the bright and fruity raspberry white chocolate, these gourmet ice cream bars are guaranteed to be a hit. Perfect for a summer gathering, a special treat, or simply a moment of personal indulgence, making your own Magnum-style ice creams is a rewarding culinary adventure. So, grab your ingredients, clear some space in the freezer, and prepare to delight your senses with these incredibly delicious and surprisingly simple homemade treats. Enjoy the process, and most importantly, savor every single exquisite bite!