
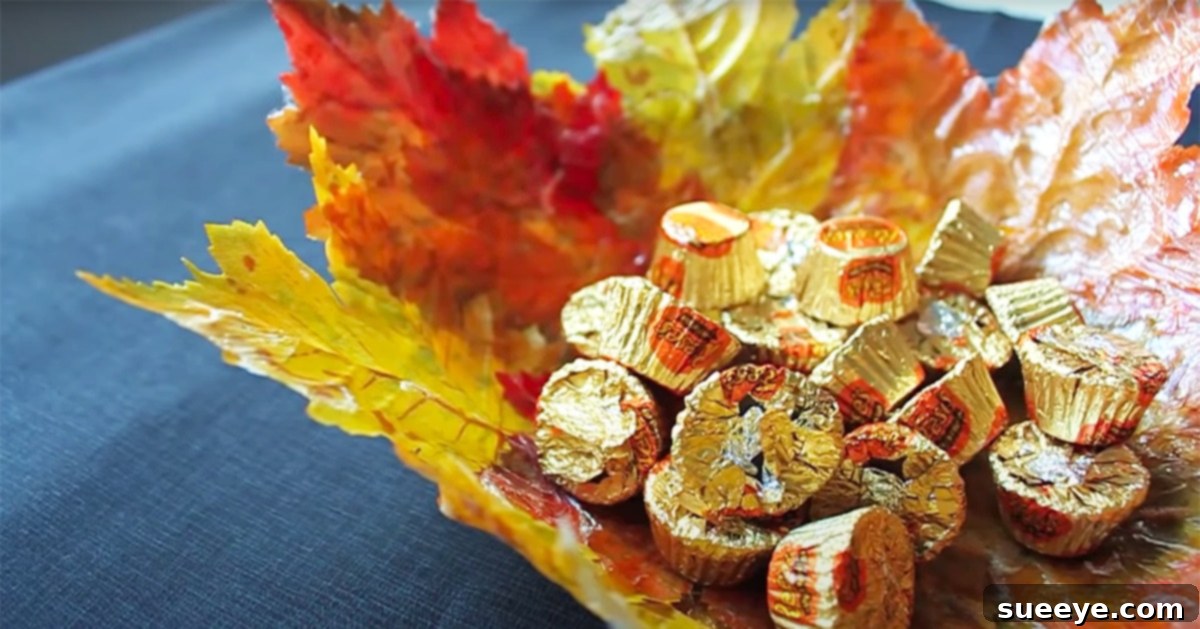
As the crisp air of autumn settles in and nature paints the world in vibrant hues of red, orange, and gold, there’s no better time to infuse your home with the spirit of the season. Crafting your own homemade decorations not only adds a personal touch but also offers a wonderfully rewarding experience. Among the plethora of Fall-themed DIYs, the humble yet elegant leaf bowl stands out as a charming and incredibly easy project. This versatile decoration, inspired by diyncraftpriscilla on YouTube, requires just a few basic supplies and transforms ordinary leaves into a functional piece of art. It’s a perfect festive craft for holding small, light items like wrapped candies, keys, or even potpourri, bringing a warm, inviting ambiance to any space.
The beauty of the DIY leaf bowl lies in its adaptability and rustic charm. While using real, freshly fallen leaves can impart an undeniably authentic and natural look, imbuing your bowl with the genuine essence of nature, artificial leaves offer distinct advantages such as greater durability and longevity. Faux leaves ensure your decorative piece can be enjoyed for many seasons to come without the worry of wilting or crumbling, making them an excellent choice for a lasting autumn craft. Whether gracing your coffee table as a simple decorative accent, welcoming guests from an entryway table, or serving as a unique centerpiece for your Thanksgiving feast, this homemade leaf bowl promises to add a captivating touch of autumn elegance to your home decor. Its effortless creation makes it an ideal project for crafters of all skill levels, from beginners looking for an easy entry into DIY to seasoned artisans seeking a quick and satisfying seasonal project.
Why a DIY Leaf Bowl is Your Next Fall Project
In a world increasingly dominated by mass-produced decor, creating something with your own hands offers a unique sense of satisfaction and individuality. A DIY leaf bowl isn’t just a pretty object; it’s a conversation starter, a reflection of your creativity, and a tangible piece of the autumn season brought indoors. Beyond its compelling aesthetic appeal, this project is remarkably budget-friendly, often utilizing materials you might already have or can easily source, making it one of the most cost-effective Fall decor ideas. It’s also an excellent activity for families, allowing children to participate in collecting leaves and applying Mod Podge (with appropriate supervision, of course), fostering a love for crafting and an appreciation for nature.
Imagine your finished leaf bowl nestled elegantly on a console table, brimming with miniature pumpkins, acorns, or fragrant cinnamon sticks, creating an inviting visual and aromatic experience. Envision it on your kitchen counter, a festive holder for wrapped treats, or even a unique spot for your car keys and loose change, keeping your space tidy with a touch of seasonal flair. Its potential uses are as boundless as your imagination, making it a truly versatile piece of seasonal home decor. Furthermore, the crafting process itself is often described as meditative and enjoyable, offering a creative outlet during the bustling autumn months. The transformation of individual leaves into a cohesive, bowl-shaped structure is a truly magical and deeply satisfying experience to witness, culminating in a beautiful and unique addition to your autumn crafts collection.
Supplies: Gather Your Autumn Crafting Essentials
One of the most appealing aspects of this easy DIY project is the minimal and accessible list of supplies. You likely have most of these items around your home already, making it an incredibly cost-effective craft. Before you begin your journey into creating stunning Fall decor, take a moment to gather everything to ensure a smooth and uninterrupted crafting experience.
- Leaves (Real or Artificial): This is the star of your project and dictates the aesthetic!
- Real Leaves: If you opt for real leaves, choose ones that are vibrant in color, visually appealing, and relatively pliable – avoiding overly dried, brittle, or crumbly specimens. Maple, oak, and sycamore leaves work wonderfully due to their beautiful shapes, sturdy nature, and diverse color palettes. Ensure they are clean and free of dirt, debris, or insects. If they are slightly damp, gently pat them dry with paper towels. Avoid overly wet or crunchy leaves, as they may not adhere well, could introduce moisture, or might break during handling. For best results, collect leaves that have recently fallen and are still somewhat flexible.
- Artificial Leaves: Faux leaves, readily available at craft stores, dollar stores, or online retailers, offer consistent color, shape, and size, along with superior durability. They are often pre-treated and ready to use, making the process even simpler and ensuring a long-lasting DIY leaf bowl. They are perfect for a bowl you want to last for many seasons to come without any concern for natural degradation.
- A Medium-Sized Bowl (for Molding): This will serve as your temporary mold, directly determining the final shape, depth, and size of your leaf bowl.
- Choose a sturdy bowl with a smooth exterior. Glass, ceramic, or even durable plastic bowls work best.
- Consider the desired depth and width of your finished leaf bowl when selecting your mold. A shallower bowl will result in a more plate-like dish, while a deeper bowl will create a more pronounced and functional bowl shape.
- Cooking Spray or Petroleum Jelly: Essential for a smooth release of your finished craft.
- This acts as a non-stick barrier between the plastic wrap and your leaves, preventing your finished leaf bowl from sticking to the mold. Ensure a comprehensive and even coverage of the mold’s exterior surface to guarantee easy removal.
- Plastic Wrap: Your protective and release layer.
- Standard kitchen plastic wrap is perfect. It creates a barrier over your mold, protecting it from the Mod Podge and making the finished leaf bowl easy to remove once dry. Opt for a roll that is wide enough to cover your chosen mold seamlessly.
- Mod Podge (Matte or Gloss Finish): The magic adhesive and sealant for Mod Podge crafts.
- Mod Podge is a versatile decoupage glue that functions as both an adhesive to bind your leaves together and a sealant to protect and stiffen the final structure, ensuring durability. You can choose between a matte finish for a natural, subtle look or a gloss finish for a subtle sheen and enhanced vibrancy of the leaf colors.
- Paintbrush (Foam or Bristle): For precise and even application.
- A medium-sized foam brush or a soft-bristle paintbrush will work wonderfully for applying the Mod Podge evenly over your leaves, ensuring every part is covered for optimal adhesion and sealing.
- Optional: Newspaper or Drop Cloth: To protect your work surface from spills and drips, making cleanup a breeze and preserving your crafting area.
- Optional: Scissors: For trimming any unruly leaf stems or shaping artificial leaves to fit your design perfectly.
Directions: Crafting Your Beautiful Leaf Bowl Step-by-Step
Creating your enchanting leaf bowl is a delightful process that unfolds in a few simple yet crucial stages. Follow these detailed steps to ensure a perfect, durable, and visually appealing autumn masterpiece that will enhance your Fall decor.
Step 1: Prepare Your Mold for Crafting
First, carefully select your medium-sized bowl that will serve as the temporary mold and the foundation for your leaf creation. Gently flip the bowl upside down onto your protected work surface, which ideally should be covered with newspaper or a drop cloth. This inverted position provides a stable, convex surface, perfectly shaped for arranging your leaves.
Next, liberally spray the entire exterior of the inverted bowl with cooking spray, ensuring a comprehensive and absolutely even coating. Alternatively, you can apply a thin, consistent layer of petroleum jelly using a paper towel. This crucial step acts as a powerful release agent, preventing the plastic wrap and, consequently, your finished leaf bowl from adhering permanently to the mold during the critical drying process. A thorough application here will significantly reduce frustration and ensure easy removal later on.
Once adequately sprayed or coated, carefully cover the entire bowl with plastic wrap. Stretch the plastic wrap smoothly over the bowl, meticulously minimizing any wrinkles or creases, as these can transfer to your finished bowl. The plastic wrap serves a dual purpose: it protects your original bowl from the Mod Podge and provides the essential non-stick barrier for easy separation of your finished leaf bowl. Ensure the plastic wrap extends sufficiently beyond the edges of your bowl to create a secure base for your leaf arrangement.
Step 2: Artfully Arrange and Adhere Your Leaves
Now comes the most artistic and enjoyable part of the process! Begin arranging your chosen leaves directly onto the plastic-wrapped mold. Start by placing a central leaf at the very top (which will become the bottom of your future bowl when flipped) and then fan out additional leaves, overlapping them generously. Think of it like shingling a roof or arranging petals on a flower, where each leaf partially covers the one below or adjacent to it. This overlapping technique is absolutely vital for creating a strong, cohesive structure that will hold its shape once dry and provide optimal coverage.
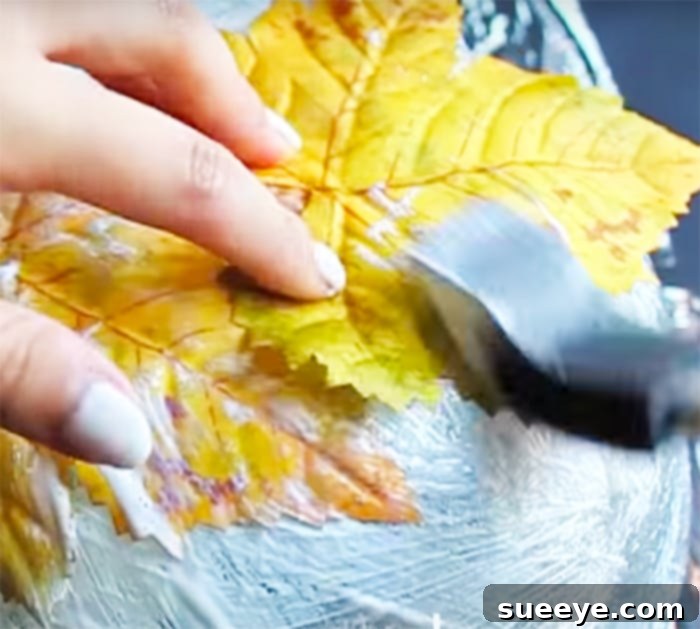
As you meticulously place each leaf, immediately apply a generous coat of Mod Podge over its entire surface using your paintbrush. Do not be shy with the Mod Podge – it acts as both the powerful glue that binds the leaves together and the essential sealant that stiffens and protects them. Ensure there are no significant gaps between the leaves, and that each leaf is thoroughly saturated and firmly adhered to the surrounding leaves and the plastic wrap below. Pay particular attention to the edges and tips of each leaf to prevent them from curling up or detaching. Continue this systematic process, working your way down the sides of the inverted bowl until the entire desired surface is completely covered with leaves, meticulously creating the full, elegant shape of your autumn leaf bowl.
Step 3: Reinforce the Structure and Ensure Thorough Drying
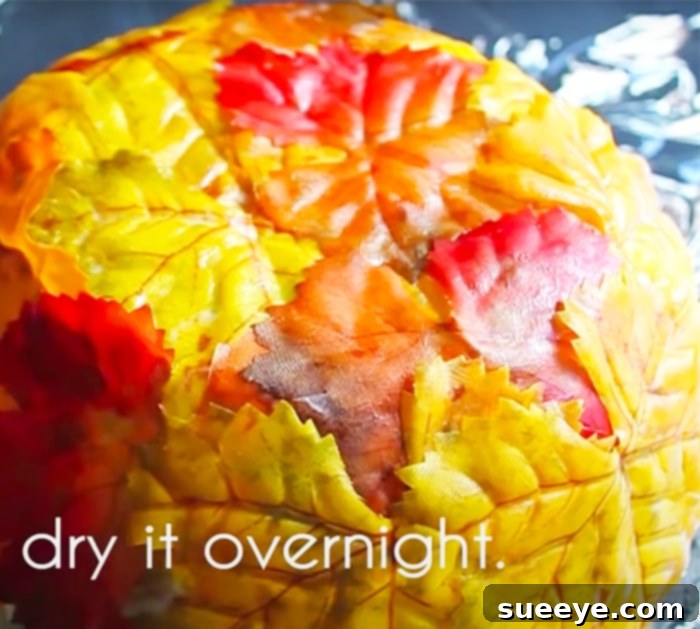
Once the entire bowl-shaped surface is meticulously covered with a single, complete layer of leaves and the initial coat of Mod Podge, it’s time to reinforce your creation. Apply another comprehensive and even coat of Mod Podge over all the leaves, ensuring every part is saturated. This second coat acts as a crucial reinforcement, further strengthening the structure, binding the layers more firmly, and ensuring all edges are completely sealed. This step is absolutely critical for the bowl’s overall durability and its ability to maintain its intended shape without warping or cracking once removed from the mold. Make sure the Mod Podge reaches every crevice, covers the leaf texture evenly, and creates a smooth, continuous layer.
After applying this final, reinforcing coat, the most challenging part begins: patience! Allow your leaf creation to dry completely, ideally overnight, or even for a full 24 hours. Drying time can vary significantly depending on the thickness of your Mod Podge layers, the type and moisture content of the leaves used, and the humidity levels in your crafting environment. It’s essential that the Mod Podge is fully cured and hardened, transforming into a rigid, transparent shell that will ensure the bowl retains its form. Resist the strong urge to touch or move the leaves during this critical drying period, as premature handling could damage the delicate structure and compromise its final shape.
Step 4: The Grand Unveiling of Your Leaf Bowl
The next day, or once you’re absolutely certain the Mod Podge is thoroughly dry and hard to the touch throughout the entire structure, it’s time for the exciting reveal! Gently peel the plastic wrap away from your original molding bowl. Thanks to the cooking spray or petroleum jelly applied in Step 1, this separation should be smooth and effortless. Once the plastic wrap is completely detached from the underlying mold, carefully begin to separate the finished leaf bowl from the plastic wrap itself. Take your time with this step, exercising utmost caution, especially if the leaves are delicate or if you have opted for a very shallow bowl design.
Peel the plastic wrap back slowly and deliberately, ensuring not to bend, tear, or crack your newly formed leaf bowl. If you encounter any stubborn spots where the leaves seem to cling, a very gentle twist of the plastic wrap or allowing for further drying (if it feels even slightly tacky) might be needed. However, in most cases, it will come off without much trouble thanks to the effective release agent. You will now have a beautiful, free-standing DIY leaf bowl, ready to be admired and incorporated into your autumn decorations!
Tips and Tricks for a Perfect Leaf Bowl
While the process of creating a DIY leaf bowl is wonderfully straightforward, a few expert tips and creative tricks can significantly elevate your project from good to truly spectacular, ensuring a stunning and durable piece of Fall decor:
- Leaf Selection Matters Immensely: For real leaves, flat, pliable leaves with clear veins work best and provide the most intricate texture. If your collected leaves are a bit curled or uneven, you can gently press them between sheets of newspaper under heavy books for a day or two before using them to flatten them out. Avoid very thick, fleshy, or overly moist leaves as they might trap moisture, leading to mold or an inability to adhere properly.
- Mastering Mod Podge Application: Apply Mod Podge generously but avoid excessive pooling that could drip or create unsightly lumps. Use your paintbrush to gently smooth out any visible air bubbles that may form under the leaves as you adhere them, ensuring a crisp, clean finish. For a more subtle, organic look that highlights the natural beauty of the leaves, opt for a matte finish Mod Podge. If you desire a slight shine, enhanced color vibrancy, and increased durability, a gloss finish is an excellent choice.
- Layering for Unparalleled Strength: For a truly robust and long-lasting bowl, consider applying a third, very light and even layer of Mod Podge over the entire bowl after the second coat has dried slightly but not completely. This adds another critical layer of sealant and strength without making the bowl appear overly thick or artificial.
- Patience is Your Greatest Virtue: Do not rush the drying process under any circumstances. An adequately dried and fully cured bowl will be significantly stronger, more resilient, and far less prone to warping, cracking, or breaking. Placing your leaf bowl in a well-ventilated area, away from direct sunlight or extreme temperatures, can significantly aid in a consistent and thorough drying process.
- Customization and Embellishments: Once your bowl is completely dry and successfully removed from the mold, the possibilities for further personalization are endless. Consider a light, delicate dusting of metallic gold, copper, or bronze spray paint on the very edges of the leaves for a touch of autumnal glam. You could also attach a small, elegant ribbon bow or a rustic twine accent for added charm. Experiment with mixing different colored leaves for a variegated, multi-tonal effect that truly pops.
- Care and Longevity of Your Craft: Your exquisite leaf bowl is primarily intended as a decorative item and, as such, should not be used for direct food contact unless you place a food-safe barrier (like a small glass insert) inside. To clean your bowl, gently dust it with a soft, dry cloth or a feather duster. Avoid any exposure to moisture, excessive humidity, or direct heat, which could damage the Mod Podge, cause the leaves to soften, or lead to discoloration. Store it carefully during off-seasons, perhaps wrapped in tissue paper, to preserve its beauty for many years to come.
Final Thoughts on Your Autumn Masterpiece
Overall, this DIY leaf bowl project, while potentially delicate in its final form, is undeniably cute, wonderfully unique, and absolutely brimming with rustic charm. It offers a simple, accessible, and incredibly inexpensive way to create stunning Fall home decorations that beautifully reflect the vibrant beauty and serene spirit of the season. The immense joy of seeing individual leaves transform and mold into a functional and aesthetically pleasing bowl is an immensely gratifying experience, fostering a deep connection to nature and your own creative capabilities. It’s a wonderful way to bring a piece of the outdoors in, celebrating the rich, warm colors and intricate textures of autumn.
Whether you choose to make one as a personal decorative item to adorn your own living space or craft several as thoughtful, heartfelt handmade gifts for friends and family, this leaf bowl is sure to garner compliments and add a distinctive, personalized touch to your seasonal decor. So, gather your supplies, embrace your creativity, and embark on this delightful autumn crafting journey. You’ll be amazed at the beautiful autumn craft you can create with just a few simple materials and a little Mod Podge!