
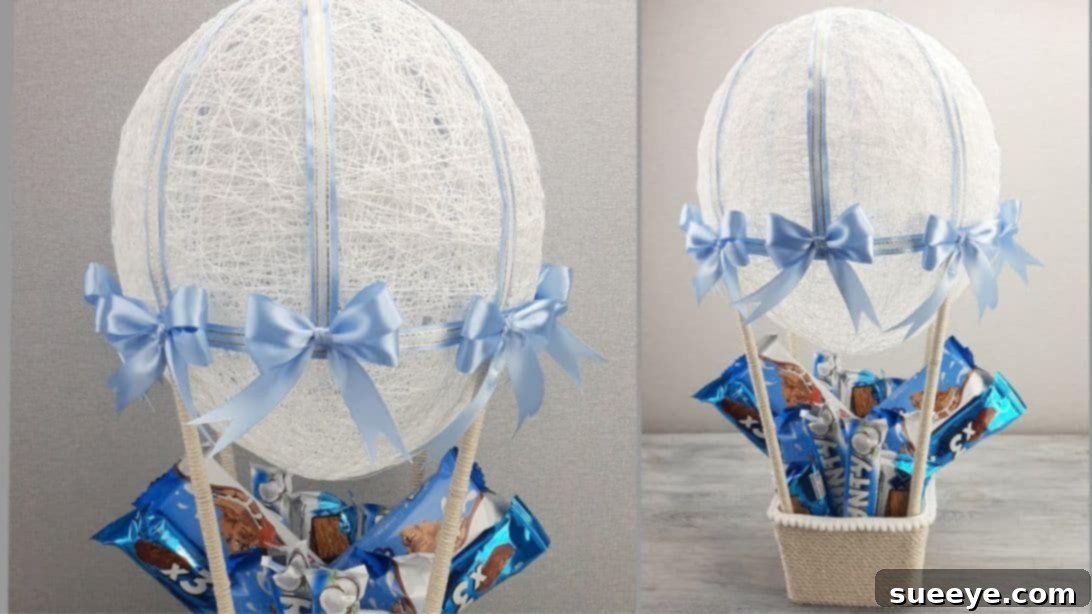
Stunning DIY Hot Air Balloon Decor: Craft Whimsical Party Decorations and Home Centerpieces
Imagine a whimsical touch transforming your next party or bringing a unique charm to your home decor. This enchanting DIY hot air balloon decor project is not just a craft; it’s a statement piece, perfect for birthdays, baby showers, festive gatherings, or simply as an eye-catching centerpiece for your living space. What makes it even more delightful? The clever basket can even be filled with sweet treats, candies, or chocolates, making it a functional and utterly adorable display! This comprehensive guide will walk you through creating a stunning hot air balloon using simple, everyday materials you likely already have or can easily acquire. It’s an incredibly fun and rewarding project that allows for immense personalization, letting your creativity soar. This wonderful art idea is inspired by the creative minds at Super Idea on YouTube, whose innovative approach sparked this detailed tutorial. Prepare to unleash your creativity and bring this charming decoration to life, adding a touch of magic to any space or occasion.
Essential Materials for Your Hot Air Balloon Craft
Before embarking on this delightful crafting journey, gather the following materials. Many of these are common household or craft supplies, making this project budget-friendly and accessible. Consider these as your starting point, and feel free to explore alternatives or add extra embellishments as your creativity dictates. Having all your materials organized before you begin will ensure a smooth and enjoyable crafting experience.
- Iris Thread (or Strong Crafting Yarn): This will form the airy, delicate globe of your hot air balloon. Choose a color that complements your desired aesthetic – white for a classic look, pastels for baby showers, or vibrant hues for a playful party. Any strong, thin thread or yarn that can hold its shape when stiffened will work, such as embroidery floss, thin cotton yarn, or even crochet thread.
- Balloon: A standard round latex balloon, approximately 10-12 inches (25-30 cm) when inflated, is ideal for creating the main structure of your hot air balloon’s globe. The size of your inflated balloon will directly determine the final dimensions of your finished decor piece.
- PVA Glue (White Craft Glue): Essential for stiffening the thread into a durable, self-supporting balloon shape. White school glue or craft glue works perfectly, dries clear, and provides a strong, lasting bond. Ensure you have a generous amount, as the thread needs to be thoroughly saturated.
- Cardboard: Recycled cereal boxes, shipping boxes, or poster board scraps are excellent for constructing the sturdy basket base. Look for cardboard that is rigid enough to hold its shape but easy enough to cut with scissors or a craft knife.
- Cloth (Fabric Scraps): Small pieces of fabric to line and decorate the inside of your basket. Burlap for a rustic look, cotton prints for charm, or even decorative paper can be used to add texture and color.
- Hot Glue Gun and Glue Sticks: Your primary adhesive for quick, strong bonds, particularly for assembling the cardboard basket, attaching the support columns, and securing decorative elements. Ensure your glue gun is in good working order and you have plenty of glue sticks on hand.
- Satin Ribbon: For elegant detailing, connecting the balloon globe to the basket, and creating decorative bows. Choose a color and width that will complement your overall design. Satin adds a touch of luxurious shine.
- Decorative Ribbon: A contrasting or complementary ribbon to add visual interest and embellish the balloon’s canopy and basket. This could be a patterned ribbon, a sheer one, or simply a different shade from your satin ribbon.
- Felt: A small sheet of felt (matching or contrasting your other materials) to cover the exterior sides of the basket, giving it a neat, soft, and finished look while concealing the cardboard.
- Newspaper (or Craft Paper): To roll into tubes that will serve as the structural supports connecting the basket to the balloon. Old newspapers are perfect for this, as they are flexible and readily available.
- Wood Skewers (Bamboo Skewers): Inserted into the newspaper tubes for added rigidity and strength, ensuring your hot air balloon stands tall and stable. Standard bamboo grilling skewers work perfectly.
- Container: A plastic container or bowl (that you don’t mind getting glue in) to hold the PVA glue and facilitate the thread-soaking process. An old food container or yogurt pot is ideal.
- Scissors: Sharp scissors are crucial for precise cutting of cardboard, fabric, thread, and ribbons. A dedicated pair for crafts is recommended.
- Plastic Wrap: To cover the glue container, preventing the glue from drying out and making the thread-saturation process cleaner and more manageable.
- Rope or Cord: A thin, rustic rope or jute twine (approximately 1/8 to 1/4 inch thick) to wrap around the basket, enhancing its authentic hot air balloon aesthetic and adding texture.
Step-by-Step Guide to Crafting Your DIY Hot Air Balloon
Follow these detailed instructions carefully to ensure a beautiful and sturdy hot air balloon decor piece. Take your time with each step, paying attention to the details, and don’t hesitate to personalize your creation along the way. This comprehensive guide will lead you through each stage, from preparing your materials to applying the final decorative touches.
Step 1: Preparing Your Thread for the Balloon Structure
This initial step is crucial for creating the lightweight yet rigid globe of your hot air balloon. Begin by taking your chosen iris thread or crafting yarn. Carefully place the entire spool or a large, manageable bundle of the thread inside a clean, shallow plastic container. Ensure the loose end of the thread is pulled out and easily accessible, ready to be unwound. Next, generously fill the container with PVA glue, ensuring the thread is fully submerged and thoroughly saturated. The goal is to have every strand of thread coated with glue. To keep the glue from drying out during the process and to manage the thread neatly, cover the container with plastic wrap. Poke a small hole in the center of the plastic wrap, just large enough to thread the loose end of your string through. Secure the plastic wrap tightly around the container’s rim with rubber bands. This clever setup allows the thread to be pulled out, glue-soaked and ready for wrapping, without creating a sticky mess or allowing the bulk of the glue to dry prematurely.
Step 2: Crafting the Balloon Globe: Wrapping and Drying
Now, prepare your latex balloon. Inflate it to your desired size; typically, a 10-12 inch (25-30 cm) diameter works well for a balanced hot air balloon design. Tie the balloon securely to prevent air leakage. Remember, the size of this inflated balloon will directly determine the final size and shape of your hot air balloon’s globe. Once the balloon is ready, gently pull the glue-saturated thread from your prepared container, making sure it’s evenly coated. Begin wrapping the thread around the inflated balloon in a random, crisscrossing pattern. Aim for an even distribution of thread across the entire surface of the balloon, creating a net-like structure. The more layers you apply, the more robust and opaque your globe will be, but avoid making it too dense, as you still want to maintain a light and airy feel reminiscent of a real balloon. Once you are satisfied with the coverage and shape, cut the thread, leaving a small tail to secure the end to the wrapped globe. Hang the wrapped balloon in a well-ventilated area – perhaps over a protected surface – and let it dry completely for approximately 24 hours, or even longer in humid conditions. Full drying is absolutely essential for the glue to harden and create a firm, self-supporting structure that will hold its shape after the inner balloon is removed.
Step 3: Constructing the Hot Air Balloon Basket Base
The basket provides both the foundation and a significant portion of the charm for your hot air balloon. Begin by precisely cutting one square piece of cardboard, measuring 3.94 inches by 3.94 inches (approximately 10 cm x 10 cm). This piece will serve as the sturdy bottom of your basket. Next, you will need to cut four trapezoidal pieces of cardboard, which will form the sides of the basket. Each trapezoid should be measured and cut with the following dimensions: a bottom edge of 3.94 inches (10 cm), a top edge of 4.72 inches (12 cm), and slanted sides measuring 3.15 inches (8 cm). Using a ruler and a sharp craft knife (always exercise caution and cut on a protected surface) or strong scissors will help ensure straight, clean cuts. Precise measurements and clean edges are vital for a neatly assembled and visually appealing basket. These specific dimensions will give your basket a classic, slightly flared shape, widening elegantly towards the top.
Step 4: Assembling and Decorating the Basket
With your cardboard pieces accurately cut, it’s time to bring the basket to life through assembly and initial decoration. First, take the square cardboard piece (which is the bottom of the basket) and cover one side with your chosen cloth or fabric scrap. Apply a thin, even layer of PVA glue or hot glue to the cardboard, then carefully smooth the fabric over it, stretching gently to remove any wrinkles. Tuck and secure the edges of the fabric neatly on the underside of the cardboard piece. This fabric-covered side will face upwards, forming the attractive inside bottom of your basket. Next, take the four trapezoidal side pieces. Using your hot glue gun, carefully attach them upright to the edges of the square base, forming the walls of the basket. Ensure the fabric-covered side of the bottom piece faces upwards, into the basket. For a polished exterior, apply hot glue and carefully cover the outside of these cardboard sides with felt paper, trimming any excess neatly along the top and bottom edges. The hot glue provides an instant, strong bond, making assembly quick and efficient while ensuring the basket is sturdy and well-finished.
Step 5: Adding a Touch of Rustic Charm to the Basket
To give your basket an authentic, rustic, and visually appealing hot air balloon feel, you’ll wrap its exterior with rope or cord. Starting at one of the top corners or edges of the basket, apply a small line of hot glue. Press the end of your chosen rope firmly into the glue to secure its starting point. Carefully begin wrapping the rope horizontally around the basket, working your way downwards. Apply small sections of hot glue as you go, securing the rope tightly and evenly with each revolution. Continue this process until the entire exterior surface of the basket’s walls is covered with rope. This not only adds a lovely texture and a more finished look but also helps to further reinforce the basket structure, making it more robust. Ensure each coil of rope sits snugly against the previous one for a seamless and professional-looking finish.
Step 6: Creating the Support Columns
These columns are essential for physically connecting and supporting your balloon globe to the basket, mimicking the real structure of a hot air balloon. Begin by rolling four long, tight tubes from newspaper or craft paper. For best results, roll the paper tightly around a thin dowel, a pencil, or a metal skewer, then gently remove the inner core. Each tube should measure approximately 12 inches (30 cm) in length and be uniform in thickness for a balanced look. To reinforce these paper tubes and give them crucial rigidity, insert a wood skewer (bamboo skewers work perfectly due to their strength and slim profile) inside each one, extending almost the full length of the tube. Next, take one string of your chosen rope or cord and carefully wrap it around each newspaper tube, securing it with a touch of hot glue at the top and bottom ends. This gives the supports a more finished, cohesive, and authentic appearance. Finally, apply a generous amount of hot glue to one end of each reinforced tube and firmly attach them to the inside corners of your completed basket, ensuring they stand vertically and securely. Hold them in place until the glue sets completely.
Step 7: Unveiling Your Balloon Globe and Attaching It
By now, your glue-soaked thread-wrapped balloon should be completely dry and hardened into a rigid, hollow globe. This is the exciting moment where your balloon truly takes shape! Carefully pop the inner latex balloon by gently poking it with a stick, a needle, or the tip of your scissors. Once deflated, gently pull and remove the remnants of the latex balloon from inside your hardened thread structure. You should now have a perfect, lightweight, and self-supporting globe ready for assembly. Apply a generous amount of hot glue to the very top ends of the four support tubes you previously attached to the basket. Carefully position the hardened thread globe onto these tubes, aligning it centrally. Press down gently but firmly to ensure a secure and balanced attachment, holding it in place for a few moments until the hot glue sets completely. This connection forms the primary structure of your hot air balloon.
Step 8: Designing the Canopy and Connecting Ribbons
To add both structural integrity and decorative flair, we’ll now attach the ribbons, creating the appearance of a balloon canopy. First, take a length of your decorative ribbon and carefully glue it on top of a corresponding length of your satin ribbon, ensuring they are perfectly aligned. This creates a more substantial and visually appealing strip with layered textures. Once these combined ribbon strips are ready, glue two of them around the base of your thread globe, positioning them so they connect opposite support tubes. This will form an elegant ‘X’ shape across the top of the globe, mimicking the authentic canopy structure of a real hot air balloon. To further enhance this, glue two additional ribbon strips in the middle of these initial ‘X’ connections, forming a star-like pattern. Finally, for a neat and finished look, wrap a single, longer piece of ribbon horizontally around the base of the globe where all these ribbon strips converge. Secure it with small dots of hot glue, effectively tying them together visually and reinforcing the attachment points, giving the illusion of a beautifully wrapped parachute cord.
Step 9: Crafting and Attaching Elegant Bows
Small bows add a touch of classic elegance and a finished look to your hot air balloon decor. From your satin ribbon, create eight small, neat bows. A simple method is to form two loops, cross one over the other, and tie a knot in the center, then trim the tails to your desired short length for a crisp appearance. Alternatively, you can tie a simple double knot and trim the loops. Once your bows are made and are uniform in size, apply a small dab of hot glue to the back of each bow. Carefully attach one bow to the end of each ribbon strip where it meets the base of the globe. These strategically placed bows not only enhance the aesthetic appeal by softening the connection points but also neatly conceal any raw edges or glue spots of the ribbon, giving your hot air balloon a polished and professional finish.
Step 10: The Grand Finale: Final Touches and Display
Your magnificent DIY hot air balloon is almost complete! For the final touch, take a length of your decorative ribbon and elegantly wrap it around the exterior of the basket, perhaps in the middle, along the top edge, or even spiraling gently downwards, securing it with small dots of hot glue as you go. This adds another layer of visual interest, ties in the decorative elements from the balloon, and brings all the design components together cohesively. Step back and admire your beautiful creation! Now your DIY hot air balloon decor is ready to grace any party as a stunning centerpiece, adorn a nursery or child’s bedroom, or simply add a whimsical touch to your living room or office space. Consider filling the basket with treats, small gifts, artificial flowers, or even a miniature teddy bear to complete its charming appeal. Congratulations on crafting a truly unique and delightful piece that is sure to enchant anyone who sees it!
Tips for a Perfect DIY Hot Air Balloon
Achieving a professional-looking finish for your hot air balloon craft is easier with a few handy tips. These insights will help you avoid common pitfalls and ensure your project turns out beautifully.
- Patience is Key: The most crucial tip is to allow ample drying time for the glue-soaked balloon. Rushing this step can compromise the structural integrity of your globe, leading to a flimsy or misshapen result. Ensure it’s bone-dry before proceeding.
- Work in Sections with Glue: When wrapping the basket with rope or attaching ribbons, apply hot glue in small, manageable sections. This prevents the glue from drying before you’ve had a chance to properly position and secure your materials. It also helps in achieving clean, even lines.
- Clean and Precise Cuts: Use a sharp pair of scissors or a craft knife (with a cutting mat) for cutting cardboard, fabric, and ribbons. Clean, straight cuts result in a much neater and more professional-looking final product. Dull tools can fray fabric or tear cardboard.
- Even Glue Application: Ensure the thread is thoroughly and evenly saturated with PVA glue for uniform hardening. When using hot glue, apply it sparingly but effectively to avoid visible excess glue, which can detract from the aesthetic.
- Safety First with Hot Glue: Always exercise caution when using a hot glue gun. Keep your fingers away from the nozzle and melted glue. If children are involved, ensure adult supervision.
- Practice Bow-Making: If you’re new to making bows, practice with a scrap piece of ribbon first to ensure consistency in size and shape before applying them to your finished piece.
- Customization is Encouraged: Think about the theme of your event or the room where the hot air balloon will be displayed. Choose thread, fabric, and ribbon colors that complement your existing decor or party theme.
- Work on a Protected Surface: Both PVA glue and hot glue can be messy. Cover your work area with newspaper, plastic sheeting, or an old tablecloth to protect your surfaces.
- Good Ventilation: When dealing with glues, especially if you’re sensitive to fumes, work in a well-ventilated area.
Creative Variations and Personalization Ideas
One of the greatest joys of any DIY project, especially this hot air balloon decor, is the freedom to customize and personalize it to suit your unique taste or specific event theme. Here are some inspiring ideas to make your creation truly one-of-a-kind:
- Lighting Up Your Creation: Drape small, battery-operated LED fairy lights around the thread globe or even tuck them inside the basket. This creates a magical, enchanting glow, making your hot air balloon especially stunning in the evening or in dimly lit spaces.
- Unique Basket Fillers: Beyond traditional candies, consider filling the basket with miniature plush toys, tiny wrapped gifts, faux flowers (silk or dried), a small pot of succulents, or even custom-printed notes for a unique message in a bottle effect.
- Themed Decals and Paintwork: Once your thread globe is completely dry and hardened, you can lightly paint patterns, stripes, polka dots, or small designs onto its surface using acrylic paints. Similarly, add small themed decals or stickers to the basket or the globe itself to match a party theme (e.g., stars for a “Twinkle Twinkle Little Star” baby shower).
- Alternative Globe Materials: Instead of plain iris thread, experiment with different materials for the globe. Lace fabric strips, metallic threads, tinsel, or even thin strips of sheer fabric can create entirely different textures and visual effects.
- Hanging Option for a Floating Effect: If you wish to hang your hot air balloon from the ceiling, attach a loop of strong, clear fishing line or invisible string to the very top of the balloon globe. This creates a stunning floating effect that adds to the whimsy.
- Miniature Storytelling: Place small plastic animals, miniature people figures, or even small ‘Up’-style house miniatures inside the basket to create a charming little scene and tell a story.
- Different Sizes and Clusters: Don’t limit yourself to just one size! Scale up or down the dimensions of the balloon and basket to create a fleet of hot air balloons in various sizes. Displayed together as a cluster, they can create a dynamic and impressive visual arrangement.
- Fabric Basket Design: Instead of cardboard covered with fabric, consider using a small, pre-made wicker basket or even a small decorative tin for a more rustic and ready-made base. Simply adapt the support column attachment to fit.
- Add Bunting or Flags: Create tiny paper or fabric bunting flags and string them between the support poles or around the rim of the basket for an extra festive touch.
- Personalized Tags: Attach small handwritten tags with names, dates, or messages to the basket or hanging from the ribbons, especially for events like weddings or baby showers.
Your Whimsical Creation Awaits: Embrace the Joy of DIY
Congratulations! You’ve successfully navigated the steps to create a truly beautiful and charming DIY hot air balloon decor piece. This project, while seemingly intricate, is a testament to the fact that stunning, personalized decorations can be crafted with a little patience, creativity, and simple, accessible materials. From the delicate globe formed by glue-soaked thread to the rustic charm of the roped basket, every detail comes together to form a unique masterpiece. Whether it’s soaring gracefully as a captivating party centerpiece, adorning a child’s bedroom or nursery with a touch of fantasy, or simply adding a whimsical elegance to your living room, your handmade hot air balloon is sure to capture hearts, spark conversation, and bring a smile to anyone who beholds it. We encourage you to embrace the joy of crafting, share your unique creations with friends and family, and inspire others to embark on their own delightful DIY adventures. Remember, the journey of creating is just as rewarding as the finished product. Happy crafting, and may your creative spirit continue to soar!