
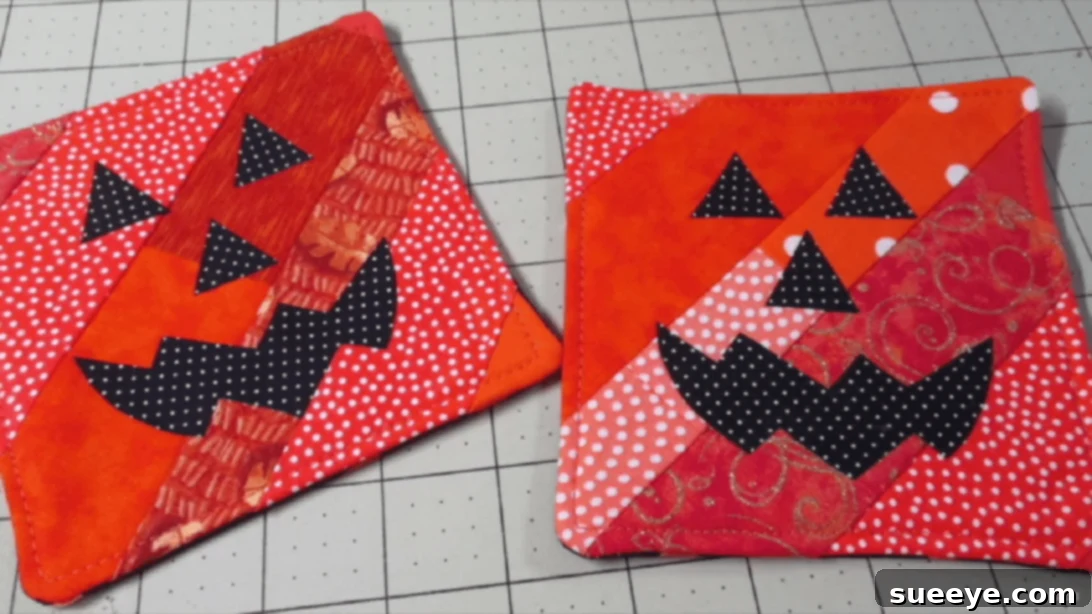
Are you still searching for that perfect Halloween craft project to add a touch of festive charm to your home? Look no further! This delightful DIY jack-o’-lantern coaster project, inspired by the creative insights of Debs Days on YouTube, offers a fantastic solution. It’s an incredibly easy and rewarding craft that leverages leftover fabric scraps, making it not only eco-friendly but also budget-friendly. You don’t need to be a quilting expert or a seasoned seamstress to achieve stunning results; simply follow our detailed instructions below, embracing the satisfying “quilt as you go” method.
RELATED: How To Sew Mini Halloween Treat Bags
Create Spooky-Cute Jack-O’-Lantern Coasters with Ease
Halloween is a time for creativity, spooky fun, and delightful decorations. What better way to infuse your home with holiday spirit than with handmade items? These quilted jack-o’-lantern coasters are not just practical for protecting your surfaces; they are also adorable conversation starters and a fantastic way to utilize those small pieces of fabric you’ve been saving. Imagine sipping your pumpkin spice latte on a coaster you’ve crafted yourself, radiating autumnal cheer!
One of the best aspects of this project is its incredible versatility. While traditional orange and black might be your go-to for jack-o’-lanterns, feel free to unleash your creativity with different color palettes. Perhaps some ghostly white, eerie purple, or even a sophisticated metallic sheen? The choice is entirely yours! Beyond color, you can also easily adjust the size of these charming creations. Want larger placemats for your Halloween feast? Or perhaps tiny versions to string together as unique ornaments for a festive garland? The possibilities are endless. Just remember to print your template to the appropriate size to ensure all the facial features fit perfectly on your custom-sized coaster.
Why You’ll Love Crafting These Jack-O’-Lantern Coasters
Beyond their charming appearance, these DIY coasters offer numerous benefits:
- Beginner-Friendly: Designed with simplicity in mind, this project is perfect for those new to sewing or quilting. The “quilt as you go” method simplifies the layering and stitching process, making it less intimidating.
- Sustainable Crafting: Dive into your fabric scrap bin! This project is an excellent way to use up small pieces of fabric that might otherwise go to waste, promoting eco-conscious crafting.
- Quick & Satisfying: Most crafters can complete a single coaster in a relatively short amount of time, offering immediate gratification and a tangible sense of accomplishment.
- Customizable Decor: From playful to spooky, you can personalize each coaster to match your unique Halloween aesthetic. Experiment with different fabrics, colors, and facial expressions.
- Handmade Gifts: These coasters make thoughtful and unique Halloween gifts for friends, family, or party hosts.
Essential Materials for Your Quilted Jack-O’-Lantern Coasters:
Gathering your supplies is the first exciting step towards creating your festive coasters. Most items are likely already in your craft stash, making this a truly accessible project.
- Fabric scraps: These form the vibrant body of your coaster. Think oranges, yellows, blacks, or even unexpected colors to give your jack-o’-lantern a unique personality. Various patterns and textures can add depth.
- Print fabric: Specifically for the eyes, nose, and mouth of your jack-o’-lantern. Contrasting colors like black, dark purple, or even glow-in-the-dark fabric can make these features pop.
- Backing fabric: A sturdy piece of fabric for the back of your coaster. Choose something that complements your front design, provides stability, and withstands heat and moisture.
- Cotton batting: This crucial layer gives your coaster its soft, cushioned feel and absorbs moisture. A medium-loft cotton batting works best for coasters, providing substance without excessive bulk.
- Marking pen, pencil, or chalk: Essential for transferring your template designs accurately onto fabric. Choose a tool that is easily visible on your chosen fabrics and can be removed or washes away.
- Ruler: For precise measurements and straight cuts, especially when trimming your fabric strips.
- Scissors or rotary cutter and a cutting mat: A sharp pair of fabric scissors is sufficient, but a rotary cutter paired with a self-healing cutting mat will make cutting strips and squares much faster and more accurate.
- Fabric pins: To hold your fabric layers securely in place while you stitch, preventing shifting and ensuring neat seams.
- Fabric glue: A temporary fabric adhesive is ideal for positioning the small facial features before stitching them down, offering precision without pins.
- Needle and thread: For any small hand-stitching details, if desired, or for securing threads.
- Iron, for pressing: An indispensable tool in quilting! Pressing seams open or to one side creates flat, professional-looking finishes and helps your coaster lay beautifully.
- Sewing machine: While it’s possible to hand-stitch, a sewing machine will make this project much quicker and easier, ensuring consistent stitches.
- Template: This provides the essential shapes for your jack-o’-lantern’s face. Click here to download the template and print it to your desired size.
Step-by-Step Guide: Crafting Your Quilted Jack-O’-Lantern Coasters
Let’s dive into the fun part – bringing your jack-o’-lanterns to life! Remember, patience and pressing are your best friends in quilting.
Step 1: Building the Quilted Fabric Base
This is where the “quilt-as-you-go” magic happens, creating a beautifully textured and unique fabric panel from your scraps.
- Prepare your strips: Begin by taking your assorted fabric scraps and piecing them together to create longer strips. Aim for strips of varying widths and lengths to add visual interest. Once assembled, trim the long edges of these pieced strips to ensure they are straight, making them easier to work with.
- Layer the batting: Lay your cotton batting flat on your work surface. This will be the foundation of your coaster.
- First strip placement: Take one of your prepared fabric strips and place it diagonally across the center of the batting. This diagonal placement is key to the dynamic look of the finished coaster.
- Add the second strip: Place another fabric strip directly on top of the first, with their right sides facing each other. Ensure their edges are perfectly aligned along one side.
- Stitch the first seam: Using your sewing machine, stitch down the aligned side of the two fabric strips. A ¼-inch seam allowance is typically standard and works well here.
- Press open: Carefully press the newly stitched fabric strip open with your iron. This creates a flat, clean seam and prevents bulk. Always press as you go for professional results.
- Continue adding strips: Keep adding more fabric strips in the same manner. Place a new strip right sides together with the last strip, align the edges, stitch, and then press open. Continue this process, radiating outwards from your initial strip, until the entire batting piece is completely covered with your pieced fabric.
Step 2: Assembling the Coaster Layers
Now that your quilted base is ready, it’s time to bring it all together into a cohesive coaster unit.
- Trim and square up: Once your batting is fully covered by your fabric scraps, carefully trim any excess fabric beyond the batting. Then, cut this pieced and quilted fabric into 4 perfect squares, each measuring 5½ inches. Use your ruler and rotary cutter for precision.
- Cut backing fabric: Cut your chosen backing fabric into squares of the exact same size (5½ inches).
- Stack the layers: Take one quilted square and one backing fabric square. Place them together with their right sides facing each other.
- Clip and pin: Use fabric clips or pins to secure all the edges, ensuring the layers don’t shift during stitching.
- Stitch around: Stitch all the way around the perimeter of the square using a ¼-inch seam allowance. Crucially, remember to leave a gap of about 2 inches unstitched along one side. This opening will be used for turning the coaster right side out. Reinforce the beginning and end of your stitching at this opening by backstitching a few stitches.
Step 3: Finishing Touches and Jack-O’-Lantern Face Application
This final step adds refinement to your coaster and brings your jack-o’-lantern to life!
- Clip corners: Before turning, carefully trim the corners of your stitched square at an angle, close to the stitching line but without cutting through it. This reduces bulk in the corners, ensuring they turn out neatly.
- Turn and press: Reach through the 2-inch opening and gently turn the entire coaster right side out. Use a point turner or a dull pencil to push out the corners so they are crisp. Then, tuck in the raw edges of the opening neatly and press the entire coaster flat with your iron.
- Topstitch: To close the opening and give your coaster a polished finish, topstitch all the way around the entire perimeter of the coaster. Use a small seam allowance, approximately 1/8 inch from the edge. This step also adds durability and helps the coaster maintain its shape.
- Prepare the facial features: Print out your jack-o’-lantern template and carefully cut out the individual pieces for the eyes, nose, and mouth. Trace these shapes onto your chosen print fabric scraps using a marking pen or chalk, and then cut them out precisely.
- Adhere and stitch features: Arrange the cut-out facial features onto one side of your coaster, experimenting with different placements until you achieve your desired expression. Once satisfied, apply a small amount of fabric glue to the back of each piece and adhere them securely to the coaster.
- Secure the features: For a professional and durable finish, use your sewing machine to stitch around the edges of each facial feature. A small, tight zigzag stitch or a straight stitch very close to the edge works best. This not only secures the pieces but also adds a decorative outline, enhancing the jack-o’-lantern design.
Creative Variations & Tips for Success
Once you’ve mastered the basic technique, don’t hesitate to experiment!
- Size it Up or Down: As mentioned, these can be tiny ornaments or large placemats. For larger items, use more batting and cut larger squares.
- Experiment with Expressions: Don’t limit yourself to one jack-o’-lantern face. Create a set with various spooky, silly, or grumpy expressions for added character.
- Embellishments: Consider adding small details like embroidery floss for stitches on the pumpkin face, or even fabric paint for highlights.
- Different Fabrics: Explore textures! Velvet for a luxurious feel, burlap for a rustic touch, or even glittery fabric for extra sparkle.
- Gift Sets: Bundle a set of these coasters with some festive mugs and a bag of gourmet coffee or tea for a charming Halloween gift.
Tips for Beginners:
- Practice on Scraps: If you’re new to machine sewing, practice your straight lines and ¼-inch seam allowances on scrap fabric first.
- Pressing is Key: Don’t skip the pressing steps! It makes a huge difference in the final appearance of your quilted project.
- Sharp Tools: Use sharp scissors or a fresh rotary cutter blade for clean, precise cuts.
- Take Your Time: Rushing can lead to mistakes. Enjoy the process and take breaks if you feel frustrated.
These Easy DIY Jack-O’-Lantern Coasters are more than just a craft; they’re a way to infuse your home with personalized, festive spirit. They are a testament to the joy of handmade creations, proving that even simple fabric scraps can transform into something truly delightful.
We encourage you to embark on this fun and rewarding project. Whether you’re making a single coaster or a whole set, the process is guaranteed to get you into the Halloween spirit. Share your creations and inspire others!
*All image credit belongs to Debs Days via YouTube. Follow and subscribe to her channel for more amazing DIY inspiration and tutorials!