
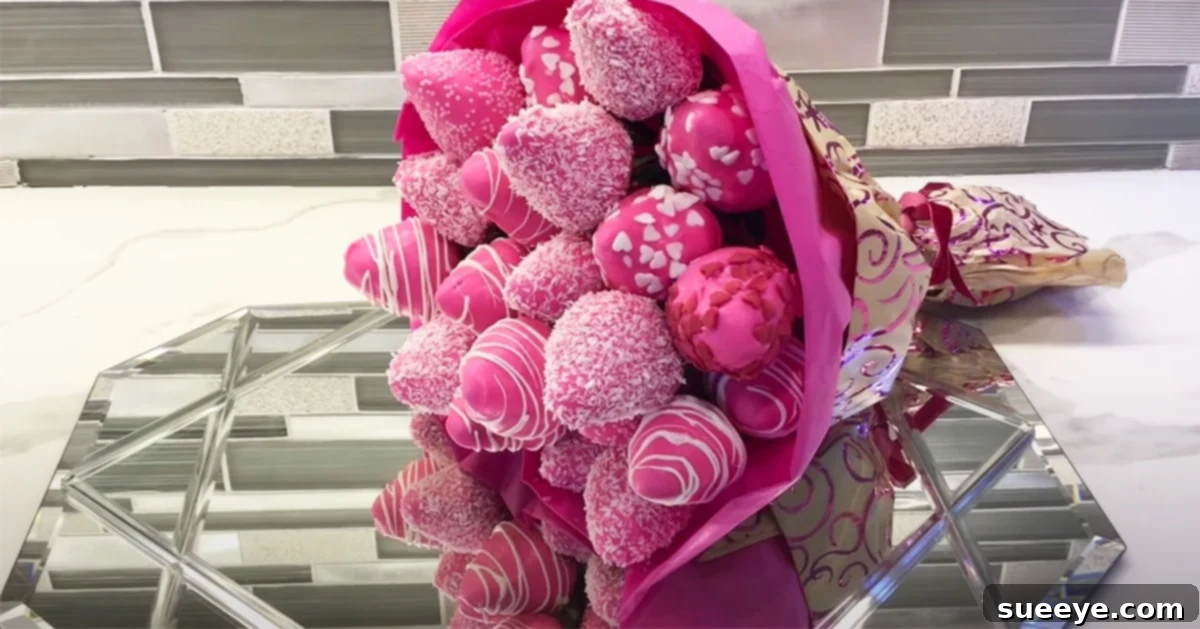
Craft the Perfect Chocolate Covered Strawberry Bouquet: A DIY Edible Gift Guide
There’s something uniquely special about a homemade gift. It carries a personal touch, a warmth, and a genuine effort that often outshines even the most expensive store-bought items. When that gift is also incredibly delicious and visually stunning, you’ve truly hit the jackpot. Enter the chocolate covered strawberry bouquet – an exquisite edible arrangement that serves as an ideal present for a myriad of occasions. While commonly associated with Valentine’s Day, its charm and elegance make it perfect for anniversaries, birthdays, Mother’s Day, or simply to show someone you care.
Imagine presenting a vibrant bouquet, not of flowers, but of glossy, perfectly coated strawberries, each one a bite of pure delight. This guide will walk you through creating your very own edible masterpiece, transforming simple ingredients into a sophisticated and heartfelt gift. Forget the exorbitant prices of commercial edible arrangements; with a little creativity and our detailed instructions, you can craft a personalized bouquet that’s both impressive and budget-friendly. We’ll explore everything from selecting the freshest berries to the art of dipping and assembling, ensuring your homemade creation is a resounding success.
Why Choose a DIY Chocolate Strawberry Bouquet?
Beyond the obvious savings, crafting your own chocolate covered strawberry bouquet offers a wealth of benefits that elevate it far beyond a simple present:
- Unparalleled Personalization: This is where your creativity truly shines. You have complete control over every element – from the specific colors of chocolate to the type of sprinkles, drizzles, and even the wrapping paper. Want a romantic pink and red theme for Valentine’s Day? Or perhaps vibrant spring colors for a birthday? The choice is yours, allowing you to tailor the bouquet perfectly to the recipient’s taste and the occasion.
- Significant Cost Savings: Commercial edible arrangements can be surprisingly expensive, often costing upwards of $50-$100 for a modest size. By making it yourself, you primarily pay for the raw ingredients, drastically reducing the overall cost while still achieving a professional-looking result. This makes a luxurious gift accessible without breaking the bank.
- The Thoughtful Touch: There’s an inherent value in a gift that requires time and effort to create. A handmade chocolate covered strawberry bouquet communicates a level of thoughtfulness and care that speaks volumes. It shows you invested yourself in making something special, which makes the gift infinitely more cherished.
- A Fun and Rewarding Experience: The process of making this bouquet is an enjoyable activity in itself. From melting the chocolate to dipping each berry and arranging them into a beautiful display, it’s a creative outlet that results in a tangible, delicious reward. It can even be a fun project to do with children or a partner.
- Impressive Presentation: The finished product is genuinely stunning. A well-arranged chocolate covered strawberry bouquet makes for an incredible centerpiece or a show-stopping surprise. Its visual appeal combined with its delectable taste ensures it will be remembered long after the last berry is devoured.
Gathering Your Sweet Supplies: The Essential Ingredients
The foundation of any great recipe lies in its ingredients. For your chocolate covered strawberry bouquet, quality matters, especially when it comes to the star of the show – the strawberries themselves. Here’s a detailed look at what you’ll need:
-
25-30 Fresh Strawberries: This quantity is a good starting point for a moderately sized bouquet. However, feel free to adjust based on your desired bouquet size.
- Selection Tips: Choose firm, ripe, vibrant red strawberries with their green caps still attached. Avoid any berries that are bruised, soft, or have mold. Larger strawberries tend to look more impressive and provide a better surface for dipping.
- Crucial Temperature: Ensure your strawberries are at room temperature before you begin dipping. This is paramount for the chocolate to adhere smoothly and prevent condensation, which can cause the chocolate to seize or slide off.
- Preparation: Gently wash your strawberries under cool running water and, most importantly, dry them *thoroughly*. Use paper towels or a clean cloth to pat them completely dry. Any residual moisture is the enemy of perfectly coated chocolate.
-
Bright Pink (or Any Color) Candy Melts: Candy melts are ideal for this project due to their ease of use, vibrant color options, and smooth melting properties that don’t require tempering.
- Color Options: While bright pink is wonderfully festive for Valentine’s Day, don’t hesitate to explore other colors. Red, white, or even a mix of colors can create a stunning visual effect.
- Quantity: A standard bag (10-12 oz) should be sufficient for 25-30 strawberries, but it’s always wise to have a little extra on hand, especially if you plan on layering colors or adding drizzles.
-
Sprinkles, for Decoration: Sprinkles add texture, color, and a festive touch.
- Thematic Choices: Heart-shaped sprinkles, tiny edible pearls, or other Valentine’s Day-related designs are perfect for a romantic theme. For other occasions, consider metallic sprinkles, nonpareils, or custom color mixes.
- Application: Remember to apply sprinkles immediately after dipping, while the chocolate is still wet, to ensure they stick.
-
White Chocolate Melts, Optional (for Decoration): A contrasting drizzle of white chocolate can elevate the visual appeal of your bouquet.
- Technique: Melt a small amount of white chocolate and either use a piping bag with a tiny hole or a fork to create elegant zigzag patterns over the colored chocolate once it has slightly set.
Essential Tools for Your Edible Masterpiece
Having the right tools will make the process of creating your chocolate covered strawberry bouquet much smoother and more enjoyable. These supplies are generally easy to find and reusable for future projects:
-
Wooden Skewers: These are the “stems” of your edible flowers.
- Length: Standard 6-inch or 8-inch skewers work well. You can trim them to varying lengths later to create different heights in your bouquet, adding visual interest.
- Safety: Be mindful of the sharp ends during handling and assembly.
-
Styrofoam Block or Floral Foam: This serves as a sturdy base for drying your dipped strawberries and for holding the assembled bouquet securely.
- Preparation: You can place the styrofoam block directly into a decorative pot or basket, or simply use it on a flat surface during the drying phase.
-
Tissue Paper or Decorative Wrapping Paper: This is what gives your bouquet its classic, elegant presentation.
- Variety: You might choose a single color, multiple coordinating colors, or even patterned paper to match your theme. Consider layering different textures for added depth.
-
Plastic Wrap: An indispensable item for securing clusters of skewers and for general kitchen use.
- Purpose: It will be used to bind groups of strawberry skewers together, providing stability to your bouquet before it’s wrapped in decorative paper.
- Microwave-Safe Bowls: For melting your candy melts.
- Spoons or Small Spatulas: For stirring chocolate and gently assisting with dipping.
- Parchment Paper or Wax Paper: To line baking sheets if you prefer to lay dipped berries down to set, though styrofoam is generally better for preventing flat spots.
- Small Bowls for Sprinkles: Makes it easy to dip and coat the strawberries with decorations.
Step-by-Step Guide: Crafting Your Chocolate-Covered Strawberry Bouquet
Creating your chocolate covered strawberry bouquet is a delightful process that can be broken down into two main stages: dipping and decorating the strawberries, and then assembling them into a beautiful arrangement. Following these steps carefully will ensure a successful and stunning outcome.
Phase 1: Dipping and Decorating Your Strawberries
The key to perfect chocolate-covered strawberries lies in preparation and technique. Remember the importance of room temperature and completely dry berries!
- Prepare Your Workstation: Line a baking sheet with parchment paper if you’re not using styrofoam for immediate drying. Have your sprinkles ready in shallow bowls. Place your styrofoam block on a stable surface where you can easily stick the skewers.
- Melt the Chocolate: Transfer your candy melts into a microwave-safe bowl. Heat in 30-second intervals, stirring thoroughly after each interval. This prevents scorching. Continue until the chocolate is smooth, creamy, and completely melted. Be careful not to overheat it, as this can make the chocolate seize or become too thick. If it’s too thick, you can add a tiny bit of shortening or coconut oil (1/4 tsp at a time) to thin it, but avoid water at all costs.
- Secure the Skewers: Take a wooden skewer and dip one end about half an inch into the melted chocolate. This little chocolate “glue” helps secure the strawberry more firmly.
- Insert the Skewer: Carefully insert the chocolate-dipped end of the skewer into the top, hard part of a strawberry, where the green leaves meet the fruit. Push it in far enough to feel secure, but not so far that it pokes through the other side of the berry. Hold the strawberry by its green cap.
- Dip the Strawberry: Holding the skewer, gently dip the entire strawberry into the melted chocolate. Tilt the bowl as needed to get full coverage.
- Tap Off Excess Chocolate: Lift the strawberry from the chocolate and gently tap the skewer against the edge of the bowl. This allows any excess chocolate to drip off, ensuring a smooth, even coating without thick puddles at the bottom.
- Decorate Immediately: While the chocolate is still wet, hold the strawberry over a bowl of sprinkles and gently rotate it, allowing the sprinkles to adhere. For white chocolate drizzles, you might wait a minute or two for the base chocolate to slightly firm up, then drizzle with a piping bag or a fork.
- Allow to Set: Carefully insert the skewer into your styrofoam block. The styrofoam will hold the strawberries upright, allowing the chocolate to set without creating flat spots. Space them out enough so they don’t touch.
- Repeat: Continue this process for all your strawberries.
- Setting Time: Allow the chocolate to set completely. This can take 15-30 minutes at room temperature, or you can place the styrofoam block in the refrigerator for about 10-15 minutes to speed up the process. Ensure they are fully firm before moving to assembly.
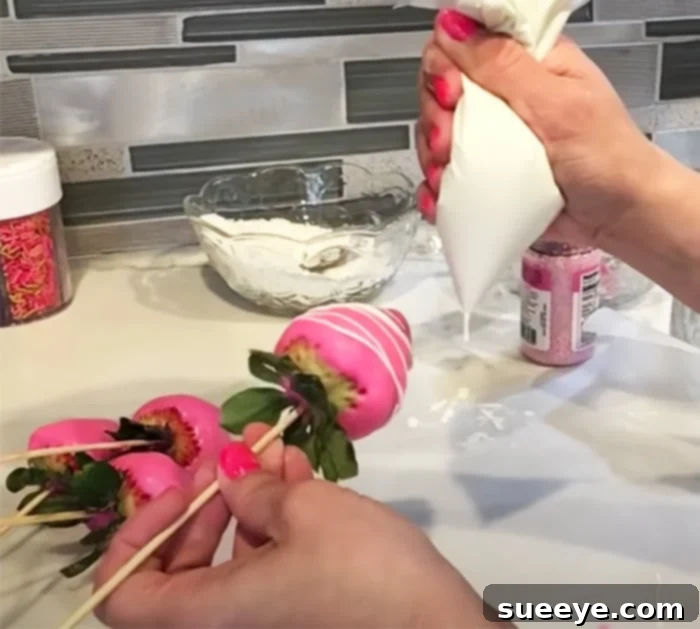
For a visual guide and additional tips on the dipping process, we highly recommend watching the full tutorial by Maribel TV on YouTube. Their detailed demonstration can provide further clarity on achieving perfectly coated berries.
Phase 2: Assembling Your Stunning Bouquet
Once your chocolate-covered strawberries are firm and ready, it’s time to arrange them into an eye-catching bouquet. This is where the presentation comes together.
- Prepare Your Wrapping Paper: Take your chosen decorative paper (tissue paper, cellophane, or wrapping paper). The quantity and size depend on how large and full you want your bouquet to appear. For a standard bouquet, you might start with two large sheets. Fold each sheet in half, either lengthwise or diagonally, depending on the desired shape and how much paper you want to show. If using two different kinds of paper, stack them, ensuring the outer wrapping paper is long enough to cover the sticks effectively and create a dramatic flair. You can also accordion-fold or crumple the paper slightly to add volume.
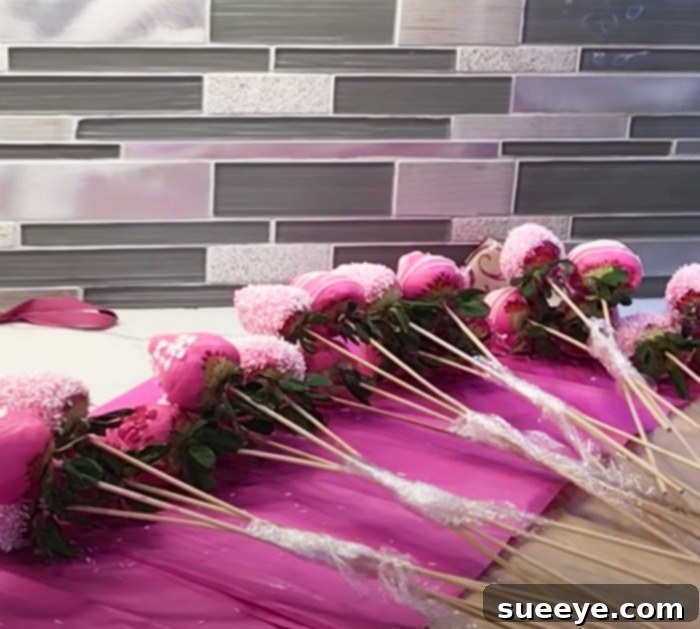
- Create Berry Clusters: Gather a few of your chocolate-covered strawberry skewers (e.g., 3-5 berries) and arrange them into a small, tight cluster. Use a piece of plastic wrap to tightly bind the sticks together near the bottom. This creates smaller, stable units that are easier to manage and arrange. Repeat this process until all your strawberries are in clusters.
- Combine Clusters into a Bouquet: Begin to combine your smaller strawberry clusters. Hold them together in one hand, varying the heights slightly to create a more natural, dynamic bouquet shape. You can have some berries higher and some lower to add dimension.
- Secure the Main Bouquet: Once you’re satisfied with the arrangement of your strawberry clusters, use a larger piece of plastic wrap or some floral tape to securely bind all the skewers together. Ensure they are held tightly at the “stem” base so the bouquet remains stable and doesn’t fall apart.
- Wrap with Decorative Paper: Carefully place your securely bundled strawberry skewers onto your prepared decorative paper. Gently wrap the paper around the base of the bouquet, forming a cone or cylinder shape. Arrange the paper so it flares out elegantly, concealing the skewers and enhancing the overall presentation. You might need to adjust and pleat the paper to get the desired look. Use clear tape or a decorative ribbon to secure the paper wrapping around the “stem” base.
- Add Finishing Touches: You can tie a beautiful ribbon around the base of the wrapped bouquet, add a personalized tag, or even tuck in a few artificial leaves or small floral accents for an extra touch of sophistication.
Troubleshooting Tips for Perfect Results
Even with the best intentions, a few challenges might arise. Here are some common issues and how to overcome them:
- Chocolate Not Sticking: This is almost always due to cold or wet strawberries. Ensure berries are at room temperature and absolutely dry.
- Chocolate Too Thick: If your candy melts are too thick, add a tiny amount of vegetable shortening or coconut oil (1/4 teaspoon at a time) and stir well until desired consistency is reached.
- Chocolate Blooming: This appears as white streaks or dullness on the chocolate, usually due to rapid temperature changes. While less common with candy melts, if using real chocolate, temper it properly and avoid extreme refrigeration after dipping.
- Strawberries Sliding Off Skewers: Ensure the skewer is inserted firmly into the tough green cap area, and use that initial dip of chocolate to act as a “glue.”
Storage and Enjoyment
To keep your chocolate covered strawberry bouquet fresh and delicious, store it in the refrigerator. Place the entire bouquet upright in a container or vase to prevent the berries from touching. It’s best enjoyed within 1-2 days of creation for optimal freshness and taste. When serving, allow the bouquet to sit at room temperature for about 15-20 minutes to let the chocolate soften slightly, enhancing its flavor and texture.
The Sweet Reward of a Handmade Gift
Overall, crafting a chocolate covered strawberry bouquet is an incredibly rewarding experience. It’s not just about the delicious outcome; it’s about the joy of creating something beautiful with your own hands, infusing it with personal thought and care. This romantic and elegant gift is perfect for expressing affection, celebrating milestones, or simply brightening someone’s day.
By making it yourself, you not only save money but also gain the freedom to design it exactly how you envision, making it truly special and unique. The ability to personalize every detail, from the vibrant colors to the sparkling sprinkles, ensures that your bouquet will leave a lasting impression. So, gather your ingredients, unleash your creativity, and embark on the delightful journey of creating an edible masterpiece that will surely be adored.