
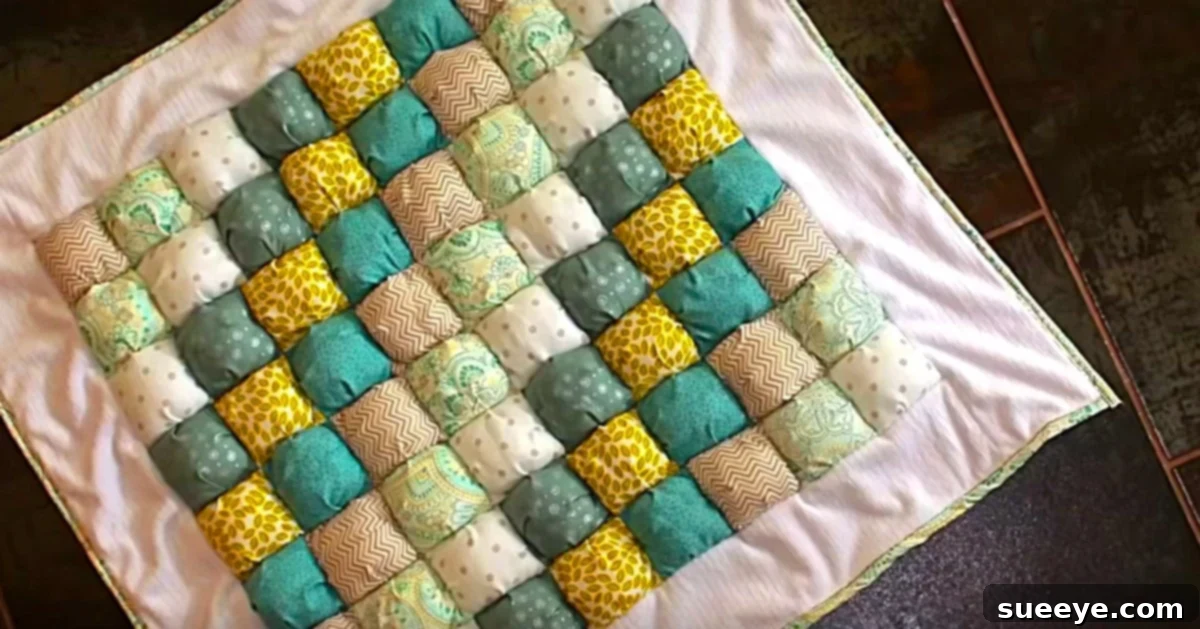
Cozy Comfort: How to Sew a Beautiful DIY Puff Quilt from Scrap Fabric
There’s a special kind of magic in quilting, a comforting rhythm that brings warmth not just to our homes but also to our hearts. While the passion for quilting burns brightly all year long, there’s something particularly enchanting about diving into a new sewing project after the New Year. It’s the perfect time to refresh your living space, infuse it with new energy, and embrace the promise of a fantastic year ahead. Our mission for this year is to transform our homes into havens of coziness, and what better way to achieve this than with a truly unique, handmade creation? This journey led us to discover the delightful puff quilt, an incredibly rewarding project that’s perfect for utilizing that precious stash of scrap fabric you’ve been saving.
Imagine the satisfaction of transforming a collection of treasured fabric remnants, each holding memories of past projects, into a luxurious and inviting throw. A puff quilt, often lovingly referred to as a “biscuit quilt,” is the ultimate scrap-buster. Its distinctive three-dimensional design means even the smallest fabric pieces can be incorporated, giving new life to bits and bobs that might otherwise go unused. We all have those vintage fabrics, charming fat quarters picked up during a fantastic sale, or even tiny scraps from baby clothes that we simply can’t bear to part with. This project is the ideal canvas for them, allowing you to create a personalized piece that radiates warmth and character, making your home feel incredibly cozy and bright.
Why a Puff Quilt is Your Next Must-Sew Project
Puff quilts stand out for several compelling reasons. Firstly, their plush, cushioned texture offers unparalleled warmth and comfort, making them absolutely perfect for snuggling up on chilly evenings. The individual “puffs” create pockets of air that trap heat, making these quilts surprisingly effective insulators. Secondly, they are incredibly forgiving and surprisingly straightforward to construct, even for those new to quilting. The individual “biscuits” are sewn separately, stuffed, and then joined together, simplifying the process and making it less intimidating than traditional quilting methods that involve complex patterns and precise piecing.
Beyond their practicality, puff quilts are also stunning decorative pieces, instantly adding a touch of whimsical charm and homemade appeal to any room. They are visual storytellers, each fabric scrap a whisper of a past project, woven into a beautiful new narrative. Our inspiration for this particular project came from a desire to create something truly special for a loved one’s bedroom. After browsing countless ideas for a unique and cozy quilt, we stumbled upon a fantastic YouTube tutorial for a puff quilt. Its inviting aesthetic and apparent ease of construction immediately captivated us. We knew right away this was the perfect design to combine our beloved fabric scraps with a functional and beautiful outcome. The thought of transforming those forgotten remnants into a vibrant, textural masterpiece was incredibly exciting. Let’s gather our materials and embark on this wonderful creative journey together!
Essential Materials for Your Puff Quilt Adventure
Before diving into the sewing, it’s crucial to gather all your supplies. The beauty of a DIY puff quilt lies in its flexibility, allowing you to work with what you have. Here’s a comprehensive list to ensure you’re prepared:
- Fabric Scraps: This is the star of the show! Gather a wide variety of cotton fabrics, flannel, or even soft blends. You’ll need two squares per puff: one for the top (e.g., 5×5 inches) and one for the bottom (e.g., 5.5×5.5 inches, to allow for the puff). The more variety, the more character your quilt will have. Don’t be afraid to mix patterns, colors, and textures for a truly unique look that reflects your personality and style.
- Stuffing/Batting: Polyester fiberfill (the kind used for pillows) is ideal for giving your puffs their plump, soft volume. Alternatively, you can use small scraps of batting or even fabric trimmings as stuffing, further reducing waste and giving your quilt an even more eco-friendly touch.
- Coordinating Thread: Choose a high-quality all-purpose polyester thread that matches or complements your fabric palette. Strong thread ensures the longevity of your quilt.
- Sewing Machine: A basic sewing machine is all you need. Ensure it’s in good working order and you have a fresh, sharp needle suitable for quilting (e.g., an 80/12 or 90/14 universal needle).
- Basic Quilting Tools:
- Rotary Cutter, Mat, and Ruler: Essential for precise and efficient fabric cutting, which is key for uniform puffs.
- Fabric Scissors: For any intricate cuts or trimming threads.
- Pins or Fabric Clips: To hold your fabric pieces securely in place, especially when working with multiple layers or pleats.
- Seam Ripper: Every quilter’s best friend – for those inevitable oops moments! Don’t be afraid to use it.
- Iron and Ironing Board: Crucial for crisp seams and a professional finish throughout the entire process.
- Border Fabric (Optional but Recommended): A continuous strip of fabric for the border adds a polished frame to your quilt and helps to define its edges.
- Binding Fabric: Strips of fabric used to finish the raw edges of the quilt, giving it a neat and durable perimeter that protects it from fraying.
- Backing Fabric: While some puff quilts simply use the bottom squares of the puffs as the back, a separate backing fabric can add another layer of warmth, enhance durability, and provide a more cohesive finish, especially for larger quilts. Choose a soft, comfortable fabric like flannel for extra snuggle factor.
Step-by-Step Guide to Crafting Your Puff Quilt
Creating a puff quilt is a meditative and enjoyable process. It’s broken down into manageable steps, making it perfect for an engaging weekend project or a series of relaxing crafting sessions. Follow these detailed steps to bring your cozy masterpiece to life:
Step 1: Preparing Your Fabric Puffs (e.g., 128 Puffs for a Throw)
The core of your puff quilt lies in these individual “biscuits.” For a medium-sized throw quilt, a target of 128 puffs (as suggested in the original inspiration) creates a lovely dimension and a good size. The exact number will depend on your desired quilt size; you can easily scale up or down. Let’s assume you’re aiming for puffs that finish at approximately 4.5 inches square. To achieve this, you’ll need to cut:
- Top Squares: 128 pieces of fabric, each measuring 5×5 inches. These will be the visible tops of your puffs and will showcase your chosen scrap fabrics.
- Bottom Squares: 128 pieces of fabric, each measuring approximately 5.5×5.5 inches. These slightly larger squares will create the “puff” effect when joined with the smaller top squares and stuffed. Using a solid or consistent fabric for the bottom squares can create a more uniform look on the underside of the quilt.
Take your time with cutting; accuracy here will make assembly much smoother and ensure your puffs are consistently sized. Press all your fabrics flat before cutting to ensure crisp edges and eliminate any wrinkles.
Step 2: Constructing Each Individual Puff
This is where the magic begins, turning flat fabric into plush, three-dimensional forms! For each puff, follow these careful steps:
- Place one 5×5 inch top square on top of one 5.5×5.5 inch bottom square, ensuring the right sides of both fabrics are facing up. Center the smaller top square on the larger bottom square, so the bottom square extends evenly beyond the top square on all four sides. This excess fabric is crucial for creating the puff.
- To create the puff shape, you’ll make small pleats. Pinch and fold the excess fabric of the larger bottom square to create a small pleat at each of the four corners of the top square. Secure these pleats in place with pins or fabric clips. This technique creates the gathers that allow the puff to form its characteristic dome.
- Sew the two squares together with a precise 1/4-inch seam allowance around all four edges. Crucially, remember to leave a 1.5 to 2-inch opening along one side of the sewn square. This opening will be used for stuffing. Make sure to backstitch at the beginning and end of your seam for added security, especially around the opening.
- Before turning, carefully clip the corners of the sewn squares at a diagonal. This step reduces bulk in the corners and helps them turn out more sharply and neatly. Be extremely careful not to cut through your stitching line.
- Turn the sewn square right side out through the opening you left. Use a blunt tool, such as a point turner, a chopstick, or even a knitting needle, to gently push out the corners, ensuring they are as crisp and square as possible.
- Lightly stuff each puff with your chosen polyester fiberfill. Don’t overstuff; you want them plump and soft but not overly firm. The goal is a squishy, biscuit-like feel that offers comfort without being stiff.
- Once stuffed to your liking, carefully hand-stitch the opening closed. A ladder stitch (or invisible stitch) is excellent for an almost imperceptible finish. Alternatively, you can machine-stitch the opening closed very close to the edge, though this will be more visible.
Repeat this detailed process for all 128 puffs (or however many you require)! It might seem tedious at first, but it quickly becomes a wonderfully repetitive and meditative task, perfect for listening to a podcast, audiobook, or your favorite music.
Then I sewed all the puffs together
With all your individual puffs created and stuffed, it’s time to bring your quilt to life by assembling the quilt top! This is where your chosen design truly begins to take shape. First, lay out your puffs on a clean floor or a large table to arrange them in your desired pattern. Experiment with color, pattern, and fabric placement until you achieve a visually pleasing design. For 128 puffs, a common layout might be 8 rows of 16 puffs or 16 rows of 8 puffs, depending on your preferred orientation and the final dimensions you envision for your quilt. Once you are completely satisfied with the arrangement:
- Working systematically in rows, take two adjacent puffs and place them right sides together, aligning their edges carefully.
- Sew them together using a consistent 1/4-inch seam allowance. Continue adding puffs to form complete rows. It’s often helpful to chain piece them (sewing one after another without breaking the thread in between) to save time.
- Once all individual rows are assembled, take two completed rows and place them right sides together, aligning the seams where the puffs meet. Use pins generously at each seam intersection to ensure perfect alignment.
- Sew these rows together with a 1/4-inch seam allowance. Continue joining rows until your entire quilt top is fully assembled. After sewing, carefully press your seams open or to one side to reduce bulk and help the quilt lay flat.
Then I Added the border fabric
Adding a border to your puff quilt provides a beautiful frame and a professional, finished look. It also helps to stabilize the edges of your quilt top and can add extra size, bringing it closer to your desired final dimensions. Choose a fabric for your border that either complements the existing colors in your puffs – perhaps a solid color that brings out the vibrancy of your scraps – or a subtle pattern that adds visual interest without overwhelming the unique texture of the puffs themselves. To attach the border:
- Measure the length of your quilt top along two opposite sides. Cut two strips of your chosen border fabric to these exact lengths, plus your standard seam allowances (typically 1/4 inch on each end). The width of your border strips can be anywhere from 2 to 6 inches, depending on your aesthetic preference and how prominent you want the frame to be.
- Pin one border strip to one side of the quilt top, ensuring right sides are together and raw edges are perfectly aligned. Sew with a consistent 1/4-inch seam allowance. Repeat this for the opposite side. Once sewn, press the seams open or towards the border fabric to create a smooth finish.
- Now, measure the new length of the quilt top (which now includes the two attached side borders) along the remaining two opposite sides. Cut two more border strips to these new, longer lengths, again adding seam allowances.
- Pin and sew these final two border strips to the remaining sides of the quilt. Press seams carefully. Your quilt top now has a beautiful, complete border that frames your puff design perfectly.
Step 5: Preparing for Binding (Backing and Batting considerations)
While puff quilts are unique in that the “puff” itself provides much of the loft and warmth, traditionally, quilts have a backing and sometimes an additional layer of batting. For puff quilts, these considerations are slightly different:
- Backing: You can simply use the bottoms of your puffs as the back, especially if they are a consistent color or pattern that you find appealing. However, for a more robust, polished, and comfortable quilt, you might choose to add a separate backing fabric. If you opt for this, cut your backing fabric a few inches larger than your quilt top on all four sides. This extra allowance helps in squaring up and ensures you don’t run short.
- Batting: Most puff quilts do not strictly require an additional layer of batting because the fiberfill inside each puff provides ample warmth and loft. Adding another layer of batting can make the quilt exceptionally heavy and stiff. If you choose to add a thin layer for extra stability or warmth, place it between your quilt top and backing, making sure it’s also a few inches larger than your quilt top. For typical puff quilts, this step is often skipped.
If you’re adding a separate backing (and optional batting), layer them: place the backing fabric wrong side up, then the batting (if using), and finally your quilt top right side up. Ensure all layers are flat and smooth. Pin all layers together securely, particularly around the edges and through the quilt body. Because the puffs are already dimensional, extensive traditional quilting through all layers (like complex stitch patterns) isn’t usually necessary. You might simply stitch in the ditch around the border or along some of the main puff seams for added stability, but often the binding is the final structural element after the puffs are joined.
Then I sewed on the binding
Binding is the final, essential step that gives your puff quilt a clean, durable, and professional edge. It encases the raw edges of your quilt, protecting them from wear and tear and giving your finished piece a truly polished look. Choose a binding fabric that complements your border and puffs, or one that adds a striking contrast to make the edges pop.
- Prepare Your Binding Strips: You’ll need enough binding strips (typically cut 2.5 inches wide, sewn together end-to-end with diagonal seams to create one long continuous strip) to go around the entire perimeter of your quilt. Add about 10-12 inches extra for joining the ends neatly. Once your long strip is sewn, press it in half lengthwise, wrong sides together, to create a double-fold binding.
- Attach the Binding to the Front: Starting somewhere in the middle of one side of your quilt (avoid starting at a corner), align the raw edge of your folded binding strip with the raw edge of the quilt top. Leave a tail of about 6-8 inches unbound. Pin the binding strip all around the perimeter of the quilt. When you reach a corner, stop sewing 1/4 inch from the corner, backstitch, remove from the machine. Fold the binding strip straight up at a 45-degree angle, then fold it back down to align with the raw edge of the next side, creating a perfect mitered corner. Pin in place and continue sewing.
- Sew the Binding: Stitch the binding to the quilt with a consistent 1/4-inch seam allowance. When you get back to your starting point, stop a few inches before the initial tail, join the two tails together (using a diagonal seam for an invisible finish), trim the excess, and finish sewing the binding down securely.
- Finish the Binding to the Back: Flip the quilt over. Wrap the folded binding strip around to the back of the quilt, ensuring it completely covers the raw edge and the seam allowance you just created. You can either hand-stitch the binding down for an invisible, heirloom-quality finish or machine-stitch it from the front for a quicker, more visible result (often called stitch-in-the-ditch on the front). Ensure your stitches catch the back of the binding securely.
Once the binding is complete, take a step back and admire your handiwork! This quilt looks absolutely amazing when finished and provides unparalleled warmth and coziness during the colder months, a true testament to your creativity and dedication. It’s ready to be loved and cherished for years to come.
Design Tips and Creative Flair for Your Puff Quilt
While the basic construction of a puff quilt is straightforward, there’s immense room for personal expression in its design. This is where you can truly make your quilt unique and reflect your individual style. Consider these elements to infuse your quilt with creative flair:
- Color Palette: Before you begin cutting, decide on your overall color scheme. Do you want a vibrant, eclectic mix of colors from all your scraps for a bohemian look? Or perhaps a more coordinated scheme using blues and greens, or warm tones like reds and oranges? A monochromatic look with varying shades of a single color can also be stunningly sophisticated.
- Fabric Selection: Cotton is a classic choice for quilting, providing durability and ease of sewing. However, flannel makes for an even softer, warmer puff, perfect for a snuggly winter quilt. You can also experiment with different textures for some puffs, such as corduroy, minky, or even velvet for a touch of luxury. Just be mindful of their stretch and thickness, as they might require a slightly different sewing approach.
- Puff Size: While 5×5 inches is a common starting point for individual puffs, you can easily adjust their size. Larger puffs mean fewer to make for the same quilt size, but they will be chunkier and potentially heavier. Smaller puffs offer more intricate detail and can be ideal for baby quilts or smaller throws.
- Arrangement: Beyond simple straight rows, think about how you want to arrange your puffs. You could create a gradient effect with colors transitioning across the quilt, a classic checkerboard pattern, or even a more abstract and random layout that celebrates the diversity of your scrap collection. Laying them out on the floor beforehand is crucial for visualizing the final design.
- Border Impact: The border fabric can dramatically change the quilt’s overall look. A wide, contrasting border makes a bold statement and provides a strong frame, while a narrow, coordinating border offers a subtle and elegant finish that lets the puffs take center stage.
- Backing Fabric: If using a separate backing, don’t overlook its potential! Choose a fabric that is soft and luxurious, like minky or a soft cotton flannel, to enhance the quilt’s cuddle factor. A playful print on the back can also add an unexpected element of fun.
Tips for a Smooth and Enjoyable Quilting Experience
Even for experienced quilters, some projects offer unique challenges or require specific considerations. Here are a few tips to ensure your puff quilt project is as enjoyable and successful as possible, helping you avoid common pitfalls and enhance your crafting journey:
- Pre-wash Fabrics: Especially if you’re mixing different types of fabrics (e.g., cotton with flannel) or if you’re unsure about their colorfastness, pre-washing all your fabrics will prevent potential shrinkage and color bleeding after the quilt is finished and washed for the first time.
- Sharp Tools: A sharp rotary cutter blade makes a huge difference in cutting accuracy and efficiency, preventing frayed edges. Similarly, a fresh sewing machine needle (changed after every project or every 8-10 hours of sewing) ensures smooth stitching and prevents skipped stitches or fabric damage.
- Press, Don’t Iron: When working with fabric, especially during piecing, you generally want to “press” your seams (lifting and placing the iron down firmly) rather than “ironing” (gliding the iron back and forth). Ironing can stretch and distort your fabric, especially on the bias, leading to wavy seams.
- Consistent Stuffing: Try to maintain a consistent amount of stuffing in each puff. This will ensure a uniform look and feel across the entire quilt, preventing some puffs from looking deflated and others overly firm. A small kitchen scale can help if you want to be extremely precise.
- Patience is a Virtue: This project involves a fair amount of repetitive work, particularly when making the individual puffs. Break it down into smaller, manageable tasks. Take breaks when you feel tired or frustrated, and remember to enjoy the process of creating. It’s a journey, not a race.
- Embrace Imperfection: Handmade items inherently have character and charm that machine-made items often lack. Don’t strive for absolute factory perfection; focus on the joy of creating something beautiful and unique with your own hands. Any small quirks will only add to the story of your quilt.
Your Completed DIY Puff Quilt: A Treasure of Warmth and Memories
And there you have it – a magnificent DIY puff quilt, born from your creativity and a stash of beloved fabric scraps! This isn’t just a blanket; it’s a testament to your ingenuity, a collection of memories woven into a tangible piece of art. Imagine draping it over a sofa, providing a vibrant splash of color and texture in your living room. Envision snuggling under its plush warmth on a crisp morning with a cup of coffee, or gifting it to a loved one as a truly heartfelt, handmade present that speaks volumes of your care and effort. Each individual “biscuit” tells a story, and together they create a rich narrative of comfort, resourcefulness, and love.
The unparalleled warmth and luxurious texture of a finished puff quilt make it an instant family favorite, especially when winter winds blow. It’s more than just home decor; it’s an invitation to relax, to feel secure, and to cherish the simple joys of a cozy home. It stands as a beautiful reminder that even the smallest fragments can come together to create something extraordinary. So go ahead, unleash your inner quilter, and transform those forgotten fabric remnants into a cherished heirloom that will be admired and loved for years to come. Happy quilting!