
Master the Blooming Flower Quilt Block: A Detailed Tutorial for Stunning Quilts
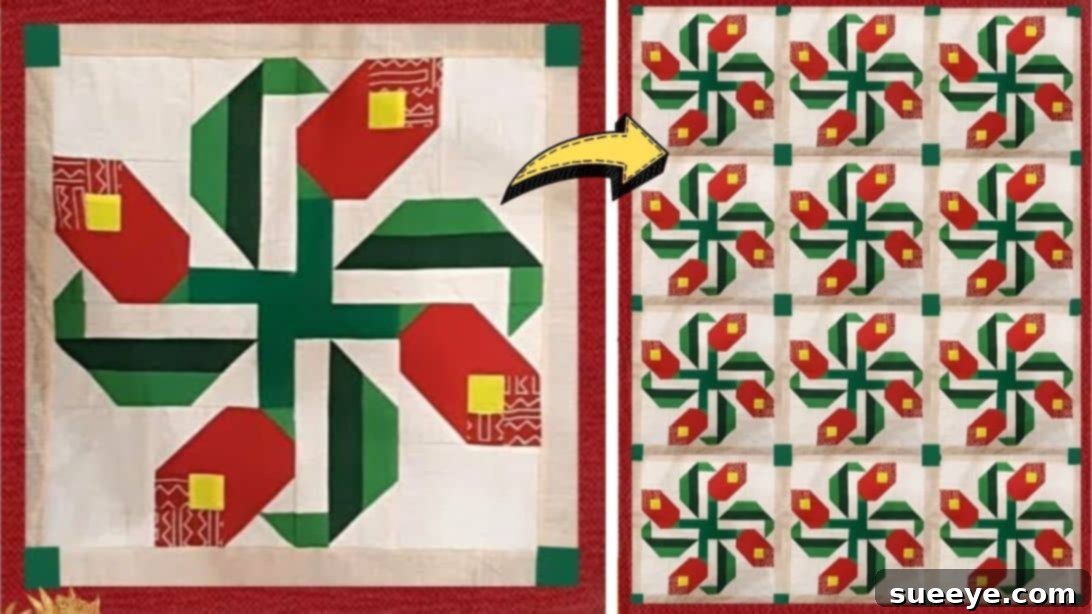
Embark on a captivating journey into the world of quilting with the enchanting Blooming Flower Quilt Block! This inspiring project, skillfully demonstrated by Anjatas Creation on YouTube, promises to ignite your creativity and sharpen your sewing skills. While its intricate design might initially suggest a challenging endeavor, you’ll be pleasantly surprised by how smoothly and enjoyably this block comes together. Perfect for quilters seeking a rewarding project that yields truly spectacular results, this tutorial will guide you through every precise cut and careful stitch. Get ready to transform various fabric pieces into a gorgeous floral masterpiece that will add a touch of elegance to any quilt. Dive in, challenge yourself, and experience the immense satisfaction of bringing this beautiful blooming flower to life!
Discover the Blooming Flower Quilt Block: A Rewarding Quilting Project
The Blooming Flower Quilt Block is more than just a pattern; it’s an opportunity to create something truly special with your own hands. Its vibrant visual appeal makes it an ideal choice for a focal point in larger quilts, charming wall hangings, decorative table runners, or even a unique gift. This block’s design creates a wonderful illusion of depth and movement, resembling a flower gracefully unfolding. We’ve broken down the process into easy-to-follow steps, ensuring that both experienced quilters and those relatively new to the craft can achieve stunning results. Prepare your workspace, gather your materials, and let’s begin crafting a beautiful piece of textile art.
Essential Fabric Requirements for Your Blooming Flower Quilt Block
Accurate fabric selection and precise cutting are the foundation of a successful quilt block. For this Blooming Flower design, we’ll be working with a variety of colors to achieve its distinctive floral appearance. Below is a detailed list of the fabric pieces you’ll need. We recommend using high-quality cotton fabrics, as they are easy to work with and provide a beautiful finish. Remember to press your fabrics before cutting to ensure they are flat and free of wrinkles, which contributes significantly to accuracy.
White Fabric
- 4 pieces @ 1½ x 5½ inches
- 4 pieces @ 3½ x 4½ inches
- 12 pieces @ 2½ x 2½ inches
- 2 pieces @ 2⅜ x 2⅜ inches
- 2 pieces @ 1⅞ x 1⅞ inches
Red Fabric
- 4 pieces @ 2½ x 4½ inches
- 2 pieces @ 2⅞ x 2⅞ inches
Red Patterned Fabric
- 4 pieces @ 1½ x 2½ inches
- 4 pieces @ 1½ x 1½ inches
Green Fabric
- 4 pieces @ 1½ x 6½ inches
Light Green Fabric
- 4 pieces @ 1½ x 6½ inches
- 4 pieces @ 1½ x 1½ inches
- 2 pieces @ 1⅞ x 1⅞ inches
Medium Green Fabric
- 4 pieces @ 1½ x 3½ inches
Yellow Fabric
- 4 pieces @ 1½ x 1½ inches
Necessary Quilting Supplies: Tools for Success
Having the right tools makes all the difference in achieving precise cuts and perfect seams. Before you begin sewing, ensure you have all the necessary supplies readily available. A well-organized workspace, equipped with these essentials, will streamline your quilting process and make the experience much more enjoyable.
- Pencil, pen, or chalk (for marking lines on fabric)
- Fabric pins (to hold pieces securely during sewing)
- Ruler (a clear acrylic quilting ruler is highly recommended for accuracy)
- Scissors or rotary cutter and a cutting mat (a rotary cutter offers speed and precision, especially for straight lines)
- Needle and thread (for hand-stitching or your sewing machine)
- Iron, for pressing (crucial for flat seams and accurate block construction)
- Sewing machine (ensure it’s in good working order and has a ¼-inch presser foot)
Step-by-Step Directions: Crafting Your Blooming Flower Quilt Block
Follow these detailed instructions to construct your beautiful Blooming Flower Quilt Block. Take your time with each step, paying close attention to measurements and pressing techniques, as these are key to a professional-looking finish.
Step 1: Preparing Your First Units – Yellow, Red Patterned, White, and Green Squares
Begin by taking one 1½ x 1½-inch yellow square and one 1½ x 1½-inch red patterned square. Place them right sides together, aligning one of their sides perfectly. Stitch along this aligned side using a precise ¼-inch seam allowance. Once sewn, press the seam open to reduce bulk and ensure the unit lays flat. Carefully trim this combined unit into a 2½-inch square. Repeat this process for all four yellow and red patterned square pairs, creating four identical 2½-inch square units. Set these aside.
Next, take two 2½ x 4½-inch red rectangles. For the first red rectangle, place one 2½ x 2½-inch white square onto its left end, right sides together. Then, take one 1½ x 1½-inch light green square and place it on the upper right corner of the same red rectangle, also right sides together. With a pencil, pen, or chalk, draw a diagonal line from corner to corner across both the white and the green squares. Stitch carefully along these marked diagonal lines. After sewing, trim off the excess fabric ¼ inch away from each stitching line. This technique, often referred to as “snowballing” or “corner-to-corner” method, creates clean, crisp points.
Step 2: Constructing Triangle Units and Combining Colors
Once the units from Step 1 are sewn and trimmed, press them open to reveal the white and light green corners. Ensure all edges are nice and straight. Repeat this entire process to create a total of four such units, then set them aside carefully. These form the initial building blocks of your flower petals.
Now, let’s work on the central triangle components. Take one 1⅞ x 1⅞-inch white square and one 1⅞ x 1⅞-inch light green square. Cut both of these squares in half diagonally from corner to corner. You will now have four white triangles and four light green triangles. Mix their colors: take one white triangle and one light green triangle. Place their straight edges together, aligning them precisely in the center, and sew them together to form a single combined triangle unit. Press these units nicely, ensuring the seams are flat. Trim any uneven edges for a clean finish.
Finally, take one 2⅜ x 2⅜-inch white square and cut it in half diagonally. These two white triangles will be joined with the existing green fabric (likely the 1½ x 6½ inch green strips, or another prepared green triangle unit from earlier steps – refer to the video for visual clarity on this specific join). Align the straight edge of one white triangle with the straight edge of a green fabric piece, right sides together, and sew. Press the seam open and trim the unit to its final size, creating a larger triangle block that incorporates both white and green elements.
Step 3: Completing the Square Units and Assembling the Block
For the next set of units, take one 2⅞ x 2⅞-inch red fabric square. Cut this square diagonally from corner to corner, yielding two red triangles. These red triangles will be combined with the triangle units you just created in Step 2. Carefully align one red triangle with a completed triangle unit (the one incorporating white and green), right sides together, and sew them to form a square. Give these newly formed squares a good press to flatten the seams. Once pressed, precisely trim these units into 2½-inch squares. Repeat this process until you have a total of four such units, then set them aside. These units, along with those from previous steps, are now ready for final assembly.
With all your individual units prepared and meticulously trimmed, the exciting phase of assembling the complete block begins. Refer to the Anjatas Creation video tutorial for a visual guide on how to arrange and stitch these pieces together systematically. Assemble the units row by row or in quadrants, carefully pinning and sewing each seam with a consistent ¼-inch allowance. Remember to press your seams frequently as you go; pressing after each seam helps ensure the block remains flat and square, preventing distortion. Once the central block is complete, the final touch is to add the border fabric, as desired. Stitch the border strips to the edges of your finished block, press the seams outward, and give the entire block a final, thorough pressing. From this point, you can quilt it in any style you prefer, adding your personal flair to this beautiful blooming flower design.
Why Choose the Blooming Flower Quilt Block for Your Next Project?
The Blooming Flower Quilt Block offers several compelling reasons to become your next favorite quilting project. Its intricate appearance belies a construction that is surprisingly accessible once you understand the technique, making it incredibly satisfying to create. The design lends itself beautifully to various color palettes, allowing for endless creative interpretations – from subtle pastels to bold, contrasting hues. It’s an excellent way to practice precision cutting, half-square triangles, and accurate seam allowances, enhancing your overall quilting proficiency. Beyond its technical benefits, the visual appeal of a blooming flower brings warmth, charm, and a touch of natural beauty to any finished quilt, making it a cherished heirloom or a thoughtful, handmade gift.
Expert Quilting Tips for a Flawless Finish
Achieving a perfectly pieced quilt block is all about attention to detail. Here are some invaluable tips to help you succeed with your Blooming Flower Quilt Block and future quilting endeavors:
-
Precision is Paramount
Always measure twice and cut once. Use a sharp rotary cutter and a non-slip ruler to ensure all your fabric pieces are exactly the required size. Even a tiny deviation can lead to blocks that don’t fit together perfectly, causing frustration down the line.
-
Master the Art of Pressing
Pressing is not ironing. When quilting, pressing means gently placing the iron down and lifting it, rather than sliding it across the fabric. Press seams open or to one side consistently to minimize bulk and ensure your blocks lay flat and square. Pressing after each seam is a game-changer for accuracy.
-
Invest in Quality Tools
Good tools make quilting easier and more enjoyable. A reliable sewing machine, a precise ¼-inch presser foot, a good cutting mat, and a sharp rotary cutter are essential. Quality fabric pins and a clear acrylic ruler will also contribute significantly to your success.
-
Embrace Your Fabric Choices
Don’t be afraid to experiment with different fabric combinations. While this tutorial uses specific colors, consider how varying prints and textures could bring a unique personality to your blooming flower. Auditioning fabrics before cutting can help you visualize the final outcome.
-
Patience and Practice
Quilting is a journey, not a race. Take your time with each step, especially if you’re learning new techniques. If a seam isn’t perfect, don’t hesitate to unpick it and re-sew. Practice makes perfect, and every stitch contributes to your growing skill.
Beyond the Block: Finishing Your Quilt Project
Once your beautiful Blooming Flower Quilt Block is complete, the possibilities are endless! You can create multiple blocks to form a larger quilt top, combine them with sashing and borders for a grand design, or even use a single block as the centerpiece for a smaller project like a cushion cover or a placemat. Remember to consider adding batting and backing fabric, then choose your preferred quilting method – whether it’s intricate free-motion quilting, classic straight-line quilting, or charming hand quilting – to secure all layers together. Finally, binding your quilt with a continuous strip of fabric will give it a polished, professional edge.
Care and Maintenance for Your Handmade Quilt
To ensure your Blooming Flower Quilt remains beautiful for years to come, proper care is essential. Generally, machine wash quilts in cold water on a gentle cycle with a mild detergent. Avoid harsh chemicals or bleach. Tumble dry on low heat or, ideally, air dry flat to prevent stretching and preserve the integrity of the stitches. Store your quilt folded or rolled in a clean, dry place away from direct sunlight to prevent fading. With gentle care, your handmade masterpiece will continue to bring joy and beauty to your home.
Embrace Your Creativity with Anjatas Creation
We hope this detailed guide empowers you to successfully create your own stunning Blooming Flower Quilt Block. The blend of intricate design and achievable steps makes this an incredibly rewarding quilting experience. Don’t forget to visit Anjatas Creation on YouTube for the original video tutorial, where you can see each step in action and explore more of her wonderful quilting projects. Happy quilting, and enjoy the beauty you create!
*All image credit belongs to Anjatas Creation via YouTube. Follow and subscribe to her channel for more inspiring quilting tutorials!