
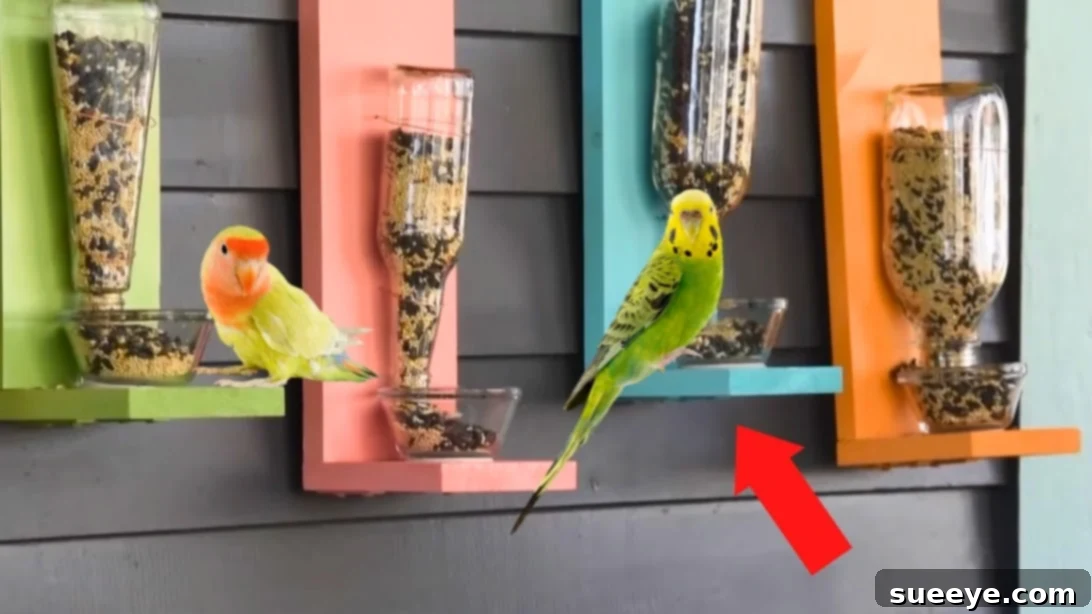
Craft a Charming DIY Bird Feeder from Recycled Materials
There’s a special kind of magic in watching birds flit and soar through the sky. Their vibrant colors and melodious songs bring a sense of peace and connection to nature right into your backyard. If you, like me, find immense joy in these feathered visitors, then creating a dedicated space for them is a truly rewarding endeavor. This passion led me to discover a brilliant DIY bird feeder project, inspired by the creative minds at HGTV Handmade, which masterfully utilizes readily available recycled materials like glass bottles and wood scraps. It’s an ingenious way to give old items a new purpose while enriching your garden with a charming, functional piece.
Since placing my handcrafted feeder in the front yard, I’ve been delighted to witness an incredible variety of bird species I hadn’t seen before. From tiny finches to robust cardinals, they’ve all found a welcoming spot to dine. What’s even better is how simple and quick this project is – it’s a small commitment with a huge payoff, easily completed in just an hour or two. This guide will walk you through every step, ensuring you can replicate this success and transform your outdoor space into a vibrant bird sanctuary. Get ready to embark on a delightful crafting journey that benefits both your home and local wildlife!
Why Build a DIY Bird Feeder?
Beyond the simple pleasure of watching birds, creating your own feeder offers numerous advantages. It’s an incredibly eco-friendly project, as it repurposes materials that might otherwise end up in landfills. This sustainable approach not only reduces waste but also provides a unique, custom-made item that store-bought feeders can’t match. Economically, DIY feeders are far more budget-friendly, utilizing scraps and common household items. Furthermore, the process itself is a therapeutic and engaging activity, perfect for a relaxing afternoon. It’s an opportunity to express your creativity, learn new skills, and foster a deeper connection with the natural world around you. A well-placed feeder can even become an educational tool for children, sparking their interest in ornithology and environmental stewardship.
Materials for Your Eco-Friendly Bird Feeder:
Gathering your materials is the first exciting step in bringing your bird feeder to life. Most of these items are likely already in your garage or recycling bin, making this a truly accessible project. Remember, quality materials will ensure your feeder withstands the elements and serves your avian friends for a long time.
- Scrap Wood: Look for a sturdy piece, ideally treated for outdoor use or naturally rot-resistant. You’ll need enough to cut two specific dimensions for the base and the back support.
- Glass Bottle: A standard wine bottle or a similar glass bottle works perfectly. Ensure it’s clean and label-free. The unique design of the bottle will be central to how the seeds are dispensed.
- Saw: A handsaw, jigsaw, or circular saw will be needed for precise wood cuts. Always prioritize safety when using power tools.
- Small Bowl: Choose a shallow, durable bowl (ceramic, plastic, or metal) that will serve as the feeding tray. It should be wide enough for birds to perch comfortably and access the seeds.
- Construction Glue: Opt for a strong, waterproof adhesive suitable for outdoor use and capable of bonding wood, glass, and the bowl material.
- 2 Pieces of L-Brackets: These will provide crucial support and stability for the feeder’s structure, ensuring it remains robust in varying weather conditions.
- Screws: Wood screws appropriate for the L-brackets and the thickness of your scrap wood. Stainless steel screws are recommended for rust resistance outdoors.
- Tape: Painter’s tape or masking tape will be useful for holding components in place during assembly and drying.
- Marker: For precise marking of cuts and drill holes.
- Ruler: Essential for accurate measurements, ensuring all your pieces fit together perfectly.
- Spray Paint: Your preferred outdoor-grade spray paint. This is your chance to add a touch of personal flair and make the feeder blend with your garden or stand out as a decorative element.
- Wire: A sturdy, flexible wire (e.g., galvanized wire or craft wire) to secure the bottle in place.
- Hook: A strong screw-in hook or eye hook for hanging your completed bird feeder.
- Safety Gear (Recommended): Gloves, safety glasses, and hearing protection, especially when using saws or drills.
Step-by-Step Instructions: Build Your Bird Feeder
Follow these detailed instructions carefully to construct a durable and attractive bird feeder that will be the envy of every bird in your neighborhood.
Step 1: Preparing Your Wood Components
Begin by carefully measuring and cutting your scrap wood. Using your ruler and marker, delineate a rectangle measuring exactly 14.25 inches by 5.5 inches. This larger piece will form the main base of your bird feeder, providing a stable platform. Next, cut a smaller rectangle, measuring 5.5 inches by 5.25 inches. This piece will serve as the vertical back support, against which your bottle will rest. Precision in these cuts is key for a well-aligned and sturdy feeder. Always ensure your saw is sharp and handle it with extreme caution.
Step 2: Assembling the Feeder Base
With your two wood pieces cut, it’s time to join them. Apply a generous, even bead of construction glue along the top edge (the 5.5-inch side) of the smaller rectangular piece. Carefully position this glued edge onto one of the 5.5-inch ends of the larger base rectangle, ensuring it stands perpendicular. Press firmly to create a strong bond. It’s crucial that this joint is secure, as it forms the backbone of your feeder. Allow the glue to cure completely for several hours, or even overnight, following the manufacturer’s instructions. A strong bond here prevents wobbling and ensures longevity.
Step 3: Reinforcing with L-Brackets
Once the glue has thoroughly dried, providing an initial hold, it’s time to add the L-brackets for permanent structural integrity. Position one L-bracket on the bottom right corner of the feeder, where the base meets the vertical support. Use tape to temporarily secure it, ensuring it’s flush and properly aligned. Using a drill, carefully drive screws through the bracket’s holes and into both wood pieces. This creates a powerful mechanical connection. Repeat this process for the left corner, ensuring both sides are equally reinforced. These brackets are vital for preventing the base from separating from the back support, especially when the feeder is loaded with seeds and exposed to the elements.
Step 4: Preparing and Painting the Bottle Support
Now, turn your attention to the vertical back support. Place your glass bottle upside down against this support, with its neck extending towards the longer base piece. Using your marker, carefully mark two points: one at the start of the bottle’s neck (where it begins to narrow) and another just below the bottom of the bottle (where it’s widest). These marks will indicate where the wire needs to secure the bottle. Use your ruler to ensure these marks are centered on the wood. Drill pilot holes at these marked points. After drilling, clean the entire wooden structure and prepare it for painting. Apply an outdoor-grade spray paint in your chosen color, using light, even coats for a smooth finish. This not only enhances its aesthetic appeal but also provides an extra layer of protection against weathering. Allow the paint to dry completely in a well-ventilated area.
Step 5: Attaching the Feeding Bowl
With the paint dry, it’s time to add the feeding bowl. Apply a strong, waterproof construction glue to the bottom rim of your chosen small bowl. Carefully center and press the bowl onto the front edge of the main wooden base, ensuring it sits securely and is level. This bowl will serve as the reservoir for the birdseed, allowing gravity to feed new seeds from the bottle. It’s important to use a durable, weather-resistant glue here, as this part will be exposed to moisture and the pecking of birds. Let the glue dry overnight for maximum strength, ensuring the bowl won’t detach when birds are feeding.
Step 6: Securing the Glass Bottle
Now, take your wire. Thread one end of the wire through the top drilled hole from the front, then loop it around the bottle’s widest point. Thread the other end of the wire through the bottom drilled hole, looping it around the bottle’s neck. This dual-point attachment is crucial for stability. Pull the wires taut against the bottle and the wood. On the backside of the vertical support, twist the wire ends securely together, or use crimps, to hold the bottle firmly in place. Ensure the bottle is snug but not so tight that the glass is stressed. Trim any excess wire, making sure no sharp ends are exposed that could harm the birds. The bottle should now be securely anchored to the feeder structure, ready to dispense seed.
Step 7: Adding the Hanging Mechanism
For hanging your feeder, select a sturdy hook that can support the weight of the feeder when it’s full of birdseed. Screw the hook securely into the very top center of the vertical back support. Ensure it’s twisted in deep enough to be stable, as this single point will bear the entire weight. Test its strength by gently pulling on it. A strong hook is essential for preventing your feeder from falling, especially during windy conditions or when multiple birds visit.
Step 8: Fill, Hang, and Enjoy Your DIY Bird Feeder!
Your beautiful, handcrafted bird feeder is now complete! Turn the bottle right-side up and fill it with your preferred birdseed. Then, carefully invert the bottle back into its wired position, ensuring the seeds flow into the small bowl. Hang your feeder in a visible yet safe location in your garden. Consider a spot that’s easily viewable from a window, but also offers some protection from predators and harsh weather. Within hours, you might start noticing curious birds investigating their new dining spot. Sit back, relax, and savor the delightful spectacle of nature coming alive in your backyard, thanks to your creative efforts.
Maximizing Your Bird Feeder Experience
Choosing the Best Location
The placement of your DIY bird feeder is crucial for its success and the safety of your feathered friends. Aim for a location that offers protection from predators like cats and squirrels. Hanging it near thorny bushes or on a pole with a baffle can deter unwanted visitors. Ensure it’s not too close to windows to prevent collisions. A spot within a few feet of dense cover (like trees or shrubs) provides birds with a quick escape route. Also, consider accessibility for yourself – you’ll need to refill and clean it regularly, so choose a spot that’s easy to reach.
Selecting the Right Birdseed
Different types of birdseed attract different species. For a general mix that appeals to a wide variety of birds, black oil sunflower seeds are an excellent choice. They have thin shells, making them easy for most birds to crack. Nyjer (thistle) seeds are perfect for attracting finches, while millet is favored by sparrows and juncos. For winter feeding, suet cakes can provide high-energy fat sources. Experiment with different seeds to discover which birds frequent your feeder most.
Maintenance and Cleaning
Regular cleaning is essential for keeping your bird feeder sanitary and preventing the spread of diseases among birds. Every two weeks (or more frequently if you notice mildew or a high volume of visitors), empty any old seed, then scrub the feeder thoroughly with a mild bleach solution (one part bleach to nine parts water) or a vinegar solution. Rinse it completely and allow it to air dry fully before refilling. This practice ensures a healthy environment for your backyard birds and keeps your feeder in pristine condition.
Customization and Personal Touches
This DIY bird feeder design is just a starting point! Feel free to customize it further to reflect your personal style or to better suit your garden’s aesthetic. You could use different colored bottles, paint intricate designs on the wooden base, or add small perches made from twigs. Consider weatherproofing the wood with a clear sealant if you live in a particularly harsh climate. You might even integrate a small rain cover above the feeding bowl to keep the seeds dry. The possibilities are endless, allowing you to create a truly unique and cherished piece for your outdoor haven.
Final Thoughts on Your DIY Bird Feeder
Crafting this recycled bottle and scrap wood bird feeder is more than just a project; it’s an invitation for nature to come closer. It’s a testament to sustainable living, transforming forgotten items into a functional and beautiful piece of garden art. The satisfaction of seeing a busy bird enjoying the fruits of your labor is truly immeasurable. I hope this detailed guide empowers you to create your own charming bird sanctuary and encourages you to spend more time observing the simple wonders of your own backyard. Share your creations and the fascinating birds you attract – happy crafting and happy bird watching!