
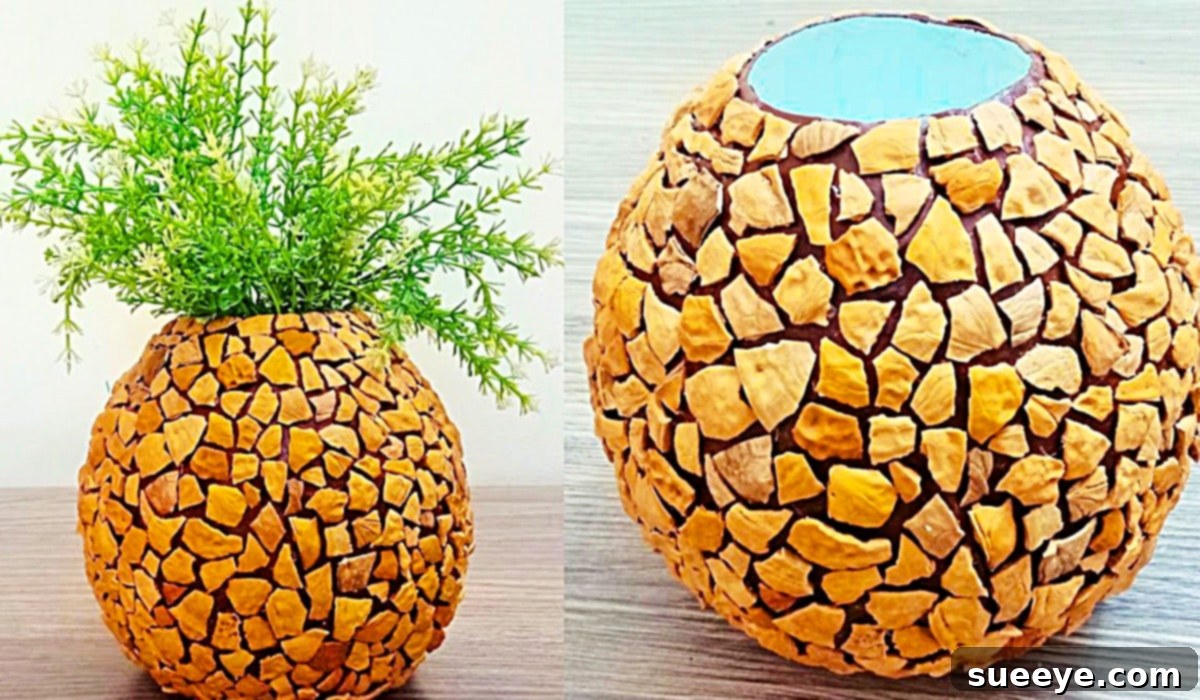
Are you searching for a unique, budget-friendly, and truly captivating way to enhance your home decor? Look no further than this incredible DIY balloon vase project. Inspired by a fantastic video tutorial by AY TV on YouTube, this creative craft transforms simple, accessible materials into a stunning, rustic piece that is guaranteed to be a conversation starter. This isn’t just a vase; it’s a testament to the beauty of handmade artistry, perfect for infusing a touch of natural elegance into any space, from a cozy living room to an inviting covered deck. The most captivating aspect of this project is its ingenious use of discarded walnut shells, which imbues the finished vase with an undeniably primitive, organic, and truly amazing aesthetic, making each piece wonderfully unique.
Craft Your Own Unique Walnut Shell & Paper Mache Balloon Vase: A Step-by-Step Guide
Embrace the pure joy of crafting with a project that perfectly combines creativity, sustainability, and rustic charm. This comprehensive guide will meticulously walk you through the entire process of creating a beautiful, textured vase using an inflated balloon as a temporary mold, paper mache for structural integrity, and natural walnut shells for an extraordinary, tactile finish. Whether you’re a seasoned DIY enthusiast looking for your next creative challenge or an absolute beginner eager to dive into the rewarding world of crafting, this project offers an incredibly satisfying experience and results in a distinctive piece of decor that authentically reflects your personal touch and artistic vision.
Why This DIY Walnut Shell Vase is a Must-Try Project: Unveiling Its Charm and Benefits
Before we dive into the creation process, let’s explore why this particular DIY vase project stands out and why it’s an excellent choice for your next crafting endeavor:
- Uniquely Rustic Aesthetic: The incorporation of natural walnut shells creates a one-of-a-kind texture and an earthy, organic appeal that is hard to replicate with manufactured decor items. It brings a touch of the outdoors in.
- Incredibly Budget-Friendly: You’ll be amazed at how economically you can create such a striking piece. Most of the required materials are common household items or inexpensive craft supplies readily available at any local craft store.
- An Engaging Creative Outlet: This project provides a wonderful opportunity to express your artistic side, experiment with textures, and craft something truly handmade and deeply personal. It’s a fantastic way to unwind and focus your energy.
- Remarkably Versatile Decor: The rustic charm of the walnut shell vase allows it to complement a wide array of interior design styles, from modern farmhouse and bohemian chic to minimalist contemporary and traditional settings.
- Beginner-Friendly Accessibility: Despite its impressive finished look, the steps involved are straightforward and easy to follow, making this an ideal project for crafters of all skill levels, even those with minimal prior experience.
- Promotes Sustainable Crafting: By repurposing natural elements like walnut shells and common materials, this project aligns beautifully with eco-conscious crafting practices, giving new life to otherwise discarded items.
- Personalized Touch: Unlike mass-produced items, your handmade vase will possess subtle imperfections and unique characteristics that tell a story, making it a truly special addition to your home.
Essential Materials for Your DIY Walnut Shell Balloon Vase Project:
Gathering your supplies thoughtfully is the crucial first step in bringing your creative vision to life. Here’s a detailed list of what you’ll need, along with some helpful tips for each item:
- Elmer’s Glue and Water: This forms the essential base for your paper mache mixture. A standard white school glue (like Elmer’s Glue-All) works perfectly due to its non-toxic nature and strong adhesive properties. You’ll typically aim for a 1:1 or 1:2 ratio of glue to water, mixing thoroughly until you achieve a smooth, lump-free consistency. The ideal mixture should be thin enough to fully saturate paper squares quickly but still thick enough to provide excellent adhesion and structural strength as it dries.
- A Balloon: This will serve as the temporary, inflatable mold for shaping your vase. Consider the final shape you desire; round balloons will yield a more traditional spherical vase, while oval-shaped balloons can create taller, more slender forms. Ensure you select a balloon that is sturdy enough to withstand multiple layers of paper mache without deflating prematurely. Larger balloons naturally result in larger vases.
- Small Squares of Paper: An excellent opportunity to repurpose and recycle! Old newspapers, discarded junk mail, paper bags, magazine pages, or even scrap printer paper are all fantastic choices. Tearing the paper into smaller, irregular pieces (rather than cutting with scissors) can actually help create a smoother, more seamless finish, as the torn fibers blend together more easily during the paper mache process. Aim for pieces roughly 1×1 inch to 2×2 inches for optimal handling and application.
- An Exacto Knife or Craft Knife: This sharp tool is absolutely essential for precisely trimming and shaping the opening of your dried paper mache vase. Always prioritize safety: use extreme caution when handling sharp blades and ensure you work on a protected, stable surface (like a cutting mat or several layers of cardboard) to prevent damage to your workspace.
- Acrylic Craft Paint (in White and Brown): These colors will provide a versatile base coat that not only enhances the natural, earthy look of the walnut shells but also allows for artistic depth and dimension. White can be used for the interior or as a primer to brighten the overall tone, while various shades of brown offer an authentic, earthy foundation. Feel entirely free to experiment with other acrylic colors that perfectly complement your existing home decor scheme.
- Walnut Shells: The undisputed star ingredient that provides the unique texture! Begin collecting broken pieces of walnut shells well in advance. These can be sourced from walnuts cracked for culinary purposes or, in some cases, purchased from specialty craft suppliers. Ensure all shell pieces are thoroughly cleaned and completely dry before use. Experiment with different sizes and irregular shapes of shell fragments to achieve a varied and visually rich texture on your vase.
- Paint Brushes: Have a selection of brushes on hand – a wider flat brush for applying the base paint and perhaps a smaller, stiffer brush for dabbing on glue for the walnut shells.
- Bowl for Glue Mixture: A dedicated, preferably disposable, bowl is ideal for preparing and holding your paper mache glue and water mixture, making cleanup much easier.
- Protective Surface: Always cover your work area generously with old newspapers, a plastic drop cloth, or an old tablecloth to shield surfaces from glue and paint spills.
- Gloves (Optional): While not strictly necessary, wearing disposable gloves can keep your hands clean and prevent them from getting sticky during the paper mache application process.
- Strong Craft Adhesive: In addition to Elmer’s glue for paper mache, you’ll need a stronger craft glue (e.g., E6000, Gorilla Glue, or even a hot glue gun with caution) for securely attaching the walnut shells.
Step-by-Step Directions for Creating Your DIY Walnut Shell Balloon Vase:
This engaging DIY project, drawing creative inspiration from the insightful guidance in AY TV’s fantastic YouTube tutorial, unfolds in several easy-to-follow yet distinct stages. Remember, patience during the crucial drying times is absolutely vital for achieving a durable, aesthetically pleasing, and long-lasting result.
Step 1: Prepare Your Paper Mache Base and Form
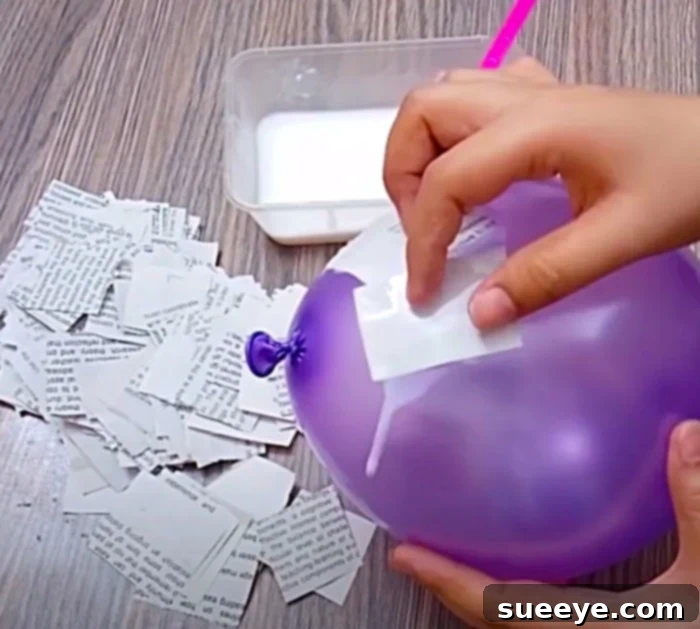
Begin by carefully inflating your chosen balloon to the precise size and desired shape that will serve as the foundation for your vase. Once inflated, tie the balloon securely to prevent air loss. In a separate, easily accessible bowl, prepare your paper mache glue mixture. Combine Elmer’s glue with water, starting with an equal 1 part glue to 1 part water ratio, and mix thoroughly until the consistency is smooth and homogenous. Adjust as needed: if it’s too thick to work with, add a little more water; if it feels too watery, incorporate a bit more glue. Now, take your small paper squares and dip each one fully into the glue mixture, ensuring it’s completely saturated. Gently remove any excessive glue by lightly running the paper piece between your fingers, leaving it moist but not dripping. Carefully apply these glue-soaked paper squares to the surface of the inflated balloon, overlapping each piece slightly to ensure full coverage and strong bonding. Gradually cover approximately two-thirds to three-quarters of the balloon’s surface, intentionally leaving the very top open to form the eventual mouth of your vase. Apply at least three to four robust layers of paper mache to ensure the vase achieves sufficient structural strength and rigidity. For enhanced durability, try to apply each subsequent layer in a different direction (e.g., vertical then horizontal) to create a cross-hatched pattern of fibers. As you work, diligently smooth out any significant wrinkles or trapped air bubbles to achieve a relatively even surface.
Step 2: Drying the Form and Initial Shaping
Once you have meticulously applied all your desired paper mache layers, it is absolutely crucial to let the balloon form dry completely and thoroughly. This critical drying phase can span anywhere from 24 to 48 hours, or even longer, depending on the ambient humidity levels in your environment and the total number of paper mache layers applied. Place the balloon on a protected surface – a small bowl, an elevated wire rack, or even suspended from a string – to allow for optimal, even air circulation around all sides of the form. It is paramount to resist the temptation to rush this step, as incomplete drying can lead to a flimsy, unstable, or even moldy vase. The paper mache must feel entirely firm, hard, and bone-dry to the touch before you can safely proceed. Once assured of its dryness, carefully pop the balloon inside the now hardened paper mache shell. You might hear a satisfying “POP!” sound, or a more gradual hiss as the air slowly escapes. Once the balloon is fully deflated, gently pull and remove it from the interior of the paper mache form. You will now be left with a sturdy, hollow, and ready-to-be-transformed paper mache shell.
Using your Exacto knife or a sharp craft knife, meticulously trim the top edge of your paper mache form to create a clean, even, and aesthetically pleasing opening for your vase. You have creative freedom here: you can opt for a perfectly straight cut for a minimalist look, or introduce a slight curve or intentionally uneven edge for a more organic, rustic appeal. Take your time to ensure a neat, precise finish, as this opening will define the mouth and overall elegance of your completed vase.
Step 3: Painting the Base Coat
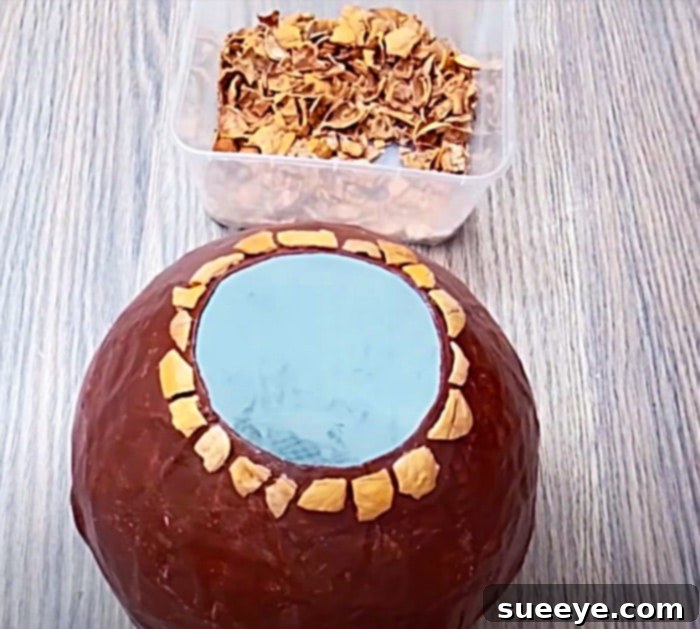
Now, it’s time to apply the foundational color to your vase. Using acrylic craft paint, apply an even, comprehensive coat of either white or brown paint to the entire exterior surface of the paper mache vase. If your intention is to use a light-colored grout or filler between your walnut shells, a white base can significantly help in brightening the overall look and making the shell texture pop. Conversely, a brown base will offer a deeper, more earthy, and naturally harmonious tone. Ensure you achieve even coverage across the entire surface, and allow the first coat to dry completely before applying a second coat if enhanced opacity or color depth is desired. For a truly professional and finished appearance, you might also consider painting the interior rim of the vase. This crucial base coat serves multiple purposes: it provides a uniform background, helps to seal and further strengthen the paper mache, and creates an excellent adhesive surface for the subsequent application of the walnut shells.
Step 4: The Art of Applying Walnut Shells
This is the stage where the true magic unfolds, and your vase begins to acquire its distinctive, unique character. Once your base paint is thoroughly dry and cured, you can begin the exciting process of applying your broken walnut shell pieces. For secure attachment, you can utilize a strong craft glue (such as E6000 or a similar industrial-strength adhesive), or a hot glue gun (exercising extreme caution due to the heat), or even a specially thickened mixture of Elmer’s glue. Apply glue directly to a small, manageable section of the vase’s surface, then carefully and deliberately press the walnut shell pieces onto the freshly glued area. It’s advisable to work in small sections to prevent the glue from drying prematurely before you can attach the shells. Arrange the shells strategically to create an interesting and varied texture – you can place them tightly together for a dense, mosaic-like look, or leave small, deliberate gaps for a more fragmented, rustic effect. Do not hesitate to break larger pieces into smaller fragments to perfectly fill awkward spaces or achieve specific textural nuances. Continue this meticulous process until the entire exterior surface of your vase is covered to your satisfaction with the walnut shells. Allow ample time for the glue to dry completely and securely bond the shells to the vase; this may take several hours or even overnight, depending on the specific adhesive you’ve chosen.
Step 5: Finishing Touches and Sealing (Optional but Highly Recommended)
To further enhance both the durability and the aesthetic appeal of your magnificent walnut shell vase, consider adding some thoughtful finishing touches. One popular option is to “grout” the minuscule spaces between the walnut shells. This can be achieved using a mixture of plaster of Paris, a thin layer of wood filler, or even a thick paste concocted from flour and water, optionally colored with a touch of brown or black paint to seamlessly blend with the shells. Apply this mixture with a small spatula, a craft stick, or even your fingertip, carefully wiping away any excess from the shell surfaces before it has a chance to dry and set. This step can bestow upon your vase a more cohesive, polished, and natural stone-like appearance. Alternatively, you can simply choose to leave the gaps as they are for a more rugged, raw, and authentically natural appeal. Once any grouting or fillers are completely dry, it is highly advisable to apply a clear sealant or varnish. A matte finish sealant will beautifully preserve the natural, earthy look of the shells, while a glossy finish can introduce a subtle sheen and add perceived depth to the texture. This protective layer will serve to prevent dust accumulation, make the vase significantly easier to clean, and most importantly, protect the delicate shells from everyday wear and tear, ensuring your creation lasts for years to come. Allow the sealant to cure fully according to the product manufacturer’s instructions for optimal results.
Creative Variations and Decor Ideas for Your Walnut Shell Vase:
While your newly crafted walnut shell vase is undeniably stunning as a standalone piece, there are countless ways to further customize it and seamlessly integrate it into your existing home decor:
- Play with Color Palettes: Instead of traditional brown and white, consider painting the paper mache base a vibrant, unexpected color like teal, mustard yellow, or deep indigo before adding the shells for a striking contemporary twist. You could even lightly dry-brush or wash the walnut shells themselves with a contrasting color after they are glued on for a layered effect.
- Incorporate Mixed Textures: Elevate the tactile experience by combining walnut shells with other complementary natural elements such as small, polished pebbles, intricate dried moss, aromatic coffee beans, or even tiny pieces of broken ceramic tile for an even richer, more complex texture.
- Introduce Metallic Accents: For a touch of understated glamour, lightly dry-brush metallic gold, silver, or copper craft paint over the high points of the finished walnut shells. This technique beautifully highlights their organic texture and adds a subtle, elegant shimmer.
- Experiment with Different Base Shapes: Don’t limit yourself to traditional balloon shapes. Experiment with elongated balloons for taller, slimmer, and more elegant vases, or create asymmetrical forms to build a diverse and visually interesting collection of varied vase shapes.
- Functional or Purely Decorative: This versatile vase is ideally suited for holding an array of decorative items such as dried floral arrangements, graceful decorative branches, vibrant peacock feathers, or even as a captivating standalone sculptural piece. Important Note: As the vase is made from paper mache, it is not inherently waterproof. Therefore, avoid filling it directly with water for fresh flowers. If you wish to display fresh blooms, simply place a narrower glass or plastic container (like a jar or a drinking glass) filled with water inside the paper mache vase.
- Strategic Placement Ideas: Showcase your finished masterpiece on a prominent mantelpiece, a chic side table, an open bookshelf, or as a captivating centerpiece on a dining table. Its inherent rustic charm makes it particularly suitable for integrating into outdoor covered spaces such as patios, sunrooms, or decks, where it will blend seamlessly with the natural surroundings. Imagine it filled with tall, wispy grasses or intricately twisted twigs, creating a serene, earthy focal point that invites contemplation.
The Enduring Joy of DIY Crafting: More Than Just a Vase
This project extends far beyond the simple act of making a vase; it serves as a profound invitation to explore and unleash your inherent creativity, and to derive immense satisfaction from the tangible act of bringing something beautiful into existence with your own hands. Engaging in DIY projects like this offers a myriad of enriching benefits:
- Authentic Personal Expression: Every item crafted by hand carries an indelible piece of your unique personality, style, and effort, making it infinitely more meaningful than mass-produced goods.
- Therapeutic Stress Relief: The focused, meditative process of crafting can be an incredibly relaxing and mindful activity, serving as a wonderful antidote to the stresses of daily life.
- Significant Cost Savings: Creating your own home decor items is almost always substantially more economical than purchasing comparable, often less unique, store-bought alternatives.
- Unrivaled Unique Decor: You will possess a truly one-of-a-kind piece that cannot be found anywhere else, distinguishing your home decor and reflecting your individuality.
- Profound Sense of Accomplishment: There is an immense and deeply gratifying sense of pride and achievement in displaying an item that you have meticulously crafted and brought to life yourself.
- Skill Development: Each project helps you hone new skills, from precision cutting to artistic arrangement, building confidence for future creative endeavors.
In conclusion, this DIY walnut shell balloon vase project is not only incredibly charming and visually appealing but also profoundly satisfying to create from start to finish. The remarkable transformation of simple, humble materials into a unique, rustic, and elegant piece of home decor is an immensely rewarding experience. We wholeheartedly recommend giving this project a try and allowing your creativity to flourish!