
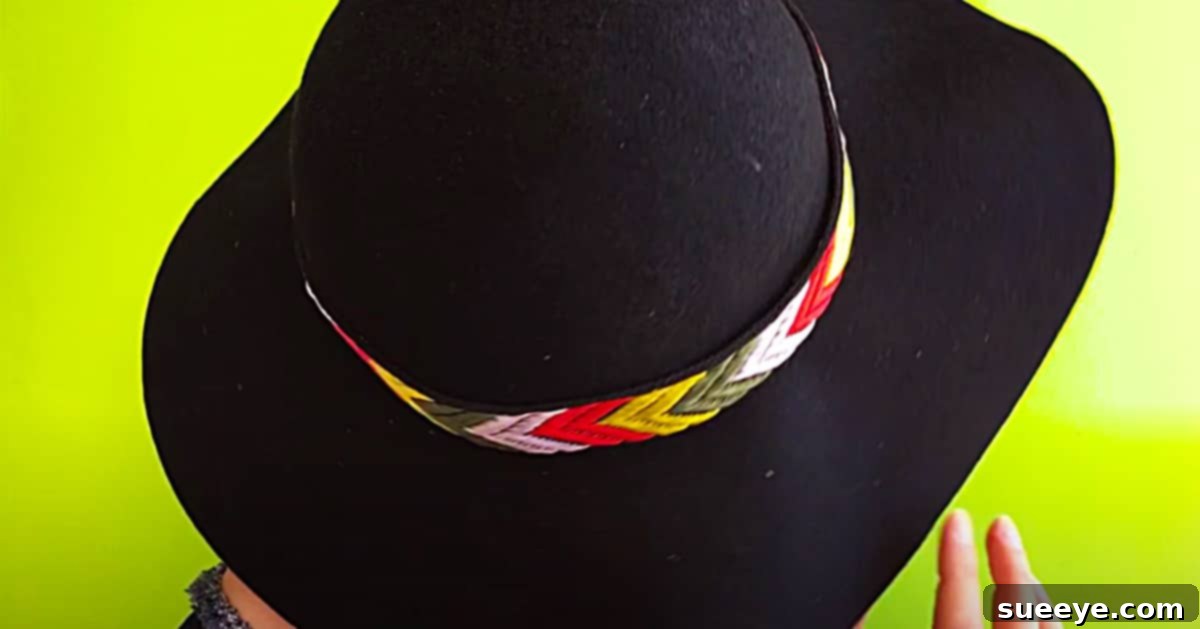
DIY Boho Hatband: Craft Your Unique Rockstar Style with This Easy Velcro Tutorial
Step into the past and channel the legendary style of the Sixties and Seventies. Imagine the iconic rockstars and free-spirited bohemians, their images etched into history, often distinguished by one essential fashion item: the effortlessly cool, wide-brimmed hat. A quick search will reveal these old-school heroes, consistently adorned with distinctive, often handcrafted hatbands that exuded a raw, authentic charm. These weren’t just simple accessories; they were declarations of individuality, appearing as if lovingly homemade or thoughtfully customized.
Today, the allure of personalized headwear is stronger than ever. The demand for unique, customized hats has created a thriving market, with countless online artisans on platforms like Instagram and Etsy selling bespoke boho-style hats at premium prices. While these creations are undeniably beautiful, the idea of paying a small fortune for a customized look might not appeal to everyone.
But what if you could capture that unique, custom look without stretching your budget? Imagine transforming a plain, everyday hat into a vibrant statement piece that perfectly reflects your personality and ever-changing style. We’ve discovered a fantastic, beginner-friendly resource that empowers you to do just that. Acclaimed crafter Naira Papyan’s brilliant boho hatband video tutorial on YouTube offers a simple, step-by-step guide to creating a versatile velcro hatband in mere minutes. This ingenious approach allows for endless customization, giving you the freedom to easily swap out hatbands or add an array of embellishments like vintage pins, delicate dried flowers, or elegant feathers, ensuring your hat is always a true reflection of your mood, outfit, and personal flair.
Why Embrace the DIY Boho Hatband Trend?
Beyond the simple joy of creating something with your own hands, crafting a DIY boho hatband offers a multitude of compelling benefits. In an era dominated by mass-produced fashion, a handmade accessory stands out, telling a story of personal effort, unique taste, and mindful consumption. Here’s why you should consider making your next hatband instead of buying one:
- Unleash Your Inner Artist: This project is a blank canvas for self-expression. You get to choose every element – from the fabric to the embellishments – ensuring the final piece perfectly resonates with your personal aesthetic.
- Cost-Effective Customization: High-end, customized hats can come with a hefty price tag. By crafting your own hatband, you can achieve a designer-inspired look for a fraction of the cost, giving new life to an existing hat or elevating an affordable, basic one.
- A Sustainable Fashion Choice: Embrace eco-friendly practices by repurposing old hats, utilizing fabric scraps, or breathing new life into forgotten textiles. DIY crafting supports a more sustainable approach to fashion by reducing waste and extending the lifespan of your wardrobe items.
- Unparalleled Versatility: The ingenious velcro design is a true game-changer. It allows you to effortlessly change your hatband to match different outfits, adapt to various seasons, or suit specific occasions without committing to a single look.
- The Perfect Personalized Gift: A handmade hatband, perhaps tailored to a friend’s favorite colors or interests, makes an incredibly thoughtful and unique gift that shows you truly care.
- A Deep Sense of Accomplishment: There’s immense satisfaction and pride in wearing something you’ve crafted yourself, knowing it’s truly one-of-a-kind and a reflection of your creativity.
Selecting the Ideal Hat for Your Boho Transformation
Before you dive into the exciting world of hatband crafting, choosing the right hat as your base is a crucial first step. While nearly any hat can be adorned, certain styles naturally lend themselves beautifully to the bohemian aesthetic, making your DIY hatband truly shine. Consider these popular hat types:
- Fedoras: Classic, timeless, and incredibly versatile, fedoras offer a sleek and structured base that can be easily transformed with a textured or embellished hatband, adding a touch of sophisticated boho.
- Wide-Brimmed Hats: Perfect for making a dramatic style statement and offering excellent sun protection, these hats provide ample space for your intricate boho hatband designs to be showcased.
- Cowboy Hats: Infuse a unique blend of Western charm with bohemian flair by adding a custom hatband to a classic cowboy hat, creating a distinctive and stylish fusion.
- Straw Hats: Ideal for warm weather, beach outings, and summer festivals, a decorative hatband can elevate a simple straw hat into a chic, holiday-ready accessory.
- Wool or Felt Hats: Providing a sturdy and often luxurious foundation, these hats are perfect for more elaborate or rustic hatband designs, making them ideal for cooler seasons.
When selecting your hat, think about its material and existing color. A neutral-colored hat (such as beige, black, grey, or natural straw) provides the most versatile canvas, allowing your vibrant or intricate DIY hatband to be the undisputed focal point. However, don’t shy away from experimenting with contrasting colors and textures between your hat and hatband for a bolder, more avant-garde statement.
Essential Materials for Your DIY Boho Hatband Project:
Gathering your supplies is the exciting initial phase of your crafting journey. The true beauty of this project lies in its remarkable simplicity and the incredible flexibility it offers in material choices. You might even find many of these items already tucked away in your craft box or around your home!
- A Hat: Your chosen canvas, ready for its stylish transformation.
- A Strip of Trim: This is where your personal style truly comes alive. The options are vast and varied:
- Brocade or Embroidered Ribbons: For a rich, luxurious, ethnic-inspired, or vintage look.
- Satin or Grosgrain Ribbons: Classic, elegant, and available in an expansive array of colors and widths for a clean finish.
- Faux Leather or Suede Strips: Ideal for a rustic, edgy, natural, or modern bohemian vibe.
- Twine, Macrame Cord, or Braided Rope: Perfect for achieving a natural, earthy, raw, or distinctly hippie and folk-art feel.
- Fabric Scraps: Don’t overlook pieces of patterned cotton, linen, silk, or even strips cut from old scarves or garments. These add unique textures and stories.
- Beaded Trims: Incorporate these for a touch of sparkle, intricate detail, or a global-inspired aesthetic.
Tip: Aim for a trim that is at least 1-2 inches wide for a prominent hatband, or opt for narrower strips if you desire a more subtle accent or plan to layer multiple trims.
- Velcro: Absolutely essential for the ingenious interchangeable design. Look for “sew-on” Velcro for maximum durability, or “fabric adhesive” Velcro for a quicker, no-sew application. Ensure it’s a sturdy, good quality velcro that will withstand repeated use.
- A Pair of Sharp Scissors: For clean, precise cuts on your chosen trim. Dull scissors can lead to frayed edges and frustration.
- A Lighter or Fray Check: To meticulously seal the ends of your trim and prevent unsightly fraying. This step is particularly important for woven fabrics, ribbons, and natural fibers.
- Matching Thread and Needle (or Strong Fabric Glue): For securely attaching the Velcro. Fabric glue offers a quick, convenient no-sew option, while traditional sewing ensures the utmost durability and longevity, especially for frequently changed hatbands.
Step-by-Step Guide: Crafting Your Boho Velcro Hatband
This comprehensive, easy-to-follow tutorial, greatly inspired by Naira Papyan’s excellent YouTube video, will expertly guide you through the process of transforming any ordinary hat into a stylish, custom boho-rockstar accessory. Let’s begin creating your unique fashion statement!
Step 1: Precisely Measure and Cut Your Trim
The foundation of a perfectly fitting hatband begins with accurate measurement. Take your chosen strip of trim and carefully wrap it around the base of your hat, precisely where you envision the hatband sitting. Ensure it feels snug but not uncomfortably tight, allowing for slight movement. Critically, overlap the ends of the trim by approximately 1 to 1.5 inches. This overlap is vital for securely attaching the Velcro and providing a small degree of adjustability once completed. Once you have confidently determined the correct length, mark your trim with a pencil or marker, and then neatly cut it with your sharp scissors, ensuring a clean edge.
Step 2: Expertly Seal the Ends of Your Trim
To ensure your hatband not only looks professional but also withstands the test of time without unraveling, it is absolutely vital to meticulously seal the raw edges of your chosen trim. If you are working with a synthetic material like satin ribbon, polyester trim, or any woven fabric that tends to melt slightly when heated, carefully and quickly run a lighter flame along each cut edge. Do this with precision and caution, allowing the fibers to melt and fuse together without burning or discoloring the fabric. For natural fibers such as cotton, jute, or linen, or if you prefer a flame-free method, apply a small amount of “Fray Check” liquid sealant to the very ends and allow it to dry completely. This crucial step guarantees a durable, clean, and professional finish for your hatband.
Step 3: Securely Attach the Velcro to Your Hatband
This is where the ingenious magic of the interchangeable design truly comes to life. Take your two distinct pieces of Velcro – the ‘hook’ side (the rougher part) and the ‘loop’ side (the softer part). Attach one piece of Velcro to the inside end of one side of your trim. Then, attach the other piece of Velcro to the *outside* end of the opposite side of your trim. This specific placement ensures that when you wrap the hatband around your hat, the Velcro pieces will overlap and connect smoothly and securely.
You have two excellent primary options for attaching the Velcro:
- Sewing: For the most secure, durable, and long-lasting attachment, either hand-stitch or machine-stitch the Velcro pieces firmly onto the trim. Use a matching thread for an invisible finish, and ensure your stitches are neat and strong, particularly around the perimeter of the Velcro. This method is highly recommended for hatbands you anticipate using frequently or those needing extra resilience.
- Strong Fabric Glue: For a quick, easy, and convenient no-sew solution, apply a robust fabric adhesive to the back of the Velcro pieces and firmly press them onto the trim. Allow ample drying time, adhering strictly to the glue manufacturer’s instructions. While undeniably convenient, always ensure the glue is specifically designed for fabric and provides a strong, flexible, and lasting bond to prevent detachment.
Step 4: Unleash Your Creativity: Customize and Embellish Your Hatband
Once your basic velcro hatband is perfectly assembled and secured, the real fun and artistic expression begin! This is your prime opportunity to infuse it with your unique personal style, transforming it into a true reflection of you. The possibilities for customization are genuinely endless:
- Vintage Pins and Brooches: Adorn your hatband with an eclectic collection of antique pins, charming enamel badges, meaningful brooches, or even repurposed earrings.
- Dried Flowers and Botanicals: For a natural, ethereal, or whimsical touch, carefully attach small bunches of dried lavender, delicate baby’s breath, pressed leaves, or tiny seed pods using discreet hot glue or fine floristry wire.
- Feathers: Add a dynamic sense of movement, whimsy, and an authentic bohemian vibe with ethically sourced feathers of varying sizes and colors. Secure them firmly with a dab of hot glue or by artfully tucking them under existing elements.
- Beads and Charms: Sew or glue on an assortment of beads (wooden, glass, ceramic), small metallic charms, cowrie shells, or even repurpose old necklace components for a distinct bohemian flair.
- Tassels and Pompoms: Attach colorful, flowing tassels or playful, fuzzy pompoms to the sides or front of your hatband for added texture, movement, and a cheerful touch.
- Chains and Small Bells: For an edgier, subtly gothic, or more whimsical acoustic look, elegantly drape delicate chains or attach tiny, jingly bells.
- Fabric Patches or Embroidery: Sew on small, intricately designed fabric patches, or even directly embroider unique patterns, initials, or abstract designs onto the hatband itself for a truly bespoke and artisan touch.
- Fabric Paint or Markers: For a minimalist yet custom appearance, use high-quality fabric paints or markers to add abstract patterns, meaningful quotes, or personalized illustrations.
Remember, sometimes less is truly more, allowing a few select embellishments to make a powerful statement. However, don’t shy away from a bold, maximalist approach if it aligns with your vision – an abundance of textures and elements can be incredibly striking. Experiment freely with different combinations and placements until your hatband perfectly captures your desired aesthetic and personal vision.
Expert Tips for Crafting a Perfect Boho Hatband Every Time
To ensure your DIY hatband projects are consistently successful, stylish, and durable, keep these expert tips and considerations in mind. These insights will help elevate your crafting skills and ensure your creations are cherished accessories:
- Master the Art of Texture Mixing: Don’t be afraid to combine contrasting materials for visual interest. Pair smooth satin ribbon with rough jute twine, shiny metallic beads with matte natural feathers, or soft velvet with intricate embroidery. Textural play adds depth and sophistication.
- Align with Your Wardrobe: Before designing, take a moment to consider the colors, patterns, and overall styles that dominate your existing wardrobe. Create hatbands that complement your go-to outfits for maximum wearability and versatility.
- Embrace Seasonal Swaps: Design hatbands with the seasons in mind. Think vibrant florals, light fabrics, and bright colors for spring and summer, contrasting with rich, earthy tones, heavier textures like faux fur, or metallic accents for autumn and winter.
- Prioritize Durability in Embellishment: When attaching any decorations – especially those prone to movement or wear – always use strong adhesives or secure, reinforced stitching. This is particularly crucial if your hat will be exposed to wind, rain, or frequent handling, ensuring your embellishments stay firmly in place.
- Practice and Experimentation are Key: Don’t expect perfection on your very first try. The beauty of DIY lies in the learning process. Be fearless in experimenting with different trims, color palettes, and decorative elements. Your initial hatband might be simple, but each subsequent creation will likely become more elaborate, refined, and truly reflective of your evolving style.
- Mindful Maintenance and Storage: To preserve the integrity and beauty of your hatbands, store them flat or gently rolled in a protective box or drawer. Avoid crushing delicate embellishments. If they accumulate dust, a soft brush or a gentle tap can usually refresh them.
Beyond the Basic: Expanding Your Hatband Horizons
The true genius of the velcro hatband system extends far beyond simply creating a single accessory. This adaptable method opens up a world of possibilities for enhancing your hat collection and continuing your creative crafting journey:
- Cultivate a Hatband Collection: Embrace the versatility by crafting several hatbands, each featuring a different theme, color scheme, or level of embellishment. This allows you to instantly transform the look of a single hat to suit any occasion, mood, or ensemble. Imagine having a vibrant floral band for a garden party, a sleek, minimalist leather band for an urban outing, and a rustic feathered band for a music festival.
- Repurpose and Upcycle Old Accessories: Give new life to forgotten items in your closet by transforming them into unique hatbands. An old silk scarf with a beautiful pattern can be elegantly tied or carefully stitched to create a flowing, luxurious hatband. Similarly, a slim, decorative belt can be cut, reshaped, and embellished to become a striking hat adornment.
- Thoughtful Gift Giving: A custom-made hatband, meticulously tailored to a friend’s favorite colors, hobbies, or personal interests, makes an incredibly thoughtful, heartfelt, and unique gift. For a complete present, consider pairing your handmade hatband with a simple, high-quality hat.
- Creative Multi-Use Potential: If your hatband is particularly long, designed with flexible materials, or features a clasp, it could even serve a dual purpose! Depending on its design, it might elegantly double as a unique belt for a dress or tunic, or even be wrapped around the wrist as a statement bracelet, offering even more value from your handcrafted item.
Unleash Your Inner Fashion Designer and Craft Your Signature Look!
Making your own boho hatband is far more than just a simple craft project; it’s an exhilarating invitation to explore and express your personal style, to save money creatively, and to add a truly unique, artisan touch to your wardrobe. The ingenious and simple velcro method ensures that you can effortlessly switch up your look, making every hat in your collection a versatile, exciting, and ever-changing fashion accessory. We sincerely hope that this comprehensive and expanded tutorial inspires you to gather your materials, embrace your creativity, and embark on your own hat-transforming adventure.
For those who prefer a visual learning experience, do not hesitate to check out Naira Papyan’s original YouTube tutorial. Her clear demonstrations will provide additional clarity and inspiration.
Once you’ve crafted your magnificent masterpiece (or even a collection of them!), don’t keep your amazing creations to yourself! Share your amazing DIY boho hatband designs on social media, tag relevant crafting communities, and inspire others to embrace the joy, sustainability, and personal satisfaction of handmade fashion. Happy crafting, and may your hats always be as unique as you are!