
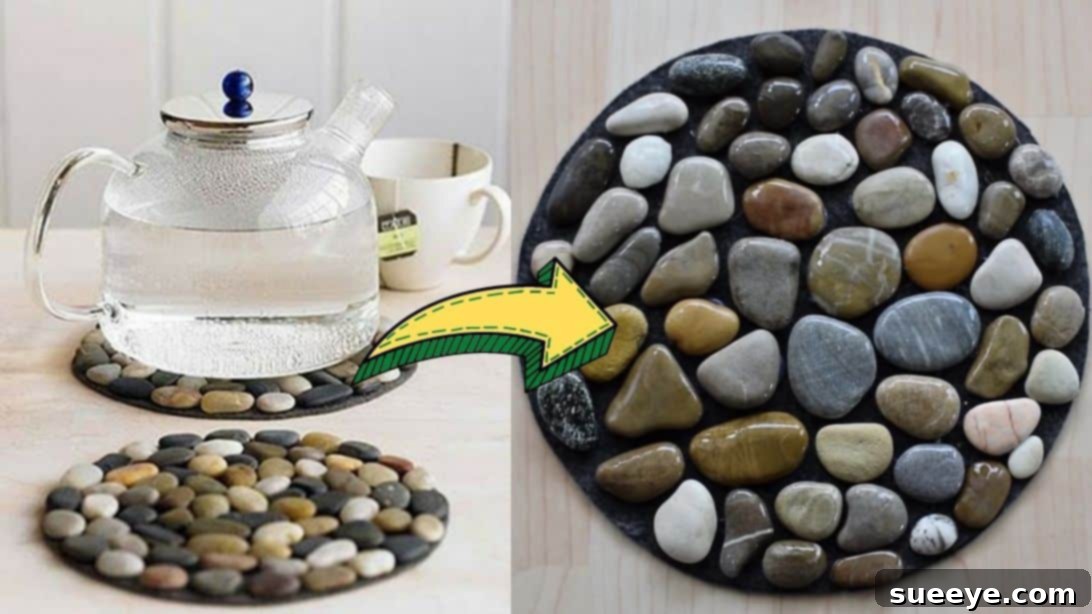
Welcome to a world where nature meets creativity! If you’re looking for a charming, eco-friendly, and incredibly satisfying DIY project, then crafting your own pebble coasters is an absolute must-try. Imagine transforming a collection of humble pebbles into exquisite, functional pieces of art that protect your surfaces while adding a touch of rustic elegance to your home. These aren’t just practical items; they are conversation starters, thoughtful handmade gifts, and even potential bestsellers if you’re venturing into the craft market.
This comprehensive guide will walk you through every simple step, from gathering your materials to applying the final touches. We’ll ensure your journey is as smooth as the pebbles you’ll be using, resulting in durable, beautiful coasters that reflect your unique style. Ready to embark on this creative adventure? Dive into the instructions below and discover the joy of making something truly special with your own hands. You might even find inspiration from the original video tutorial by Pink Cloud on YouTube, whose creativity sparked this wonderful idea.
Why Make DIY Pebble Coasters?
Beyond the simple pleasure of crafting, creating your own pebble coasters offers a multitude of benefits:
- Unique Home Decor: Each coaster is one-of-a-kind, bringing an organic, natural aesthetic into any room.
- Personalized Gifts: Handmade gifts carry immense sentimental value. Customize them for friends and family.
- Eco-Friendly Craft: Utilizing natural elements like pebbles makes this a sustainable and environmentally conscious project.
- Cost-Effective: Many materials can be found for free or at a very low cost, making it budget-friendly.
- Stress-Relieving Activity: The meditative process of arranging pebbles can be incredibly calming and therapeutic.
- Functional Art: They effectively protect surfaces from heat and moisture rings, combining beauty with utility.
- Potential for Profit: If you enjoy making them, these coasters can be popular items at craft fairs or online shops.
Materials You’ll Need
Gathering your supplies is the first exciting step. While the list is straightforward, understanding each item’s role ensures a successful outcome for your pebble coasters.
- A Pile of Flat Pebbles: The star of your project! Look for pebbles that are relatively flat and smooth on at least one side. These can be collected from beaches, riverbanks, or even purchased from craft stores or garden centers. Aim for a variety of sizes and shapes to add visual interest, and consider different natural colors for a mosaic effect.
- A Piece of Felt Fabric: This will form the sturdy, protective base of your coaster. Felt is ideal because it’s soft, absorbent, and prevents scratches on furniture. Choose a color that complements your pebbles or one that you want to stand out. Options like cork sheets or thick craft foam can also be used as alternatives for the base.
- An Object in the Desired Shape: To create a consistent and neat coaster base, you’ll need a template. A round mug, a square tile, a triangular ruler, or even a star-shaped cookie cutter can serve this purpose. Ensure the object is large enough to accommodate several pebbles and provide adequate surface protection.
- Scissors: A good pair of sharp scissors, preferably fabric scissors, will make cutting the felt base much easier and cleaner, ensuring crisp edges for your coaster.
- Pen or Fabric Marker: For tracing your desired shape onto the felt fabric. A permanent marker is generally best to ensure clear lines that won’t smudge.
- Hot Glue Gun and Glue Sticks: Your primary adhesive. A hot glue gun provides a quick and strong bond, which is crucial for securely attaching the pebbles to the felt. Always exercise caution when using a hot glue gun to avoid burns. Ensure you have plenty of glue sticks on hand.
- Clear Varnish Spray (Optional but Recommended): This clear sealant adds a layer of protection, enhancing the durability and water resistance of your coasters. It can also give your pebbles a lovely, subtle sheen, making their natural colors pop. Look for a clear, waterproof, and non-yellowing spray varnish.
- Optional Materials for Enhancement:
- Small brush: For cleaning pebbles if necessary.
- Sandpaper: Fine-grit sandpaper can be used to gently smooth any slightly rough edges on your pebbles, though most natural pebbles won’t require this.
- Decorative elements: Tiny shells, glitter, or other small embellishments can be added for extra flair before varnishing.
- Protective gloves: When applying varnish spray in a well-ventilated area.
Step-by-Step Instructions to Create Your Pebble Coasters
Step 1: Preparation and Creating the Felt Base
Thorough preparation ensures a high-quality finished product. This initial phase sets the foundation for your beautiful pebble coaster.
- Pebble Gathering and Cleaning: Begin by collecting or acquiring a good pile of flat pebbles. The flatter they are, the easier they will be to glue and the more stable your coaster will be. Once you have your selection, it’s crucial to wash them thoroughly. Use a brush and soapy water to remove any dirt, sand, algae, or debris. Rinse them well and spread them out on a towel or newspaper to dry completely. Any residual moisture or dirt can prevent the hot glue from adhering properly.
- Sorting (Optional but Recommended): While your pebbles dry, you can sort them. Separate them by size, shape, or color. This pre-sorting allows you to plan your design more effectively and creates a more aesthetically pleasing arrangement later on. You might decide to create a coaster with uniformly sized pebbles, or a more organic mosaic with mixed sizes.
- Choosing and Cutting the Felt Base: Take your piece of felt fabric. Select a color that you envision complementing the natural tones of your pebbles. Grab your chosen shaping object (e.g., a mug for a round coaster, a small box for a square one). Place the object firmly on the felt and use your pen or fabric marker to carefully trace its outline onto the fabric. Aim for a clean, continuous line. Once traced, use your sharp scissors to meticulously cut along the line. Take your time to ensure the edges are smooth and even, as this will be the base for your coaster. The felt base serves as a crucial component, protecting your tabletops from scratches and absorbing any condensation from beverages.
Step 2: Arranging, Gluing, and Finishing Your Coaster
This is where your coaster truly comes to life! Careful arrangement and secure gluing are key to a beautiful and long-lasting product.
- Pebble Arrangement (Dry Run): Before you even think about the glue gun, arrange your sorted pebbles on top of the cut-out felt base. This “dry run” allows you to experiment with different patterns, colors, and sizes until you are completely satisfied with the layout. You might create concentric circles, a random mosaic, or a more structured pattern. Ensure the pebbles cover most of the felt, leaving minimal gaps, and that the overall shape remains balanced. This step is critical for visualizing your final design and making any adjustments before the permanent gluing begins.
- The Gluing Process: Once you’re absolutely content with your arrangement, it’s time to glue. Work methodically, either by gently lifting each pebble one by one, or by working in small sections. Apply a dab of hot glue to the back (flatter side) of each pebble. Press the pebble firmly onto the felt fabric in its designated spot. Hold it for a few seconds to allow the glue to set. Be careful not to use too much glue, as it might squeeze out from under the pebbles, but ensure enough is used for a strong, secure bond. Continue this process until all pebbles are firmly attached to the felt base. Allow the entire coaster to cool and the glue to fully set for at least 15-20 minutes before proceeding.
- Applying Clear Varnish Spray (Optional Finishing Touch): For enhanced durability, a polished look, and increased water resistance, take your transparent varnish spray. In a well-ventilated area (preferably outdoors or in a garage), hold the can about 6-8 inches away from the coaster and apply an even coat over all the pebbles. Ensure good coverage, but avoid oversaturating the surface, which could lead to drips. Let the first coat dry completely according to the manufacturer’s instructions (usually 30 minutes to an hour). For extra protection and shine, you can apply a second thin coat. This step helps seal the pebbles, protect them from wear and tear, and often makes their natural colors appear more vibrant.
- Final Drying Time: After applying the varnish, leave your newly crafted pebble coaster to dry completely. This might take several hours, or even up to 24 hours, depending on the varnish type and environmental conditions. It is essential for the varnish to fully cure before the coaster is put to use to ensure maximum durability and prevent stickiness.
Creative Variations and Design Tips
Once you’ve mastered the basic pebble coaster, unleash your creativity with these ideas:
- Painted Pebbles: Before gluing, paint some pebbles with acrylic craft paint for pops of color or intricate designs. Seal with clear coat after drying.
- Mixed Media: Incorporate small pieces of sea glass, tiny shells, or polished stones alongside your pebbles for varied textures and colors.
- Grout for a Mosaic Look: For a more professional mosaic finish, you can apply sanded or unsanded grout between the pebbles after gluing, similar to tiling. Wipe away excess before it dries. This creates an extremely durable and water-resistant surface.
- Themed Coasters: Create themed sets, such as beach-inspired (with sand-colored felt and shells), garden-themed (with moss-green felt and darker pebbles), or minimalist (with monochrome pebbles).
- Different Base Materials: Experiment with cork or wood slices as your base instead of felt for a different aesthetic and feel.
- Custom Shapes: Don’t limit yourself to circles and squares. Try making heart-shaped, star-shaped, or even animal-shaped coasters for a truly unique touch.
Care and Maintenance for Your Pebble Coasters
To ensure your beautiful pebble coasters last for years, follow these simple care tips:
- Gentle Cleaning: To clean, simply wipe the pebble surface with a damp cloth. Avoid harsh abrasive cleaners or scrubbing, which could damage the varnish or loosen pebbles.
- Avoid Soaking: Do not submerge the coasters in water, as this can weaken the hot glue bond and potentially damage the felt base.
- Handle with Care: While durable, dropping them on hard surfaces could cause pebbles to chip or detach.
- Re-seal Periodically (Optional): If your coasters see heavy use, you might consider reapplying a thin coat of clear varnish every few years to maintain their protective layer and shine.
Easy DIY Pebble Coasters Tutorial: Conclusion
Congratulations! You’ve successfully created stunning DIY pebble coasters, transforming simple natural elements into functional works of art. This project is a testament to how accessible and rewarding crafting can be. Whether you crafted these for your own home, as heartfelt gifts, or to sell, each coaster now carries a unique story and the personal touch of your creativity.
We hope you enjoyed following this tutorial and found the process both easy and inspiring. Remember, the beauty of DIY lies in experimentation, so don’t hesitate to explore different pebble types, felt colors, and design arrangements. For more fantastic crafting ideas and visual inspiration, be sure to visit Pink Cloud’s YouTube channel, where this wonderful project originated. Happy crafting, and may your home always be adorned with beautiful, handmade treasures!