
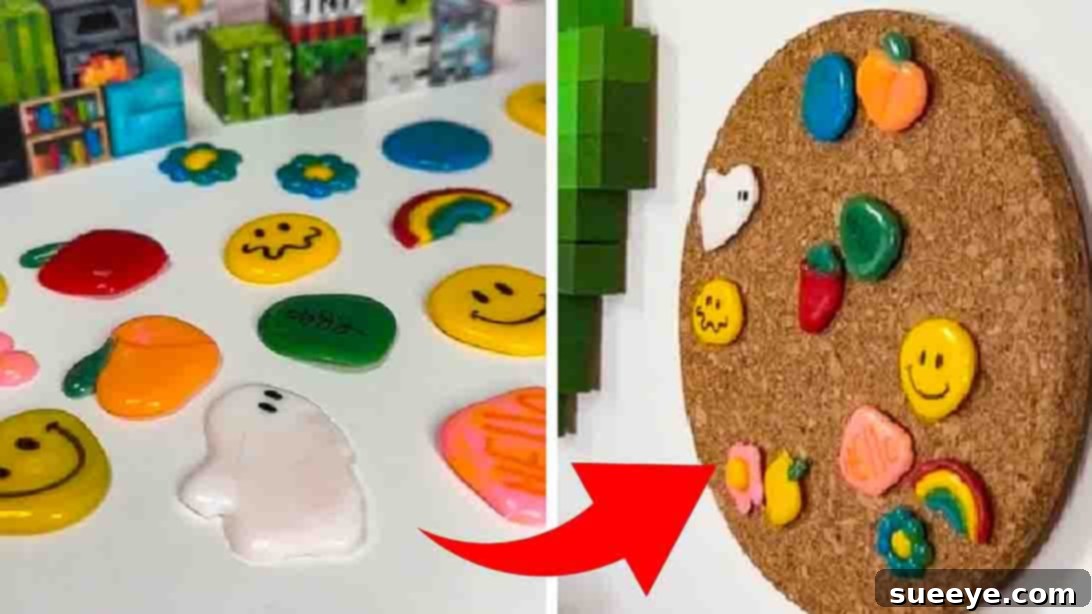
Are you searching for a delightful and straightforward DIY craft to brighten your weekend? Look no further! The incredibly talented @celynhaf on TikTok has unveiled the perfect project that’s taking the crafting world by storm: adorable hot glue pin badges. These charming little creations are not only incredibly easy to make but also offer an endless canvas for your creativity. Imagine crafting a vibrant collection of your favorite shapes, emojis, or even personalized mini artworks that reflect your unique style. This project is more than just a craft; it’s an opportunity to unwind, express yourself, and create something truly special. Whether you’re looking for a solo artistic escape or a fun-filled activity to share with friends, these hot glue pins are guaranteed to be a hit. Get ready to transform simple materials into captivating wearable art. We invite you to dive into this comprehensive guide, inspired by @celynhaf’s viral tutorial, and discover how to make these irresistible pins step by step.
Why Hot Glue Pin Badges: Your Next Addictive DIY Project
Hot glue pin badges offer a fantastic entry point into the world of DIY crafts, appealing to both seasoned crafters and absolute beginners. Their popularity stems from several compelling advantages. Firstly, the cost-effectiveness of the materials is undeniable. You likely already have a glue gun at home, and colored hot glue sticks are widely available and very affordable. This makes it an accessible hobby for anyone on a budget.
Secondly, the versatility of hot glue is truly remarkable. It dries quickly, allowing for rapid project completion – perfect for those spontaneous crafting urges or when you need a last-minute handmade gift. The molten glue can be easily shaped into an array of designs, from simple geometric forms to intricate characters and vibrant abstract patterns. With a little imagination, you can replicate almost anything that inspires you, turning everyday objects or digital icons into tangible, wearable art.
Beyond their practicality, these pins serve as a wonderful medium for personal expression. You can choose colors that match your mood, create symbols that represent your passions, or even design a whole set of pins to commemorate special events or inside jokes with friends. They are excellent conversation starters and a subtle way to showcase your personality without saying a word. Moreover, this project is incredibly beginner-friendly. There’s no complex stitching, intricate painting techniques, or specialized tools required. Just a glue gun and your imagination are enough to get started, ensuring a rewarding crafting experience with minimal frustration.
Essential Materials for Crafting Your Custom Pins
Before you embark on your creative journey, gathering all the necessary tools and materials is crucial. Ensuring you have everything at hand will make the crafting process smooth and enjoyable. Here’s a detailed look at what you’ll need:
- Glue Gun: A standard, low-temperature glue gun is perfect for this project. If you have a high-temperature gun, exercise extra caution as the glue will be hotter. Ensure it’s clean and in good working order.
- Colored Hot Glue Sticks: This is where the magic happens! While clear hot glue works, colored glue sticks eliminate the need for painting later, offering vibrant, ready-to-use hues. You can find these in a wide array of colors, from pastels to neons, and even glitter-infused options. Stock up on your favorite shades to unleash your creativity.
- Parchment Paper (Baking Paper): This non-stick surface is indispensable. Hot glue will peel off parchment paper effortlessly once dry, preserving the shape and integrity of your pins. Wax paper can also work, but parchment paper is generally more reliable.
- Pin Backs: These are the small metal components that allow your creations to be worn. You can purchase pin backs specifically designed for crafts, typically with a flat surface for adhesion. Consider different sizes to match the scale of your pins.
- Black Permanent Marker (Fine-Tip): A fine-tip marker, such as a Sharpie, is ideal for adding delicate details, outlines, or expressive facial features to your pins. Ensure it’s permanent so your designs don’t smudge or fade.
- Strong Adhesive (Gorilla Glue Recommended): To securely attach the pin backs to your hot glue creations, a powerful adhesive is essential. Gorilla Glue, as recommended, is an excellent choice known for its strong bond and durability. Other strong craft glues designed for metal-to-plastic adhesion can also work.
Optional Materials for Enhanced Creativity:
- Templates or Stencils: If freehand drawing isn’t your strong suit, print out small templates of shapes or characters to place under your parchment paper as a guide.
- Glitter: For an extra spark, sprinkle fine glitter onto the wet hot glue before it dries.
- Acrylic Paints: While colored glue is great, you can add more intricate details or shading with acrylic paints once the glue is dry.
- Clear Sealant (e.g., Mod Podge, Clear Nail Polish): To protect your marker details and give your pins a glossy, professional finish, a clear sealant can be applied after all decorations are complete.
Step-by-Step Guide: Crafting Your Custom Hot Glue Pins
Now that you have all your materials, it’s time to bring your designs to life! Follow these detailed steps to create your own unique hot glue pin badges, inspired by the innovative TikTok user @celynhaf:
1. Prepare Your Workspace
Find a clean, flat, and heat-resistant surface. Lay down a sheet of parchment paper over your workspace. If you plan to use templates, slide them underneath the parchment paper now, ensuring they are visible and won’t shift during the gluing process. This preparation ensures a smooth crafting experience and protects your surfaces.
2. Load Your Glue Gun and Start Shaping
Insert your chosen colored hot glue stick into the glue gun and allow it to heat up sufficiently. Once the glue is flowing smoothly, begin carefully drawing your desired shapes directly onto the parchment paper. This is the moment to let your artistic side shine! You can create anything from simple circles, stars, and hearts to more complex designs like flowers, fruits, or cute animal faces. Remember to apply the glue in a consistent layer, ensuring it’s thick enough to be sturdy but not so thick that it takes excessively long to dry. For defined outlines, start with the border and then fill in the center. Don’t be afraid to experiment with layering different colors if you’re feeling ambitious.
3. Allow for Complete Drying
Patience is key in this step. Once you’ve created all your hot glue shapes, set them aside to dry completely. Depending on the thickness of your glue and the ambient temperature, this could take anywhere from a few minutes to about 15-20 minutes. It’s crucial that the glue is fully hardened before you move to the next step; otherwise, your shapes might distort when handled. You can gently touch the glue to check if it’s cool and firm throughout.
4. Gently Peel Off Your Creations
Once thoroughly dry, carefully peel your hardened hot glue shapes off the parchment paper. The non-stick surface should allow them to release easily. Be gentle to avoid bending or cracking your newly formed pins. Admire your vibrant, three-dimensional hot glue pieces – they are now ready for personalization!
@celynhaf diy hot glue pin badges! 🍓🌈 #diy #giftidea #pins #pinbadge #tutorial #easydiy #art
♬ get him back! – Olivia Rodrigo
5. Add Personality with Details
Now it’s time to give your pins character! Grab your fine-tip black permanent marker and draw on expressive faces, intricate patterns, or outlines to define your shapes. This step truly brings your pins to life. For example, turn a yellow circle into a smiling emoji, or add seeds to a red strawberry shape. If you’re feeling adventurous, you can also use acrylic paints for more detailed coloring or shading. Remember to let any marker or paint dry completely before proceeding.
6. Secure the Pin Backs
This is the final structural step. Carefully apply a small, pea-sized dab of strong adhesive, such as Gorilla Glue, to the flat back of each pin. Then, firmly press the pin back onto the desired position on the reverse side of your hot glue creation. Ensure the pin is centered and aligned correctly so your badge hangs straight when worn. Hold it in place for a few seconds to allow the glue to start bonding. It’s crucial to allow the adhesive to cure fully according to the manufacturer’s instructions, which might take several hours or even overnight. A strong bond here ensures your pins will withstand regular use.
7. Optional: Finishing Touches
For added durability and a professional sheen, you can apply a thin layer of clear sealant (like Mod Podge or clear nail polish) over the decorated surface of your pins once all the marker and glue are dry. This will protect your designs from wear and tear, give them a lovely glossy finish, and make them truly stand out. Allow the sealant to dry thoroughly before handling or wearing your new badges.
Tips for Success and Creative Variations
To ensure your hot glue pin badge project is a resounding success, consider these additional tips and explore ways to expand your creativity:
- Controlling Stringy Glue: Hot glue can sometimes be stringy. To minimize this, try releasing the trigger slightly before pulling the glue gun away from your project, or quickly dab the tip on a scrap piece of parchment paper.
- Even Thickness: Strive for a relatively even thickness across your shapes to ensure consistent drying and a sturdy final product. Thinner areas can be fragile, while overly thick areas take longer to set.
- Layering Colors: For multi-color designs, allow the first layer of glue to cool slightly before adding another color on top. This prevents colors from bleeding too much.
- Mixing Materials: Embed small embellishments like rhinestones, small beads, or fine glitter into the wet hot glue for extra sparkle and texture.
- Thematic Collections: Create themed sets of pins! Think seasonal (pumpkins for autumn, snowflakes for winter), holiday-specific (hearts for Valentine’s Day), or based on your favorite fandoms.
- Gift Giving: These handmade pins make thoughtful, personalized gifts for friends, family, or teachers. Package them creatively for an extra special touch.
- Displaying Your Art: Beyond wearing them, these pins can adorn cork boards, backpacks, denim jackets, hats, or even serve as unique magnets if you attach small magnet discs instead of pin backs.
- Practice Makes Perfect: Don’t be discouraged if your first few attempts aren’t exactly what you envisioned. Hot glue is forgiving, and practice will quickly improve your technique.
Sharing Your Hot Glue Creations
One of the most rewarding aspects of any DIY project is sharing your unique creations with the world. Your handmade hot glue pin badges are perfect for this! Pin them to your jacket, backpack, or hat to instantly showcase your artistic flair and personality. They are fantastic conversation starters, allowing you to share your crafting journey with others.
Consider gifting a set of custom-made pins to friends and loved ones. A personalized pin crafted by you holds far more sentimental value than a store-bought item. You could create matching pins for your friend group or design unique badges tailored to each person’s interests and hobbies. Imagine their delight when they receive a one-of-a-kind accessory made with care!
Don’t forget to share your masterpieces on social media! Take vibrant photos of your finished pins and post them using relevant hashtags like #HotGluePins, #DIYCrafts, #HandmadePins, #CraftyWeekend, or #CreativeProjects. You can even tag the original inspirer, @celynhaf, to show your appreciation. Engaging with the online crafting community can provide inspiration, feedback, and connect you with fellow enthusiasts who appreciate the joy of making things by hand. Let your creativity inspire others and become part of a global community of makers.
Conclusion: Your Journey to Handmade Happiness Starts Now
As we’ve explored, crafting hot glue pin badges is much more than just a simple DIY project; it’s an accessible, enjoyable, and incredibly rewarding creative endeavor. From gathering your affordable materials to meticulously drawing shapes, adding intricate details, and finally securing the pin backs, each step offers an opportunity for personal expression and a sense of accomplishment. Inspired by the captivating tutorial from @celynhaf, you now possess all the knowledge and tips required to embark on this exciting crafting adventure.
Whether you’re looking to personalize your accessories, create unique gifts for friends, or simply unwind with a fun and productive weekend activity, these hot glue pins are the perfect canvas. Their versatility, ease of creation, and endless customization options make them an ideal project for crafters of all skill levels. So, gather your supplies, ignite your imagination, and get ready to transform ordinary hot glue into extraordinary, wearable works of art. The world of handmade happiness awaits – start crafting your own collection of adorable hot glue pin badges today!