
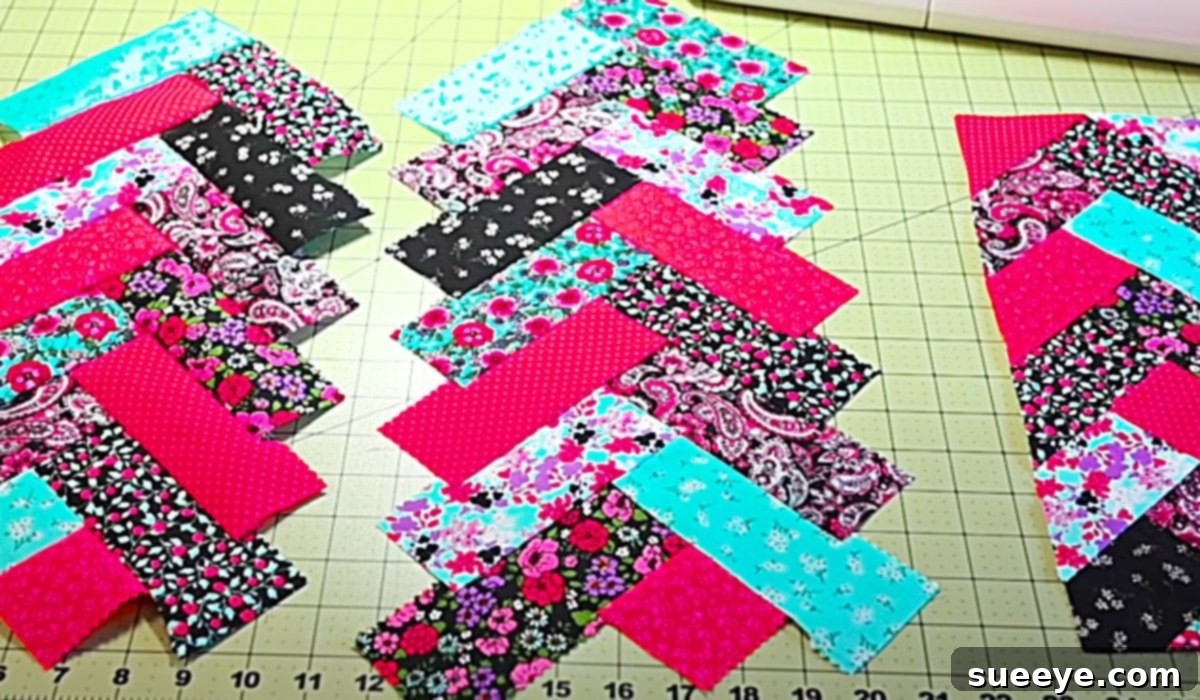
Are you searching for a creative and enjoyable quilting project that allows for boundless customization? Look no further than the delightful technique of French braid quilting using jelly roll strips. This method transforms simple fabric strips into intricate, woven designs that add a touch of elegance and uniqueness to any textile creation. Whether you’re a seasoned quilter or just beginning your journey into the world of fabric artistry, the French braid offers a satisfying and visually stunning outcome. We recently discovered a fantastic tutorial by Pattymac Makes on YouTube, which brilliantly showcases how to master this lovely technique. The simplicity and beauty of these quilted braids make them perfect for an endless array of projects, from practical home decor items to personalized gifts. Imagine crafting charming small curtains, a cozy blanket, a stylish tote bag, or even unique garment embellishments. The versatility of the jelly roll French braid quilting pattern truly makes the possibilities limitless, inspiring both creativity and practicality in equal measure.
Mastering Jelly Roll French Braid Quilting: A Comprehensive Guide to Stunning Fabric Artistry
Jelly roll French braid quilting is a popular and visually appealing technique that utilizes pre-cut fabric strips to create a striking braided effect. This method is celebrated for its ability to produce intricate-looking designs with surprising ease, making it a favorite among quilters of all skill levels. A “jelly roll” typically consists of 40 pre-cut fabric strips, each 2.5 inches wide and 42 inches long, often coordinated in a specific collection or theme. This convenience eliminates the need for extensive fabric cutting, allowing you to dive straight into the creative process. The French braid pattern itself creates a dynamic, diagonal flow across your fabric, resembling a woven braid, which adds depth and movement to your finished piece. It’s a fantastic way to showcase a beautiful fabric collection or to combine various scraps into a cohesive and captivating design. From large bed quilts to smaller accessories, the jelly roll French braid technique delivers a polished and professional look every time.
Why Choose Jelly Roll French Braid Quilting?
Beyond its aesthetic appeal, French braid quilting with jelly rolls offers several compelling advantages:
- Efficiency and Speed: Using pre-cut jelly roll strips significantly speeds up the preparation phase, allowing you to start sewing almost immediately. This is ideal for those who love quilting but have limited time for extensive cutting.
- Visually Stunning Results: The alternating fabric strips create a mesmerizing, three-dimensional effect that is both elegant and eye-catching. It’s a pattern that truly draws attention.
- Versatility: As mentioned, this technique is incredibly adaptable. The finished braided panels can be incorporated into almost any quilting project imaginable, big or small.
- Great for Beginners: While the outcome looks complex, the sewing steps are straightforward, primarily involving straight seams. This makes it an excellent project for those new to quilting who want to achieve impressive results without advanced techniques.
- Scrap-Friendly: If you don’t have a full jelly roll, you can easily use your own collection of 2.5-inch fabric strips, making it a perfect stash-busting project.
- Customization: The choice of fabrics allows for endless design variations. Play with contrasting colors for a bold statement or choose coordinating shades for a more subtle and sophisticated look.
Essential Materials For Your Jelly Roll French Braid Project
Before you embark on your quilting adventure, gathering the right tools and materials will ensure a smooth and enjoyable process. Here’s a detailed list of what you’ll need:
- Jelly Roll Strips or Scrap Fabric: The star of the show! A standard jelly roll contains 40 strips, each 2.5″ x 42″. If you’re using scrap fabric, ensure your strips are consistently cut to 2.5 inches wide and at least 20-42 inches long, depending on the desired length of your braid. Coordinating colors and patterns will enhance the braided effect, so consider how your fabrics will interact.
- A Sewing Machine: Any standard sewing machine capable of a straight stitch will work perfectly. Ensure it’s in good working order and you have fresh needles appropriate for quilting (e.g., universal or quilting needles).
- A Pair of Sharp Scissors: Essential for snipping threads, trimming corners, and general fabric manipulation.
- A Rotary Cutter: This tool is invaluable for quickly and accurately cutting fabric strips and squaring up blocks. Its precision helps maintain consistent strip widths, which is crucial for a neat braid.
- A Cutting Mat: A self-healing cutting mat is necessary to protect your work surface when using a rotary cutter. Choose one large enough to accommodate your fabric strips comfortably.
- An Iron: Pressing seams is a fundamental step in quilting. A good iron helps flatten seams, making your blocks lie flat and ensuring accurate alignment.
- An Ironing Board: Provides a stable surface for pressing your fabric, allowing for crisp, flat seams.
- A Quilter’s Ruler (or Acrylic Ruler): A clear acrylic ruler, ideally with a non-slip grip, is vital for precise cutting and trimming, especially when squaring up your braided sections. A 6″ x 24″ ruler is often recommended for strips.
- Coordinating Thread: Choose a high-quality cotton or polyester thread that matches or blends well with your fabric colors. Neutral colors like white, cream, or light grey are often versatile choices.
- Pins or Fabric Clips: To hold your fabric strips in place while sewing, preventing shifting and ensuring accurate seam allowances.
Directions: Crafting Your Jelly Roll French Braids Step-by-Step
The process of creating jelly roll French braids is more straightforward than it appears, yielding impressive results with a methodical approach. For a visual guide, the Pattymac Makes video tutorial on YouTube is an excellent resource. Here’s a detailed breakdown of the steps:
Step 1: Prepare Your Strips and Establish the Starting Point
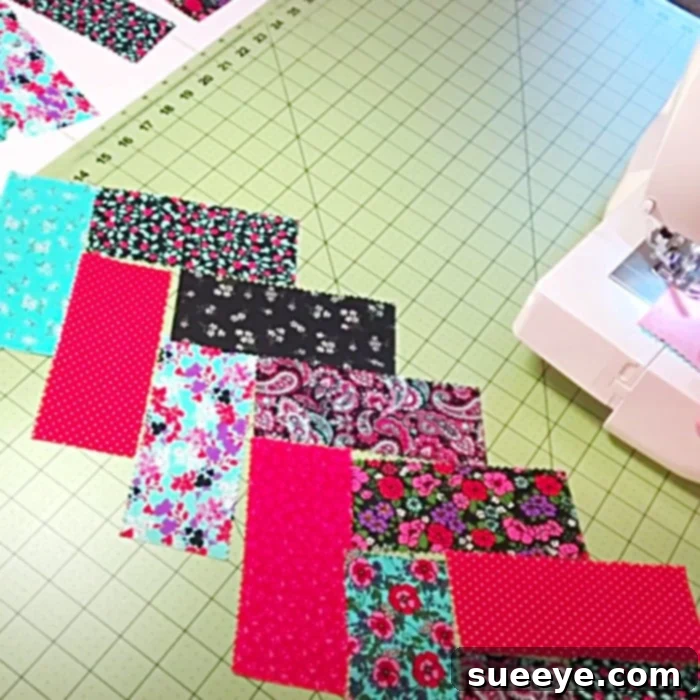
Begin by selecting your jelly roll strips. You’ll need a “center” strip and several “side” strips. The center strip will run through the middle of your braid. Take your first side strip and cut one end at a 45-degree angle. This angled cut is crucial for creating the continuous diagonal pattern of the braid. Lay your center strip right side up. Place the angled end of your first side strip right side down onto the center strip, aligning the raw edge with the long edge of the center strip and creating a 90-degree angle. You want the angled end of the side strip to overhang the center strip slightly at the top.
Step 2: Sewing the First Segment
Sew the first side strip to the center strip using a consistent 1/4-inch seam allowance. Start your stitch just before the angled end of the side strip meets the center strip, and sew along the length of the side strip for about 6-8 inches, or until the entire angled piece is attached. Press the seam open or to one side, depending on your preference. Pressing towards the darker fabric often helps to prevent shadowing. You will notice the beginning of the diagonal pattern emerging.
Step 3: Adding Subsequent Strips to Form the Braid
Now, rotate your piece so the newly sewn side strip is pointing upwards. Take your next side strip (you can alternate colors or follow a sequence). Place this new strip right side down onto the center strip, aligning its raw edge with the raw edge of the center strip. Make sure this strip also has one end cut at a 45-degree angle, and this angled end should overlap the previous side strip. Stitch this new strip to the center strip using your 1/4-inch seam allowance, stopping just before you reach the end of the center strip. Press the seam open or to the side. Repeat this process, adding strips alternately to each side of your center strip. Each new strip will slightly overlap the previous one, creating the interlocking braided effect. Consistency in your 1/4-inch seam allowance is key to a smooth and even braid.
Step 4: Continuing and Expanding the Braid
Continue adding strips, one after the other, to alternating sides of the growing braid. With each strip you add, you will trim the raw edge of the strip to match the angle of the previous strip before sewing it. This maintains the clean, diagonal lines. As your braid grows longer, you’ll need to periodically trim the center strip and the outer edges to maintain straight lines. Always press after each strip is sewn to ensure flat and accurate construction. Keep going until your braid reaches the desired length for your project.
Step 5: Finishing and Squaring Up Your Braid
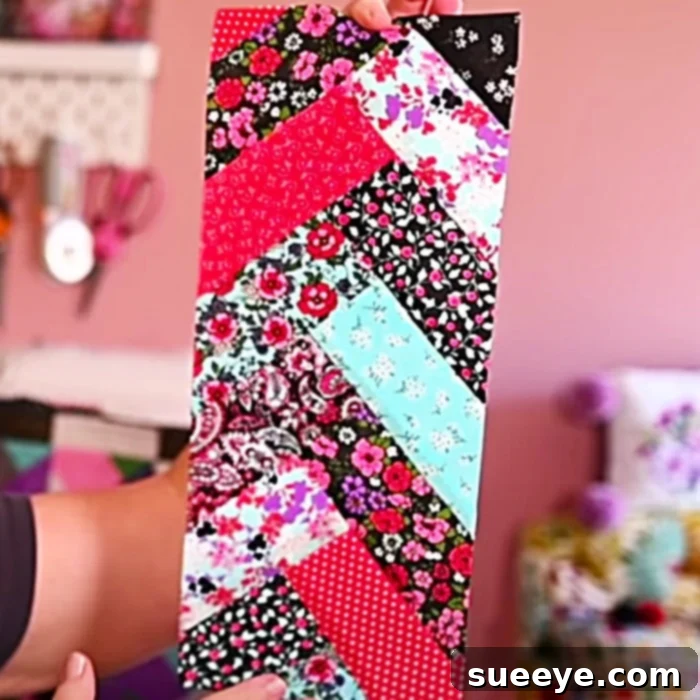
Once your French braid strip is the desired length, you’ll need to square up its sides. Use your rotary cutter and quilter’s ruler to trim the long edges parallel to the center line of the braid. This creates neat, straight edges, which are essential for attaching borders or assembling multiple braids into a larger piece. You can also trim the ends straight if needed. At this point, you have a beautiful, long braided panel that is ready to be incorporated into your chosen project.
Inspiring Project Ideas for Your Jelly Roll French Braids
The beauty of the French braid technique lies in its incredible adaptability. Once you have created your braided panels, the possibilities for transforming them into stunning textile art are truly endless. Here are just a few ideas to spark your creativity:
- Quilts: This is the most obvious application! Combine several braided panels to create striking baby quilts, lap quilts, or even full-sized bed quilts. You can frame the braids with solid borders or sashing for added definition.
- Table Runners and Placemats: A single, well-crafted French braid panel makes an exquisite table runner. Pair it with matching placemats for a coordinated dining set that elevates any meal.
- Wall Hangings: Showcase your intricate braiding as a decorative wall hanging. Add some simple borders and a hanging sleeve, and you have a unique piece of art for any room.
- Pillow Covers: Use a French braid panel as the front of a throw pillow cover. It adds texture and visual interest to your sofa or bed.
- Tote Bags and Pouches: Integrate a braided panel into the design of a handmade tote bag, clutch, or cosmetic pouch for a chic, personalized accessory.
- Curtains or Valances: As demonstrated by the initial inspiration, braided panels can make charming small curtains or valances, adding a touch of handmade elegance to your windows.
- Garment Embellishments: Consider using smaller braided sections to embellish a denim jacket, a vest, or the hem of a skirt for a unique, handcrafted fashion statement.
- Apparel Accents: Create braided panels to use as decorative bands on hats, headbands, or even as unique straps for bags.
- Pet Beds: A cozy and stylish pet bed can be constructed with a French braid top, making it both durable and beautiful for your furry friends.
Tips for Success in French Braid Quilting
To ensure your French braid quilting project turns out beautifully, keep these tips in mind:
- Consistent Seam Allowance: A precise 1/4-inch seam allowance is paramount. Inconsistent seams will lead to a wavy or distorted braid. Consider using a 1/4-inch quilting foot for your machine.
- Pressing is Key: Pressing after each strip is sewn helps your seams lie flat and contributes to the accuracy of your finished braid. Decide early if you will press seams open or to one side and stick to that method.
- Choose Your Fabrics Wisely: High-contrast fabrics will make the braid pattern pop, while lower-contrast fabrics will create a softer, more blended effect. Consider the overall aesthetic you want to achieve.
- Start with a Template: If you’re new, it might be helpful to draw the initial 45-degree angle on a piece of paper or cardboard to use as a guide for cutting your first strip.
- Stay Organized: Keep your strips neatly stacked in the order you plan to sew them to maintain your desired color progression.
- Don’t Rush: Take your time with each step, especially when aligning strips and pressing. Enjoy the process!
Caring for Your Quilted Creations
Once your beautiful jelly roll French braid project is complete, proper care will ensure its longevity. For most cotton quilts and quilted items, machine washing on a gentle cycle with cold water and a mild detergent is appropriate. Tumble dry on low heat or, for best results, lay flat to dry. Avoid harsh chemicals or excessive heat, which can damage the fabric and stitching. Always check fabric manufacturer recommendations if you’ve used specialty fabrics.
The jelly roll French braid quilting technique is a wonderfully rewarding project that combines simplicity with striking visual impact. With pre-cut strips, a few essential tools, and a clear set of directions, you can transform ordinary fabric into extraordinary textile art. We highly recommend checking out the video tutorial by Pattymac Makes on YouTube for a fantastic visual demonstration that will guide you through each step. Whether you create functional items for your home or beautiful gifts for loved ones, you’ll undoubtedly fall in love with the elegance and charm of French braid quilting. So, gather your jelly roll strips, fire up your sewing machine, and start braiding your way to your next favorite handmade masterpiece!