
The Ultimate Guide to DIY Fabric Mini Bolts: Organize Your Stash Like a Pro
Are you a passionate crafter or an enthusiastic sewist whose fabric stash has spiraled into an unmanageable mountain of textiles? Do you find yourself rummaging through piles, only to discover forgotten treasures or creased remnants just when inspiration strikes? You’re not alone! A growing fabric collection is a joy, but maintaining its order and accessibility can be a significant challenge. Fortunately, there’s a simple, cost-effective, and incredibly satisfying solution that will transform your chaotic fabric corner into an organized haven: DIY fabric mini bolts.
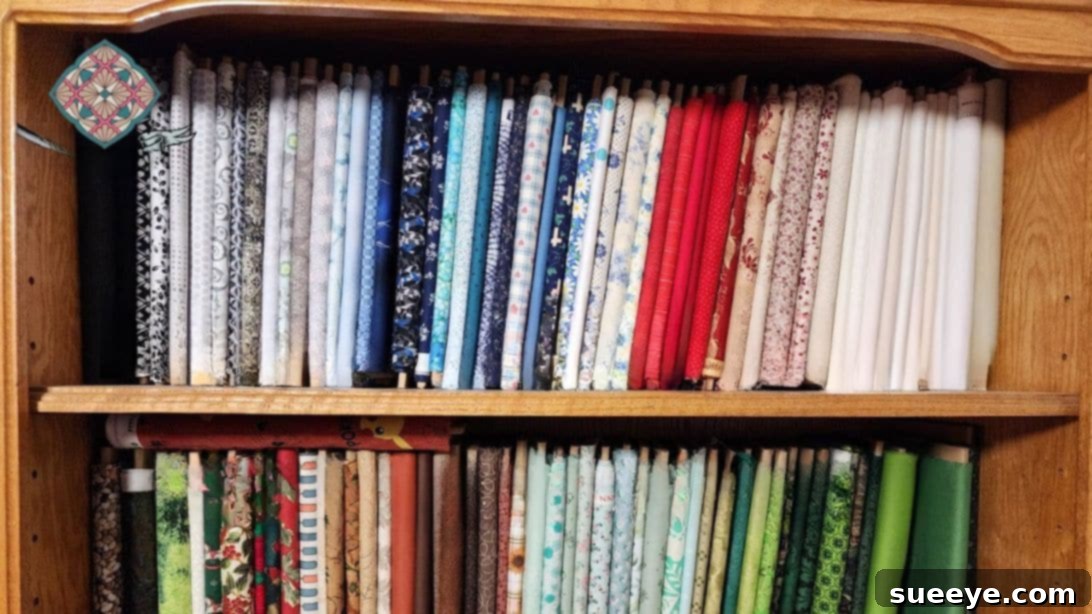
Inspired by how professional fabric stores keep their inventory pristine, these homemade cardboard bolts are a game-changer for any sewing room. They not only free up valuable space and keep your fabrics wrinkle-free, but also make it incredibly easy to see and access every beautiful print and vibrant color in your collection. Get ready to embark on a journey to a perfectly organized fabric stash!
Why Mini Bolts Are a Game-Changer for Fabric Storage
The concept of using mini bolts for fabric storage goes beyond mere aesthetics; it’s a highly functional approach that addresses several common pain points for crafters and sewists. This ingenious method offers a multitude of benefits that will elevate your fabric organization from frustrating to fantastic.
- Optimal Space Utilization: Traditional folding methods often result in bulky, uneven stacks that quickly overflow shelves and drawers, making it difficult to store a large collection efficiently. Mini bolts allow you to roll your fabric tightly and uniformly, creating compact, vertical storage units. This efficient stacking maximizes your shelf space, enabling you to fit significantly more fabric into your existing storage footprint without creating clutter. You’ll be amazed at how much fabric you can store neatly when it’s rolled.
- Wrinkle-Free Preservation: One of the most frustrating aspects of fabric storage is discovering your beautiful textiles marred by deep, stubborn creases from prolonged folding. Rolling fabric around a sturdy bolt minimizes sharp folds and pressure points, significantly reducing the likelihood of wrinkles. This means your fabric is project-ready as soon as you unroll it, saving you valuable time and effort on ironing. Imagine grabbing a piece of fabric and immediately being able to cut into it, rather than having to spend precious creative minutes at the ironing board! (You can also learn more about keeping laundry wrinkle-free with this clever hack: Best Hack for Wrinkle-Free Laundry).
- Enhanced Visibility and Accessibility: Imagine being able to instantly spot the perfect print or shade for your next project without rummaging. When fabrics are neatly rolled on mini bolts, their edges are visible, showcasing patterns, textures, and colors at a glance. No more digging through heavy stacks or pulling out every piece to find what you need. This visual organization aids immensely in project planning, inspires new ideas, and ensures no fabric gets “lost” or forgotten in the depths of your stash.
- Protection and Longevity: Storing fabric rolled also offers a degree of protection against dust (especially if stored in covered bins or behind glass doors), light exposure (which can fade certain dyes), and accidental snags that can occur with loose piles. By keeping fabrics tidy and contained, you contribute to their overall longevity and pristine condition, preserving your investment in these beautiful materials.
- Professional and Inspiring Workspace: A well-organized craft space isn’t just about efficiency; it’s about creating an inspiring and joyful environment. Mini-bolted fabrics arranged neatly on shelves mimic the inviting display of a high-end fabric store, making your creative sanctuary feel more professional, orderly, and motivating. This visual appeal can boost your creativity and make your time in the sewing room even more enjoyable.
- Cost-Effective Solution: Compared to purchasing expensive ready-made fabric storage systems or custom shelving, DIY mini bolts are an incredibly budget-friendly alternative. By utilizing readily available (and often recycled) cardboard, you can achieve a sophisticated storage solution without breaking the bank.
As you optimize your fabric storage, consider other aspects of your quilting and sewing supplies. For instance, if you’re looking for clever alternatives for essential materials, you might find this article useful:
RELATED: 5 Alternatives to Store Bought Quilt Batting
Materials You’ll Need for Your DIY Fabric Bolts
Crafting these mini bolts is incredibly straightforward and requires just a few basic materials, many of which you might already have on hand. The beauty of this project lies in its simplicity, adaptability, and cost-effectiveness, making it accessible for everyone.
- Sturdy Cardboard Sheets (12″ x 12″, at least 1/8″ thick): This is the fundamental component of your mini bolts. While you can certainly purchase pre-cut cardboard sheets from craft stores or online suppliers for a consistent, professional look, repurposing cardboard boxes from packages (like shipping boxes from online orders) is an excellent eco-friendly and budget-friendly option. Look for corrugated cardboard that is firm, uncreased, and not too thin to ensure your bolts are durable and provide good support for your fabric. The 12″x12″ dimension is ideal for most standard fabric widths once folded, and the 1/8″ thickness (or about 3mm) provides the necessary rigidity to prevent the bolt from bending under the fabric’s weight. If you’re cutting your own, aim for precise, square cuts.
- Ruler (preferably 6-inch or longer): An essential tool not just for precise measurements if you’re cutting cardboard, but more importantly, for creating the initial strong crease that forms the core of your mini bolt. A metal ruler offers greater durability and a cleaner, sharper edge for creasing the cardboard than a plastic one. A 6-inch ruler is perfect for the specific technique used in this tutorial, but a longer one will also work.
- Fabric Pins or Clips: These are used to secure the end of your fabric once it’s neatly rolled onto the bolt, preventing it from unraveling. Standard sewing pins with sharp points work perfectly. For heavier fabrics, or if you prefer a pin-free alternative, fabric clips (such as Clover Wonder Clips) or even small binder clips can be excellent choices.
- Optional: Box Cutter or Craft Knife (with a cutting mat): If you’re cutting your own cardboard from larger boxes, a sharp box cutter or craft knife will make the process much easier, faster, and yield cleaner, straighter edges than scissors. Always use these tools with extreme caution, away from your body, and on a protective cutting mat to prevent damage to your work surface and ensure safety.
- Optional: Pencil: Useful for marking cut lines, measurements, or any other guidelines on the cardboard, if needed, before cutting or folding.
How to Make Mini Bolts: A Step-by-Step Tutorial
Now that you have your materials gathered, let’s dive into the simple and satisfying process of creating your very own fabric mini bolts. Follow these detailed steps for an efficient and effective organizational tool that will transform your fabric storage.
Step 1: Preparing and Folding Your Cardboard
Begin by taking a 12″ x 12″ cardboard sheet. If you’re using a repurposed box, ensure it’s cut cleanly into this size, perfectly square, and completely flattened. The foundation of a good mini bolt is a well-prepared piece of cardboard. Carefully fold the cardboard exactly in half. Take your time to align all the edges perfectly before pressing down firmly along the fold to create a strong, sharp crease down the middle. This central fold will form the primary spine of your mini bolt, so precision here is key to a sturdy and symmetrical finished product.
Step 2: Creating the Core Structure of Your Bolt
With your cardboard now folded in half from Step 1, open it slightly so it forms a gentle ‘V’ shape, almost like a book. Take your 6-inch ruler and place it directly in the middle of one half of the cardboard, running parallel to the central fold you just made. The purpose here is to create a consistent, tight channel or a ‘spine’ for your fabric. Gently but firmly apply pressure to the ruler with one hand, holding it securely in place. With your other hand, bend the outer edge of the cardboard upwards and inwards, pressing it firmly over the edge of the ruler. This action will create a second sharp, defined crease parallel to the first. Repeat this exact process on the other half of the cardboard, bending the outer edge over the ruler to form a symmetrical core. You should now have a cardboard piece with three strong, parallel creases, forming a raised central section that will hold your fabric. To add extra stability and prevent the bent-over sides from unfolding while you work, you might secure them on the inside with a small piece of painter’s tape or masking tape. This step is crucial for the bolt’s structure and its ability to hold fabric tightly. Repeat this entire process for all the cardboard pieces you plan to turn into mini bolts to create a uniform collection.
Step 3: Preparing Your Fabric for Rolling
Before you can roll your fabric onto the mini bolt, it needs to be properly prepped to ensure an even and compact roll. Lay your fabric out flat on a large, clean surface, such as a cutting mat or a large table. Take the time to smooth out any existing wrinkles or folds as much as possible. For optimal rolling and a consistent width, first, fold your fabric lengthwise in half, making sure the edges (especially the selvage edges) are neatly aligned. Then, take this already folded fabric and fold it in half again, bringing the selvage edge (the finished edge of the fabric) to the previously folded edge. This creates a consistent width, typically around 11 inches, which is perfect for fitting onto the 12-inch mini bolts with a small margin on either side. This careful and precise folding ensures that your fabric will roll evenly and compactly onto the bolt, preventing uneven edges, bulging, or slippage.
Step 4: Rolling Your Fabric onto the Mini Bolt
Now it’s time to marry your fabric with its new organizational home. Take one of your prepared mini bolts and place it on top of one end of your neatly folded fabric. The goal is to start the roll as straight and tight as possible to ensure a wrinkle-free finish. Fold the very end of your fabric (about 1-2 inches) over the top edge of the mini bolt. Then, gently lift the flap of fabric you just folded over and carefully insert the raw edge of the fabric into the central channel you created in the cardboard bolt in Step 2. This action effectively “locks” the beginning of your fabric securely onto the bolt. Once the fabric is securely inserted, begin to gently but firmly roll the fabric towards the other end of the bolt. Maintain even tension as you roll to ensure a smooth, tight, and uniform bolt of fabric. Avoid rolling too loosely, as this can lead to wrinkles, shifting, or the fabric slipping off the bolt. Continue rolling until all the fabric is neatly wrapped around the bolt, creating a clean, professional-looking package.
Step 5: Securing and Labeling Your Fabric Bolt
Once your fabric is fully rolled onto the mini bolt, you need to secure the loose end to prevent it from unraveling and becoming messy. Use one or two fabric pins (or clips, if you prefer) to fasten the end of the fabric to the rolled bolt, piercing through a few layers of the fabric itself. It’s absolutely crucial to ensure the pins do not go all the way through the entire bolt and protrude out the back. Protruding pin tips could scratch surfaces, snag other fabrics, or, more importantly, injure you. To check, flip the bolt over and gently feel for any sharp pin tips. If you find any, adjust the pin’s placement immediately to ensure it’s securely embedded within the fabric layers without piercing through. For an even more organized and efficient system, consider adding a small label to each bolt. You can write down important details like the fabric type (e.g., “quilting cotton,” “linen blend”), fiber content (e.g., “100% cotton”), approximate yardage, care instructions, or even the project you intend to use it for. This simple step will save you immense time and guesswork in the future, making your fabric library truly functional.
Tips for Maximizing Your Fabric Stash Organization with Mini Bolts
Creating mini bolts is just the first step towards a beautifully organized and highly functional fabric collection. Here are some additional tips to help you get the most out of your new system and maintain a tidy, inspiring craft space:
- Categorize Your Stash Smartly: Once your fabrics are on mini bolts, take the opportunity to categorize them. Group your bolts by fabric type (e.g., cotton, linen, knits, fleece), by color family, by designer collection, by season, or even by intended project type (e.g., quilting cottons, apparel fabrics). This logical grouping makes finding specific fabrics incredibly fast and efficient, saving you precious creative time.
- Label Everything Precisely: Don’t underestimate the power of a good label! Use small sticky notes, self-adhesive labels, or even a piece of paper tucked under the securing pin to note essential fabric details. Information like the exact fabric type, fiber content, exact yardage, washing instructions, and where you purchased it can be invaluable. This prevents guessing and ensures you use the right fabric for the right project.
- Choose Smart Storage Solutions: With fabrics now neatly bolted, your storage options expand. They can be stored vertically on bookshelves (mimicking a fabric store display), horizontally in wide drawers, or neatly stacked in clear plastic bins. Clear bins are particularly fantastic as they allow you to see your fabrics at a glance while protecting them from dust, pests, and direct sunlight, which can fade colors over time.
- Batch Your Bolting Process: Instead of making one bolt at a time as you acquire new fabric, consider dedicating an hour or two periodically to preparing several cardboard pieces and then rolling a batch of your fabrics. This streamlines the process and gets your entire stash organized much faster and more efficiently. Put on some music or a podcast and make an afternoon of it!
- Maintain and Declutter Regularly: Even with a perfect organizational system, it’s good practice to periodically review your fabric stash. Once a year, go through your bolts. Donate, sell, or swap fabrics you no longer love, fabrics that don’t fit your current projects, or scraps that are too small to be useful. This ongoing decluttering prevents your stash from becoming overwhelming again and makes space for new inspirations.
- Consider Fabric Weight and Type: While this method works for most fabrics, be mindful of extremely thick or very slippery materials. For very heavy upholstery fabrics, you might need slightly thicker cardboard. For very slippery silks or satins, you might need extra pins or a wider tape to secure the ends initially.
Revolutionize Your Fabric Storage Today!
Transforming your fabric stash from a daunting, disorganized mess into an inspiring, accessible collection is one of the most rewarding steps you can take in your creative journey. These DIY fabric mini bolts offer an elegant, practical, and incredibly effective solution for anyone struggling with fabric organization, whether you have a small hobby collection or a burgeoning fabric library.
Not only will you reclaim valuable space in your craft room and keep your beautiful textiles pristine and wrinkle-free, but you’ll also find renewed joy, efficiency, and inspiration in your crafting process. Say goodbye to endless searching through crumpled piles and hello to a perfectly curated fabric library where every print and color is visible and ready for your next masterpiece. Embrace this simple yet powerful hack, and watch your sewing room become a beacon of order, creativity, and calm. What are you waiting for? Gather your materials, follow these easy steps, and start crafting your mini bolts today to revolutionize your fabric storage forever!