
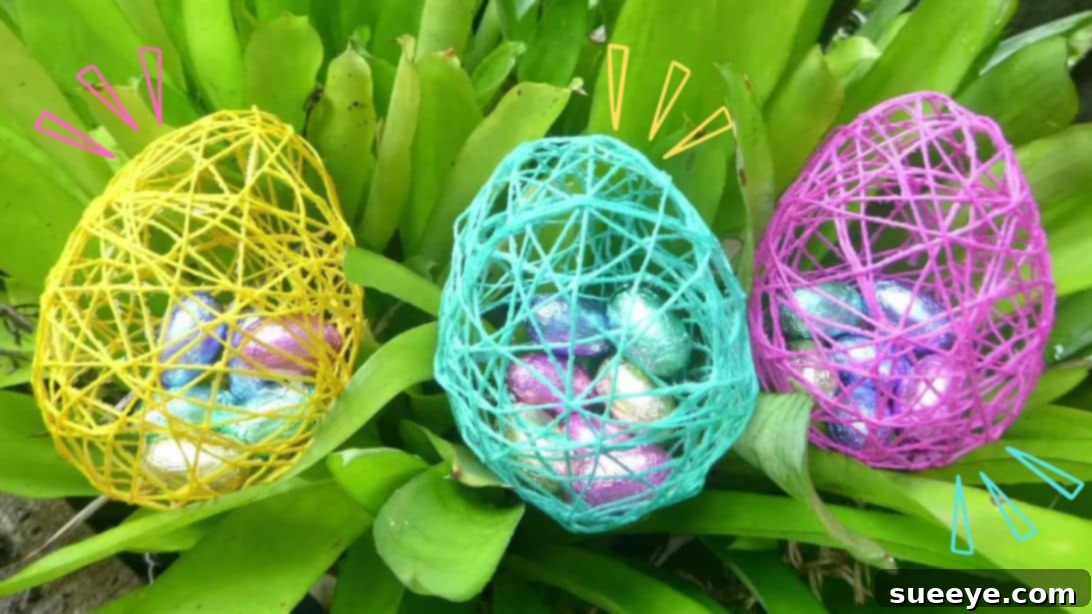
Craft Adorable DIY Easter String Egg Treat Holders: A Fun & Reusable Project for All Ages
Get ready to elevate your Easter celebrations with a delightful and eco-friendly craft project: DIY Easter String Egg Treat Holders! Forget fragile, single-use plastic eggs; this year, create vibrant, durable, and reusable treat containers shaped like charming, colorful eggs. Perfect for an exciting Easter egg hunt, these handmade treasures are sure to bring smiles to every child’s face, not just for the yummy surprises tucked inside, but also for their unique, handcrafted appeal. What makes this idea truly special is their resilience – crafted from yarn, they’re soft, unbreakable, and perfectly safe for even the most enthusiastic little hands. Plus, their reusability means you can collect them after the festivities and bring them out again next year, either for another thrilling egg hunt or as charming seasonal decor. Join us as we guide you through creating these wonderful string eggs, inspired by the creative minds at Easy Kids Craft on YouTube. Let’s dive into a project that combines fun, sustainability, and endless Easter joy!
Why Choose DIY String Eggs Over Traditional Options?
In a world increasingly focused on sustainability and mindful consumption, these DIY string egg treat holders offer a refreshing alternative to conventional Easter egg choices. Beyond their undeniable charm, they come with a host of benefits that make them a superior option for your holiday celebrations:
- Durability and Safety: Unlike delicate hard-boiled eggs that can easily crack or plastic eggs that might snap, string eggs are robust yet soft. This means no more worries about accidental breakage during a spirited egg hunt. They are also gentle on little hands and much safer than sharp plastic pieces.
- Eco-Friendly and Reusable: A significant advantage is their reusability. Once Easter is over, simply store these yarn eggs away, and they’ll be ready for action next year. This significantly reduces waste compared to single-use plastic eggs, aligning perfectly with a more sustainable lifestyle.
- Customizable and Creative: The possibilities for customization are endless! Choose any yarn color, add glitter, beads, or ribbons, and even vary the size. This allows for personalized creations that truly reflect your style and the spirit of the season. It’s an excellent way to express creativity and make each egg unique.
- Sensory Experience for Kids: The process of making these eggs involves tactile engagement with yarn and glue, offering a wonderful sensory experience for children. The soft texture of the finished eggs is also pleasant to touch.
- Cost-Effective: While there’s an initial investment in materials, the reusability factor makes them highly cost-effective in the long run. Many materials might even be items you already have around the house.
- Unique Aesthetic: String eggs possess a whimsical, handcrafted aesthetic that plastic eggs simply can’t match. They add a rustic yet elegant touch to your Easter decor, making your home feel cozy and festive.
Essential Materials for Your String Egg Creation
Gathering your supplies is the first exciting step in any DIY project. For these charming string egg treat holders, you’ll need a few common and easily accessible items. Here’s a detailed list to ensure you have everything ready before you begin:
- Small Water Balloons: These are crucial for forming the egg shape. Opt for good quality balloons that can withstand inflation and the weight of the wet yarn. Regular party balloons can also work, but water balloons are often smaller and more consistently egg-shaped when partially inflated.
- White Craft Glue (PVA Glue): Standard white school glue or craft glue works perfectly. It dries clear and provides a firm, durable finish. Ensure you have enough, as you’ll be soaking the yarn thoroughly.
- Water: Used to dilute the glue, creating a workable consistency that allows the yarn to fully absorb the adhesive without becoming too thick or clumpy.
- Wide Container or Bowl: You’ll need this for mixing the glue solution and soaking the yarn. Choose a container with a wide opening to easily submerge and coat your yarn.
- Scissors: For cutting the yarn to the appropriate length. A sharp pair will make the process smoother.
- Yarn: This is the star of the show! Any type of yarn can work, but medium-weight acrylic or cotton yarn is often recommended for beginners. Consider vibrant Easter colors like pastels (pink, blue, yellow, green, lavender) or classic white for a sophisticated look. Thicker yarn will create a more pronounced texture, while thinner yarn will result in a more delicate, intricate web.
- Newspaper or Protective Covering: Essential for protecting your workspace from glue spills.
- Gloves (Optional): If you prefer to keep your hands clean while working with the glue mixture.
Step-by-Step Guide: Crafting Your DIY Easter String Eggs
Now that you have all your materials ready, let’s embark on the creative journey of making these delightful string egg treat holders. Follow these detailed steps carefully for the best results, and remember, crafting should be a fun and relaxing experience!
Step 1: Preparing Your Balloons and Glue Mixture
The foundation of your string egg lies in the balloon and the perfectly mixed adhesive. Take your time with this initial stage to ensure a smooth crafting process.
- Inflate the Balloons: Carefully blow air into your small water balloons. The key is not to overinflate them to their full capacity. Instead, inflate them just enough so they take on a distinct egg-like shape. Gently squeeze and mold them with your hands if needed to achieve that classic oval form. Tie the ends of the balloons tightly to prevent air from escaping. Make sure the knots are secure, as these balloons will serve as your mold. You can prepare several balloons at once to streamline the process.
- Prepare Your Workspace: Lay down newspaper, old plastic sheets, or a disposable tablecloth to protect your working surface. This project can get a bit messy, so preparation is key!
- Mix the Glue Solution: In your wide container or bowl, combine equal parts of white craft glue and water. For example, if you use half a cup of glue, add half a cup of water. Stir the mixture thoroughly with a spoon or craft stick until it is completely incorporated and has a smooth, consistent, somewhat thin but still sticky, liquid consistency. This dilution is crucial as it allows the yarn to absorb the glue effectively without becoming too stiff or difficult to work with.
Step 2: Soaking and Wrapping the Yarn
This is where your string eggs truly begin to take shape! Patience and a steady hand will help you create beautiful, well-formed eggs.
- Cut the Yarn: Measure and cut your chosen yarn into manageable lengths. A good starting point is about 9 to 10 yards (approximately 8-9 meters) per egg, but this can vary depending on the size of your balloon and how dense you want your string egg to be. You can cut several pieces at once to speed up the process.
- Soak the Yarn: Take one length of yarn and submerge it completely into the glue mixture. Ensure it is fully saturated and absorbed, allowing it to soak for a minute or two. You want the yarn to be thoroughly coated and pliable.
- Remove Excess Glue: Gently pull the yarn out of the mixture, running it between your fingers (or gloved fingers) to squeeze off any excess glue. You want the yarn to be wet and sticky, but not dripping excessively.
- Start Wrapping the Balloon: Begin wrapping the glue-soaked yarn around one of your prepared balloons. Start by tying the very end of the yarn around the balloon’s knot, or simply hold it in place until the first few wraps secure it. Then, continue wrapping the yarn in a random, crisscross pattern around the entire surface of the balloon.
- Control the Spacing: As you wrap, pay attention to the spacing between the yarn strands. You need to leave enough open space for treats to be inserted and removed later. Aim for a delicate, web-like structure rather than a dense, solid shell. Continue wrapping until the balloon is covered to your liking, maintaining an open, airy feel.
- Secure the End: Once you’ve used up all your yarn for that balloon, make sure the end of the yarn is tucked securely under other strands or tied to another piece of yarn to finish it nicely. This prevents it from unraveling during the drying process.
Step 3: Drying and Finishing Your String Eggs
The drying process is critical for the structural integrity of your string eggs. Don’t rush this step!
- Hang to Dry: Carefully hang each wrapped balloon to dry completely. You can use clothespins, paper clips, or string tied to the balloon’s knot to hang them from a clothesline, a drying rack, or even an overturned cardboard box with small holes punched in it. Ensure they are in a well-ventilated area, away from direct heat or humidity.
- Allow Ample Drying Time: Drying can take anywhere from 12 to 24 hours, or even longer, depending on the humidity in your environment and how much glue the yarn absorbed. The yarn must be completely dry and solid to the touch. It should feel stiff and retain its shape firmly. Resist the urge to poke or squeeze them prematurely!
- Pop the Balloons: Once the yarn is absolutely dry and rigid, it’s time for the satisfying part: gently popping the balloon! Use a pin, a sharp needle, or the tip of a small scissor to poke the balloon. You’ll hear a small pop, and the balloon will deflate and shrink away from the hardened yarn shell.
- Carefully Remove the Balloon: Once deflated, carefully reach inside the yarn egg and pull out the shriveled balloon pieces. Be gentle to avoid damaging the delicate string structure. If a small piece of balloon is stubborn, you can use tweezers to extract it.
- Fill with Treats: Now your beautiful string egg treat holders are ready to be filled! Gently push small egg chocolates, jelly beans, mini toys, or any other desired Easter treats through the open spaces in the yarn. Their flexible design allows for easy insertion of various goodies.
Expert Tips for Crafting Perfect String Eggs
To ensure your DIY Easter string eggs turn out beautifully and stand the test of time, keep these helpful tips in mind:
- Balloon Size Matters: The size of your inflated balloon directly dictates the size and shape of your finished string egg. Experiment with slightly different inflation levels to create a variety of egg sizes for your hunt.
- Glue Consistency is Key: If your glue mixture is too thick, the yarn won’t absorb it properly, leading to a weak structure. If it’s too watery, it won’t provide enough rigidity. Aim for a consistency similar to thin pancake batter.
- Don’t Overwrap: Resist the urge to wrap the yarn too densely. The charm of these eggs lies in their delicate, open-weave structure. Overwrapping makes it harder to insert treats and less aesthetically pleasing.
- Thorough Drying: This cannot be stressed enough. Incomplete drying will result in a flimsy, potentially moldy egg. If in doubt, let them dry for an extra few hours. You can even gently blow a fan on them to speed up the process in a well-ventilated room.
- Creative Embellishments: Before the glue fully dries, you can sprinkle glitter onto the wet yarn for a sparkling effect. Once dry, you can also tie small ribbons or attach artificial flowers for extra flair.
- Child Participation: This is a fantastic project for older children! They can help with inflating balloons, cutting yarn, and wrapping (with adult supervision for glue and scissors). It’s a wonderful way to involve them in Easter preparations.
Variations and Creative Ideas for Your String Eggs
Once you’ve mastered the basic technique, feel free to unleash your creativity! These string eggs are incredibly versatile:
- Color Combinations: Instead of a single color, use two or three complementary yarn colors on one egg for a striped or multicolored effect.
- Different Yarn Textures: Experiment with different yarn types – fluffy chenille, sparkly metallic, or even jute twine for a rustic look. Each will create a unique visual and tactile experience.
- Larger Decorations: Use larger balloons (like small standard party balloons) to create bigger string eggs that can serve as impressive centerpieces or home decor elements, perhaps filled with fairy lights.
- Hanging Ornaments: Attach a loop of ribbon to the top of the egg before drying, and they can be hung as ornaments on an Easter tree or around the house.
- Gift Packaging: These make charming and unique packaging for small gifts beyond just Easter treats.
Caring for Your Reusable String Eggs
One of the best features of these DIY string eggs is their reusability. To ensure they last for many Easters to come:
- Gentle Handling: While durable, they are still a crafted item. Handle them gently, especially when filling or emptying.
- Clean Before Storage: Ensure any treat residues are cleaned out before storing. A quick wipe with a dry cloth is usually sufficient.
- Proper Storage: Store them in a dry, cool place, preferably in a box or container where they won’t be crushed. Avoid damp areas to prevent mold or mildew.
Embrace the Joy of Homemade Easter!
Creating your own DIY Easter string egg treat holders is more than just a craft; it’s an opportunity to infuse your holiday with personal charm, creativity, and a touch of eco-consciousness. These delightful, unbreakable yarn eggs promise an unforgettable Easter egg hunt and serve as beautiful, reusable decorations that you’ll cherish year after year. They are a testament to the joy of handmade items and the simple pleasure of making memories with loved ones. So gather your materials, follow our guide, and prepare to add a unique, handcrafted sparkle to your Easter celebrations. Happy crafting, and may your Easter be filled with joy, laughter, and plenty of sweet surprises!
*All image credit for this delightful project belongs to Easy Kids Craft via YouTube. We highly recommend visiting and subscribing to their channel for more inspiring and creative DIY ideas!