
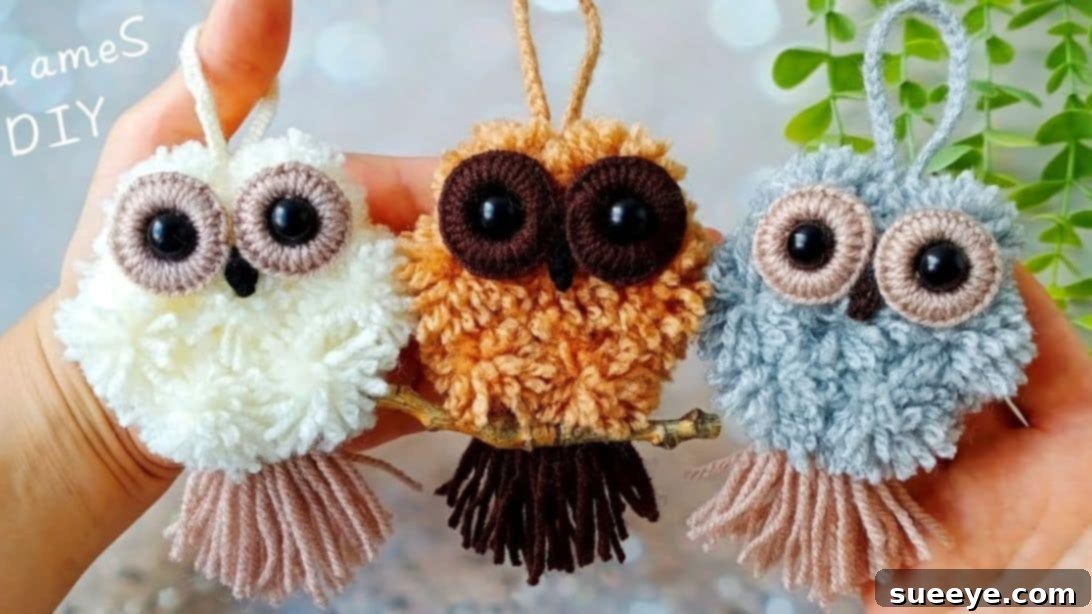
Craft Adorable DIY Yarn Owls: An Easy Step-by-Step Guide for Handmade Gifts
Unleash your creativity and dive into the enchanting world of crafting with this delightful tutorial on making mini yarn owls. These adorable creatures are not only incredibly simple to construct but also serve as the perfect heartfelt gift for friends, family, or even as charming additions to your own home decor. Whether you’re a seasoned crafter or just starting your DIY journey, this project is designed for everyone. With minimal materials and straightforward steps, you can complete a single owlet in mere minutes, experiencing the joy of handmade creation without needing any specialized skills. You’ll be amazed at how easily you can achieve professional-looking results right from your very first attempt!
This comprehensive guide will walk you through each phase of the process, ensuring you have all the information needed to bring your fluffy little owls to life. For a visual demonstration, we highly recommend following the fantastic video tutorial by Ola ameS DIY on YouTube, which perfectly complements these written instructions.
Why These Mini Yarn Owls Are Your Next Must-Try Craft Project
There are countless reasons why these mini yarn owls stand out as an exceptional DIY endeavor. Firstly, their simplicity makes them accessible to crafters of all ages and skill levels, transforming what might seem like a complex art into an achievable and enjoyable pastime. Secondly, the minimal investment in materials means you can create numerous owls without breaking the bank, making them a fantastic option for bulk gifting or decorating for various occasions.
Beyond their ease and affordability, these yarn owls offer immense scope for personalization. You can experiment with different yarn textures, colors, and embellishments to create a unique personality for each owl. Imagine a collection of owls in vibrant hues, or a more subtle, natural palette, each reflecting a distinct charm. They are also incredibly versatile – perfect as keychains, ornaments, thoughtful gift toppers, or even as miniature desk companions to brighten your workspace. The therapeutic act of crafting, coupled with the satisfaction of creating something beautiful with your own hands, makes this project a truly rewarding experience.
Materials You’ll Need for Your Owl Craft
One of the best aspects of this project is the limited number of supplies required, most of which you might already have around the house. Gathering your materials beforehand will ensure a smooth and enjoyable crafting process.
- Yarn: You’ll need three distinct colors to give your owls character.
- Gray Yarn: This will form the main fluffy body of your owl. A medium-weight yarn works best for creating voluminous pom-poms.
- Brown Yarn: Used for the owl’s expressive eyes and charming tail. Choose a shade that contrasts nicely with the body color.
- Black Yarn: Essential for crafting the tiny, adorable beak. A thinner yarn or even embroidery floss can be ideal here.
- Scissors: A sharp pair of craft scissors will make cutting yarn and shaping your owls much easier.
- Small Black Beads: These are crucial for giving your owls their characteristic bright and watchful eyes. Ensure they are small enough to fit proportionately on the owl’s face.
- Hot Glue Gun and Glue Sticks: Your primary adhesive for assembling all the components. Hot glue provides a strong, quick bond, which is perfect for this project. Always exercise caution when using a hot glue gun.
- Cardboard: A sturdy piece of cardboard is needed to create the base for your owl’s body. Recycled cardboard from old boxes works perfectly.
Crafting Your Mini Yarn Owls: A Detailed Step-by-Step Guide
Now that you have all your materials ready, let’s begin the exciting process of bringing your mini yarn owls to life. Follow these steps carefully, and don’t hesitate to refer to the video tutorial if anything is unclear.
Step 1: Creating the Fluffy Body Base with Yarn Pom-Poms
The foundation of your adorable owl is its fluffy, round body, made from multiple small yarn pom-poms. Start by cutting a single piece of gray yarn, approximately 6-8 inches long, and set it aside; this will be used for tying. Next, take your gray yarn and begin wrapping it around your forefinger, making sure the wraps are snug but not overly tight. You will need to wrap the yarn a total of 20 times. This specific number ensures a good volume for your individual pom-pom pieces. Once you’ve completed 20 wraps, carefully cut the yarn from the main skein, leaving a short tail.
Gently slide the looped yarn off your finger, keeping its circular shape intact. Place this bundle of loops precisely on top of the gray yarn piece you initially set aside. Use this separate piece to wrap securely around the center of the looped yarn bundle. Tie a very tight double knot to cinch the loops together, forming a bow-tie shape. Trim any excessively long ends from this tying piece. Now, take your scissors and carefully cut through all the loops on both sides of the tied center. This action will release the yarn strands, allowing them to fan out. Use your fingers to fluff and shape this yarn bundle into a small, spherical pom-pom.
Repeat this process to create more of these individual yarn balls. For a standard mini owl, you will need a total of 14 such yarn balls. The key to a well-formed owl body is consistency in the size and fluffiness of these individual components. Ensure each yarn ball is roughly the same size for a cohesive final look.
Step 2: Assembling the Body and Crafting Expressive Eyes
With your 14 gray yarn pom-poms ready, it’s time to create the core body of your owl. Take a piece of cardboard and cut it into a perfect circle with a diameter of approximately 5.5 cm or 2 inches. This cardboard piece will serve as a sturdy base for your owl, providing structure and ensuring a neat, round shape. Once cut, begin hot gluing your gray fluff balls all over both the front and back surfaces of the cardboard circle. Arrange them tightly together, covering every inch of the cardboard to create a dense, fluffy body. Pay attention to how they are positioned to ensure a uniform and aesthetically pleasing result. Set this aside to allow the glue to cool and solidify completely.
Next, we will craft the owl’s captivating eyes. Take your brown yarn and wrap it around your little finger approximately 15 times. This creates a smaller, denser loop compared to the body pom-poms, suitable for the eyes. Cut a long excess yarn tail from the skein, long enough to thread through a needle. Carefully thread this yarn tail through a sewing needle. Gently slide the looped brown yarn off your little finger. Using the threaded needle, sew through the center of the brown yarn loop, effectively cinching it together to form a small, round shape. While it’s still on the needle, take one of your small black beads and sew it securely in the very center of this brown yarn loop. This bead will serve as the pupil, giving your owl its characteristic gaze. Knot the yarn securely at the back to hold the bead and the loop firmly in place. Trim any excess yarn, leaving a neat, compact eye.
Step 3: Bringing Your Owl to Life: Beak, Tail, and Finishing Touches
To complete the owl’s facial features, you will need two eyes. Repeat the eye-making process described in Step 2 to create a second identical brown yarn eye with a black bead pupil. Once both eyes are complete, take your main owl body (the cardboard circle covered with gray pom-poms) and hot glue the two eyes firmly onto the front surface. Position them close together, leaving a small space in between where the beak will go. Ensure they are aligned and symmetrical for a balanced look.
Now, prepare the owl’s beak. Take a small piece of black yarn, perhaps 2-3 inches long. Fold it in half to create a tiny V-shape or a small triangular point. Apply a tiny dab of hot glue in the space between the two eyes and carefully adhere the black yarn beak, ensuring it points downwards. Press it gently into place until the glue sets.
Once the facial features are in place, you may want to gently trim the overall shape of your owl. Use your scissors to carefully snip away any stray yarn fibers or uneven sections, creating a more defined and rounded owl silhouette. This step allows for a personalized touch, giving your owl its unique outline.
For the tail, take a small bundle of brown yarn (perhaps 5-7 strands, each a couple of inches long). Cinch them together at one end with a short piece of yarn, similar to how you made the pom-poms, but don’t cut the loops. This will create a small, fan-like tail. Hot glue this brown yarn tail to the back and bottom edge of the owl’s body. Position it so it appears to be peeking out from beneath the fluffy body.
Finally, if you wish to hang your adorable owl, create a small loop. Take a short piece of gray yarn (about 4-5 inches), fold it in half, and tie the ends together to form a loop. Apply a small amount of hot glue to the very top center of your owl’s head and securely attach the knotted end of the yarn loop. Hold it in place for a few seconds until the glue completely dries. And there you have it – your charming mini yarn owl is complete and ready to bring joy!
Tips for Perfecting Your Yarn Owls and Unleashing Creativity
While the basic steps are simple, a few extra tips can elevate your yarn owls from cute to absolutely captivating:
- Yarn Variety: Don’t limit yourself to just gray and brown. Experiment with different yarn textures – fluffy chenille for an extra soft owl, variegated yarn for a unique patterned look, or even glitter yarn for a festive touch. Think about seasonal colors for holiday-themed owls!
- Symmetry is Key: Pay close attention to the placement of the eyes and beak. Symmetrical features often result in a more appealing and harmonious finished product. Use a ruler or simply eyeball it before applying glue to ensure they are even.
- Hot Glue Gun Safety: Always use your hot glue gun with caution. Keep it on a heat-resistant surface, and be mindful of the hot tip and melting glue. For younger crafters, adult supervision is highly recommended, or consider using fabric glue, though drying time will be longer.
- Customization Ideas:
- Wings: Add small felt cutouts or tiny yarn loops on the sides for delicate wings.
- Ears/Tufts: Glue small yarn tufts or felt triangles at the top of the head for “ear” feathers, common in many owl species.
- Embellishments: Tiny bows, ribbons, or small fabric flowers can be glued onto your owls for added charm, especially if making them for specific occasions or themes.
- Different Eye Styles: Instead of beads, you could use small felt circles for the eyes, or even sew on embroidery floss for a different expression.
- Practice Makes Perfect: If your first owl isn’t exactly as you envisioned, don’t get discouraged! Crafting is a skill that improves with practice. Each owl you make will teach you something new about yarn handling, glue application, and shaping.
Creative Ways to Use Your Handmade Yarn Owls
Once you’ve finished crafting your delightful collection of yarn owls, the possibilities for their use are endless. Here are some inspiring ideas:
- Charming Keychains: Attach a small keyring to the hanging loop, and you have an adorable, personalized keychain.
- Festive Ornaments: Perfect for Christmas trees, or as year-round decorative hangers in a nursery or cozy nook.
- Gift Toppers: Elevate your gift wrapping by tying a mini owl onto a package for a unique and thoughtful touch.
- Garlands and Banners: String multiple owls together with beads or other decorative elements to create a whimsical garland for a party, baby shower, or children’s room.
- Nursery Decor: These soft, friendly owls are ideal for decorating a baby’s room, adding a touch of handmade warmth.
- Desk Companions: Place them on your desk or shelf to add a whimsical, comforting presence to your workspace.
- Party Favors: If you’re hosting a woodland-themed party, these owls make fantastic and memorable party favors for guests.
- Magnets: Glue a small magnet to the back of the owl to turn it into a cute fridge or locker decoration.
- Brooches/Pins: Attach a safety pin or brooch back for a unique wearable accessory.
The versatility of these mini yarn owls truly makes them a wonderful craft project, offering both the joy of creation and a multitude of ways to enjoy the finished product.
Conclusion: Embrace the Joy of Crafting Your Own Mini Yarn Owls
Crafting these mini yarn owls is more than just a DIY project; it’s an opportunity to engage in a relaxing, creative activity that yields delightful results. From the initial wrapping of yarn to the final placement of the tiny beak, each step is infused with the satisfaction of bringing something beautiful into existence. These handmade owls serve as a testament to the fact that you don’t need extensive skills or expensive materials to create truly charming and meaningful items.
We hope this detailed guide has inspired you to pick up some yarn and start crafting your own flock of adorable owlets. Remember that every owl you create will carry a piece of your unique craftsmanship and personality. They make perfect personalized gifts, heartfelt tokens of appreciation, or simply lovely additions to your own collection of handmade treasures.
For more fantastic DIY ideas and to support the creator of this wonderful project, we highly encourage you to visit Ola ameS DIY’s channel on YouTube. Give her channel a visit, explore her other tutorials, and subscribe for an abundance of creative inspiration!
*All images in this tutorial are credited to Ola ameS DIY via YouTube. We extend our gratitude for the inspiring content.