
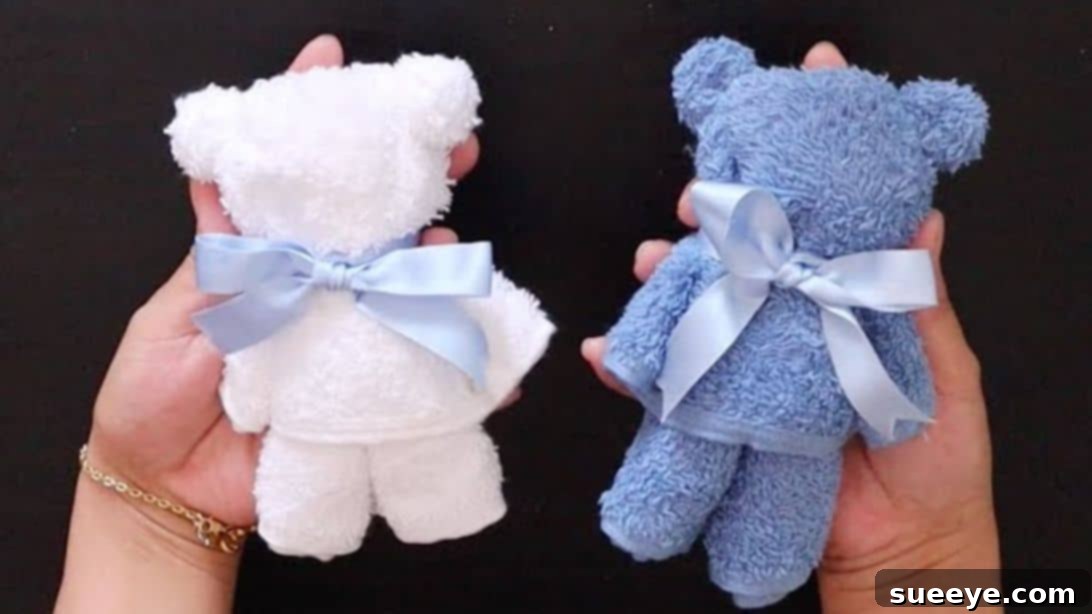
Craft Adorable DIY Towel Teddy Bears: The Ultimate Easy Gift Guide
There’s something truly special about a handmade gift, and few things capture hearts quite like an adorable teddy bear. But what if we told you that you could create a charming teddy bear without any sewing, stuffing, or complex patterns? Enter the DIY towel teddy bear – a delightful craft that’s surprisingly simple, incredibly cute, and wonderfully versatile. I first stumbled upon these captivating creations while searching for unique gifts for children, and immediately fell in love with their charm and potential.
The journey to mastering this craft led me to the fantastic step-by-step instructions by Happy Home Crafts by Mommy Van on YouTube. What I discovered was a crafting secret: with just a single square towel, a few elastic bands, and some clever folding techniques, you can transform a simple piece of fabric into an endearing little bear. This project is an absolute game-changer for anyone looking to add a personal touch to celebrations. Imagine giving these as unique souvenirs for baby showers, charming favors for kids’ parties, or memorable birthday gifts that stand out from the crowd. They also make an adorable addition to a nursery or bathroom decor!
In this comprehensive guide, we’ll walk you through everything you need to know to create your very own towel teddy bear. We’ll delve into the materials, provide detailed instructions, offer creative variations, and share tips for making your bears truly special. Get ready to unleash your creativity and bring these adorable towel companions to life!
Why Craft a DIY Towel Teddy Bear?
Beyond their undeniable cuteness, towel teddy bears offer a multitude of benefits that make them an ideal project for crafters of all skill levels. Here’s why this DIY is a must-try:
- Effortlessly Adorable: The result is consistently charming and evokes smiles from everyone who sees them.
- No-Sew Simplicity: Forget about needles, thread, and sewing machines! This craft relies purely on folding and securing with elastics, making it accessible to absolute beginners.
- Budget-Friendly: You only need a towel, a few elastic bands, and a ribbon. Most of these items might already be in your home, making it an incredibly economical crafting option.
- Versatile Gifting Solution: These bears are perfect for almost any occasion. They shine as baby shower favors, birthday party takeaways, nursery decor, get-well gifts, or even as a thoughtful gesture for teachers or friends. Their reusability as a towel also adds practical value.
- Personalization Potential: With a wide array of towel colors, ribbon choices, and decorative embellishments, you can customize each bear to match a specific theme, recipient’s preference, or event color scheme.
- Quick to Create: Once you get the hang of the folds, you can whip up a towel teddy bear in just a few minutes, making it ideal for last-minute gifts or large batches of party favors.
- Eco-Conscious Choice: By gifting a reusable towel, you’re offering something practical and reducing waste compared to single-use favors.
The joy of creating something beautiful with your own hands, combined with the practicality and charm of the towel teddy bear, makes this DIY project a truly rewarding experience.
Gather Your Materials: What You’ll Need
One of the best aspects of this DIY project is how few materials it requires. You likely have most of these items around your house already, or they can be easily purchased at any craft or dollar store. Here’s a detailed look at what you’ll need:
- Square Towel:
- Color of Your Choice: This is where you can let your creativity shine! Opt for classic teddy bear browns, soft pastels for baby showers, vibrant hues for kids’ parties, or colors that match a specific theme.
- Size Matters: A standard hand towel or a smaller bath towel works best. The key is that it’s square or can be easily folded into a square. Larger towels will yield bigger bears, while smaller washcloths can create mini versions. Ensure the towel is clean, dry, and preferably new or gently used with no loose threads, as this will result in a neater finish.
- Material: Soft, absorbent cotton towels are ideal, as they hold their shape well and are pleasant to touch.
- 3 Pieces of Transparent Elastic:
- Why Transparent? Clear elastics (like those used for hair or small craft projects) are perfect because they blend seamlessly with the towel, making them virtually invisible and allowing the bear’s form to take center stage.
- Alternatives: Small rubber bands or tiny hair ties can also work, but transparent options offer the cleanest look. Ensure they are strong enough to hold the folds securely but flexible enough not to snap.
- Ribbon (Color of Your Choice):
- Decorative Touch: The ribbon adds a lovely finishing touch, creating a charming bow around the teddy bear’s neck.
- Selection: Choose a color that complements your towel. Satin, grosgrain, or even patterned ribbons can elevate the bear’s appearance. About 12-18 inches (30-45 cm) of ribbon is usually sufficient, depending on the desired bow size.
- Flowers, Small Boxes, and Accessories (Optional):
- Personalization: This is where you can truly make each bear unique!
- Decoration Ideas: Consider tiny silk flowers, miniature bows, googly eyes, felt cut-outs for noses or mouths, small buttons, or even a tiny fabric vest.
- Presentation: Placing your finished teddy bear in a small gift box, a clear cellophane bag, or a decorative basket instantly transforms it into a polished, ready-to-give present.
Having all your materials neatly organized before you begin will make the crafting process smooth and enjoyable.
Easy Step-by-Step Instructions to Create Your Towel Teddy Bear
Now, let’s dive into the fun part: folding your towel into an adorable teddy bear! Follow these detailed instructions carefully, and you’ll be amazed at how quickly your bear takes shape. Remember, the key is gentle but firm folding and careful placement of your elastics.
Step 1: Prepare the Towel Rolls
Begin by laying your chosen square towel flat on a clean, smooth surface. Ensure it’s unfolded and completely flat, without any creases or wrinkles, as this will help achieve a crisp and neat final shape. Now, take one side of the towel and begin to tightly roll it towards the center, stopping approximately halfway across the towel’s width. Once you’ve completed the first roll, repeat the process with the opposite side, rolling it inward towards the center as well. The goal is to have two uniform, tightly rolled sections meeting in the middle of the towel. These rolls will form the bulk of your teddy bear’s body and head.
Step 2: Secure the Rolls
With both sides of the towel rolled inward and meeting in the middle, you should now have a long, cylindrical shape. Gently hold each end of this rolled towel using your hands. Place one hand firmly on the top end and the other hand on the bottom end. This grip will help you maintain the integrity of the rolls as you prepare for the next crucial step. Ensure your grip is secure but not so tight that it distorts the shape of the rolls.
Step 3: Form the Head and Body
This step is where your teddy bear truly begins to take form. While holding the rolled towel from Step 2, carefully twist the top third of the entire rolled length. Once twisted, gently fold this twisted top section downward. As you fold it, carefully open the folded section towards the sides, creating distinct shapes for what will become the arms and legs. Now, take one of your transparent elastic bands and carefully insert it around the middle section of the towel, right at the point where the twisted top meets the main body. This elastic will cinche the towel, effectively separating the teddy bear’s head from its body. Spend a moment to gently fix and adjust the folds, shaping them to clearly define the arms and legs, ensuring they are symmetrical and look proportionate to the body. This step sets the foundation for your bear’s overall structure.
Step 4: Create the Ears
With the body and head now defined, it’s time to give your bear its signature ears. Carefully pull the upper corners or sides of the head part of the towel upwards and outwards slightly. Take your second transparent elastic band and gently secure one of these pulled-out sections on the top right side of the head, effectively forming one ear. Ensure the elastic is snug enough to hold the shape but not so tight that it tears the towel. Repeat this process precisely on the other side, using your third elastic band to create the second ear. Try to make both ears as symmetrical as possible, giving your teddy bear a balanced and adorable appearance. A little adjustment of the towel fabric around the elastics can help define the ear shape better.
Step 5: Refine the Shape
Now that all the basic folds and elastics are in place, take a moment to meticulously fix and adjust all the folds. Gently tug and smooth the towel fabric to make the teddy bear look cleaner, tidier, and more in shape. Pay attention to the symmetry of the arms, legs, and ears. Ensure the head is sitting squarely on the body, and that all parts are well-defined. This refining step is crucial for achieving a professional and polished finished look for your towel teddy bear. Don’t be afraid to make small tweaks until you’re happy with its appearance.
Step 6: Add the Ribbon Bow
To give your teddy bear a charming touch, select a medium-length ribbon (about 15-18 inches is usually good). Before tying it, cut a V-shape or a swallowtail shape into both ends of the ribbon. This simple detail instantly makes the ribbon look more elegant and finished. Now, carefully tie the ribbon around the neck of your teddy bear, just below the head. Secure it with a neat bow, ensuring the bow is centered and the ribbon sits snugly. The ribbon adds a pop of color and a delightful accessory, completing your bear’s classic look.
Step 7: Decorate and Gift
Your towel teddy bear is now complete, but the fun doesn’t have to stop there! This is your chance to personalize and decorate your creation. You can adorn the teddy bear with small silk flowers, tiny fabric bows, or even draw on a cute face with fabric markers for extra character. For gifting, place your finished teddy bear in a small, decorative gift box, a clear cellophane bag tied with an extra ribbon, or nestled in a basket alongside other small items. This presentation elevates it from a simple craft to a truly thoughtful and ready-to-give present. These finished bears are perfect for baby showers, children’s birthdays, or any occasion where a unique, handmade touch is appreciated.
For more easy and beautiful projects like this, be sure to visit and subscribe to Happy Home Crafts by Mommy Van on Youtube. Their channel is a treasure trove of creative ideas!
Creative Variations and Personalization Ideas
While the classic teddy bear is universally loved, this basic towel folding technique can be adapted and embellished in countless ways to create truly unique gifts. Here are some ideas to spark your imagination:
- Different Animals:
- Bunnies: For a towel bunny, simply make the ears longer and more pointed, perhaps by twisting the towel more loosely at the top. You could also use a small pom-pom for a tail.
- Puppies: Experiment with floppy ears by adjusting the elastic placement lower on the head or by using a smaller portion of the towel for the ears.
- Themed Bears:
- Holiday Bears: Use red and green towels for Christmas, pastel colors for Easter, or orange and black for Halloween, adding themed ribbons and tiny accessories like miniature santa hats or witch hats.
- Sports Fans: Use towels in team colors and add a small team logo or a miniature sports ball.
- Scented Bears: For an extra special touch, you can lightly spray the towel with a baby-safe linen spray or a diluted essential oil (like lavender for calming) before folding, making it a soothing companion.
- Googly Eyes & Felt Features: For a more animated look, use non-toxic glue to attach googly eyes and small felt cut-outs for a nose and mouth. Ensure these are securely attached if the bear is for a young child, or consider embroidered features for infants.
- Gift Set Additions: Transform your towel teddy bear into part of a larger gift set. Nestle it in a basket with baby lotion, pacifiers, small rattles, bath toys, or even a mini bottle of champagne for an adult baby shower gift.
- Message Tag: Attach a small gift tag with a handwritten message or care instructions for the towel, adding a personal and thoughtful touch.
- Different Towel Sizes: Experiment with washcloths for miniature bears perfect as keychains or small desk decor, or use bath sheets for extra-large cuddly bears (though these will require more elastics to hold shape).
The possibilities are endless, allowing you to tailor each towel teddy bear to the recipient and occasion, making every creation truly one-of-a-kind.
Tips for a Perfect Towel Teddy Bear Every Time
While this craft is incredibly straightforward, a few expert tips can help ensure your towel teddy bears turn out beautifully every single time:
- Start with Quality Towels: New, unwrinkled towels tend to hold their shape better and look neater. If using old towels, make sure they are clean, soft, and don’t have too many loose threads or frayed edges.
- Practice Makes Perfect: Don’t get discouraged if your first bear isn’t absolutely perfect. The folding technique becomes much easier and quicker with a little practice. Try a few times with a practice towel before committing to your final gift towels.
- Roll Tightly and Evenly: The key to a well-structured bear lies in consistent, tight rolls in Step 1. Loose rolls will result in a floppy bear, while uneven rolls will make it difficult to achieve symmetry.
- Use Transparent Elastics: As mentioned, clear elastics offer the most professional and seamless look, making them almost invisible against the towel.
- Gentle Shaping: After placing each elastic, gently massage and shape the towel. Don’t pull too harshly, as this can distort the folds or tear the towel. Think of it as sculpting the bear’s features.
- Symmetry is Key: Pay close attention to making the arms, legs, and especially the ears, as symmetrical as possible. This greatly contributes to the aesthetic appeal of your bear.
- Personalize Thoughtfully: When adding accessories, consider the age of the recipient. For infants, avoid small, detachable parts that could pose a choking hazard. Embroidery or fabric paint might be safer alternatives for facial features.
- Consider the Occasion: Tailor your towel color and ribbon choice to the event. Pastels for baby showers, vibrant colors for kids’ birthdays, or even sophisticated neutrals for a more elegant touch.
- Presentation Matters: A beautifully folded towel teddy bear deserves an equally beautiful presentation. A simple gift box, a clear bag, or a decorative tag can significantly enhance its appeal as a gift.
By following these simple tips, you’ll be able to create a batch of charming, perfectly formed towel teddy bears that will delight anyone who receives them.
Conclusion: Your Next Favorite DIY Gift
The DIY towel teddy bear truly embodies the spirit of thoughtful gifting: it’s handmade, adorable, practical, and incredibly easy to create. What starts as a simple square towel transforms into a heartwarming companion, ready to bring joy to baby showers, birthday parties, or simply to add a touch of whimsy to any space. We’ve journeyed through the simple materials, mastered the unique folding techniques, and explored a world of creative personalization, proving that you don’t need expert crafting skills to make something truly special.
Whether you’re looking for a budget-friendly party favor, a unique baby gift, or just a fun afternoon craft, the towel teddy bear delivers on all fronts. Its no-sew design makes it accessible to everyone, and the potential for customization means each bear can be as unique as the person receiving it. So, gather your materials, follow our step-by-step guide, and prepare to be amazed at how easily you can bring these charming creations to life. Share your creations, inspire others, and revel in the joy of crafting. Happy folding!