
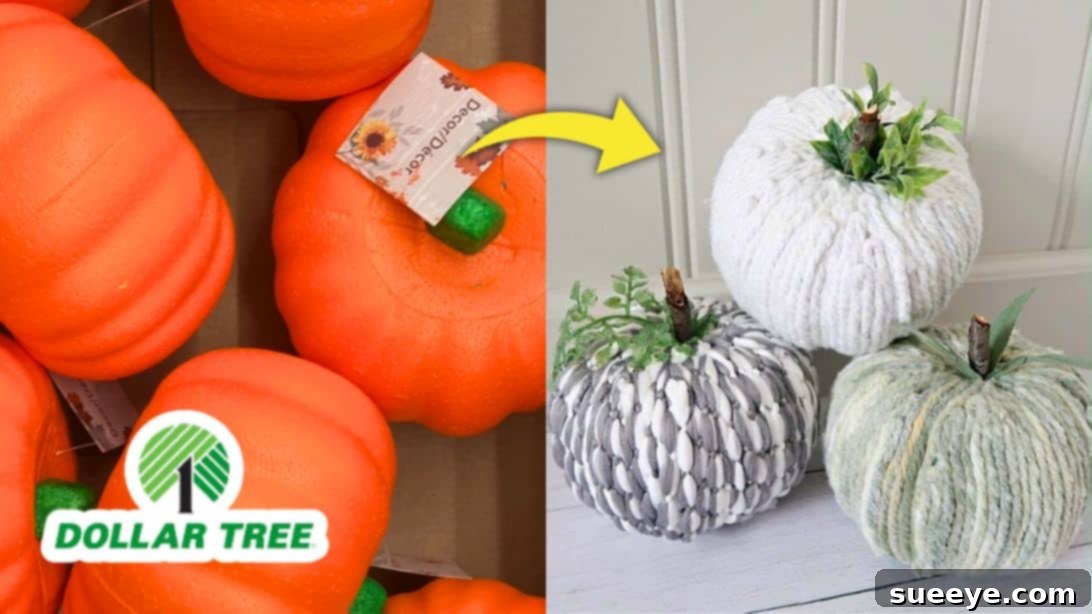
As the leaves begin to change and a crisp breeze fills the air, there’s no better time to infuse your home with the cozy spirit of autumn. Fall decorating doesn’t have to be expensive or complicated, especially when you discover the joy of DIY crafts. If you’re searching for the ultimate budget-friendly and charming fall project, look no further than these incredibly easy Dollar Tree mop pumpkins. Inspired by the brilliant creativity of The Crazy Craft Lady, these DIY pumpkins are not just adorable; they’re also highly customizable, making them the perfect addition to any fall decor scheme. Imagine crafting these delightful pieces while enjoying your favorite autumn-themed shows – it’s a quick, satisfying project that yields beautiful results.
The beauty of these farmhouse-style pumpkins lies in their simplicity and versatility. Whether you envision them as a rustic centerpiece for your dining table, a welcoming accent on your entryway console, or charming additions to your side tables, they are guaranteed to enhance your home’s seasonal ambiance. With the Thanksgiving season just around the corner, these handmade treasures also make exquisite dinner table decorations, adding a personal and heartfelt touch to your holiday gatherings. The best part? You can easily customize their color to match your existing decor, simply by dyeing the mop strands. Dive into the complete step-by-step instructions by watching the inspiring video below, and get ready to experience the pure joy of crafting!
RELATED: How to Carve a Spewing Pumpkin
Looking for more innovative DIY ideas to adorn your home this season? You might also enjoy another fantastic project: Easy No-Sew Toilet Paper Pumpkin Tutorial. There’s a world of creativity waiting for you!
Create Charming Fall Decor: DIY Dollar Tree Mop Pumpkins
Embrace the warmth and charm of autumn with a craft project that’s as rewarding as it is simple. These DIY Dollar Tree mop pumpkins are a fantastic way to bring farmhouse-inspired elegance into your home without breaking the bank. Using readily available items from your local Dollar Tree, you can transform ordinary materials into extraordinary decorative pieces. This guide will walk you through every step, ensuring your crafting experience is smooth and enjoyable. Get ready to add a touch of rustic charm to your fall and Thanksgiving decorations!
Why Choose Dollar Tree Mop Pumpkins for Your Fall Decor?
There are countless reasons why this particular craft has become a beloved favorite among DIY enthusiasts. Firstly, it’s incredibly budget-friendly. Dollar Tree is renowned for its affordable prices, making it possible to create stunning decor for just a few dollars. Secondly, the simplicity of the project means it’s perfect for crafters of all skill levels, from beginners to seasoned DIYers. No complicated tools or techniques are required – just a bit of patience and creativity. Thirdly, these pumpkins offer unparalleled customization. You can easily adapt them to any color scheme, whether you prefer traditional oranges and browns, elegant whites and grays, or vibrant jewel tones. They’re also durable and reusable year after year, offering a sustainable alternative to fresh pumpkins. Plus, crafting them provides a wonderful opportunity for relaxation and a sense of accomplishment, filling your home with handmade warmth.
Easy Dollar Tree Mop Pumpkins: Essential Materials List
Gathering your materials is the first exciting step in any craft project. For these adorable mop pumpkins, you’ll be pleased to find that everything you need is affordable and easily accessible, primarily from Dollar Tree. Here’s a detailed list of what you’ll need to transform simple items into beautiful fall decor:
- Dollar Tree Microfiber Mop Head: Choose a mop head that has long, stringy strands, as these will be disassembled to create the pumpkin’s texture. One mop head typically yields enough strands for one medium-sized foam pumpkin.
- Dollar Tree Foam Pumpkin: Select a foam pumpkin that suits the size you desire. These often come with a small plastic stem that will be removed. White or light-colored foam pumpkins are ideal as they provide a neutral base.
- White Paint: Any acrylic craft paint in white will work perfectly. This acts as a primer, ensuring an even base for your mop strands and helping any dyed strands stand out vibrantly.
- Brush: A simple foam brush or an inexpensive craft paintbrush will be sufficient for applying the white paint evenly to your foam pumpkin.
- Hot Glue Gun and Glue Sticks: A trusty hot glue gun is essential for securely attaching the mop strands. Ensure you have plenty of glue sticks on hand to complete your project.
- Twig: A small, natural twig collected from your yard or a craft store will serve as the perfect rustic stem for your pumpkin, adding an authentic touch.
- Faux Leaves: Look for small, autumnal faux leaves (maple, oak, or generic fall foliage) to embellish the top of your pumpkin around the stem. Dollar Tree often carries these, especially during the fall season.
- Fingertip Protector (Optional but Recommended): This silicone thimble or protector will save your fingers from hot glue burns, especially when working with small, intricate placements.
Having all your materials organized before you begin will make the crafting process much smoother and more enjoyable!
How to Make Dollar Tree Mop Pumpkins: Step-by-Step Guide
Now that you have all your supplies ready, let’s dive into the fun part: creating your very own charming mop pumpkins. Follow these detailed steps to achieve perfect, farmhouse-style fall decor.
Step 1: Preparing Your Foam Pumpkin Base
The foundation of your beautiful mop pumpkin starts with proper preparation of the foam base. First, carefully remove any tags or plastic stems from the Dollar Tree foam pumpkin. These typically pull out easily. Once cleared, you’ll need to paint the entire surface of the foam pumpkin white. This step is crucial for a few reasons: it creates a clean, uniform base, ensures that no original pumpkin color shows through the mop strands, and allows any dyed mop strands to appear more vibrant against a bright background. Apply a coat of white acrylic paint evenly over the entire pumpkin. Depending on the original color of your foam pumpkin, you might need a second coat to achieve full opacity. After painting, set the pumpkin aside in a well-ventilated area and allow it to dry completely. Patience here will prevent smudges and ensure a smooth, durable finish.
Step 2: Disassembling and Dyeing the Mop Strands
This step is where your mop head transforms into the soft, textured “skin” of your pumpkin. Carefully disassemble the microfiber mop head. This usually involves gently pulling the strands free from the central plastic core. You might need to snip a few threads to release them entirely. Typically, one Dollar Tree mop head provides enough material for one foam pumpkin, but if you’re making several or larger pumpkins, you might need an additional mop. Once disassembled, you’ll have a pile of individual mop strands.
If you desire a color other than the natural white or off-white of the mop, now is the time to dye your strands. Fill a shallow dish or tray with a small amount of water. Add a generous amount of chalk paint in your preferred color – chalk paint works wonderfully for this as it adheres well and dries with a lovely matte finish. Alternatively, you can use acrylic paint mixed with a fabric medium, or even fabric dye for a more intense color. Submerge the mop strands into the colored water, ensuring they are fully saturated. Gently squeeze out any excess paint water, then lay the dyed strands flat on a piece of parchment paper or wax paper. This prevents them from sticking as they dry. Allow them to dry completely, which might take several hours or even overnight, depending on humidity and how much liquid they absorbed. Ensure they are fully dry before proceeding to the next step, as damp strands won’t adhere properly.
Step 3: Attaching the Mop Strands to Create Texture
Now it’s time to give your pumpkin its signature fluffy texture. For this step, we highly recommend wearing a fingertip protector or silicone thimble, as you’ll be working closely with hot glue. Take one mop strand and fold it neatly in half, creating a loop. Apply a dab of hot glue to the top center of your painted foam pumpkin, and securely press the folded end of the mop strand onto the glue. Hold it in place for a few seconds until it’s set. Carefully bring the two ends of the folded strand down the sides of the pumpkin, trimming them to a length that reaches the bottom center. Apply another dab of hot glue to the bottom center of the pumpkin and secure the ends of the strand there. This creates one distinct “rib” of the pumpkin.
Continue this process, working your way around the pumpkin. Start by adding evenly spaced strands to establish the main “ribs” of the pumpkin, much like the segments of a real pumpkin. Once these initial strands are in place, begin to fill in the sections between them with additional folded mop strands. The goal is to cover the entire pumpkin surface densely, ensuring no white foam shows through. You can use smaller, trimmed strands to fill any gaps or thin spots. Overlap slightly if necessary to create a full, plush look. Work systematically, rotating the pumpkin as you go, to maintain an even distribution of strands. This step requires a bit of patience and attention to detail, but the results are incredibly rewarding.
Step 4: Adding the Finishing Touches – Stem and Leaves
With your pumpkin fully covered in soft, textured mop strands, it’s time to add the charming details that truly bring it to life. Take your chosen twig, which will serve as the pumpkin’s rustic stem. Insert one end of the twig into the top center of your pumpkin, pushing it gently into the foam. If it feels a bit loose, add a drop of hot glue around the base of the twig to secure it firmly in place. Next, arrange your faux leaves around the base of the twig. You can use a single large leaf or a cluster of smaller ones. Apply small dots of hot glue to the underside of the leaves and press them gently into the mop strands, arranging them artistically around the stem. Allow the glue to cool completely, and voilà! Your beautiful, handmade Dollar Tree mop pumpkin is complete and ready to adorn your home. For an extra touch, consider adding small faux berries, a tiny burlap bow, or a curl of raffia around the stem.
Creative Variations and Styling Ideas for Your Mop Pumpkins
One of the best aspects of these DIY mop pumpkins is their incredible versatility. Once you’ve mastered the basic technique, you can let your creativity soar and customize them to fit any decor style or occasion. Here are some ideas to inspire you:
- Color Schemes: Experiment beyond traditional fall colors. Try elegant neutrals like cream, grey, or blush pink for a modern farmhouse look. Go bold with jewel tones like deep teal or burgundy, or even pastels for a whimsical touch. You can also create ombre effects by dyeing strands in varying shades of the same color.
- Size and Shape: Dollar Tree often carries foam pumpkins in various sizes. Create a cohesive collection by making several pumpkins in different sizes and arranging them together. You can even find elongated foam gourds or squashes to expand your autumn harvest display.
- Alternative Stems: While a natural twig is classic, consider other options for your pumpkin stems. Cinnamon sticks offer a delightful aroma and rustic appeal. Wine corks cut in half or small wooden spools can also make unique stems. For a softer look, roll up a piece of burlap or jute twine and glue it into a spiral for a charming, textural stem.
- Additional Embellishments: Elevate your pumpkins with extra details. Tie small bows made from plaid ribbon, burlap, or velvet around the stem. Glue tiny faux berries, acorns, or miniature pinecones amongst the leaves. You could also lightly dust the tips of the mop strands with glitter for a subtle sparkle, perfect for holiday-themed displays.
- Display Ideas:
- Centerpieces: Arrange a cluster of varying-sized mop pumpkins on a rustic tray, perhaps with some faux fall leaves, candles, or small gourds, to create a stunning dining table centerpiece.
- Mantel Decor: Line your fireplace mantel with these pumpkins, interspersing them with fairy lights, garlands, or other fall-themed trinkets for a warm and inviting display.
- Tiered Trays: Mop pumpkins are perfect for styling tiered trays, especially smaller versions. Combine them with mini signs, ceramic mugs, and other seasonal decor for a charming vignette.
- Entryway Welcome: Place a few pumpkins on your entryway table or porch (if covered) to greet guests with a festive fall atmosphere.
- Bookcase Fillers: Tuck them into shelves on bookcases or open shelving units to add pops of autumnal color and texture.
- Seasonal Adaptation: While perfect for fall and Thanksgiving, these pumpkins can also be adapted for Halloween by using black, purple, or lime green dyes, or by adding googly eyes and spooky embellishments. For a more subtle winter transition, use white or silver mop strands and add frosted berries or glittery pinecones.
Don’t be afraid to experiment and personalize your mop pumpkins to reflect your unique style. These handmade treasures will bring warmth and character to your home throughout the autumn season and beyond.
DIY Dollar Tree Mop Pumpkins: Your Perfect Fall Craft Awaits!
You’ve now learned how to create charming, budget-friendly, and customizable fall decor pieces that will undoubtedly add a special touch to your home. These DIY Dollar Tree mop pumpkins are more than just a craft; they’re a testament to how simple materials can be transformed into something truly beautiful with a little creativity and effort. Perfect for gracing your dinner table, enhancing your mantelpiece, or adding a cozy vibe to any room, these pumpkins embody the warmth and spirit of the autumn season.
So, gather your supplies, put on your crafting hat, and get ready to impress your friends and family with your newfound DIY skills. Remember, the video tutorial by The Crazy Craft Lady is an excellent resource if you need a visual guide to any of the steps. Happy crafting, and may your home be filled with the delightful glow of handmade fall charm!