
DIY Tree Stump Fairy House: Crafting a Magical Haven in Your Garden
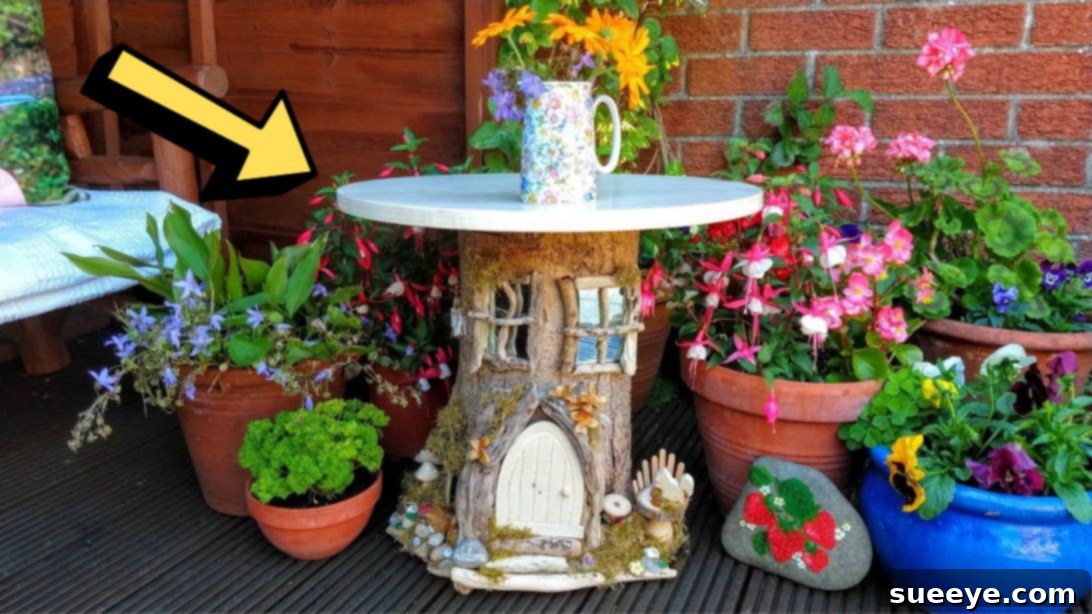
There’s an undeniable charm in infusing a touch of magic into our surroundings, and few things capture that whimsical spirit quite like fairy-themed decor. For those who delight in crafting unique garden features, the idea of creating a DIY tree stump fairy house presents an enchanting opportunity. This delightful project, brilliantly showcased by Ruth Hamilton on YouTube, invites you to transform a simple tree stump into a captivating miniature world. Imagine a quaint fairy abode nestled amongst your flowers, or even a multi-purpose table where tiny forest dwellers might gather for an afternoon snack. Not only does this project offer a creative outlet, but it also provides a unique focal point for your garden, sure to spark joy and conversation among visitors. Let’s delve into how you can bring this magical vision to life, step by imaginative step.
Why Choose a Tree Stump for Your Fairy House?
The beauty of using a tree stump as the foundation for your fairy house lies in its inherent natural appeal and sturdy presence. Unlike delicate, manufactured pieces, a tree stump seamlessly integrates into the garden landscape, providing an authentic, rustic base that feels like it has always been a part of the natural world. This organic starting point offers several advantages:
- Durability and Longevity: A solid tree stump can withstand various weather conditions, offering a long-lasting structure for your fairy dwelling. With proper treatment, it will endure for years, becoming a permanent fixture in your enchanted garden.
- Natural Aesthetic: The unique contours, bark textures, and earthy tones of a tree stump provide an unparalleled natural backdrop. This eliminates the need for extensive landscaping, as the stump itself contributes significantly to the natural charm.
- Eco-Friendly Upcycling: Repurposing a tree stump that might otherwise be discarded is a sustainable and environmentally conscious choice. It gives new life to natural materials, aligning with the ethos of mindful crafting and gardening.
- Versatility: A tree stump offers a substantial canvas for creativity. Its size allows for intricate detailing and the incorporation of various embellishments, from tiny doors and windows to miniature furniture and landscaping elements. It can even be adapted to serve a dual purpose, acting as both a decorative fairy house and a functional garden table.
Embracing a tree stump as your fairy house base is not just about crafting; it’s about connecting with nature and fostering a sense of wonder in your outdoor space.
Gathering Your Magical Materials
Before embarking on this delightful crafting journey, ensure you have all the necessary supplies within reach. Many of these items can be found in craft stores, online, or even collected from nature walks, adding an extra layer of charm and authenticity to your project. Here’s a detailed list of what you’ll need:
Core Materials:
- Tree Stump: The central component of your fairy house. Choose one that is stable, relatively flat on top (if you plan to add a table surface), and a size that fits your desired location and aesthetic. Ensure it’s dry to prevent rotting and make gluing easier.
- Wooden Fairy Door: This is the focal point that instantly signals a magical dwelling. These can be purchased online or from craft stores in various styles and sizes.
- Popsicle Sticks: Versatile for crafting small details, fences, or window frames.
- Small Wooden Embellishments: Think miniature mushrooms, toadstools, squirrels, birds, tiny chairs, or benches. These add character and storytelling elements to your fairy scene.
- Jute Twine: Excellent for adding rustic accents, creating tiny ropes, or securing smaller elements.
- Pebbles, Small Rocks, Sea Glass: These natural elements are perfect for pathways, decorative borders, or even to write tiny messages on.
- Driftwood Pieces (Small and Large): Irregular shapes and textures of driftwood are ideal for creating unique window frames, decorative accents, or even miniature fences.
- Dried Leaves and Small Branches: Gathered from your garden, these add authentic texture and realism to the miniature landscape.
- Little Pieces of Mirror: Small shards or cut pieces of mirror can be used to create enchanting, reflective windows, mimicking glass.
- Moss (Dried or Preserved): Essential for adding lush greenery, softening edges, and giving your fairy house an aged, natural look.
Adhesives and Tools:
- Tacky Glue: A strong, general-purpose craft glue suitable for most materials.
- Hot Glue Gun and Glue Sticks: Provides an instant, strong bond for quick assembly and securing heavier elements. Ensure you have plenty of glue sticks.
- Optional: Wooden Round Piece: If you plan to convert your stump into a multi-purpose table. This should be slightly larger than the top of your stump.
- Optional: Saw (Hand or Electric): If your stump needs to be cut to size or leveled, or if you’re cutting the wooden round piece.
- Optional: Wood Sealant/Varnish: Highly recommended for weatherproofing your finished project, especially if it will reside outdoors.
- Optional: Small Paint Brushes: For applying glue or sealant.
Having everything ready before you begin will ensure a smooth and enjoyable crafting experience.
Step-by-Step Guide: Crafting Your Magical Tree Stump Fairy House
Now that you’ve gathered your materials, it’s time to unleash your creativity and build your enchanting fairy dwelling. Follow these detailed steps to construct a beautiful and unique piece of garden art.
Step 1: Preparing Your Tree Stump Foundation
The first and most crucial step is preparing your tree stump. If you’re lucky, you might find a stump that’s already perfectly sized and leveled. If not, you may need to cut it down to your desired height using a saw. Ensure the top surface is relatively flat and stable. If you wish to create a multi-purpose fairy house and table, securely attach a round wooden piece to the top of the stump using strong wood glue and possibly screws for extra stability. This creates a functional surface for drinks or small decorations while leaving the sides free for your fairy design. Before proceeding, make sure your stump is clean and dry. Consider applying a wood sealant at this stage to protect the stump from the elements, especially if it will be outdoors.
Step 2: Installing the Enchanting Fairy Door
The fairy door is the heart of your project, instantly drawing the eye and setting the tone for the entire house. Choose a prominent spot at the bottom part of your tree stump where the door will be most visible and accessible to its tiny inhabitants. Apply a generous amount of tacky glue or hot glue to the back of your wooden fairy door and press it firmly against the stump. Hold it in place for a few moments to ensure a secure bond. Make sure the door is level and aesthetically pleasing within its chosen spot.
Step 3: Crafting Natural Walls and Windows
Around the newly installed fairy door, begin attaching various sizes of driftwood pieces. These irregular shapes are perfect for creating a rustic, organic facade, mimicking natural stone or bark walls. Use hot glue for a strong, instant bond. Experiment with different arrangements to create texture and depth. Above the fairy door, envision where you’d like the windows to be. Use smaller pieces of driftwood to frame these openings. For the windowpanes, carefully glue small pieces of mirror inside these driftwood frames. The reflective quality of the mirror pieces will add a magical sparkle and give the illusion of tiny windows looking out into your garden.
Step 4: Adding Whimsical Embellishments and Greenery
This is where your fairy house truly comes to life! Take your small wooden embellishments, such as miniature mushrooms, toadstools, tiny squirrels, or chairs, and strategically glue them around the fairy door and along the ‘walls’ of the stump. Create little scenes or narratives with these elements. For example, a tiny squirrel perched on a mushroom near the door, or a small chair inviting a weary fairy to rest. Next, use preserved or dried moss to fill in any empty spaces and soften the harsh lines of the stump and driftwood. Moss adds an incredible touch of realism, providing lush, miniature greenery that makes the fairy house feel ancient and established in its natural surroundings. Secure the moss with tacky glue or small dabs of hot glue.
Step 5: Personalizing with Pebbles and Natural Elements
Gather your pebbles, small rocks, and sea glass. You can draw tiny patterns, symbols, or even write miniature messages on some of the stones using a fine-tipped permanent marker. Once personalized, glue these elements to the tree stump. You might create a winding pebble pathway leading up to the fairy door, or use sea glass to form decorative borders around the base. Incorporate dried leaves and small branches to enhance the natural environment, perhaps creating a tiny canopy or a mini forest floor around the house. Continue adding these natural decorations until you achieve the desired whimsical look and feel. Remember, the beauty is in the details and the natural, slightly chaotic arrangement.
Step 6: The Finishing Touches and Magical Illumination
With the main structure and decor complete, it’s time for the final touches that elevate your fairy house from charming to truly magical. Once all glues have dried completely, take a strand of fairy lights (solar-powered ones are ideal for outdoor use) and delicately wrap them around your tree stump fairy house. The soft glow of these lights will transform your creation into an enchanting beacon after dusk, inviting wonder and adding an ethereal ambiance to your garden. Consider positioning the fairy house in a spot where it can be admired both day and night. For added durability and weather protection, especially if your fairy house will live outdoors, apply a clear outdoor-grade sealant or varnish over all the decorative elements. This will help protect the embellishments from moisture and UV damage, ensuring your magical creation lasts for many seasons.
Tips for Success and Creative Variations
Creating your DIY tree stump fairy house is a journey of creativity and imagination. To ensure your project is a success and to inspire further exploration, consider these additional tips and variations:
Safety First
When working with tools like saws or hot glue guns, always prioritize safety. Wear appropriate protective gear, handle sharp objects with care, and supervise children closely if they are involved in the crafting process. If moving a heavy tree stump, enlist help to prevent injury.
Weatherproofing Your Masterpiece
For outdoor placement, weatherproofing is crucial. Even if you’ve sealed the stump in Step 1, consider a final coat of clear, outdoor-grade sealant over all your glued decorations once everything is dry. This will protect the embellishments from rain, humidity, and sun exposure, ensuring your fairy house remains vibrant and intact for longer. Look for marine-grade varnishes or outdoor craft sealants.
Choosing the Perfect Location
The placement of your finished fairy house can significantly impact its magic. Consider a shaded spot where moss can thrive, or a location near a winding path or a flower bed to enhance its integration into the garden. If using solar fairy lights, ensure the solar panel receives adequate sunlight during the day.
Involving the Little Ones
This project is wonderfully family-friendly. Children can help collect natural elements, choose embellishments, and even assist with gluing smaller, safer items. It’s a fantastic way to foster creativity and a love for nature in younger generations.
Embrace Creative Freedom
Don’t feel limited by the exact materials or steps. Your fairy house should reflect your unique vision. Experiment with different themes (e.g., a gnome home, a hobbit hole), colors, or additional features like tiny ladders, swings, or bird feeders. Use your imagination to create a truly one-of-a-kind piece.
Seasonal Adaptations
Consider how you can adapt your fairy house for different seasons. In autumn, surround it with miniature pumpkins and colorful leaves. For winter, add tiny snow-dusted branches and perhaps a miniature sled. This keeps your garden feature fresh and engaging throughout the year.
Maintaining Your Enchanted Dwelling
To ensure your DIY tree stump fairy house continues to enchant for years to come, a little maintenance goes a long way. Periodically check for any loose embellishments and re-glue them as needed. If you’ve used natural moss, it may dry out over time; you can refresh it with new moss or spray it lightly with water to revive its appearance. Gently clean the surfaces with a soft brush to remove dust or cobwebs. Reapply a clear sealant annually, especially before the wetter or harsher seasons, to maintain its protective layer and keep the colors vibrant. By dedicating a small amount of time to its upkeep, your magical fairy house will remain a cherished feature in your garden.
These amazing images are all credited to Ruth Hamilton via YouTube. Check her other content and follow for more!
Conclusion: Unleash Your Inner Alchemist with a DIY Tree Stump Fairy House
Creating a DIY tree stump fairy house is more than just a craft project; it’s an opportunity to transform an overlooked natural element into a source of wonder and joy. Inspired by the creative vision of Ruth Hamilton, this guide empowers you to build a unique, enchanting piece of garden art that not only beautifies your outdoor space but also sparks imagination and conversation. From selecting the perfect tree stump to adorning it with intricate details and magical lights, each step is an act of infusing your garden with a whimsical spirit. Whether you opt for a simple dwelling or a multi-functional fairy table, the satisfaction of crafting something so charming and personal is immense. So, gather your materials, embrace your inner alchemist, and embark on this delightful journey to create a magical haven that will delight both young and old for years to come. Your garden is waiting for its touch of fairy magic!